Your browser does not support inline frames or is currently configured not to display inline frames.
Sony PlayStation 2
# A B C D E F G H I J K L M N O P Q R S T U V W X Y Z
#
A
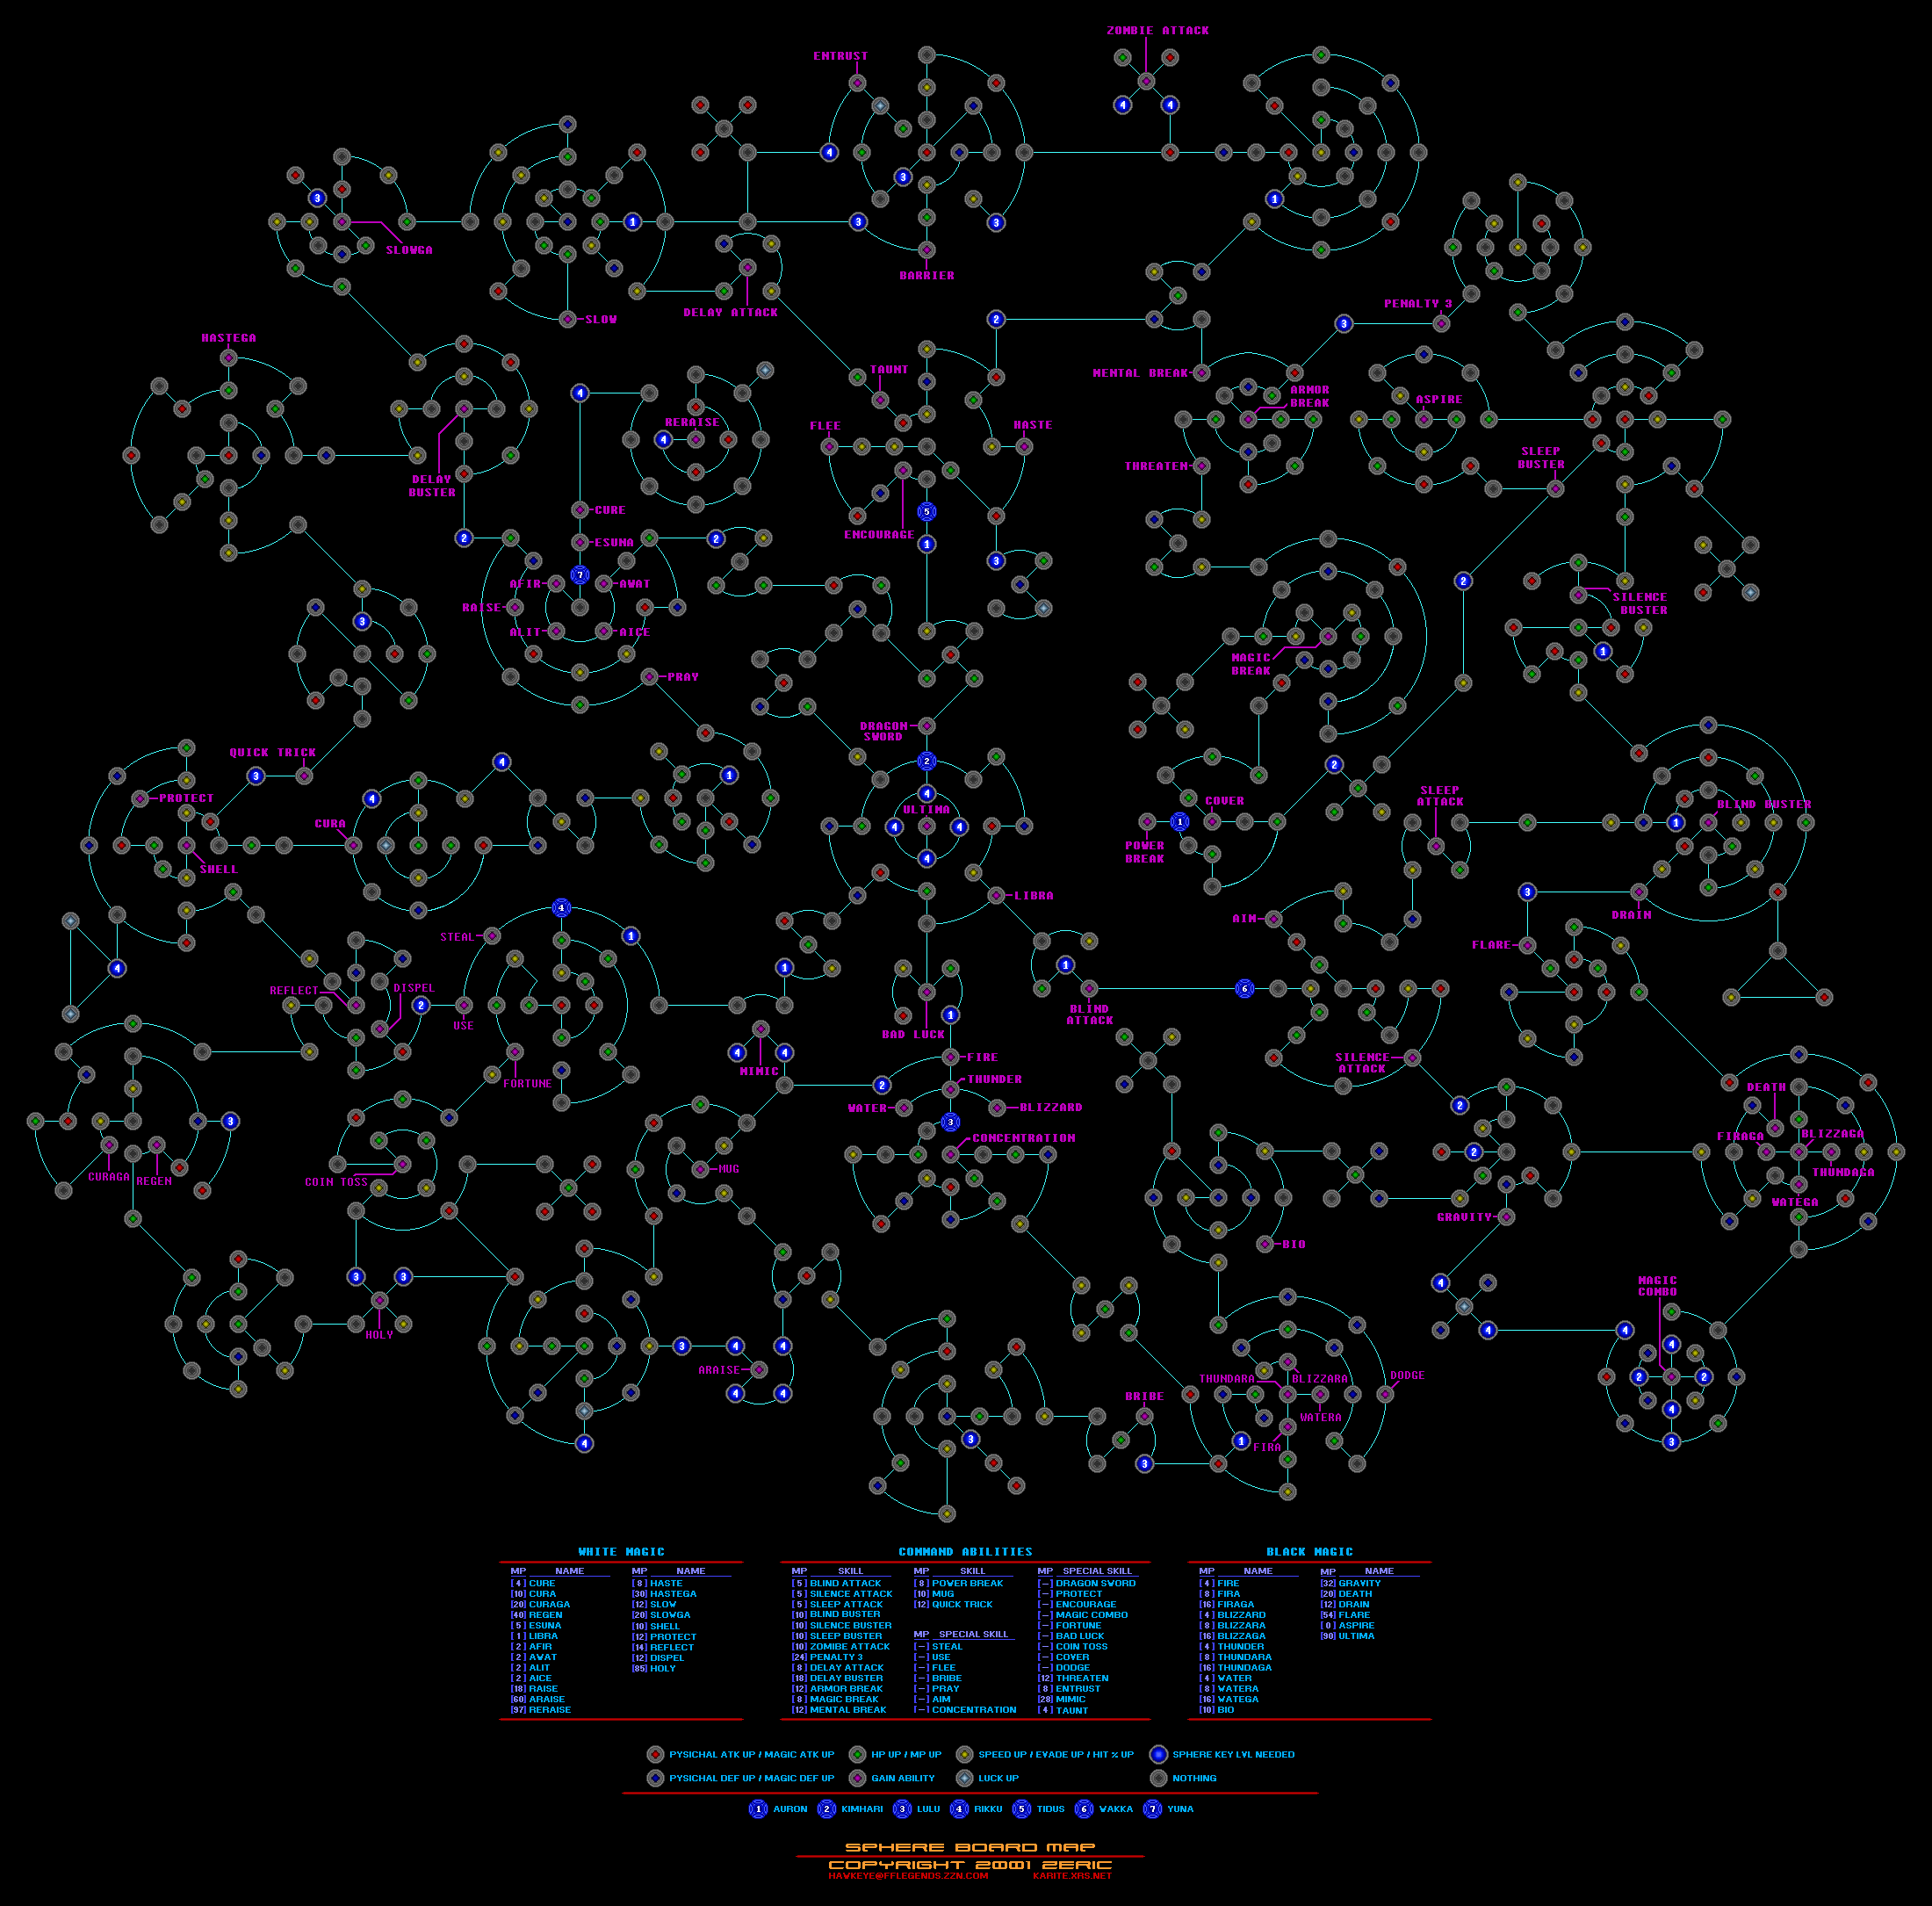
(Sega Ages 2500 Series Vol. 22:) Advanced Daisenryaku: Deutsch Dengeki Sakusen (J) Maps
© 2005 SEGA Corporation / SystemSoft Alpha Corporation
Map 00: Case White
3144 x 2364
154 kB
PNG
ripped
gymzatan
Map 01: Piotrkow
172 kB
Map 02: Random Encirclement
182 kB
Map 03: Vistula River
457 kB
Map 04: Warsaw
469 kB
Map 05: Denmark
313 kB
Map 06: Norway
860 kB
Map 07: Low Countries
488 kB
Map 08: France-Somme
909 kB
Map 09: France-Maginot
905 kB
Map 10: Battle Of Britain
1.08 MB
Map 11: Sea Lion
0.99 MB
Map 12: Yugoslavia
1.38 MB
Map 13: Greece
882 kB
Map 14: Baltic States
1.32 MB
Map 15: Smolensk
1.48 MB
Map 16: Ukraine
1.52 MB
Map 17: Moscow - 4Pz
1.40 MB
Map 18: Moscow - 2Pz
Map 19: Rostov
1.24 MB
Map 20: Sevastopol
965 kB
Map 21: Caucasus
1.36 MB
Map 22: Stalingrad
1.43 MB
Map 23: Kharkov
1.35 MB
Map 24: Kursk
1.45 MB
Map 25: Cyrenaica
874 kB
Map 26: Tobruk
897 kB
Map 27: Egypt-Syria
2999 x 2242
1.30 MB
Map 28: Iran-Iraq
1.49 MB
Map 29: El Alamein
904 kB
Map 30: Tobruk
Map 31: Turkey Enters War
Map 32: French Africa
933 kB
Map 33: Sicily
963 kB
Map 34: Salerno
1.12 MB
Map 35: Anzio
Map 36: Ural
1.63 MB
Map 37: Normandy
1.22 MB
Map 38: Falaise
1.31 MB
Map 39: Arnhem
1.04 MB
Map 40: Ardennes-44
1.53 MB
Map 41: Budapest
1.23 MB
Map 42: Germany
Map 43: Island CP
626 kB
B
C
D
Daisenryaku 1941: Gyakuten no Taiheiyou (J) Maps
© 1998-2002 Sammy / SystemSoft Alpha Corporation
01: Military Exercise
3856 x 2816
2.04 MB
02: Pearl Harbor Surprise Attack
2.46 MB
03: Battle Of The Coral Sea
04: Battle Of Midway
501 kB
05: US Fleet Pursuit
945 kB
06: Guadalcanal Attack Force Pursuit
984 kB
07: Guadalcanal Recapture
529 kB
08: Concealment Annihilation
787 kB
09: US Submarine Sweep
413 kB
10: Withdrawal Interdiction
1.73 MB
11: Saipan Garrison Support
563 kB
12: South Pacific Naval Battle
397 kB
13: New Guinea Air Battle
1.09 MB
14: Bougainville Assault
1.00 MB
15: Convoy Escort
907 kB
16: Midway Reattack
596 kB
17: Battle Of Leyte Gulf
1.13 MB
18: Fiji Counter Occupation
749 kB
19: Fiji Breakthrough
731 kB
20: Samoa Island Pursuit
718 kB
21: Enemy Convoy Attack
642 kB
22: Landing Interdiction
859 kB
23: Samoa Garrison Support
0.98 MB
24: Advance On Hawaii
735 kB
25: US New Weapons Sweep
475 kB
26: Hawaii Occupation
1.69 MB
27: Pacific Fleet Annihilation
531 kB
28: West Coast Bombardment
1.80 MB
29: Panama Blockade
1.67 MB
30: Operation Go
1.10 MB
Debug: Small Island
763 kB
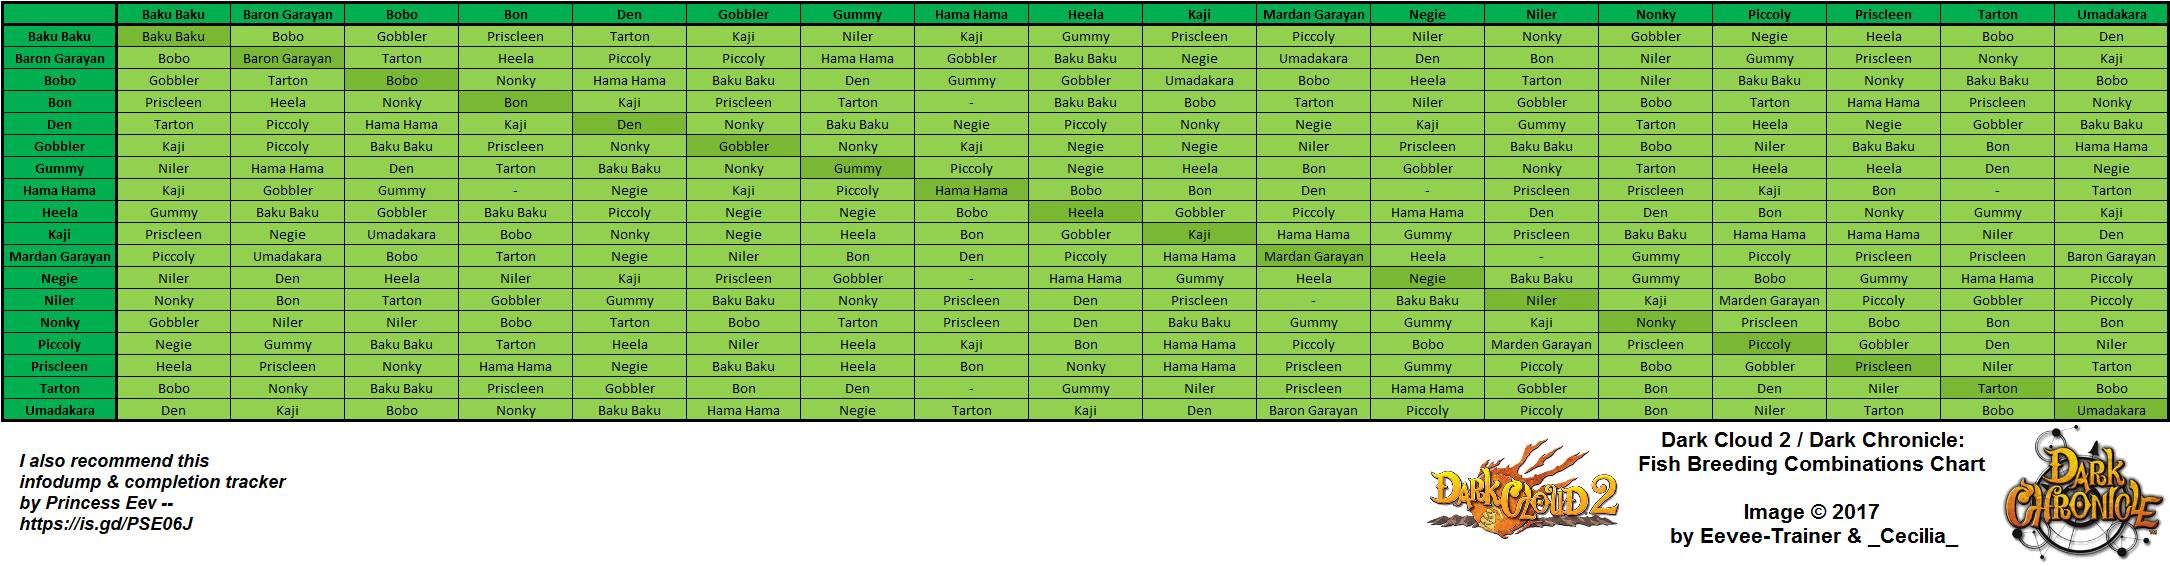
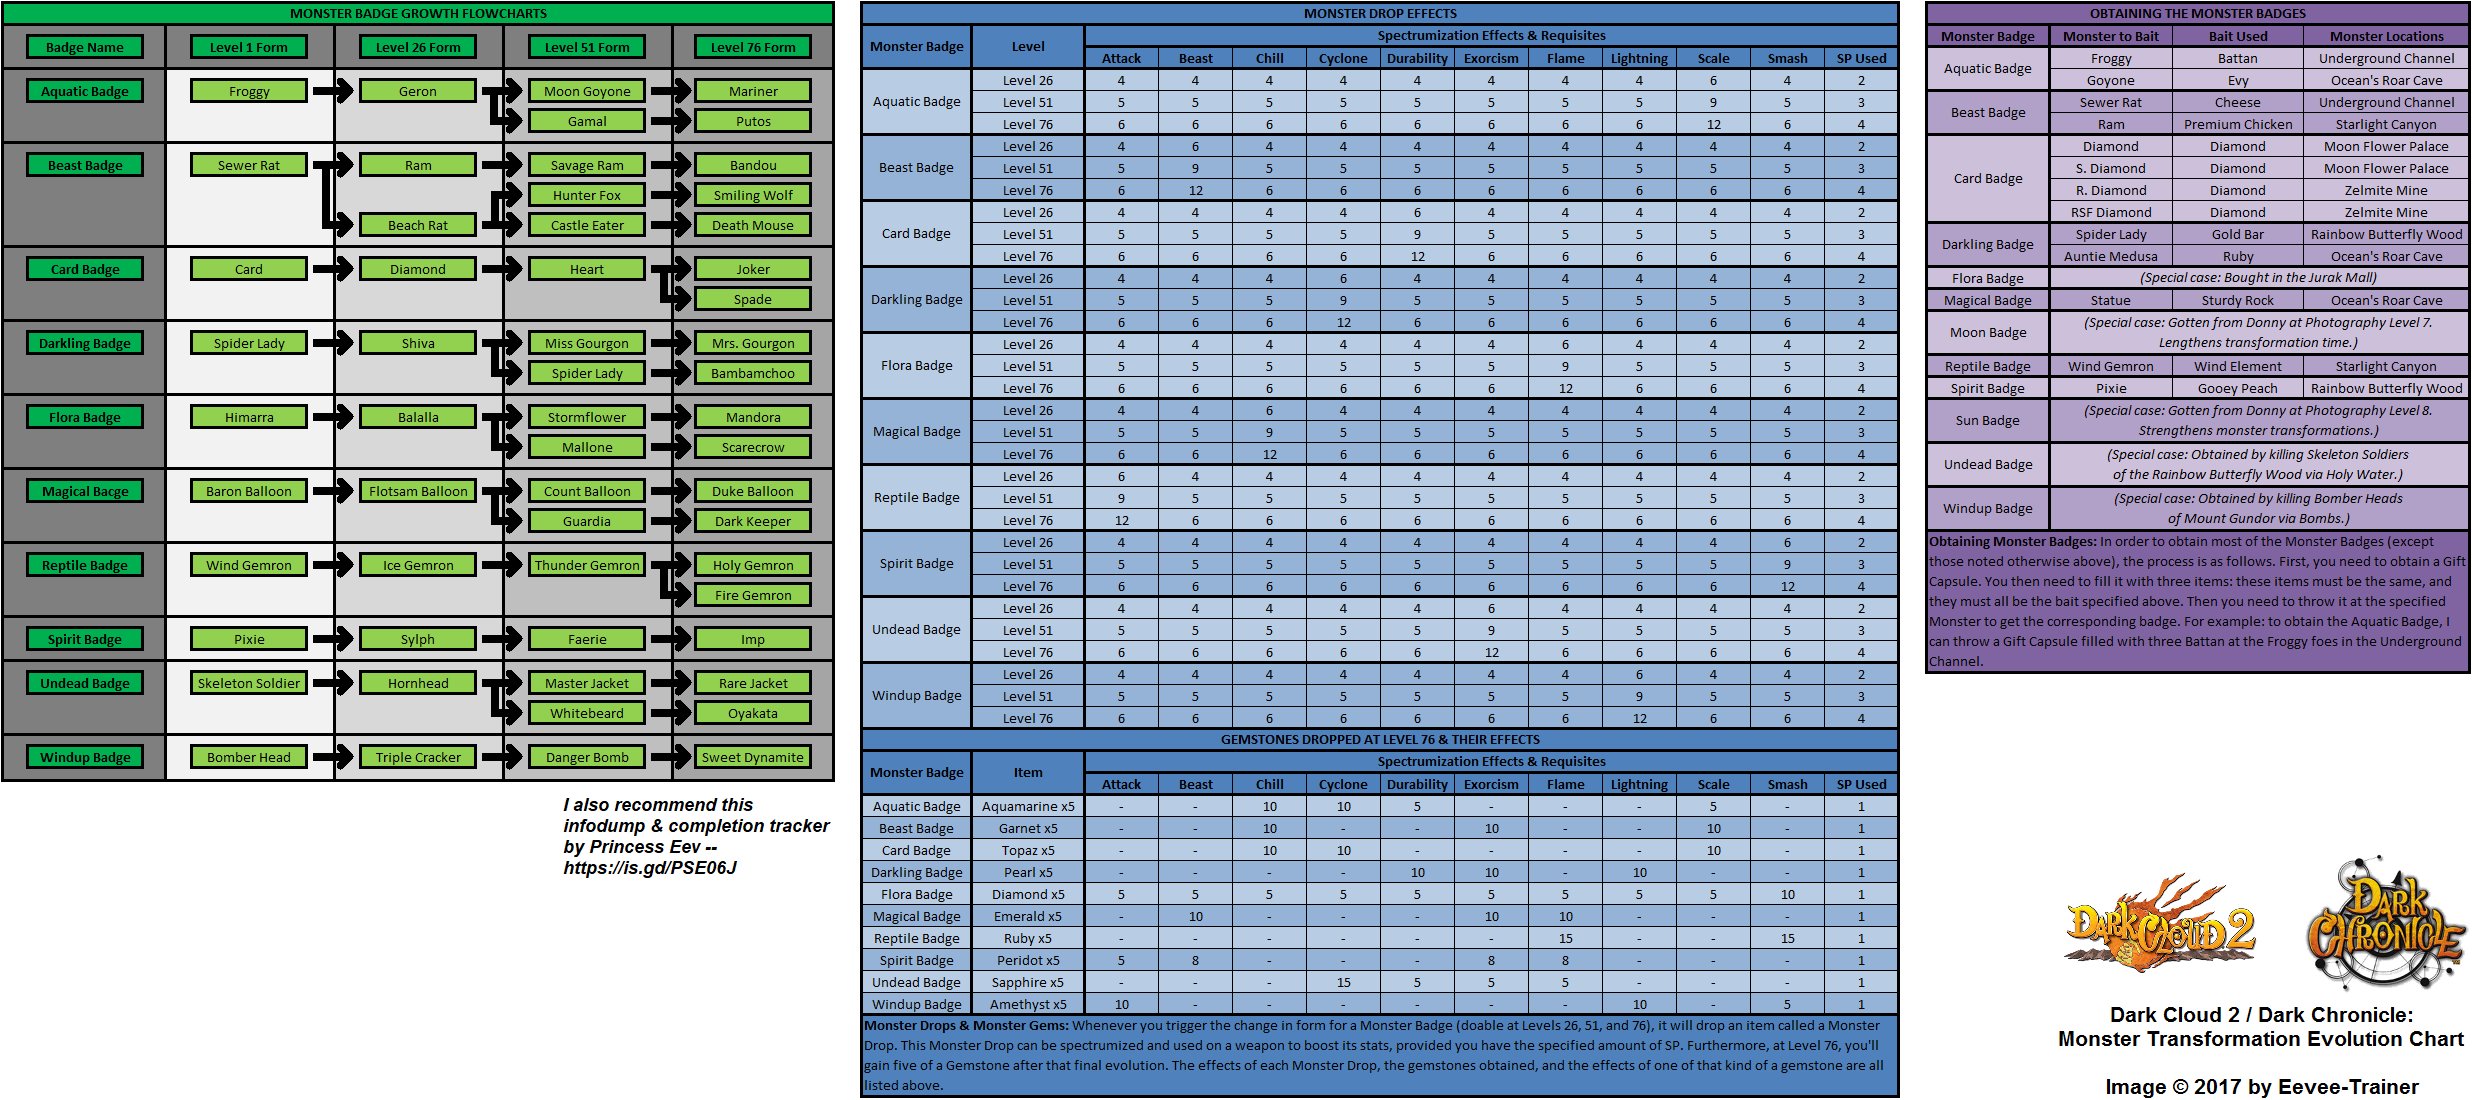
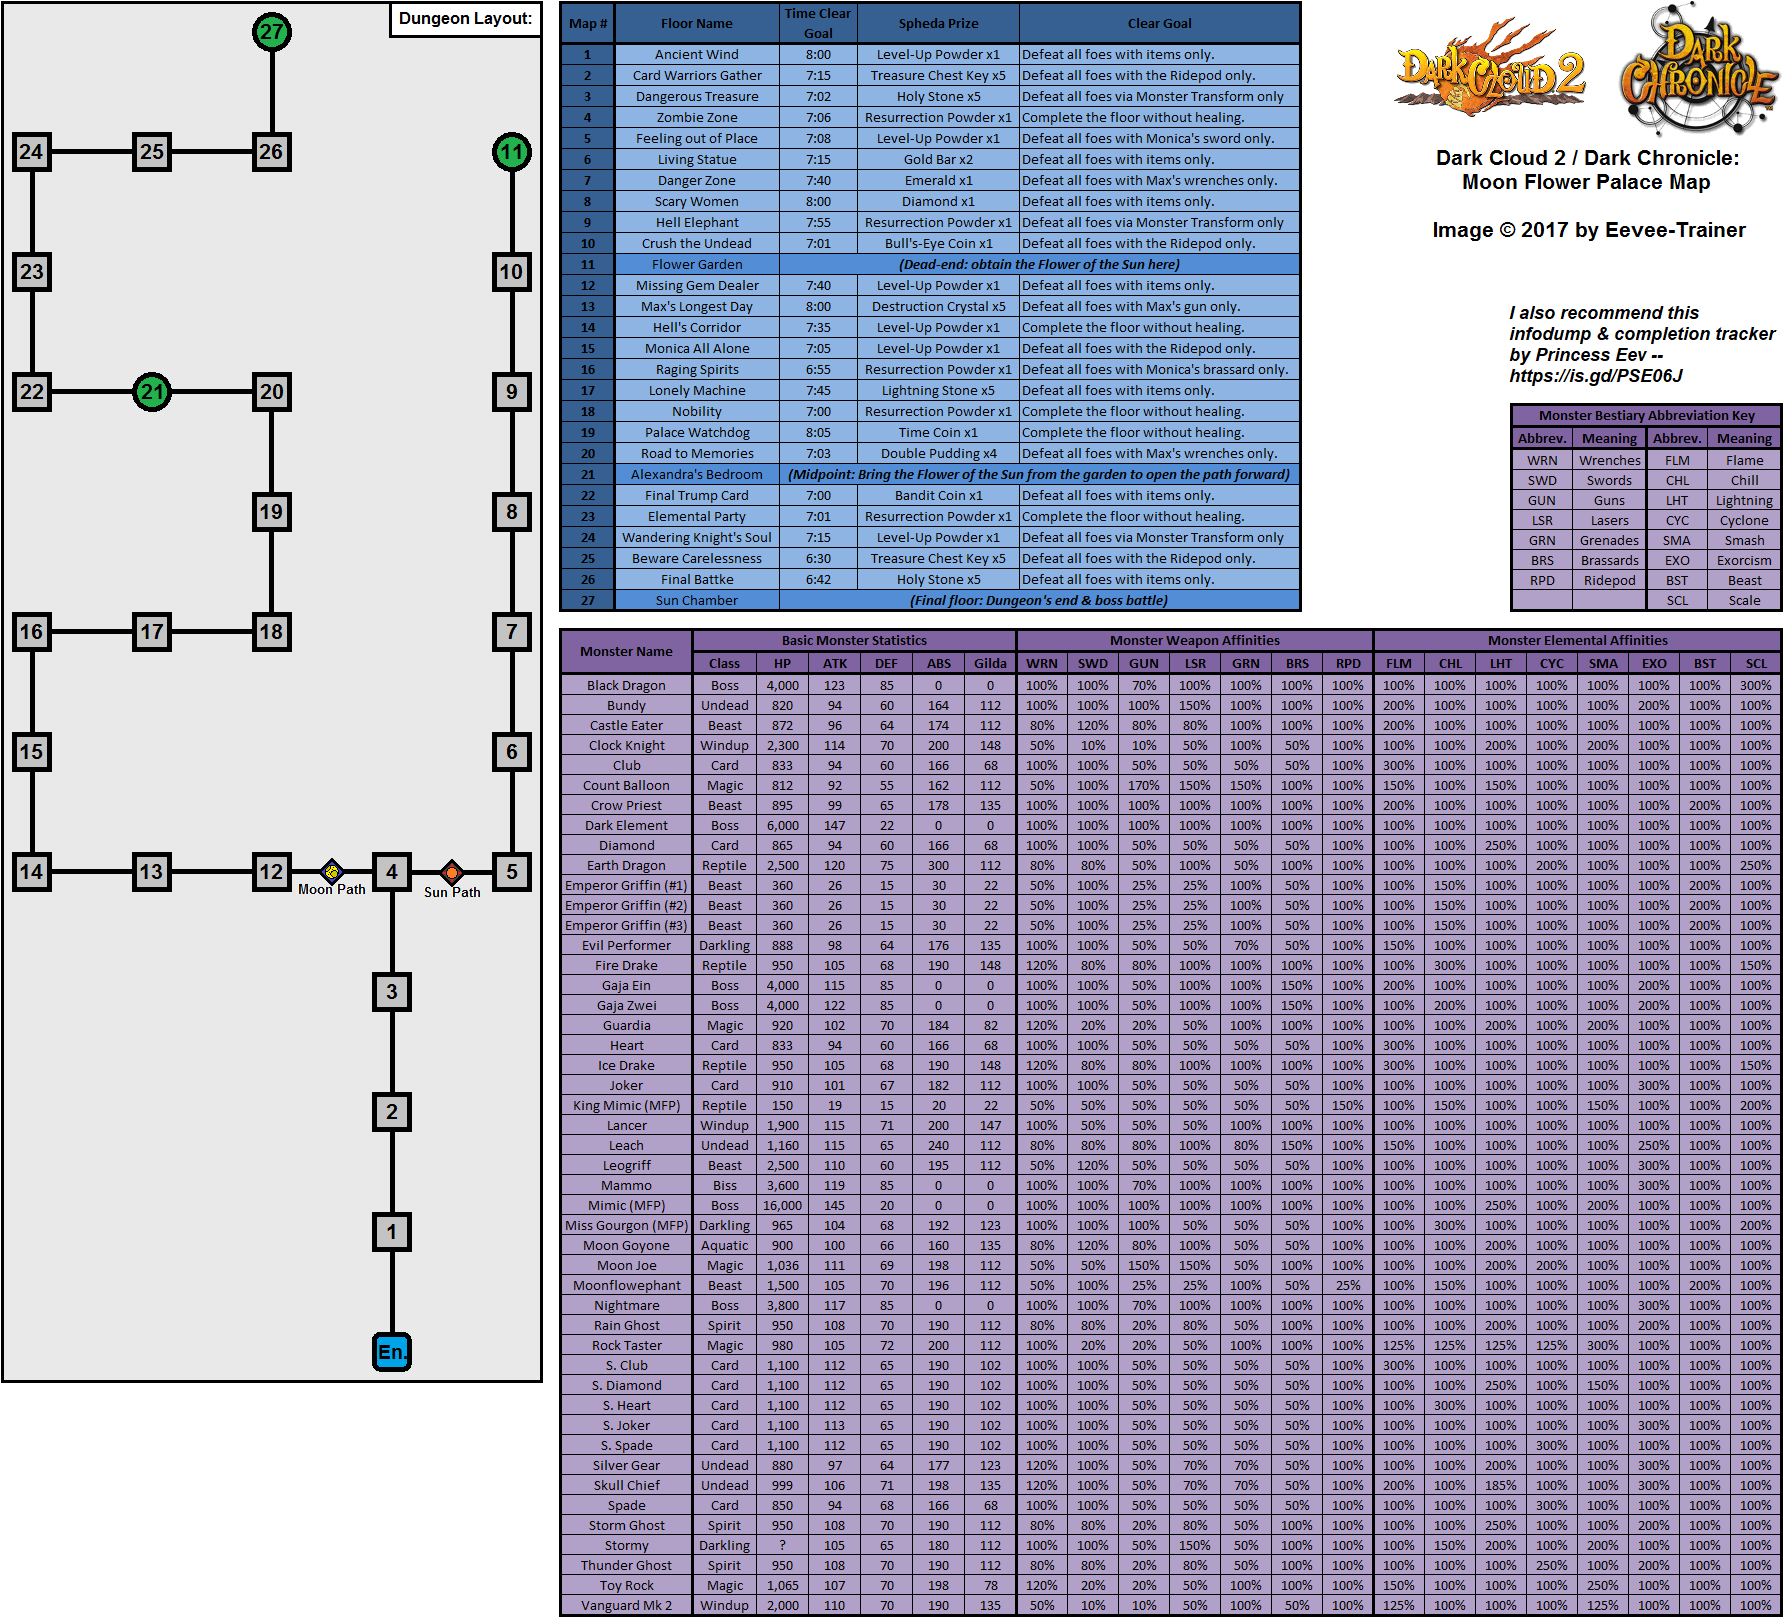
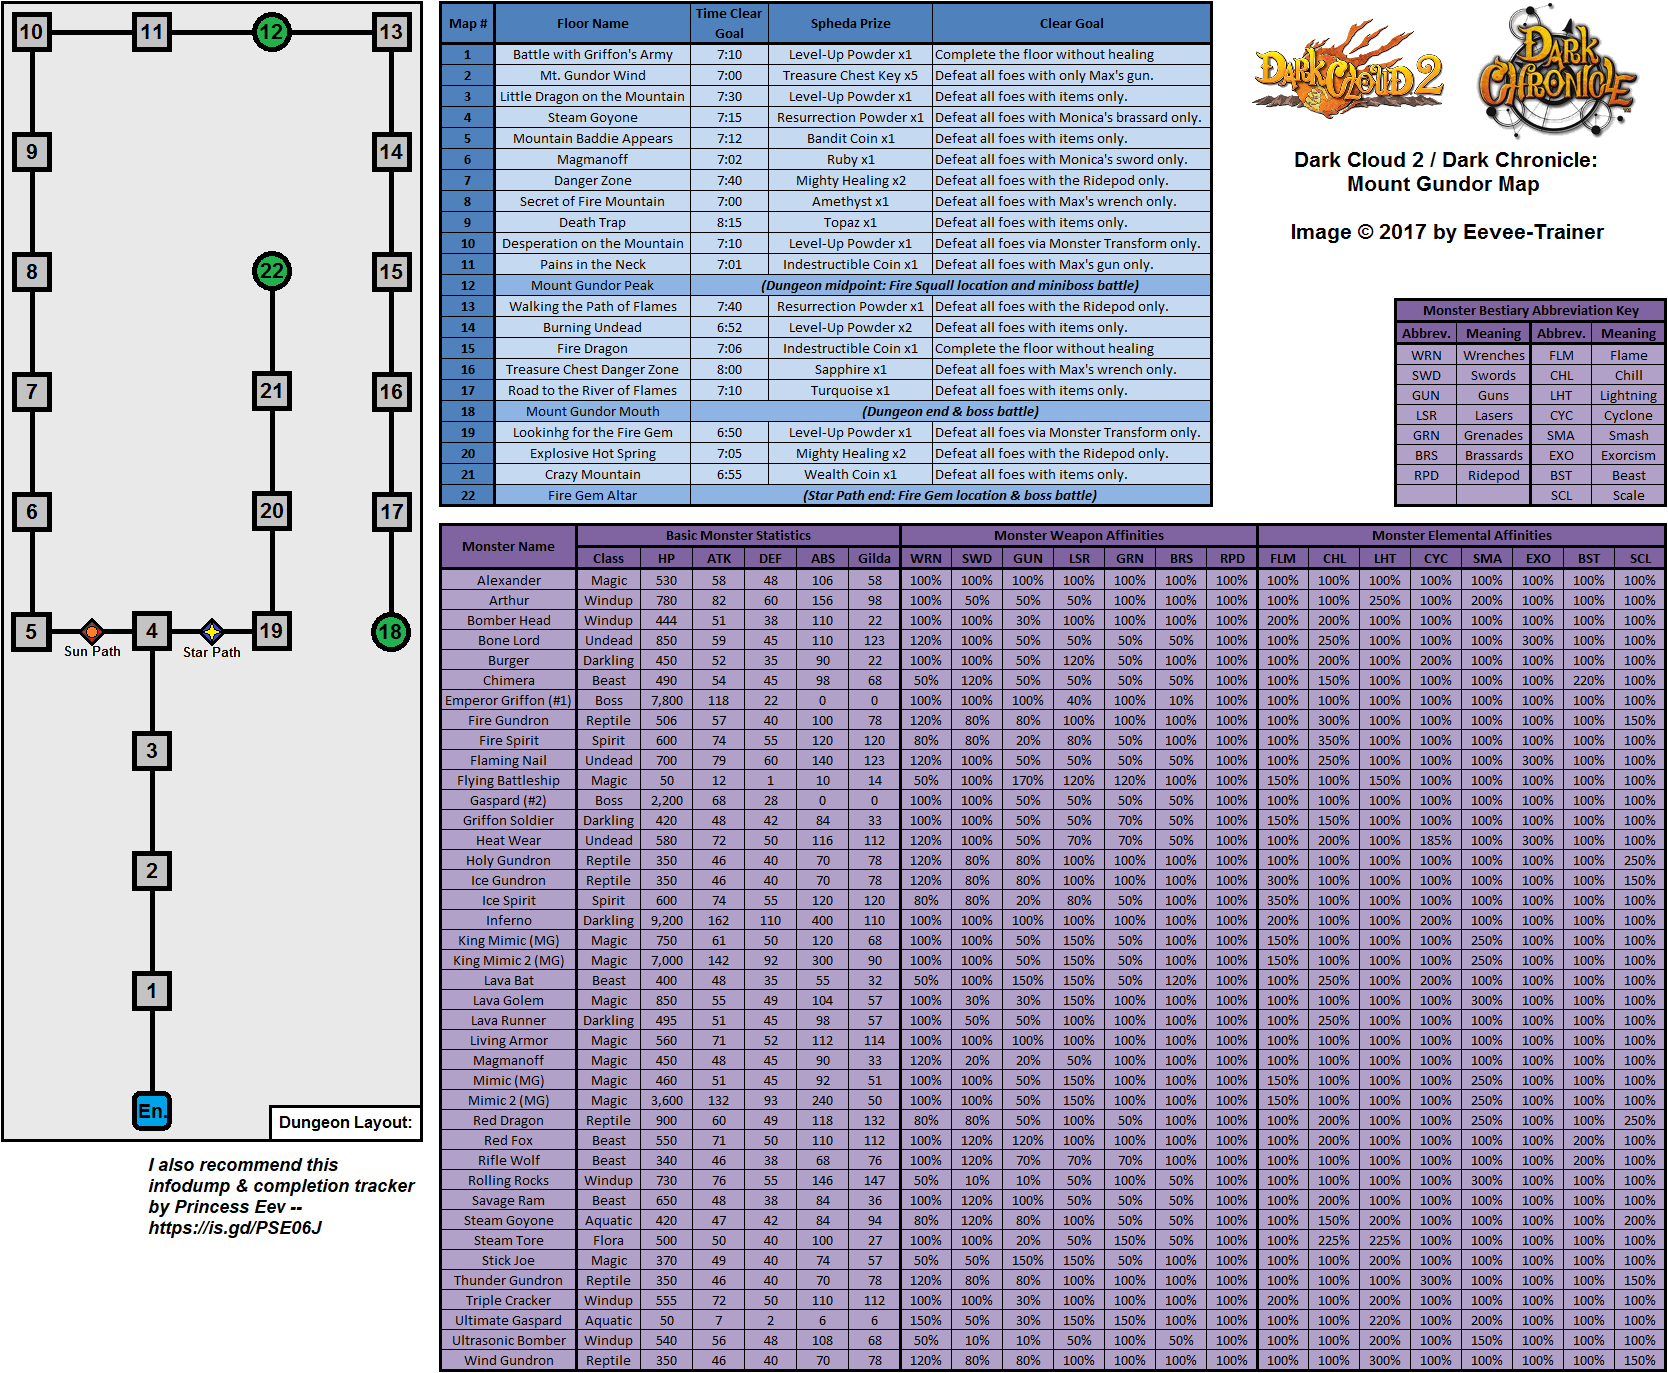
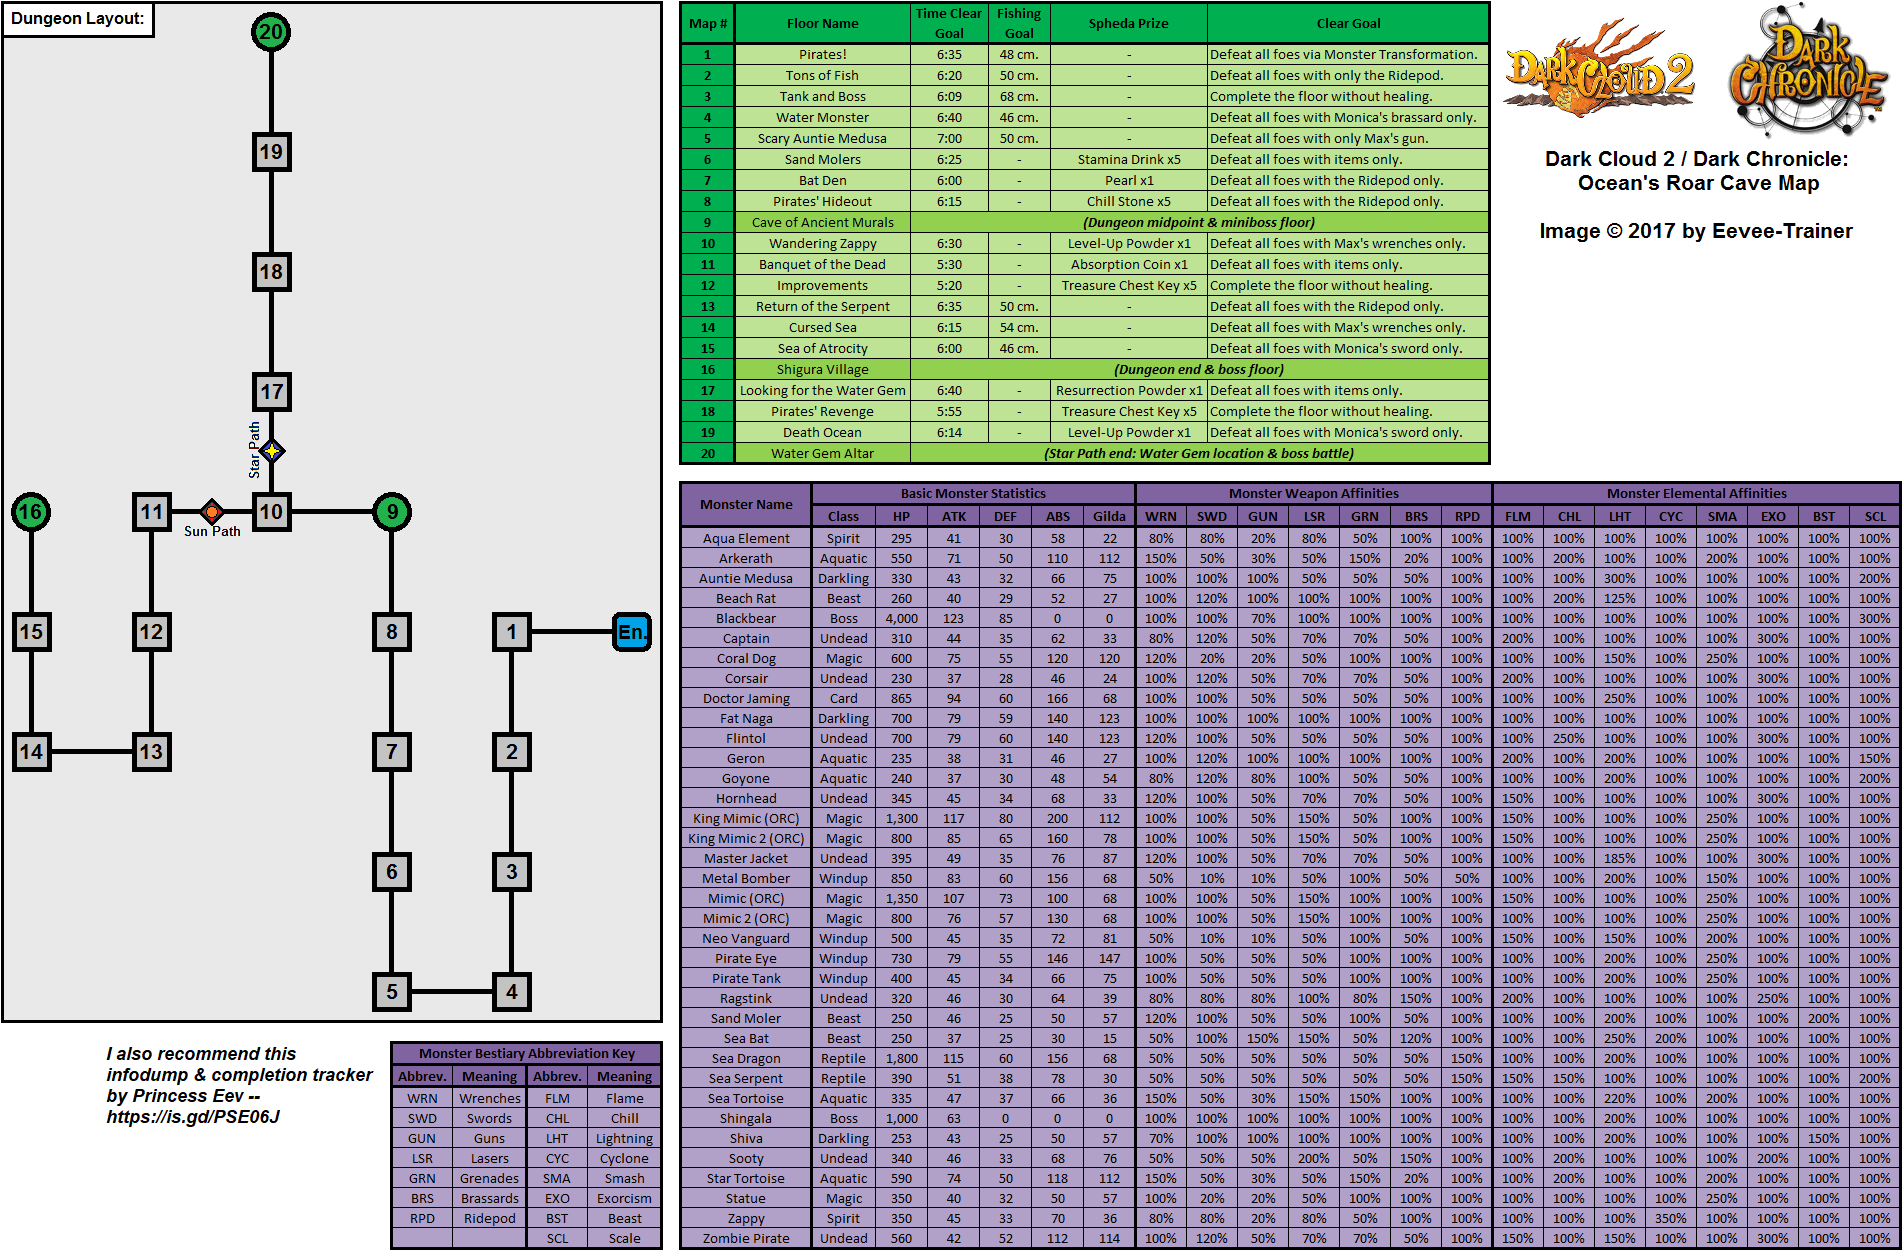
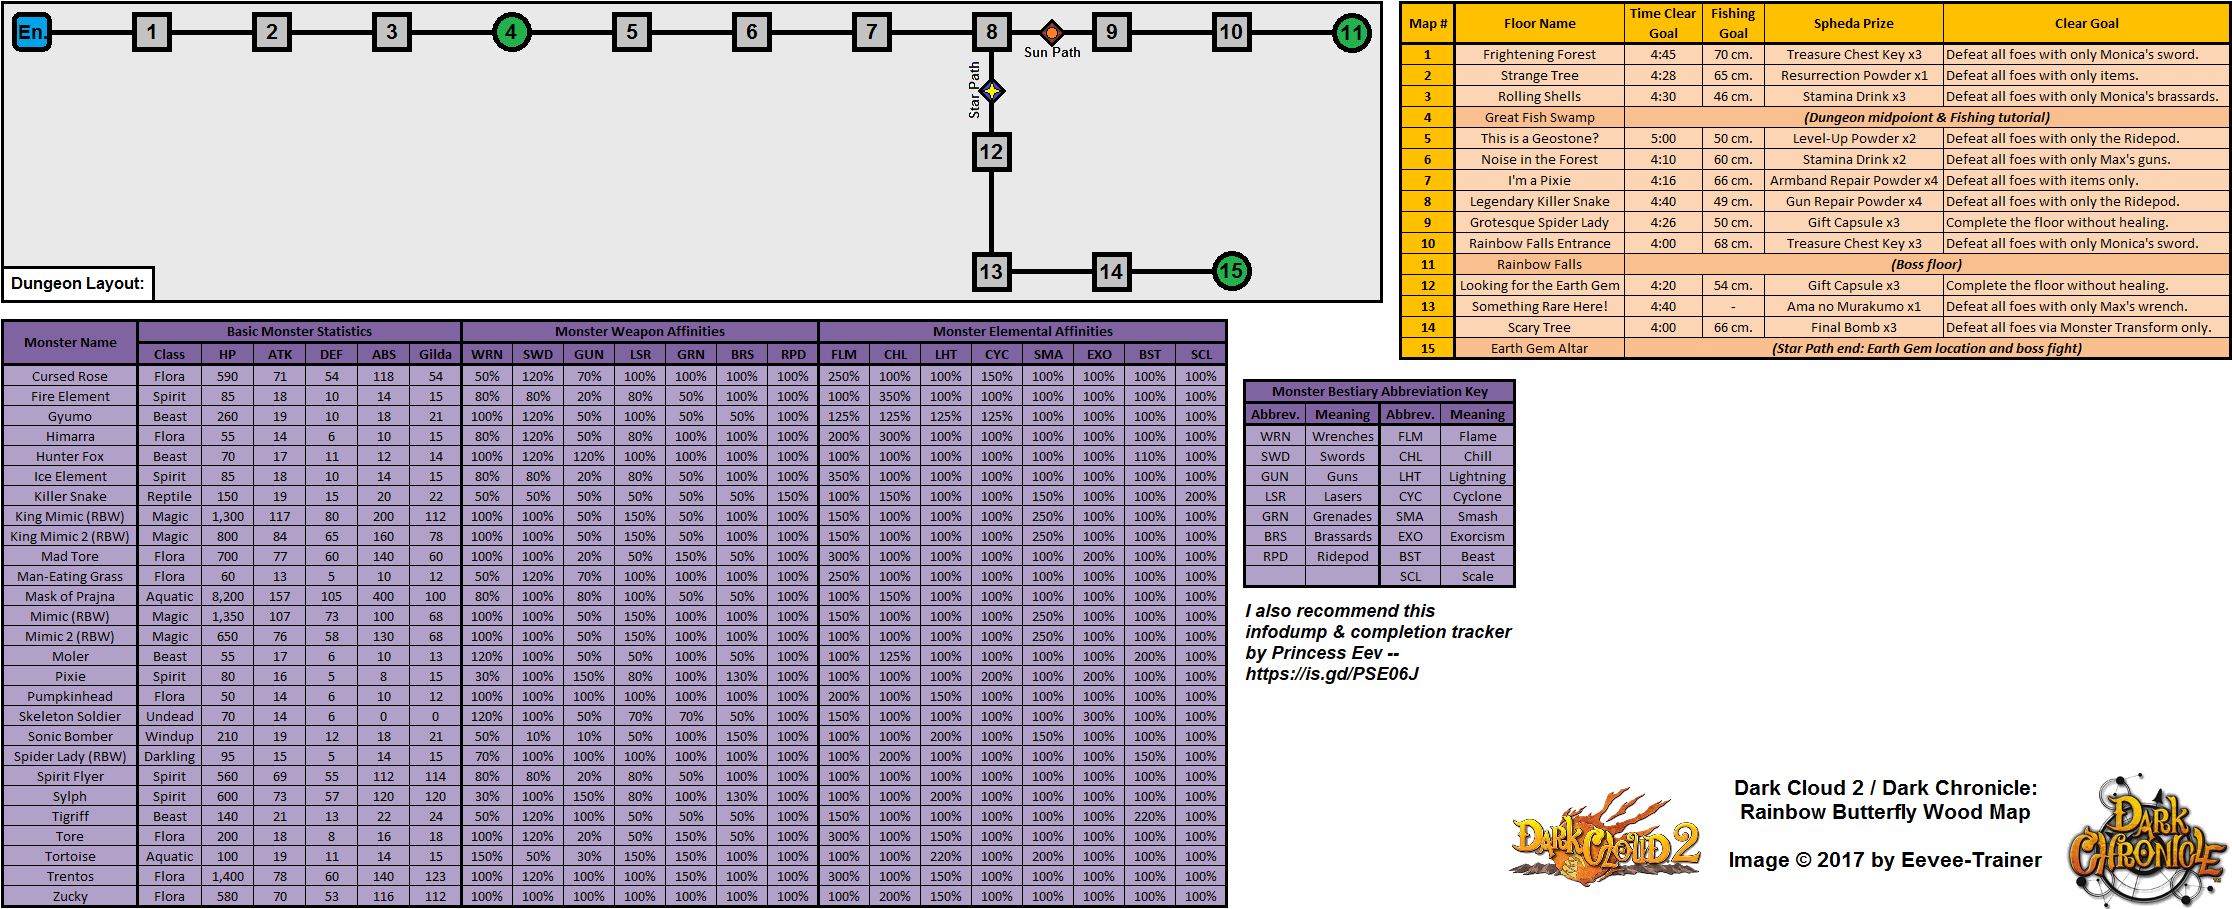
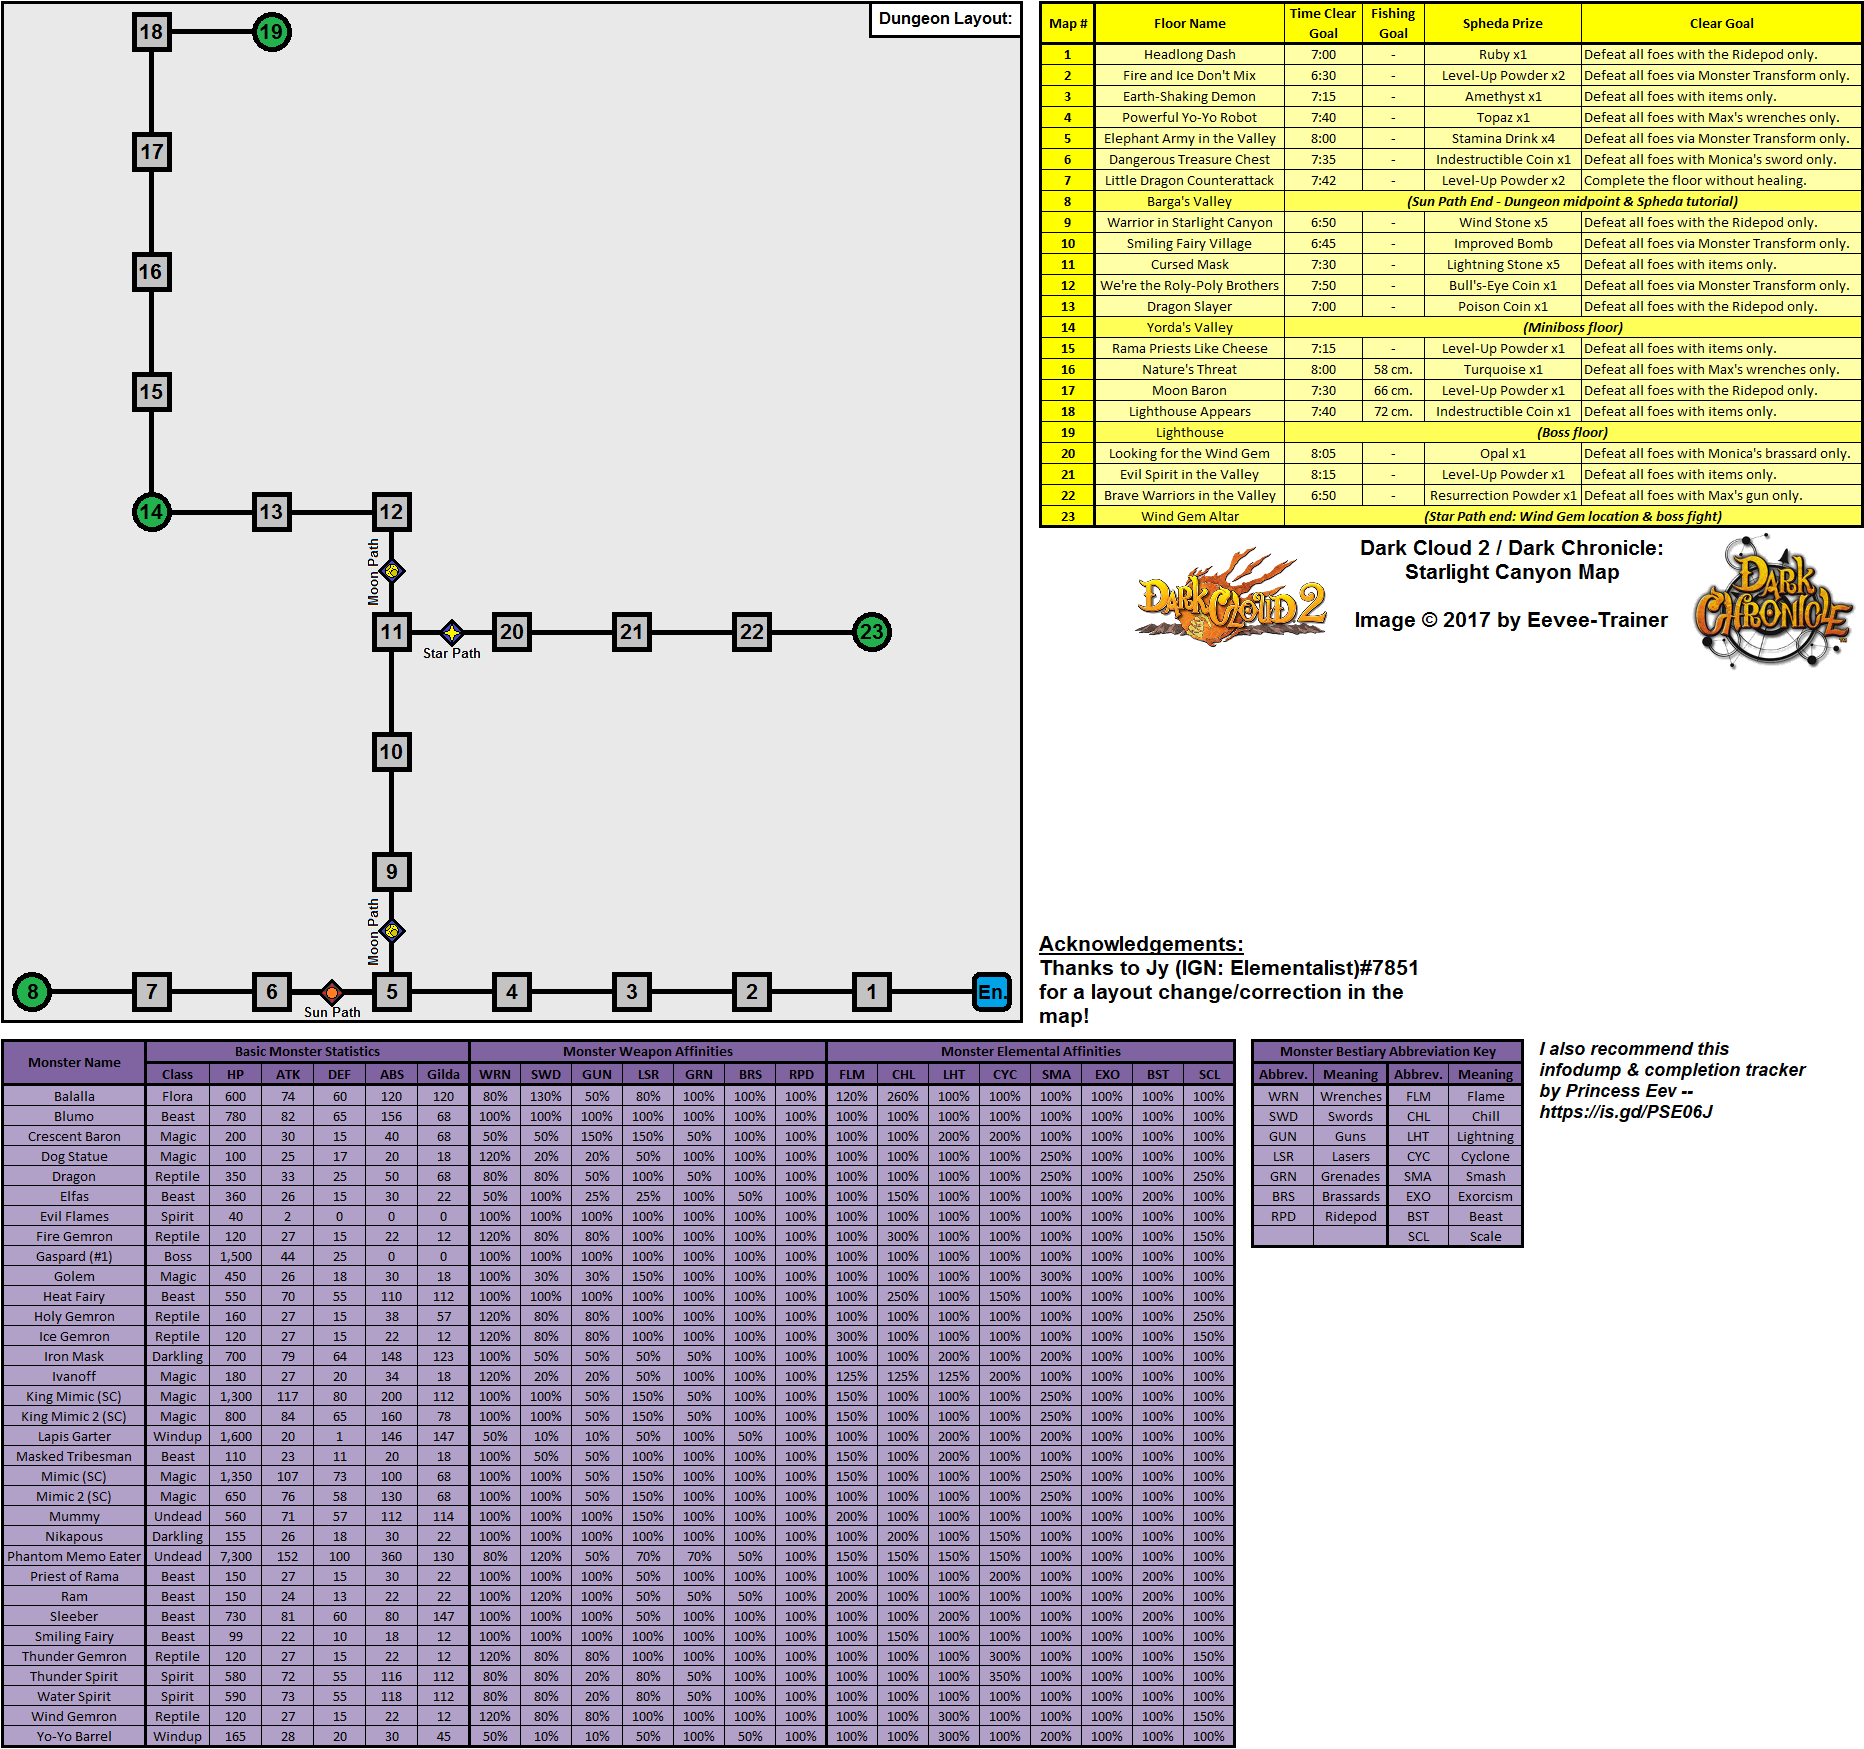
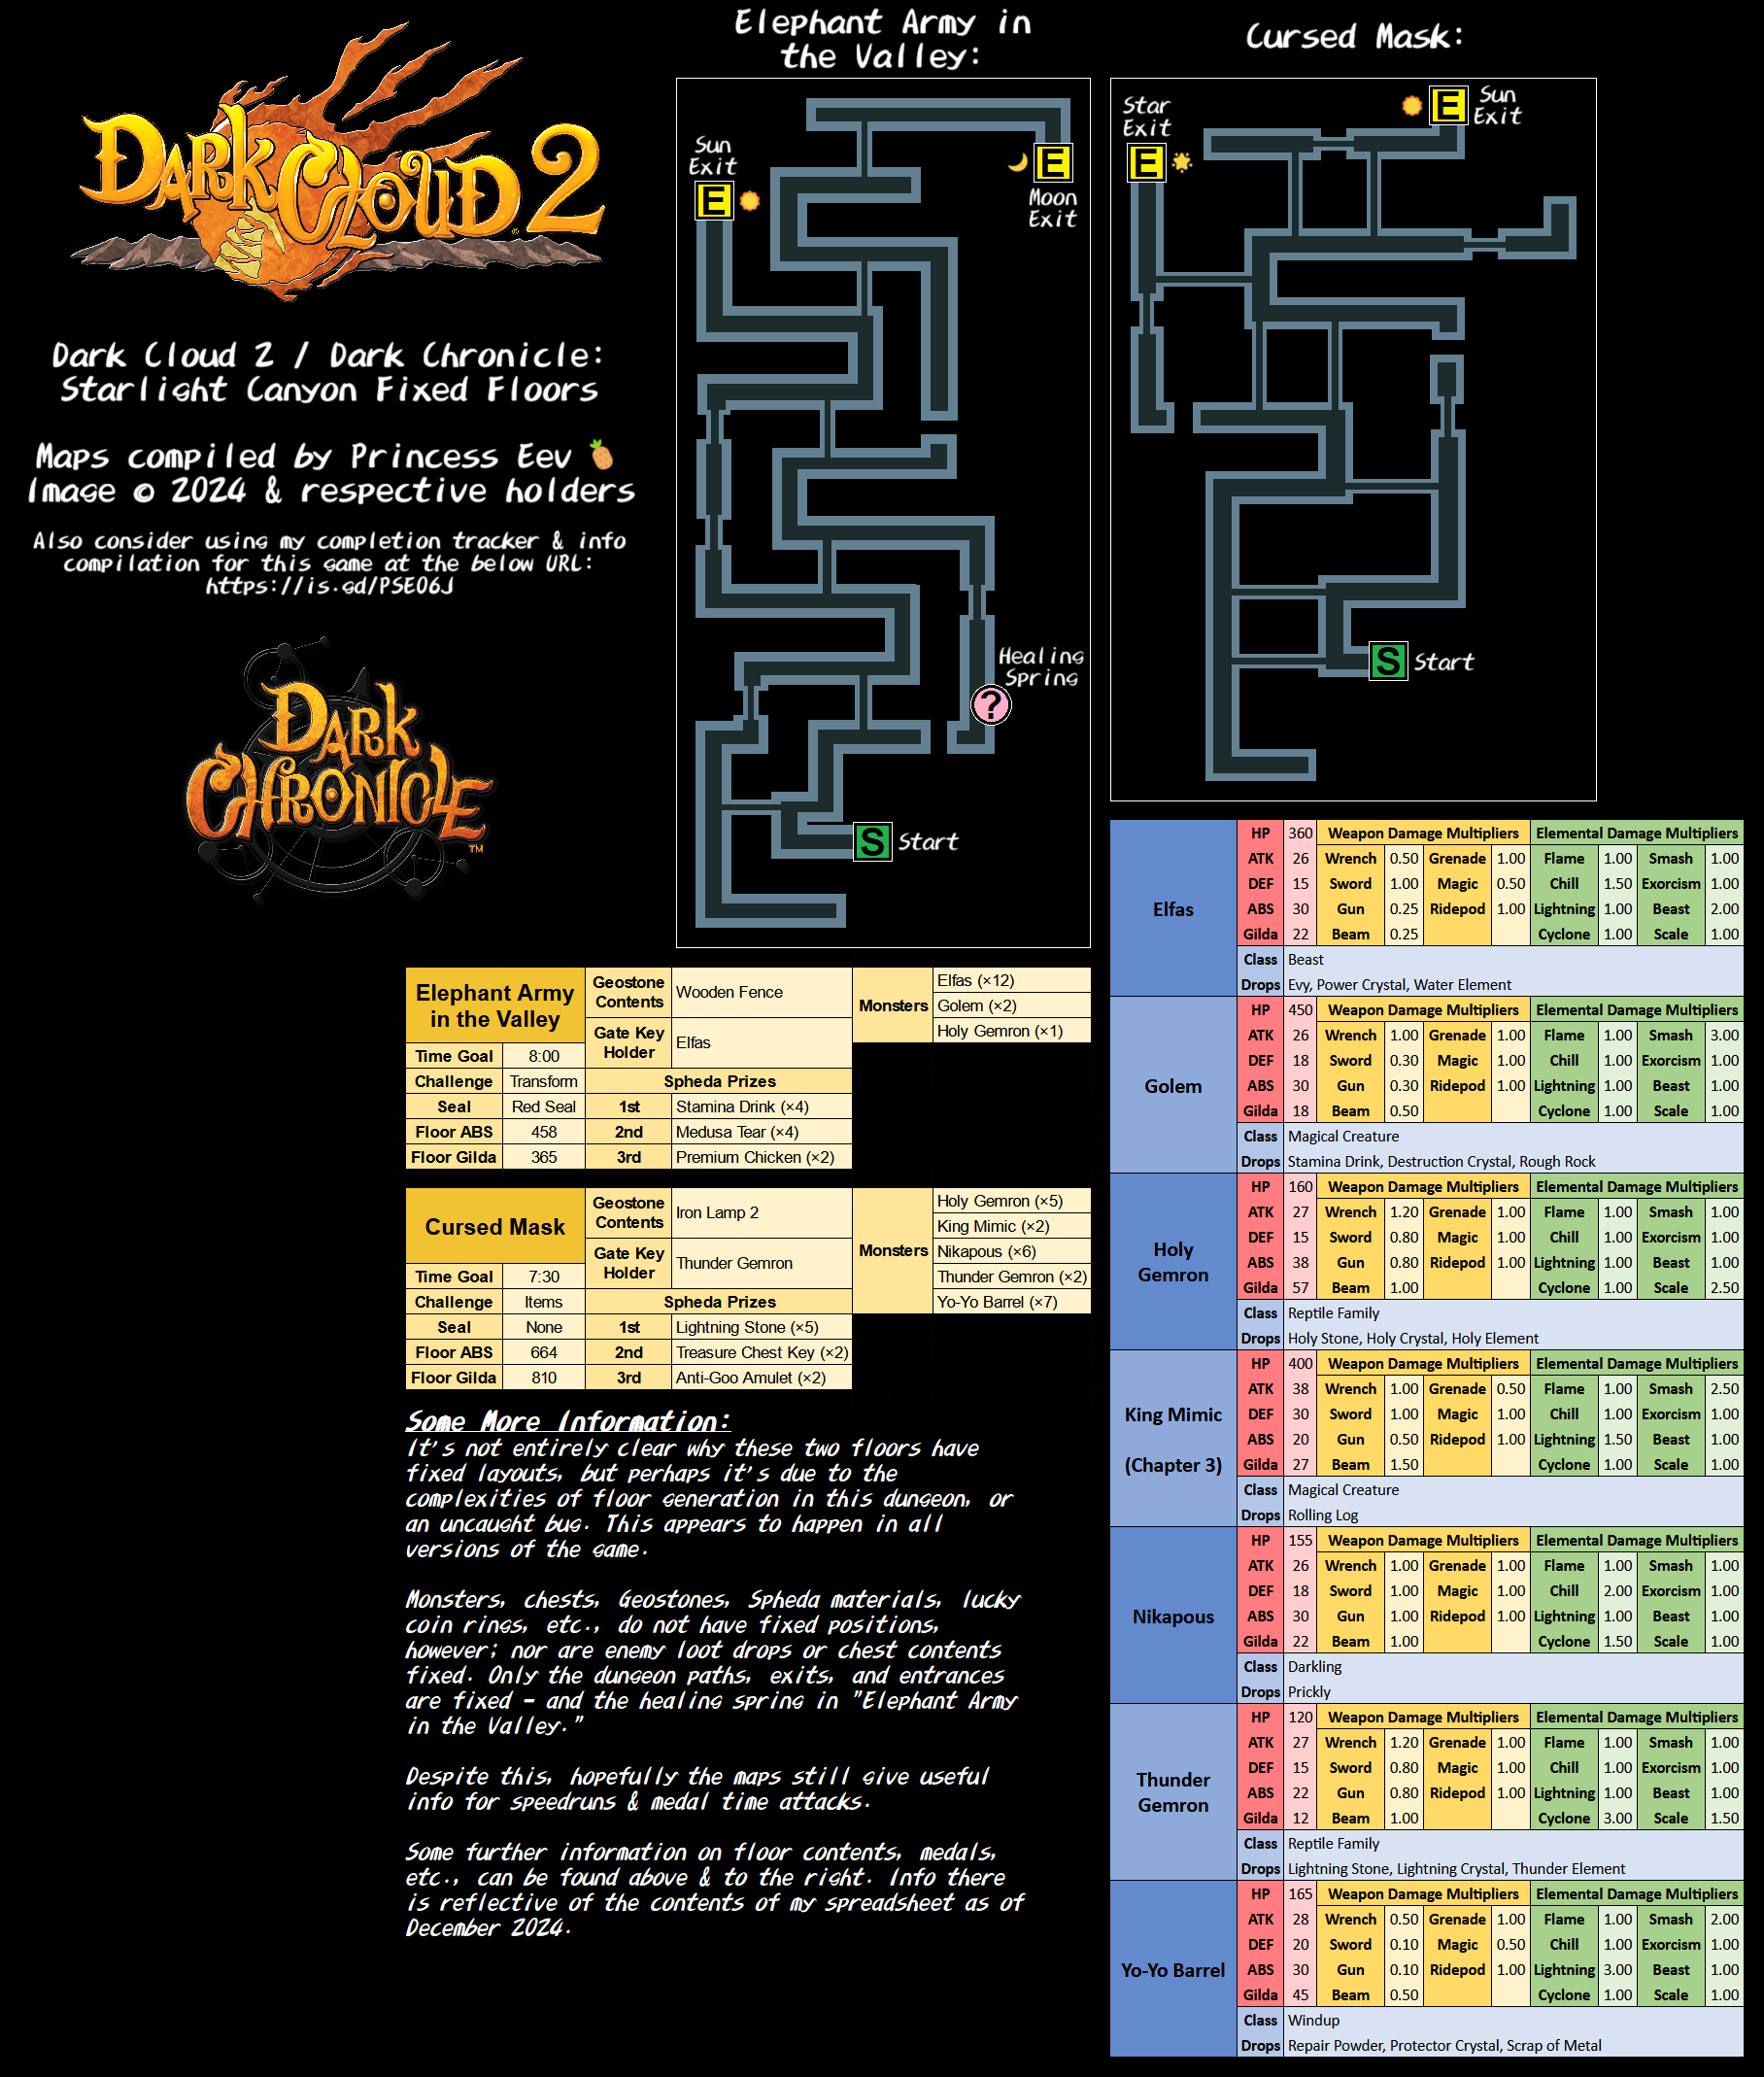
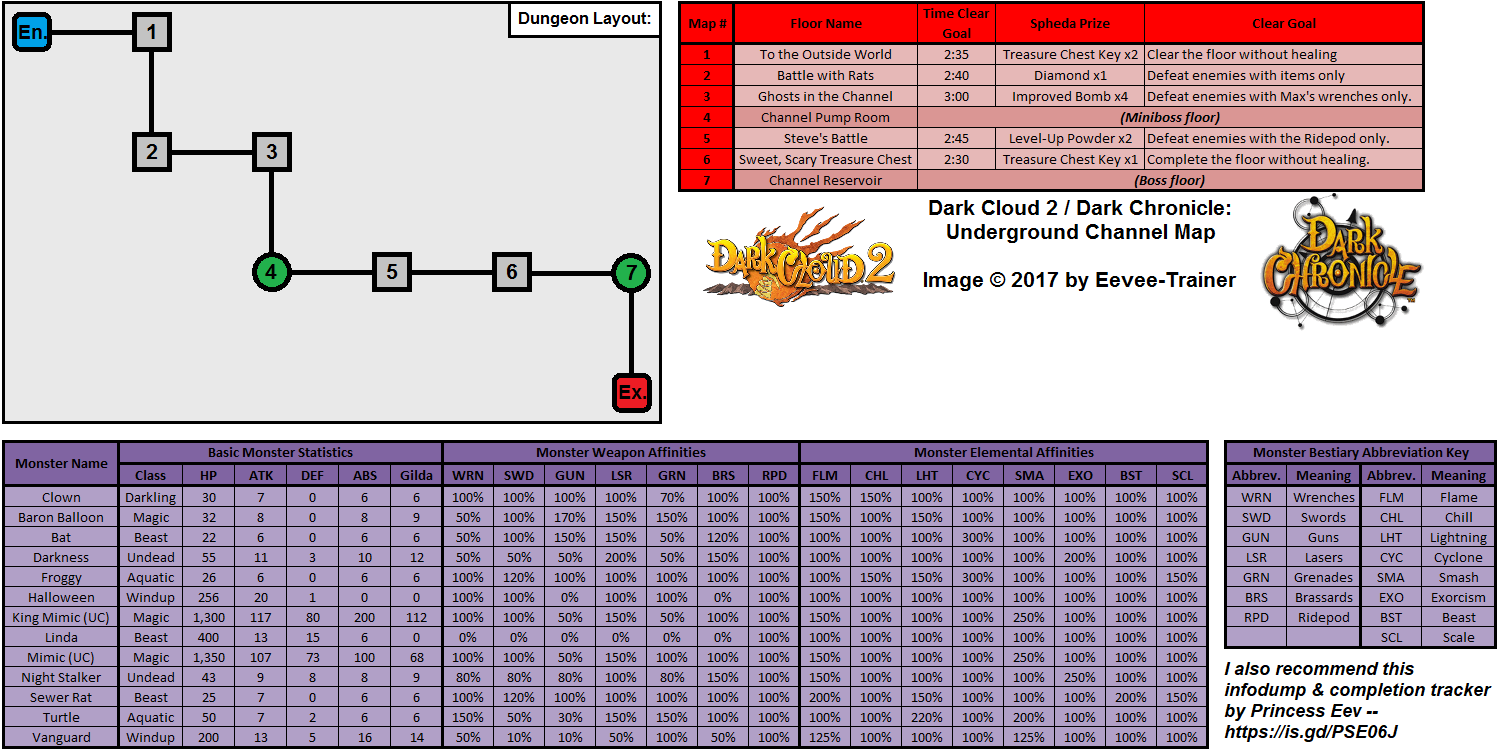
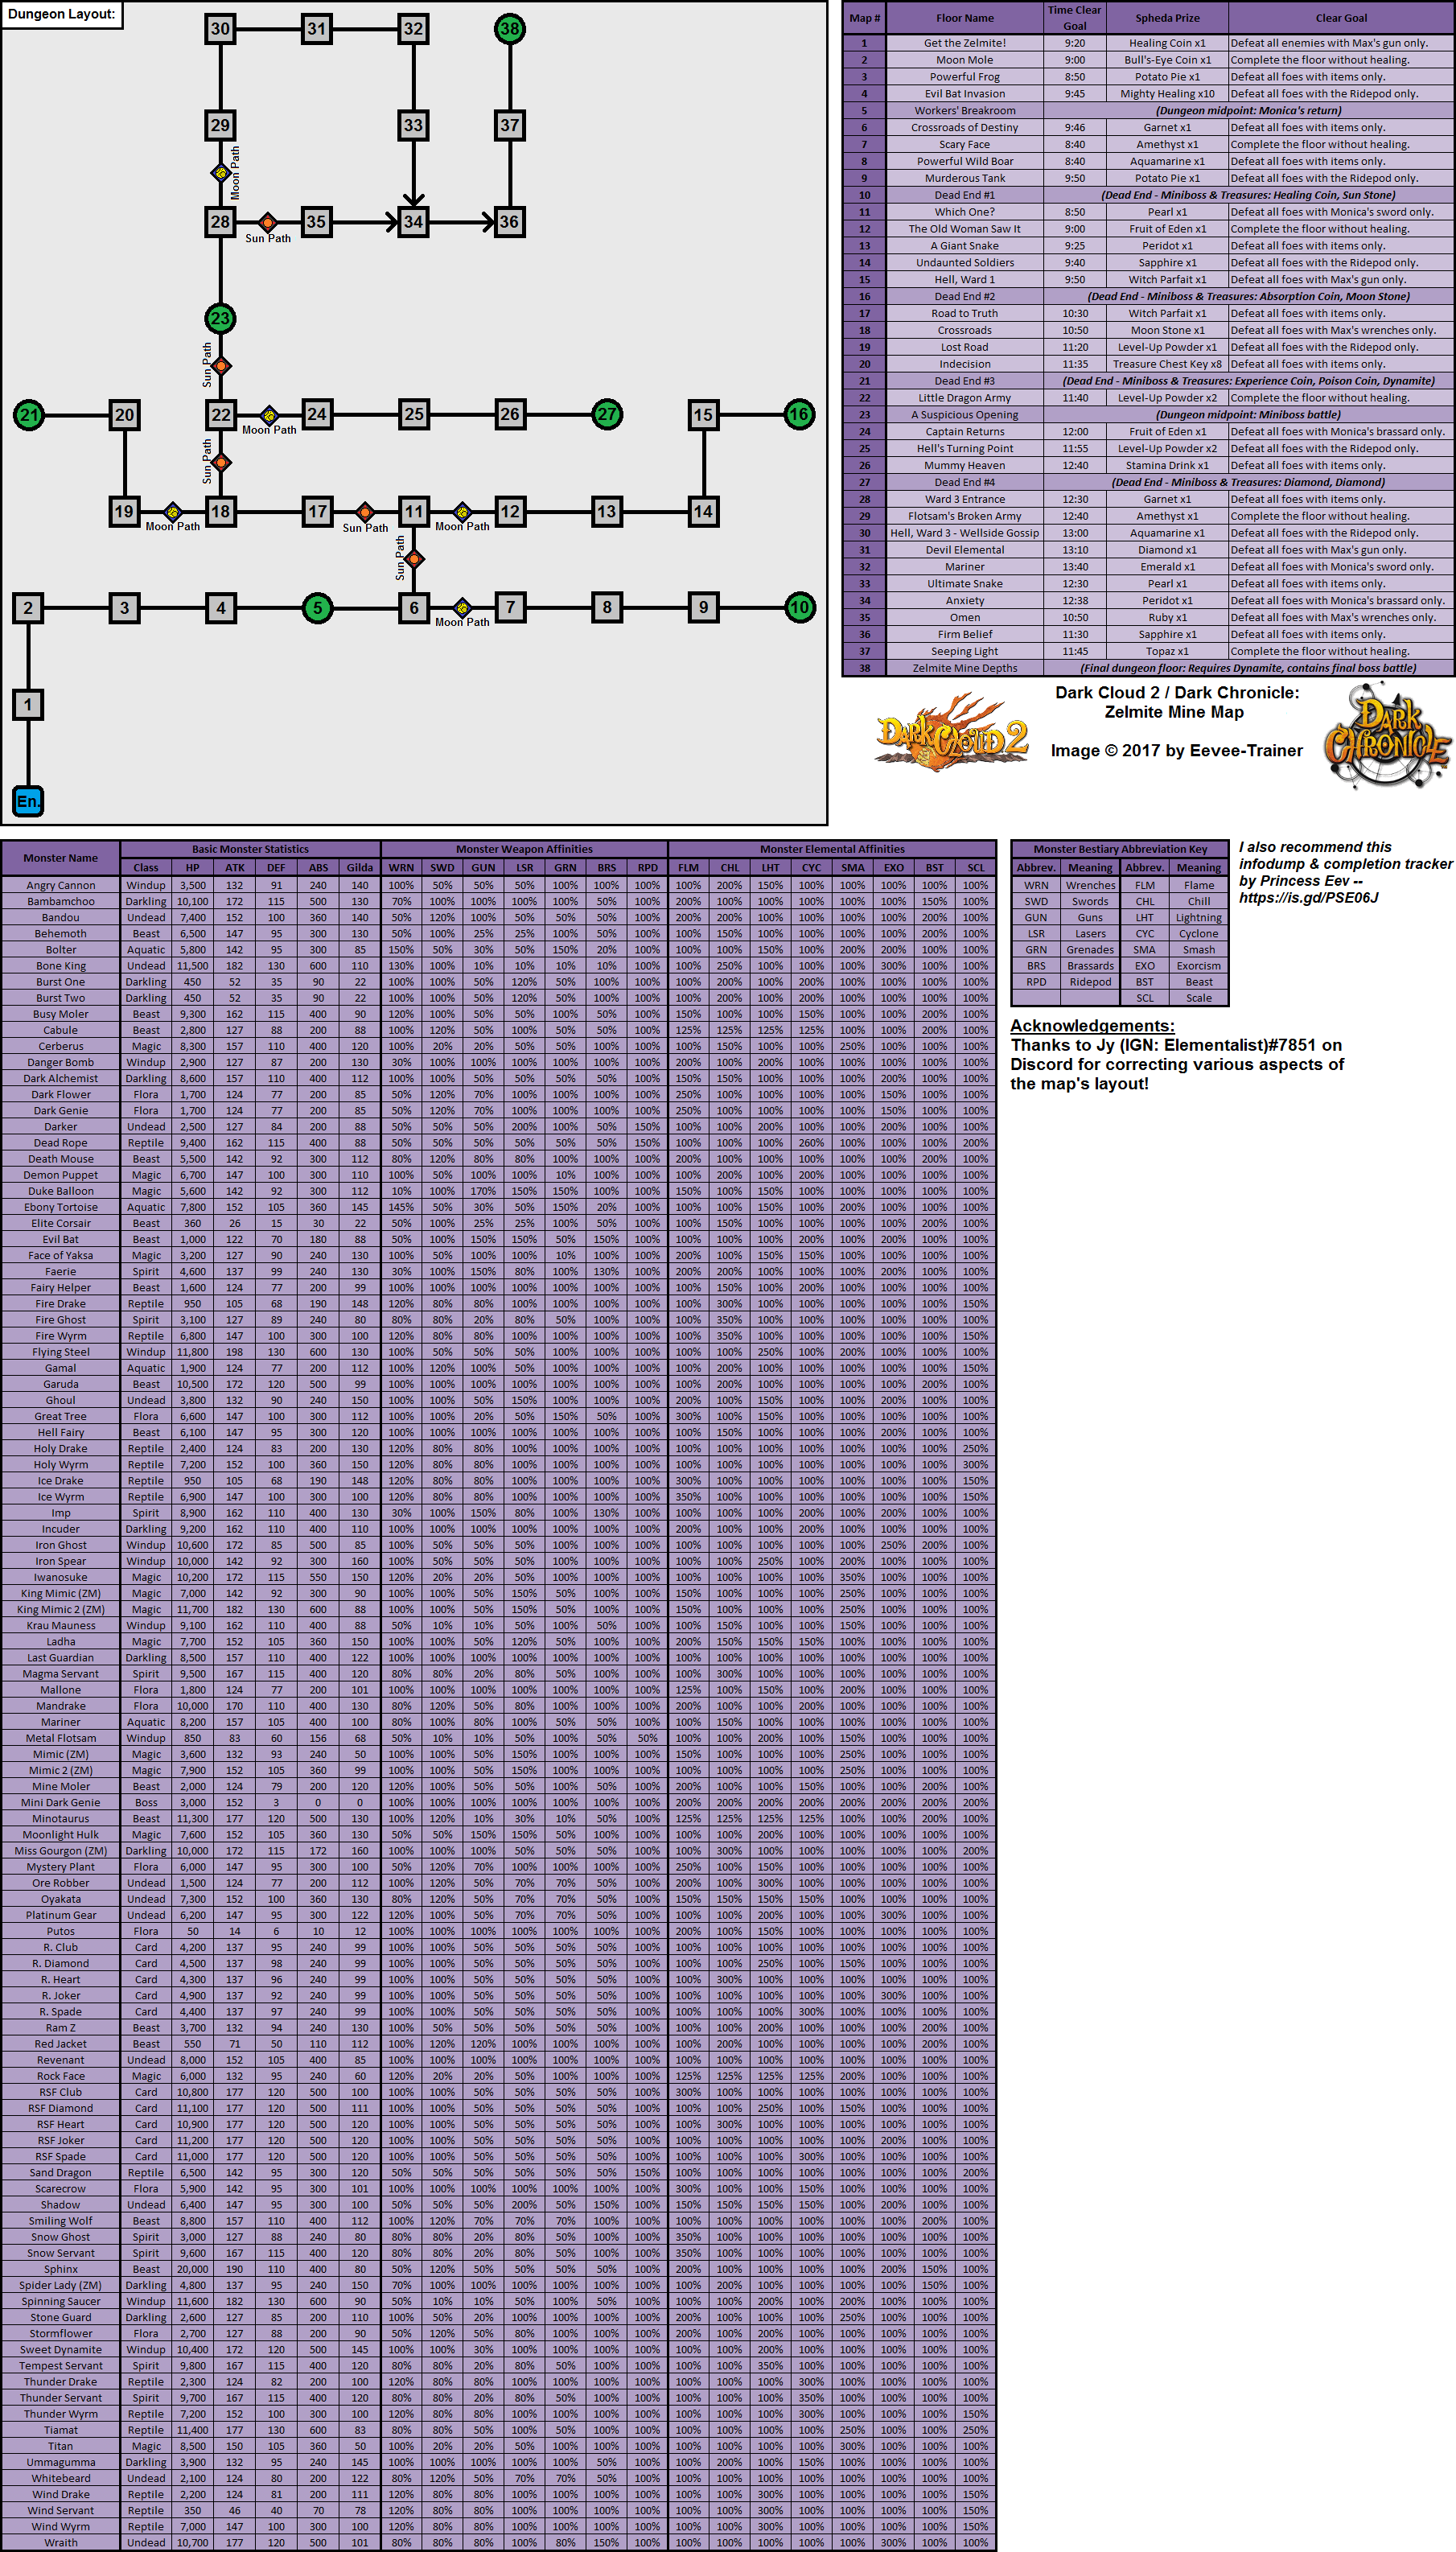
Dark Cloud 2 Maps
© 2003 Sony Computer Entertainment Inc.
Fish Breeding Combinations
2170 x 566
129 kB
original
Eevee-Trainer
Monster Transform Evolutions
2472 x 1100
208 kB
Moon Flower Palace
1784 x 1618
229 kB
Mount Gundor
1668 x 1373
206 kB
Ocean's Roar Cave
1903 x 1251
196 kB
Rainbow Butterfly Wood
2232 x 909
Starlight Canyon
1864 x 1749
Fixed Floors
1816 x 2138
640 kB
Underground Channel
1498 x 750
124 kB
Zelmite Mine
1810 x 3172
359 kB
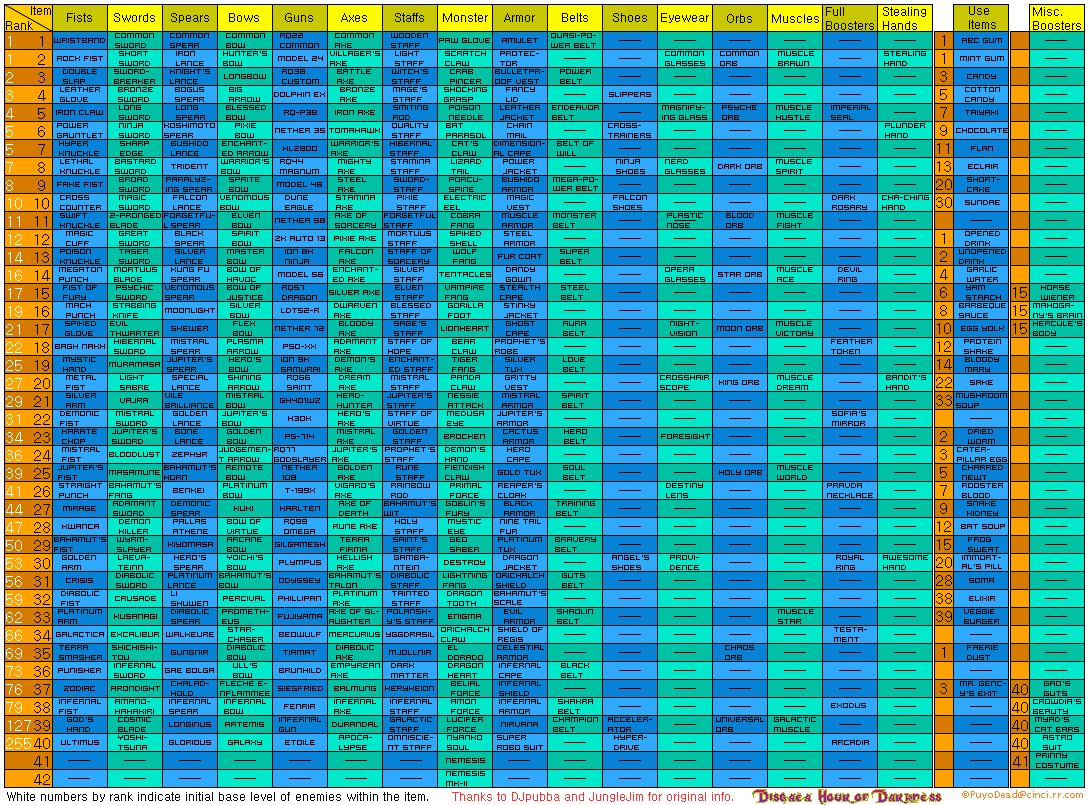
Disgaea: Hour Of Darkness Maps
© 2003 Nippon Ichi Software / Atlus
Weapon Ranks
1089 x 805
33.9 kB
PuyoDead
D.N.A.: Dark Native Apostle (E) Maps
© 2001 Hudson Soft / Virgin Interactive Entertainment (Europe) Ltd.
Sewer 1
Sewer 1 (In-Game Map)
1354 x 939
213 kB
JPG
Andrey Romanov
Sewer 2
Sewer 2 (In-Game Map)
1357 x 939
225 kB
Laboratory
Laboratory B1F (In-Game Map)
1353 x 938
244 kB
Laboratory 1F (In-Game Map)
1359 x 940
218 kB
Laboratory 2F (In-Game Map)
1355 x 935
209 kB
Laboratory 3F (In-Game Map)
1358 x 938
216 kB
Laboratory 4F (In-Game Map)
221 kB
Laboratory 5F (In-Game Map)
1355 x 939
202 kB
West Area
West Area (In-Game Map)
1352 x 936
171 kB
East Area
East Area (In-Game Map)
186 kB
Control Block
Control Block 1F (In-Game Map)
1357 x 937
183 kB
Control Block 2F (In-Game Map)
188 kB
Control Block 3F (In-Game Map)
1352 x 939
181 kB
Control Block 4F (In-Game Map)
1357 x 941
185 kB
Excavation Site
Excavation Site (In-Game Map)
1355 x 938
190 kB
Cave 1
Cave 1 (In-Game Map)
193 kB
Cave 2
Cave 2 (In-Game Map)
1353 x 936
Cave 3
Cave 3 (In-Game Map)
Dragon Quest: Hand Of The Heavenly Bride (J) Maps
© 2004 Armor Project / Bird Studio / Artepiazza / Square Enix
World
4097 x 4724
23.2 MB
Paco
World (Mini-Map)
1024 x 1024
1.05 MB
Fairy World
1424 x 1734
2.82 MB
Fairy World (Mini-Map)
1.14 MB
Demon World
1394 x 1552
2.80 MB
Demon World (Mini-Map)
1.07 MB
E
F
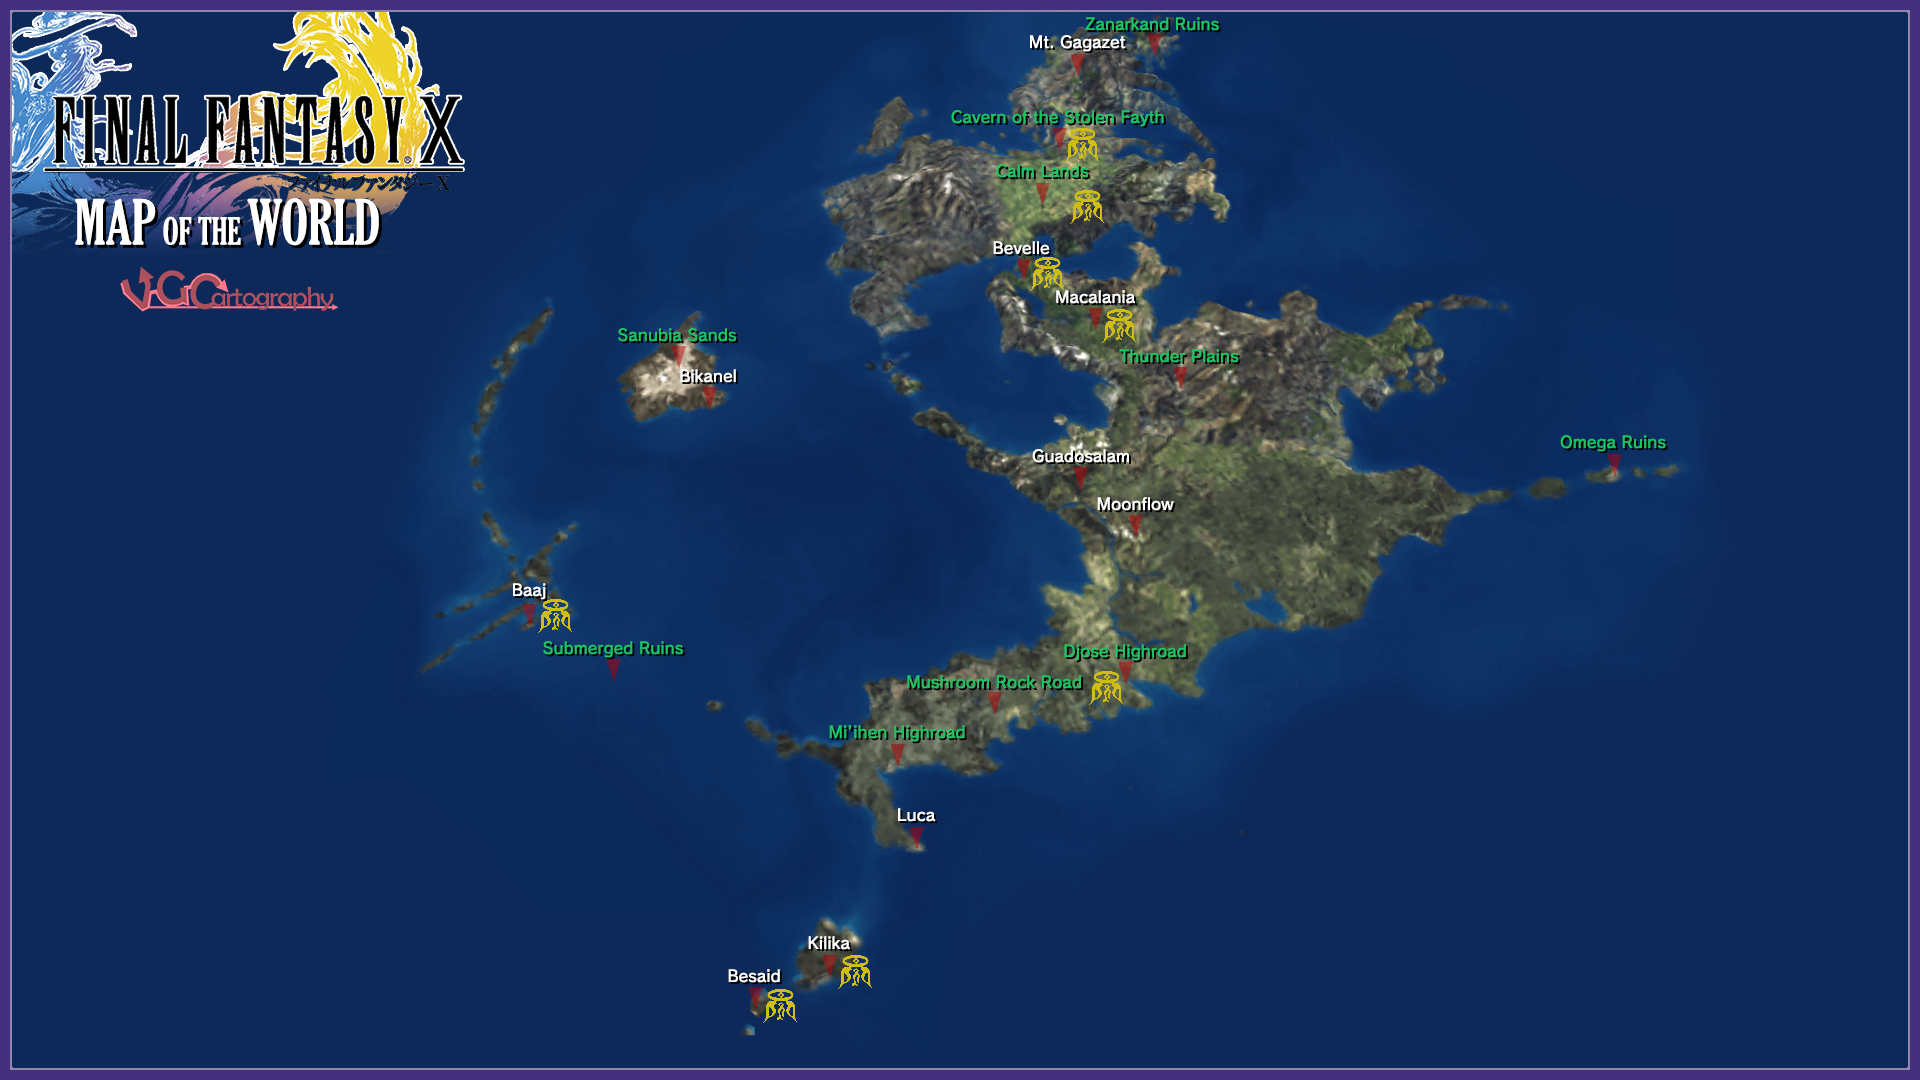
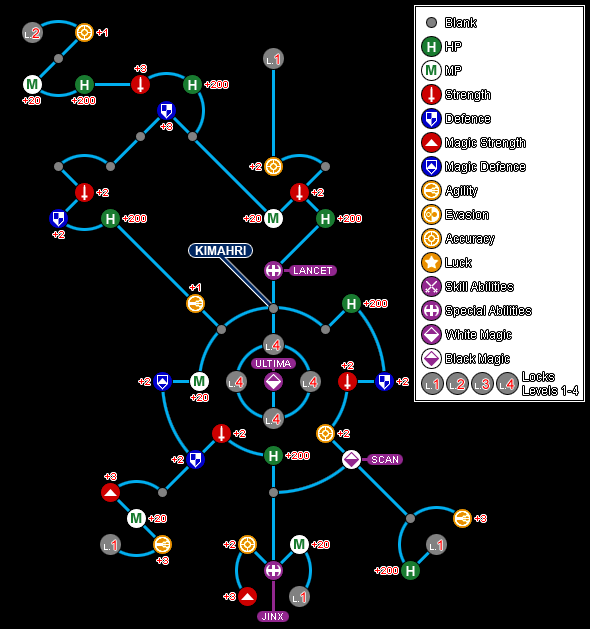
Final Fantasy X Maps
© 2001 Square
1920 x 1080
836 kB
VGCartography
Sphere Grid
2200 x 2170
105 kB
Zeric
Kimahri
590 x 629
48.4 kB
Goucher
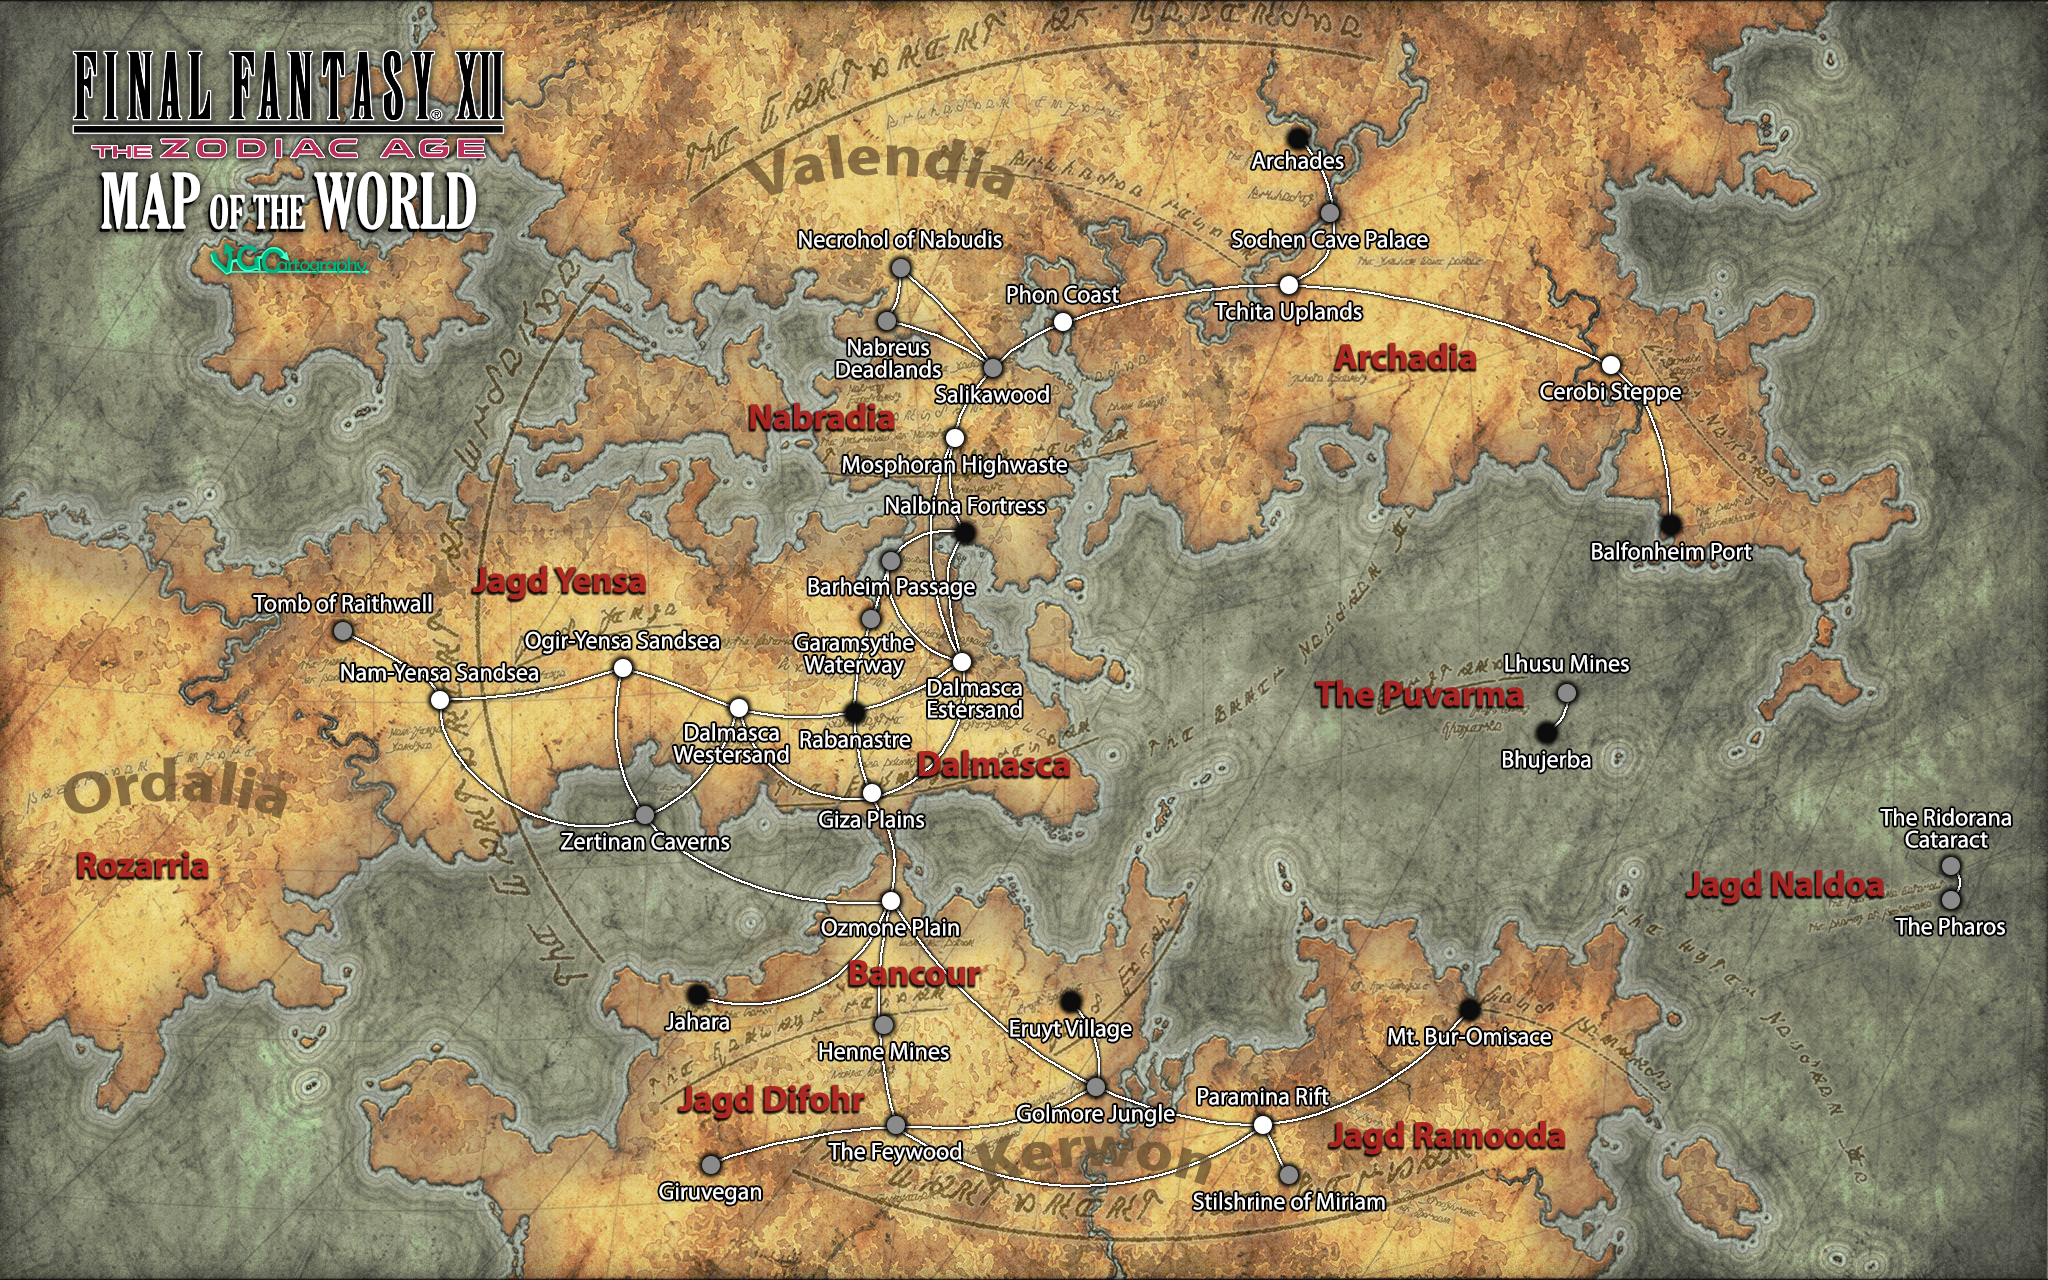
Final Fantasy XII Maps
© 2006 Square Enix Co., Ltd.
Ivalice
2048 x 1280
4.28 MB
Final Fantasy XII: International Zodiac Job System (J) Maps
© 2006, 2007 Square Enix Co., Ltd.
Map Key / Legend
720 x 960
324 kB
Tirpitz
Nalbina Fortress
Aerial Gardens (In-Game Map)
720 x 540
159 kB
Inner Ward (In-Game Map)
Lower Apartments (In-Game Map)
725 x 652
144 kB
Upper Apartments (In-Game Map)
The Highhall (In-Game Map)
160 kB
Rabanastre
Southgate (In-Game Map)
151 kB
Southern Plaza (In-Game Map)
175 kB
Eastgate (In-Game Map)
156 kB
Westgate (In-Game Map)
East End (In-Game Map)
178 kB
Muthru Bazaar (In-Game Map)
176 kB
North End (In-Game Map)
720 x 599
135 kB
Dalmasca Westersand
Galtea Downs (In-Game Map)
725 x 980
294 kB
The Midfault (In-Game Map)
725 x 1028
321 kB
Shimmering Horizons (In-Game Map)
725 x 1118
371 kB
Windtrace Dunes (In-Game Map)
725 x 1068
341 kB
The Western Divide (In-Game Map)
161 kB
Corridor Of Sand (In-Game Map)
725 x 1104
139 kB
Wyrm's Nest (In-Game Map)
725 x 624
41.7 kB
Dalmasca Estersands
The Stepping (In-Game Map)
725 x 1076
329 kB
Outpost (In-Game Map)
725 x 804
220 kB
Yardang Labyrinth (In-Game Map)
725 x 1120
137 kB
Sand-swept Naze (In-Game Map)
138 kB
Passage Entrance (In-Game Map)
174 kB
Banks Of The Nebra (In-Game Map)
Murmuring Defile (In-Game Map)
725 x 622
South Bank Village (In-Game Map)
725 x 720
62.5 kB
North Bank Village (In-Game Map)
163 kB
The Yoma (In-Game Map)
725 x 1208
395 kB
Broken Sands (In-Game Map)
725 x 1300
Skyferry
Saloon (In-Game Map)
720 x 600
Observation Parlour (In-Game Map)
720 x 653
133 kB
Air Deck (In-Game Map)
720 x 756
201 kB
Lowtown
North Sprawl (In-Game Map)
725 x 832
240 kB
South Sprawl (In-Game Map)
725 x 786
215 kB
Giza Plains (Dry)
Throne Road (In-Game Map)
725 x 872
256 kB
Nomad Village (In-Game Map)
Gizas North Bank (In-Game Map)
725 x 927
285 kB
Gizas South Bank (In-Game Map)
725 x 840
234 kB
Crystal Glade (In-Game Map)
167 kB
Warrior's Wash (In-Game Map)
725 x 880
255 kB
Toam Hills (In-Game Map)
265 kB
Starfall Field (In-Game Map)
725 x 1103
356 kB
Giza Plains (Rain)
226 kB
725 x 698
725 x 828
243 kB
725 x 827
247 kB
725 x 606
143 kB
725 x 892
268 kB
725 x 936
112 kB
725 x 966
304 kB
Tracks Of The Beast (In-Game Map)
725 x 968
299 kB
Garamsythe Waterway
Waterway Sluice Controls (In-Game Map)
1200 x 1600
652 kB
Northern Sluiceway (In-Game Map)
253 kB
North Spur Sluiceway (In-Game Map)
725 x 963
297 kB
East Spur Stairs (In-Game Map)
East Waterway Control (In-Game Map)
725 x 792
78.7 kB
No. 11 Channel (Not Drained) (In-Game Map)
725 x 851
249 kB
East Sluice Control (In-Game Map)
725 x 603
136 kB
Southern Sluiceway (In-Game Map)
725 x 695
195 kB
West Sluice Control (In-Game Map)
725 x 696
No. 10 Channel (Not Drained) (In-Game Map)
725 x 756
211 kB
No. 11 Channel (Drained) (In-Game Map)
725 x 847
No. 10 Channel (Drained) (In-Game Map)
95.5 kB
No. 3 Cloaca Spur (In-Game Map)
725 x 711
203 kB
No. 1 Cloaca (In-Game Map)
725 x 601
No. 4 Cloaca Spur (In-Game Map)
725 x 771
224 kB
Central Waterway Control (In-Game Map)
725 x 672
59.2 kB
Overflow Cloaca (In-Game Map)
725 x 612
Central Spur Stairs (In-Game Map)
169 kB
Royal Palace
Cellar Stores (In-Game Map)
720 x 594
111 kB
Cellars (In-Game Map)
720 x 829
Lower Halls (In-Game Map)
720 x 688
204 kB
The Garden Stairs (In-Game Map)
155 kB
Nalbina Dungeons
Arena (In-Game Map)
Stockade (In-Game Map)
725 x 744
The Confiscatory (In-Game Map)
The Black Watch (In-Game Map)
725 x 1016
382 kB
Barheim Passage
The Lightworks (In-Game Map)
Op Sector 29 (In-Game Map)
725 x 708
Great Eastern Passage (In-Game Map)
1452 x 953
361 kB
Op Sector 36 (In-Game Map)
187 kB
Special Op Sector 3 (In-Game Map)
725 x 714
Op Sector 37 (In-Game Map)
725 x 799
212 kB
North-South Junction (In-Game Map)
Great Central Passage (In-Game Map)
724 x 754
194 kB
The Zeviah Subterrane (In-Game Map)
725 x 984
300 kB
Terminus No. 4 Adjunct (In-Game Map)
Terminus No. 4 (In-Game Map)
Special Op Sector 5 (In-Game Map)
725 x 987
305 kB
East-West Bypass (In-Game Map)
725 x 906
The Zeviah Span (In-Game Map)
1440 x 960
West Annex (In-Game Map)
401 kB
Terminus No. 7 Adjunct (In-Game Map)
725 x 623
Terminus No. 7 (In-Game Map)
725 x 706
179 kB
Bhujerba
Aerodome (In-Game Map)
720 x 644
128 kB
Travica Way (In-Game Map)
720 x 646
149 kB
Rithil's Protectives - Armor Shop (In-Game Map)
723 x 647
40.0 kB
Targe's Arms - Weapon Shop (In-Game Map)
720 x 649
Mait's Magicks - Magick Shop (In-Game Map)
723 x 651
40.1 kB
Khus Skygrounds (In-Game Map)
720 x 647
Cloudborne Row (In-Game Map)
723 x 648
48.3 kB
The Cloudborne (In-Game Map)
The Staras Residence (In-Game Map)
720 x 692
Miner's End (In-Game Map)
146 kB
Bashketi's Gambits (In-Game Map)
720 x 645
134 kB
Clio's Technicks - Technick Shop (In-Game Map)
Lhusu Square (In-Game Map)
148 kB
Kaff Terrace (In-Game Map)
Lhusu Mines
Shaft Entry (In-Game Map)
725 x 878
260 kB
Oltam Span (In-Game Map)
Transitway 1 (In-Game Map)
725 x 742
Shunia Twinspan (In-Game Map)
173 kB
Site 2 (In-Game Map)
725 x 1010
318 kB
Site 3 (In-Game Map)
725 x 922
295 kB
Transitway 2 (In-Game Map)
166 kB
Tasche Span (In-Game Map)
725 x 608
132 kB
Site 9 (In-Game Map)
725 x 960
109 kB
Site 11 (In-Game Map)
Lasche Span (In-Game Map)
Site 5 (In-Game Map)
725 x 1236
467 kB
Site 6 South (In-Game Map)
281 kB
Site 6 North (In-Game Map)
725 x 647
54.1 kB
Staging Area (In-Game Map)
131 kB
Site 7 (In-Game Map)
725 x 690
165 kB
Dreadnought Leviathan
Port Launch (In-Game Map)
Port Section (In-Game Map)
725 x 741
Large Freight Stores (In-Game Map)
273 kB
Airship Berth Access (In-Game Map)
Central Brig Access (In-Game Map)
180 kB
Brig No. 1 (In-Game Map)
Starboard Section (In-Game Map)
725 x 874
282 kB
Sub-control Room (In-Game Map)
725 x 789
Ogir-Yensa Sandsea
Platform 1 - East Tanks (In-Game Map)
725 x 890
Platform 1 - Refinery (In-Game Map)
725 x 1056
358 kB
East Junction (In-Game Map)
725 x 1012
328 kB
Primary Tank Complex (In-Game Map)
725 x 924
Central Junction (In-Game Map)
725 x 964
312 kB
Platform 2 - Refinery (In-Game Map)
362 kB
Platform 1 - South Tanks (In-Game Map)
245 kB
South Tank Approach (In-Game Map)
Yensa Border Tunnel (In-Game Map)
162 kB
Nam-Yensa Sandsea
The Sandscale Bank (In-Game Map)
The Urutan-Yensa Sea (In-Game Map)
725 x 876
252 kB
Withering Shores (In-Game Map)
725 x 940
303 kB
Augur Hill (In-Game Map)
725 x 970
Yellow Sands (In-Game Map)
725 x 1014
332 kB
Demesne Of The Sandqueen (In-Game Map)
335 kB
Trail Of Fading Warmth (In-Game Map)
725 x 604
Simoon Bluff (In-Game Map)
365 kB
The Tomb Of Raithwall
Valley Of The Dead (In-Game Map)
Hall Of The Destroyer (In-Game Map)
Hall Of The Sentinel (In-Game Map)
Royal Passage (In-Game Map)
720 x 870
280 kB
Northfall Passage (In-Game Map)
720 x 871
266 kB
Southfall Passage (In-Game Map)
720 x 962
322 kB
Cloister Of Flame (In-Game Map)
720 x 780
Chamber Of First Light (In-Game Map)
Ozmone Plain
Field Of Fallen Wings (In-Game Map)
725 x 962
298 kB
Dagan Flats (In-Game Map)
259 kB
The Switchback (In-Game Map)
Haulo Green (In-Game Map)
725 x 1134
375 kB
The Greensnake (In-Game Map)
Field Of Light Winds (In-Game Map)
725 x 654
Sunlit Path (In-Game Map)
153 kB
The Shred (In-Game Map)
725 x 1102
Zertinian Caverns
Invitation To Heresy (In-Game Map)
720 x 1004
319 kB
Sandfalls (In-Game Map)
720 x 827
Hourglass Basin (In-Game Map)
720 x 872
Halls Of Ardent Darkness (In-Game Map)
720 x 825
233 kB
The Undershore (In-Game Map)
246 kB
Athroza Quicksands (In-Game Map)
The Balamka Fault (In-Game Map)
720 x 959
Drybeam Cavern (In-Game Map)
Darkened Wharf (In-Game Map)
Canopy Of Clay (In-Game Map)
Jahara
Banks Of The Sogoht (In-Game Map)
Lull Of The Land (In-Game Map)
725 x 602
The Elderknoll (In-Game Map)
725 x 650
Golmore Jungle
Paths Of Chained Light (In-Game Map)
94.4 kB
The Needlebrake (In-Game Map)
725 x 918
289 kB
Whisperleaf Way (In-Game Map)
The Parting Glade (In-Game Map)
Dell Of The Dreamer (In-Game Map)
130 kB
The Branchway (In-Game Map)
725 x 740
198 kB
The Greenswathe (In-Game Map)
725 x 694
The Rustling Chapel (In-Game Map)
725 x 848
Eruyt Village
Road Of Verdant Praise (In-Game Map)
The Spiritwood (In-Game Map)
177 kB
Fane Of The Path (In-Game Map)
Henne Mines
North Entrance (In-Game Map)
Pithead Junction A (In-Game Map)
Phase 1 Shaft (In-Game Map)
725 x 653
46.3 kB
Phase 1 Dig (In-Game Map)
725 x 1194
406 kB
Crossover A (In-Game Map)
725 x 734
200 kB
Pithead Junction B (In-Game Map)
725 x 616
Crossover B (In-Game Map)
168 kB
Staging Shaft (In-Game Map)
Ore Separation (In-Game Map)
Phase 2 Dig (In-Game Map)
725 x 1325
Crossover C (In-Game Map)
725 x 978
Pithead Junction C (In-Game Map)
Phase 2 Shaft (In-Game Map)
291 kB
Special Charter Shaft (In-Game Map)
725 x 1284
480 kB
Special Charter Dig (In-Game Map)
Mt. Bur-Omisace
Sand-strewn Pass (In-Game Map)
Temple Approach (In-Game Map)
Temple Grounds (In-Game Map)
Hall Of The Light (In-Game Map)
157 kB
Paramina Rift
Fading Vale (In-Game Map)
Head Of The Silverflow (In-Game Map)
323 kB
Freezing Gorge (In-Game Map)
219 kB
Frozen Brook (In-Game Map)
Path Of The Firstfall (In-Game Map)
142 kB
Spine Of The Icewyrm (In-Game Map)
Silverflow's End (In-Game Map)
725 x 1098
357 kB
Karydine Glacier (In-Game Map)
385 kB
Icebound Flow (In-Game Map)
290 kB
Stilshrine Of Miriam
Walk Of Sky (In-Game Map)
720 x 690
199 kB
Walk Of Mind (In-Game Map)
720 x 596
Ward Of Measure (In-Game Map)
Ward Of Velitation (In-Game Map)
720 x 736
Walk Of Torn Illusion (In-Game Map)
Cold Distance (In-Game Map)
720 x 689
Walk Of Prescience (In-Game Map)
720 x 597
141 kB
Walk Of Reason (In-Game Map)
720 x 1007
Ward Of Steel (In-Game Map)
720 x 648
Walk Of Revelation (In-Game Map)
125 kB
Ward Of The Sword-King (In-Game Map)
720 x 662
164 kB
Hall Of Worth (In-Game Map)
Vault Of The Champion (In-Game Map)
Throne Of Veiled Gods (In-Game Map)
720 x 598
119 kB
Nalbina Town
West Barbican (In-Game Map)
Jajim Bazaar (In-Game Map)
West Ward (In-Game Map)
Mosphoran Highwaste
Southern Skirts (In-Game Map)
Summit Path (In-Game Map)
Empyrean Way (In-Game Map)
Rays Of Ashen Light (In-Game Map)
Babbling Vale (In-Game Map)
725 x 824
Trail Of Sky-flung Stone (In-Game Map)
725 x 834
Northern Skirts (In-Game Map)
317 kB
Halny Crossing (In-Game Map)
Skyreach Ridge (In-Game Map)
Empyrean Seat (In-Game Map)
The Salikawood
The Omen-Spur (In-Game Map)
Path Of Hours (In-Game Map)
Trunkwall Road (In-Game Map)
720 x 963
Diverging Way (In-Game Map)
720 x 1098
367 kB
Living Chasm (In-Game Map)
Sun-dappled Path (In-Game Map)
720 x 826
238 kB
Garden Of Decay (In-Game Map)
239 kB
Quietened Trace (In-Game Map)
Grand Bower (In-Game Map)
720 x 782
Corridor Of Ages (In-Game Map)
720 x 966
301 kB
Piebald Path (In-Game Map)
217 kB
Nabreus Dreadlands
Green Crag (In-Game Map)
The Muted Scarp (In-Game Map)
Vale Of Lingering Sorrow (In-Game Map)
725 x 784
210 kB
Hope's Reach (In-Game Map)
152 kB
Echoes Of The Past (In-Game Map)
725 x 888
94.5 kB
The Slumbermead (In-Game Map)
725 x 1148
391 kB
The Fog Mutters (In-Game Map)
Overlooking Eternity (In-Game Map)
725 x 648
147 kB
Succor Midst Sorrow (In-Game Map)
Lifeless Strand (In-Game Map)
326 kB
Field Of The Fallen Lord (In-Game Map)
262 kB
Necrohol Of Nabudis
Hall Of Slumbering Might (In-Game Map)
342 kB
Hall Of The Ivory Covenant (In-Game Map)
725 x 1154
405 kB
Cloister Of Reason (In-Game Map)
Cloister Of The Highborn (In-Game Map)
483 kB
Cloister Of Distant Song (In-Game Map)
396 kB
Cloister Of Solace (In-Game Map)
Hall Of Effulgent Light (In-Game Map)
725 x 1013
349 kB
The Crucible (In-Game Map)
Phon Coast
Kaukula Pass (In-Game Map)
The Reseta Strand (In-Game Map)
720 x 1011
320 kB
The Mauleia Strand (In-Game Map)
720 x 1056
354 kB
Pora-Pora Sands (In-Game Map)
720 x 1010
Cape Uahuk (In-Game Map)
720 x 970
Cape Tialan (In-Game Map)
720 x 965
302 kB
The Hakawea Shore (In-Game Map)
369 kB
Hunter's Camp (In-Game Map)
720 x 601
The Vaddu Strand (In-Game Map)
720 x 1399
Caima Hills (In-Game Map)
720 x 1057
348 kB
Limatra Hills (In-Game Map)
720 x 1058
336 kB
Rava's Pass (In-Game Map)
Tchita Uplands
Realm Of The Elder Dream (In-Game Map)
720 x 1005
The Skytrail (In-Game Map)
The Chosen Path (In-Game Map)
Oliphzak Rise (In-Game Map)
720 x 1053
The Nameless Spring (In-Game Map)
Garden Of Life's Circle (In-Game Map)
327 kB
The Highlands (In-Game Map)
364 kB
Fields Of Eternity (In-Game Map)
Sundered Earth (In-Game Map)
720 x 1099
373 kB
The Lost Way (In-Game Map)
720 x 1051
352 kB
Uazcuff Hills (In-Game Map)
720 x 1097
The Shaded Path (In-Game Map)
Sochen Cave Palace
Doubt Abandoned (In-Game Map)
720 x 1061
337 kB
Hall Of Lambent Darkness (In-Game Map)
The Acolyte's Burden (In-Game Map)
Mirror Of The Soul (In-Game Map)
Falls Of Time (In-Game Map)
720 x 918
307 kB
Destiny's March (In-Game Map)
720 x 993
Pilgrim's Path & Ascetic's Path (In-Game Map)
Hall Of Shadowlight (In-Game Map)
720 x 781
Temptation Eluded (In-Game Map)
720 x 858
251 kB
Hall Of The Wroth God (In-Game Map)
720 x 783
Chamber Of The Chosen (In-Game Map)
Skybent Chamber (In-Game Map)
Old Archades
Alley Of Low Whispers (In-Game Map)
725 x 1100
Alley Of Muted Sighs (In-Game Map)
Archades
Trant (In-Game Map)
Rienna (In-Game Map)
Molberry (In-Game Map)
Nibasse (In-Game Map)
Tsenoble (In-Game Map)
Grand Arcade (In-Game Map)
725 x 644
Highgarden Terrace (In-Game Map)
158 kB
Draklor Laboratory
66th Floor (In-Game Map)
67th Floor (In-Game Map)
725 x 715
68th Floor (In-Game Map)
725 x 758
205 kB
70th Floor (In-Game Map)
Energy Transitarium (In-Game Map)
47.7 kB
Balfonheim Port
Saccio Lane (In-Game Map)
720 x 616
Quayside Court (In-Game Map)
720 x 617
Canal Lane (In-Game Map)
720 x 695
Gallerina Marketplace (In-Game Map)
Chivany Breakwater (In-Game Map)
720 x 620
Sea Breeze Lane (In-Game Map)
720 x 739
197 kB
Cerobi Steppe
Windmill Locations (In-Game Map)
South Liavell Hills (In-Game Map)
725 x 1256
430 kB
North Liavell Hills (In-Game Map)
725 x 1162
388 kB
The Terraced Bank (In-Game Map)
725 x 1210
411 kB
Feddik River (In-Game Map)
725 x 1302
439 kB
Journey's Rest (In-Game Map)
The Northsward (In-Game Map)
725 x 1296
Crossfield (In-Game Map)
725 x 1248
427 kB
Old Elanise Road (In-Game Map)
725 x 1338
The Feywood
Walk Of Flitting Rifts (In-Game Map)
720 x 1054
Walk Of Stolen Truths (In-Game Map)
720 x 1074
Walk Of Dancing Shadow (In-Game Map)
376 kB
Antiquity's End (In-Game Map)
Redolent Glade (In-Game Map)
White Magick's Embrace (In-Game Map)
720 x 1060
Ice Field Of Clearsight (In-Game Map)
720 x 1157
399 kB
The Edge Of Reason (In-Game Map)
720 x 1096
374 kB
Giruvegan
Gate Of Earth (In-Game Map)
Gate Of Water (In-Game Map)
The Trimahla Water-Steps (In-Game Map)
725 x 884
91.5 kB
The Aadha Water-Steps (In-Game Map)
69.8 kB
The Haalmikah Water-Steps (In-Game Map)
699 x 601
Gate Of Fire (In-Game Map)
725 x 808
73.0 kB
Gate Of Wind (In-Game Map)
725 x 705
The Great Crystal
Overview - 1 (In-Game Map)
Overview - 2 (In-Game Map)
1 (In-Game Map)
720 x 828
241 kB
2 (In-Game Map)
3 (In-Game Map)
4 (In-Game Map)
720 x 976
5 (In-Game Map)
720 x 1574
600 kB
6 (In-Game Map)
7 (In-Game Map)
720 x 1152
267 kB
8 (In-Game Map)
720 x 674
Ridorana Cataract
Footfalls Of The Past (In-Game Map)
Echoes From Time's Garden (In-Game Map)
Colosseum (In-Game Map)
City Of Other Days (In-Game Map)
Path Of Hidden Blessing (In-Game Map)
Pharos - First Ascent
They Who Thirst Not (In-Game Map)
231 kB
The Wellspring (In-Game Map)
Wellspring Labyrinth (In-Game Map)
720 x 919
296 kB
Blackrock Vault (In-Game Map)
170 kB
Wellspring Ravel - 1st Flight (In-Game Map)
720 x 877
Wellspring Ravel - 2nd Flight (In-Game Map)
720 x 788
Wellspring Ravel - 3rd Flight (In-Game Map)
720 x 830
250 kB
Wellspring Ravel - 4th Flight (In-Game Map)
Horizon's Break (In-Game Map)
720 x 651
Horizon's Cusp (In-Game Map)
720 x 738
214 kB
Pharos - Second Ascent
The Reach (In-Game Map)
Station Of Banishment (In-Game Map)
720 x 1101
392 kB
Station Of Suffering (In-Game Map)
720 x 1062
340 kB
Station Of Ascension (In-Game Map)
720 x 1175
Reach Of The Damned (In-Game Map)
The Bounds Of Truth (In-Game Map)
720 x 737
Cleft Of Profaning Wind (In-Game Map)
720 x 786
Reach Of The Occult (In-Game Map)
Pharos - Third Ascent
Spire Ravel - 1st Flight / 2nd Flight (In-Game Map)
720 x 817
271 kB
Spire Ravel - 1st Flight (In-Game Map)
720 x 831
Spire Ravel - 2nd Flight (In-Game Map)
720 x 924
314 kB
Empyrean Ravel (In-Game Map)
720 x 784
223 kB
Pharos - Subterra
Penumbra - Interior (In-Game Map)
720 x 631
Penumbra - North (In-Game Map)
720 x 996
Penumbra - South (In-Game Map)
270 kB
Umbra - Interior (In-Game Map)
720 x 635
140 kB
Umbra - North (In-Game Map)
720 x 905
Umbra - South (In-Game Map)
720 x 1034
Abyssal - Interior (In-Game Map)
720 x 636
Abyssal - North (In-Game Map)
720 x 1182
419 kB
Abyssal - South (In-Game Map)
720 x 1133
393 kB
Hell's Challenge (In-Game Map)
Sky Fortress Bahamut (In-Game Map)
720 x 994
G
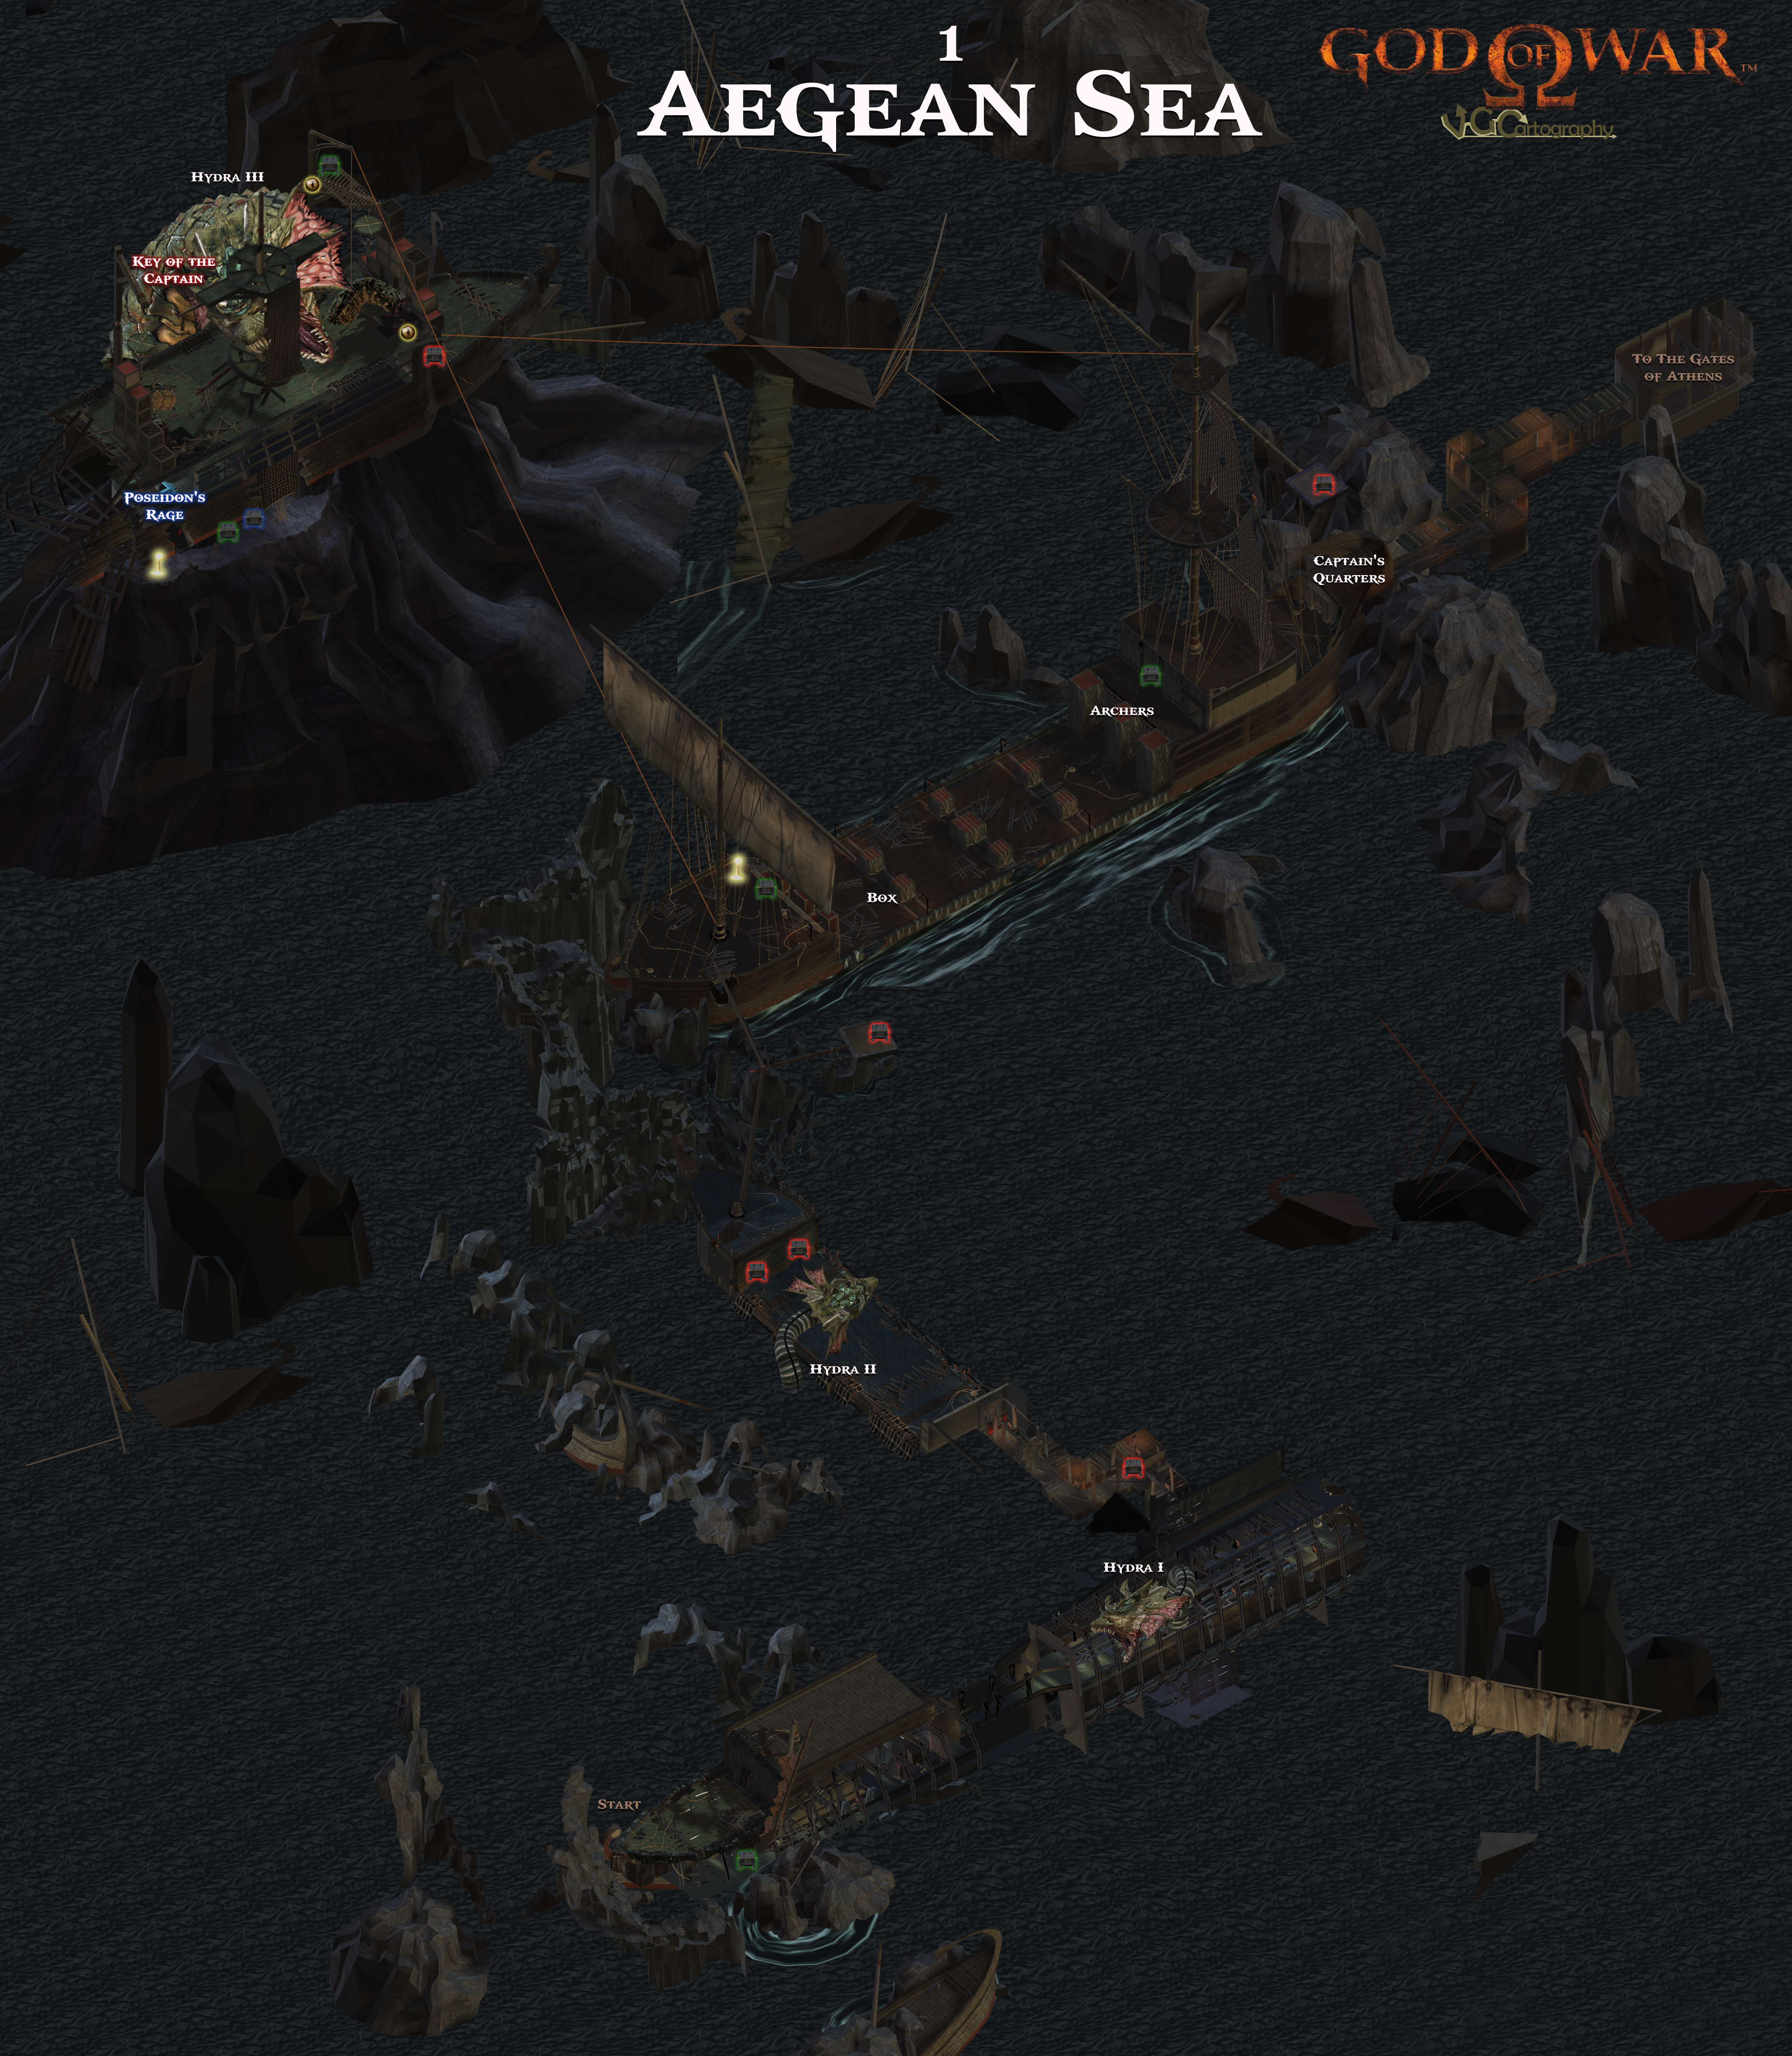
God Of War Maps
© 2005 Sony Computer Entertainment America
Maps Of The Month: November 2022 (VGCartography)
Aegean Sea
3843 x 4408
21.3 MB
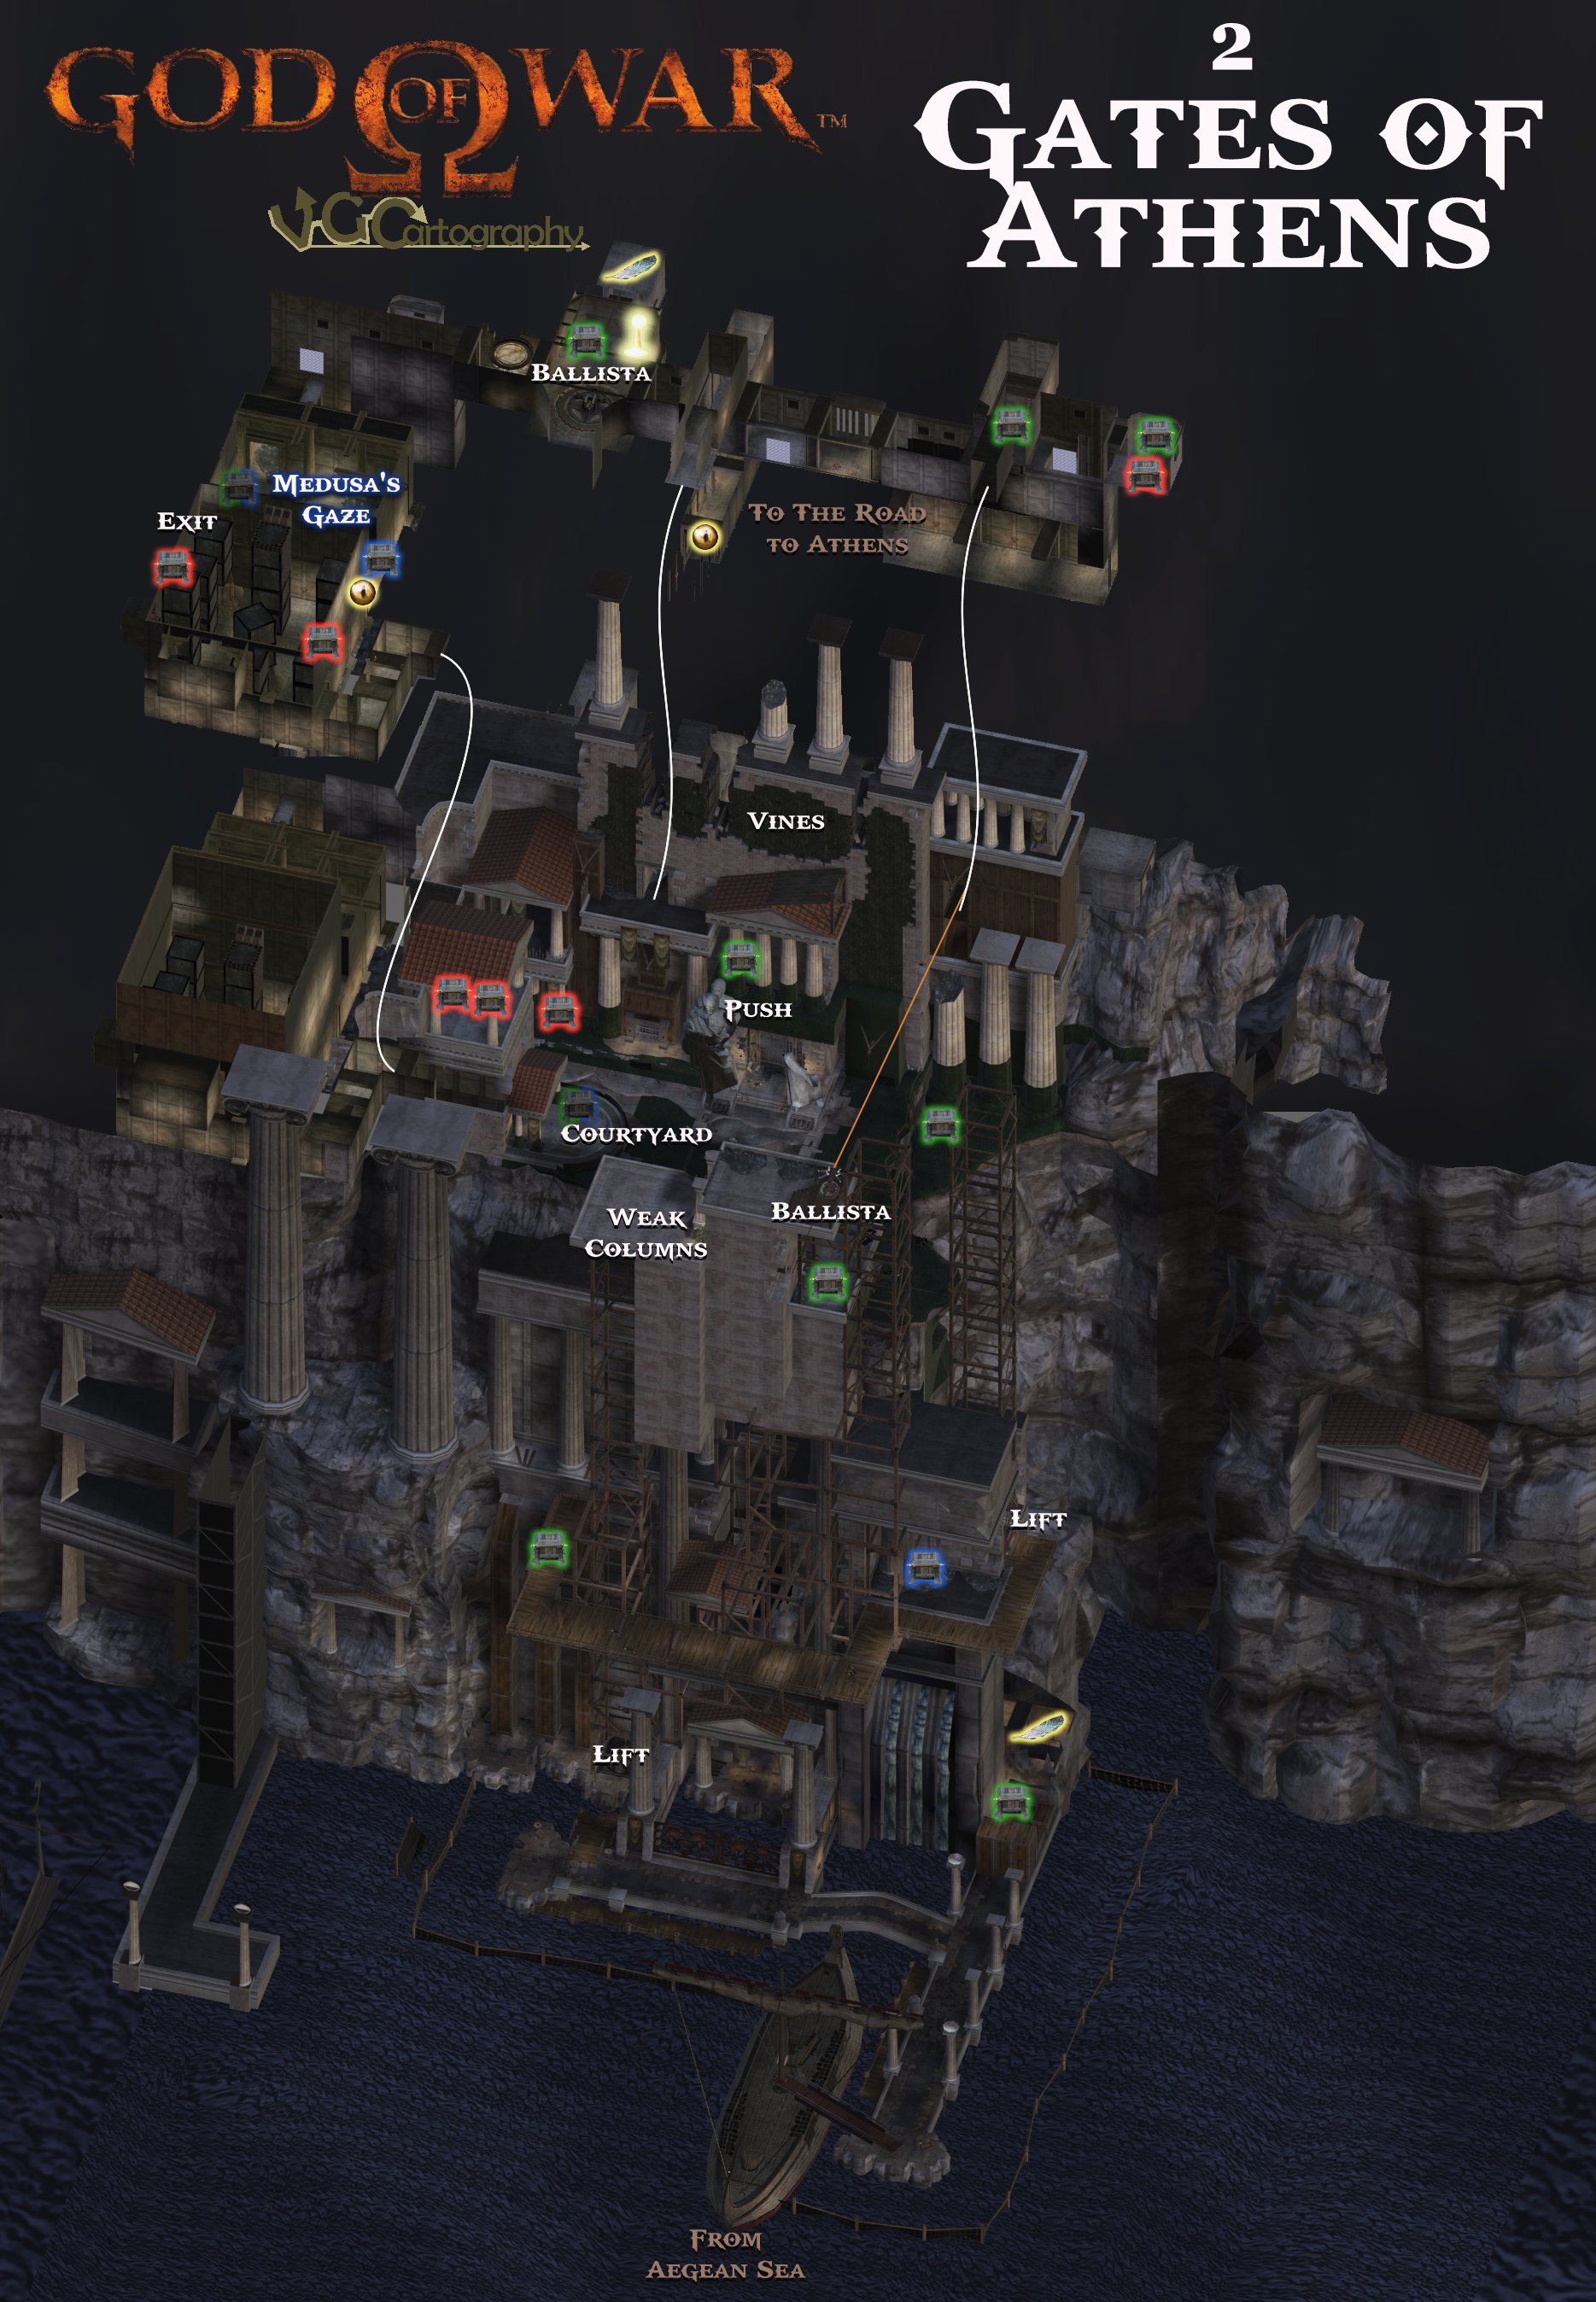
Gates Of Athens
1869 x 2696
5.43 MB
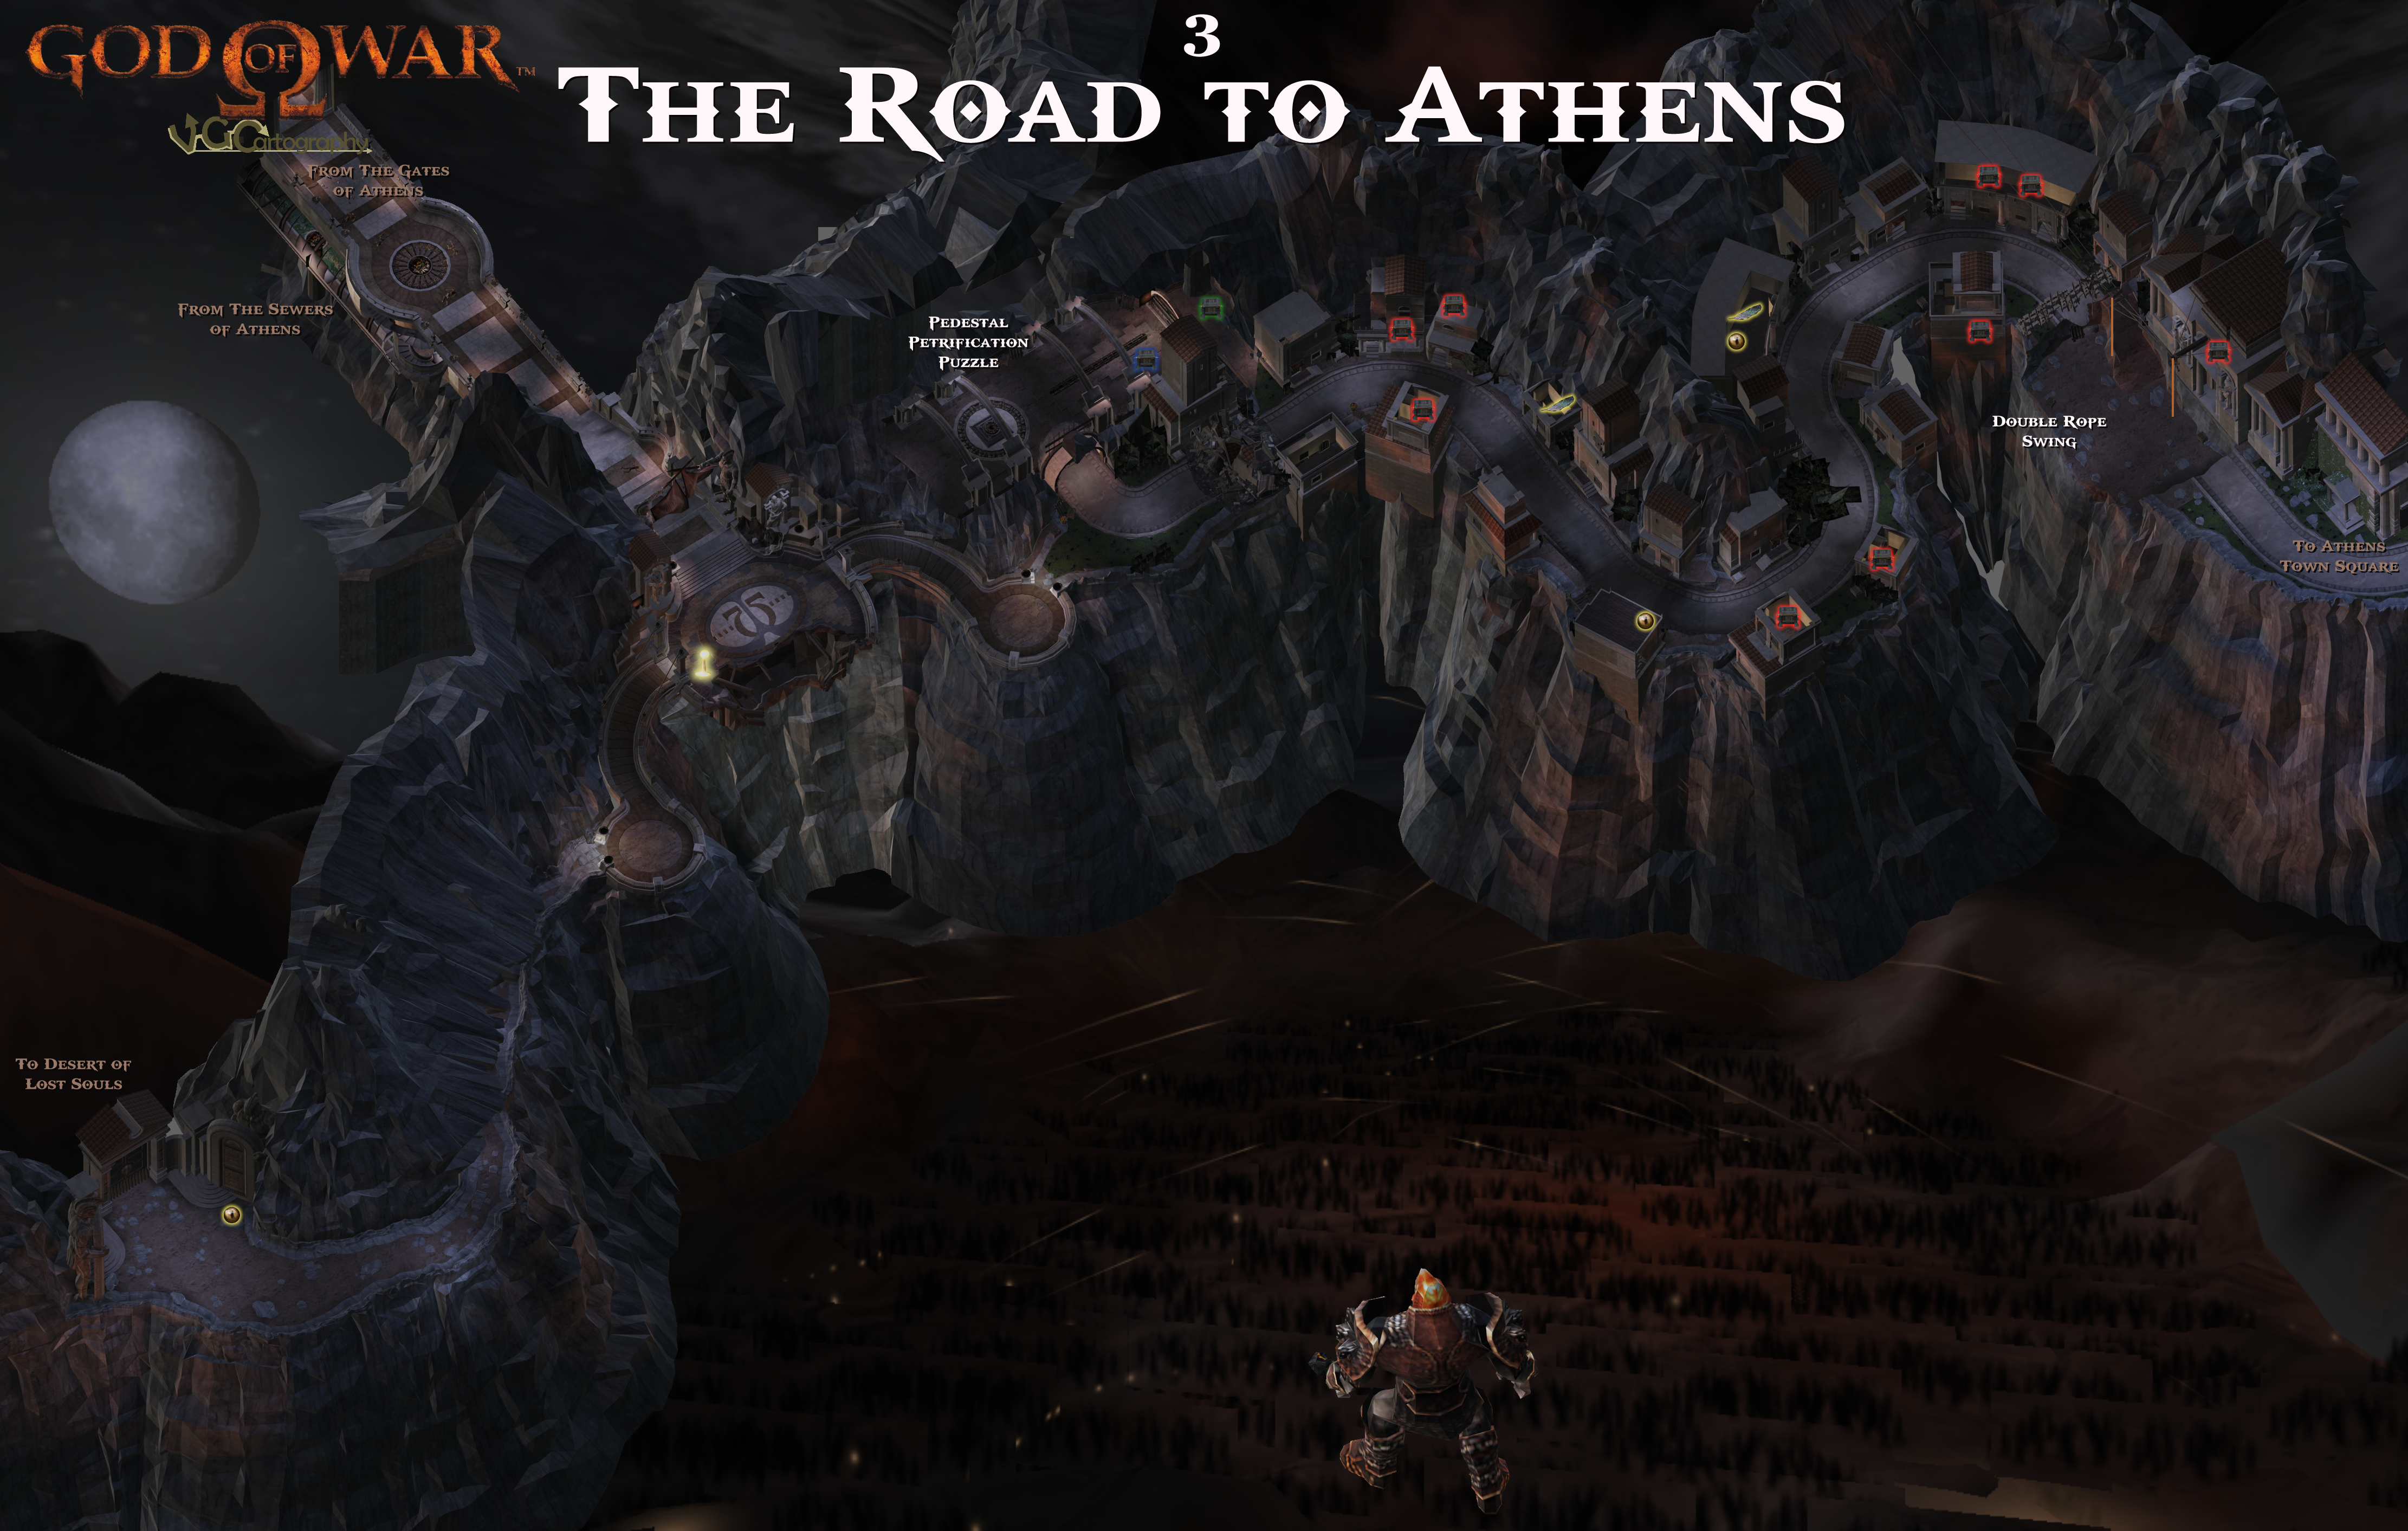
The Road To Athens
4444 x 2825
11.7 MB
Athens Town Square
2823 x 2825
5.33 MB
Rooftops Of Athens
2816 x 2053
4.49 MB
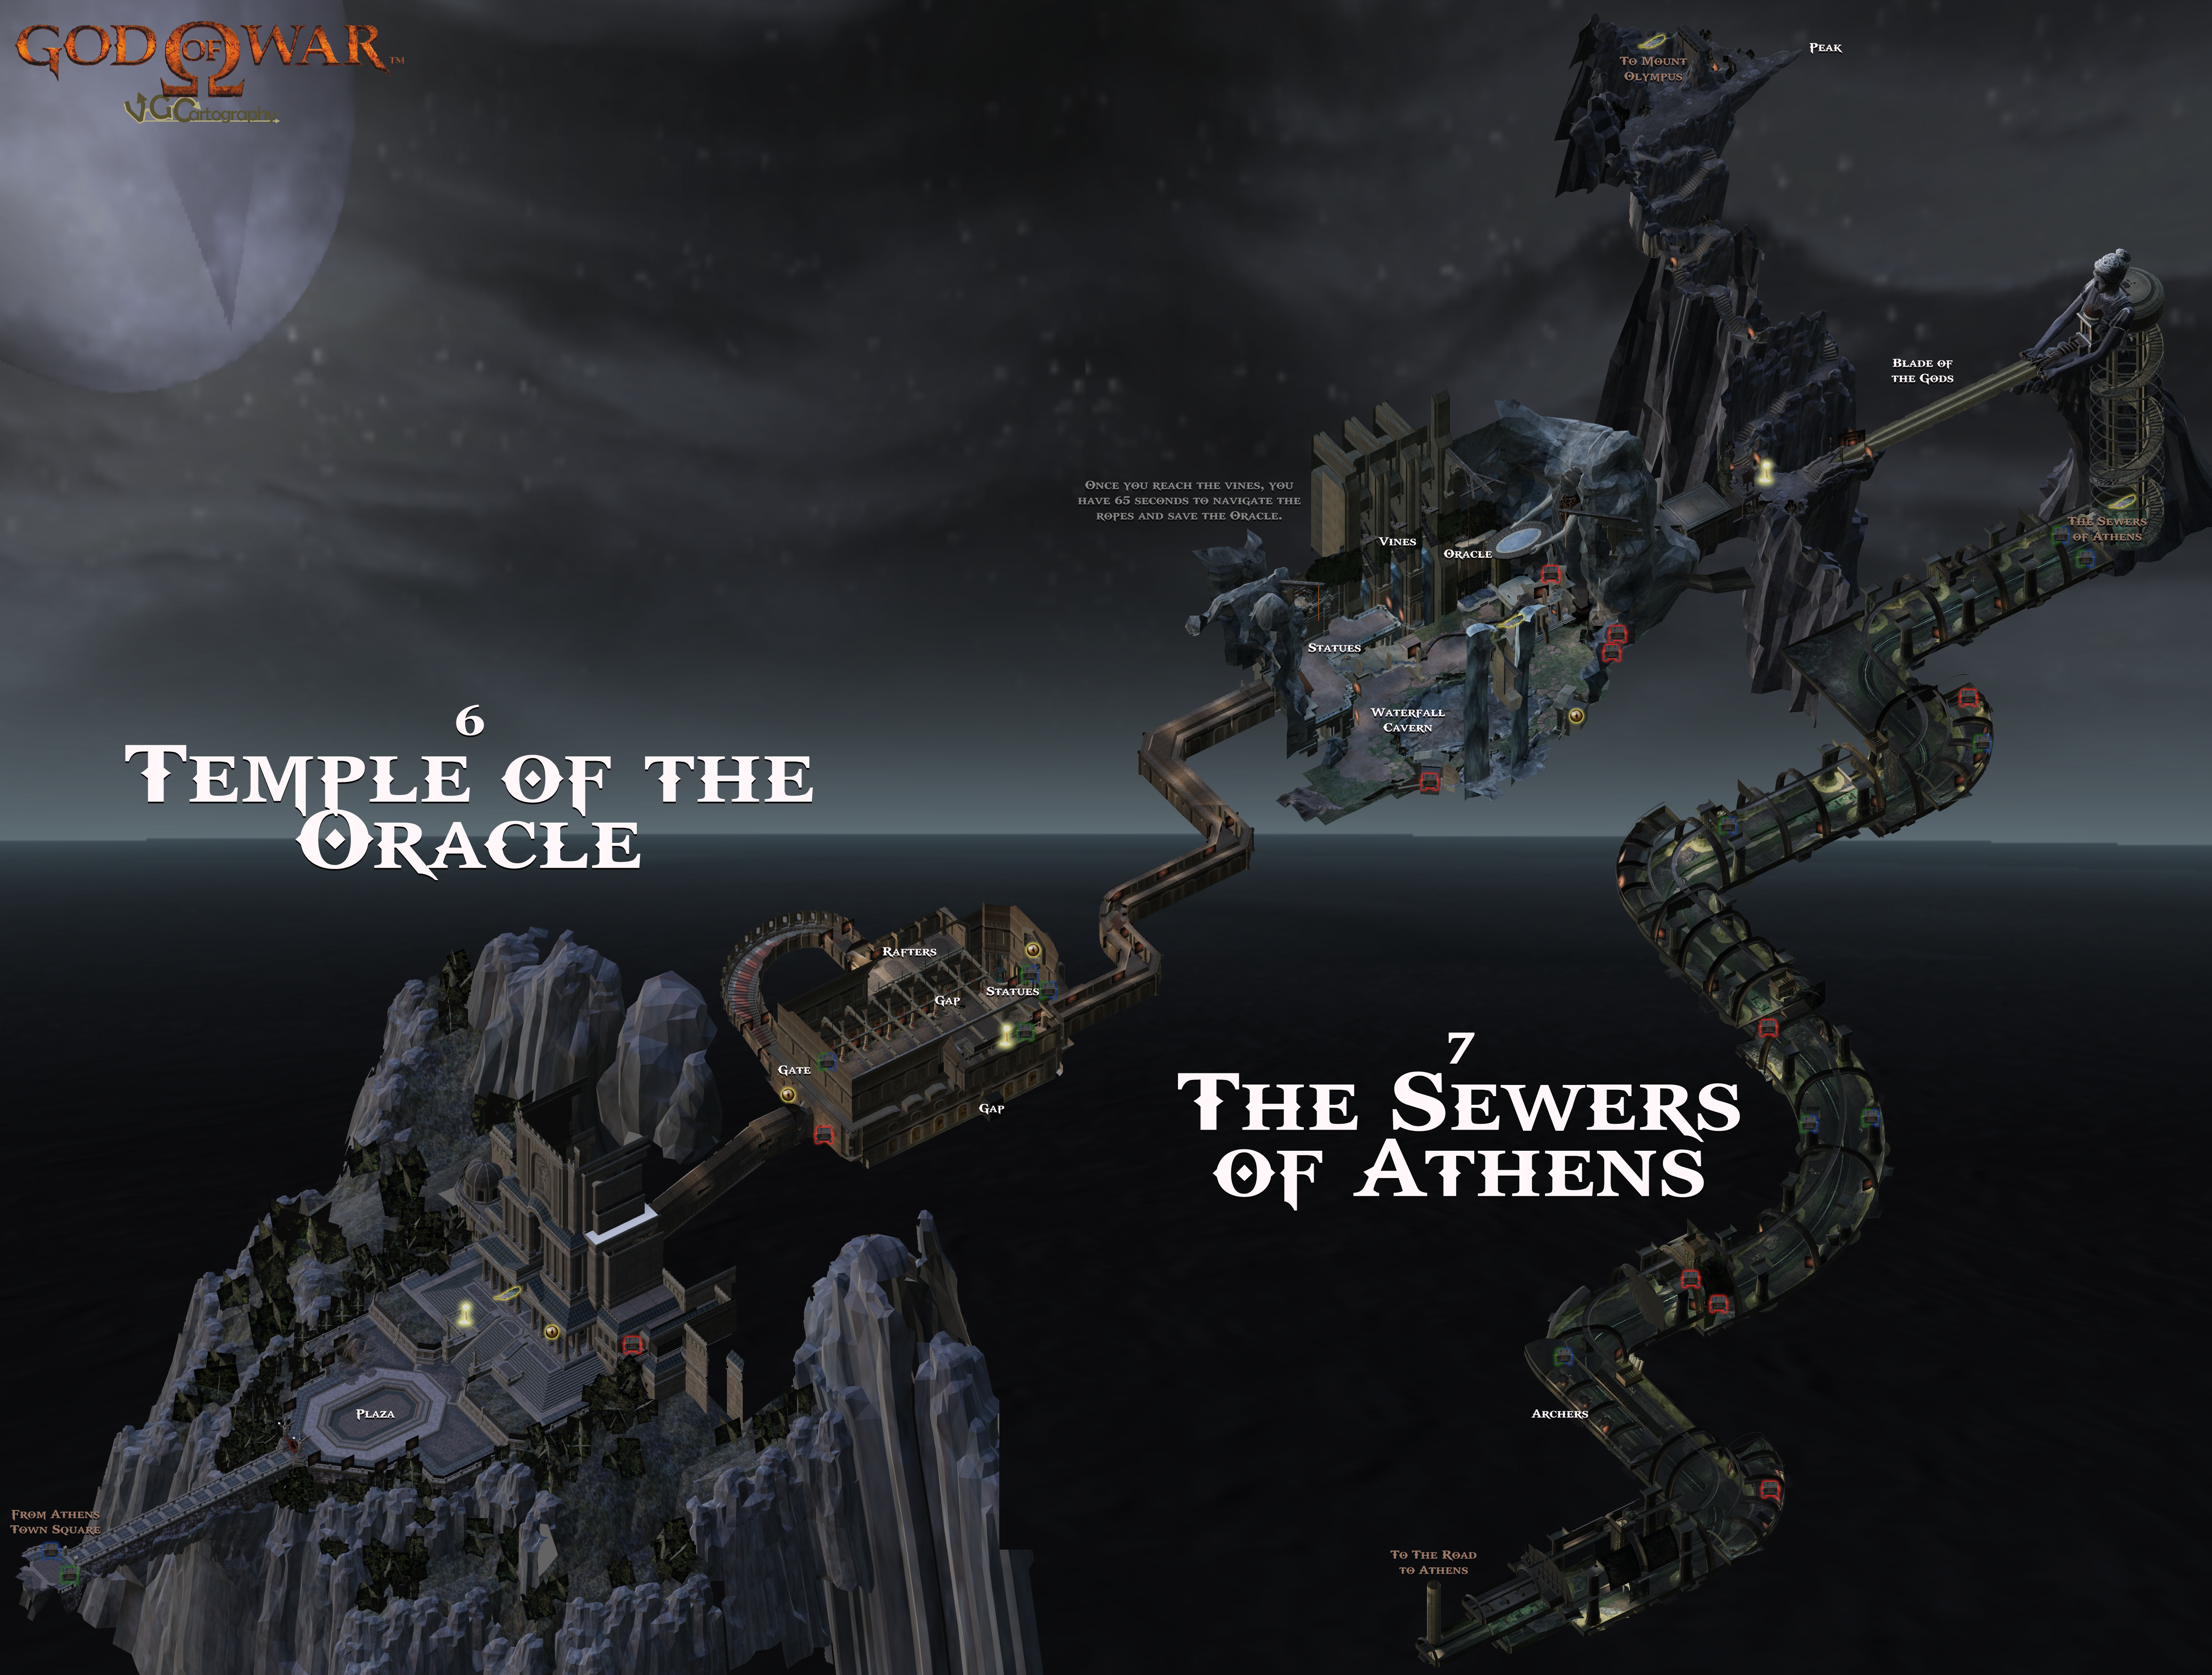
Temple Of The Oracle & The Sewers Of Athens
5346 x 4048
9.61 MB
Desert Of Lost Souls
4763 x 4703
11.6 MB
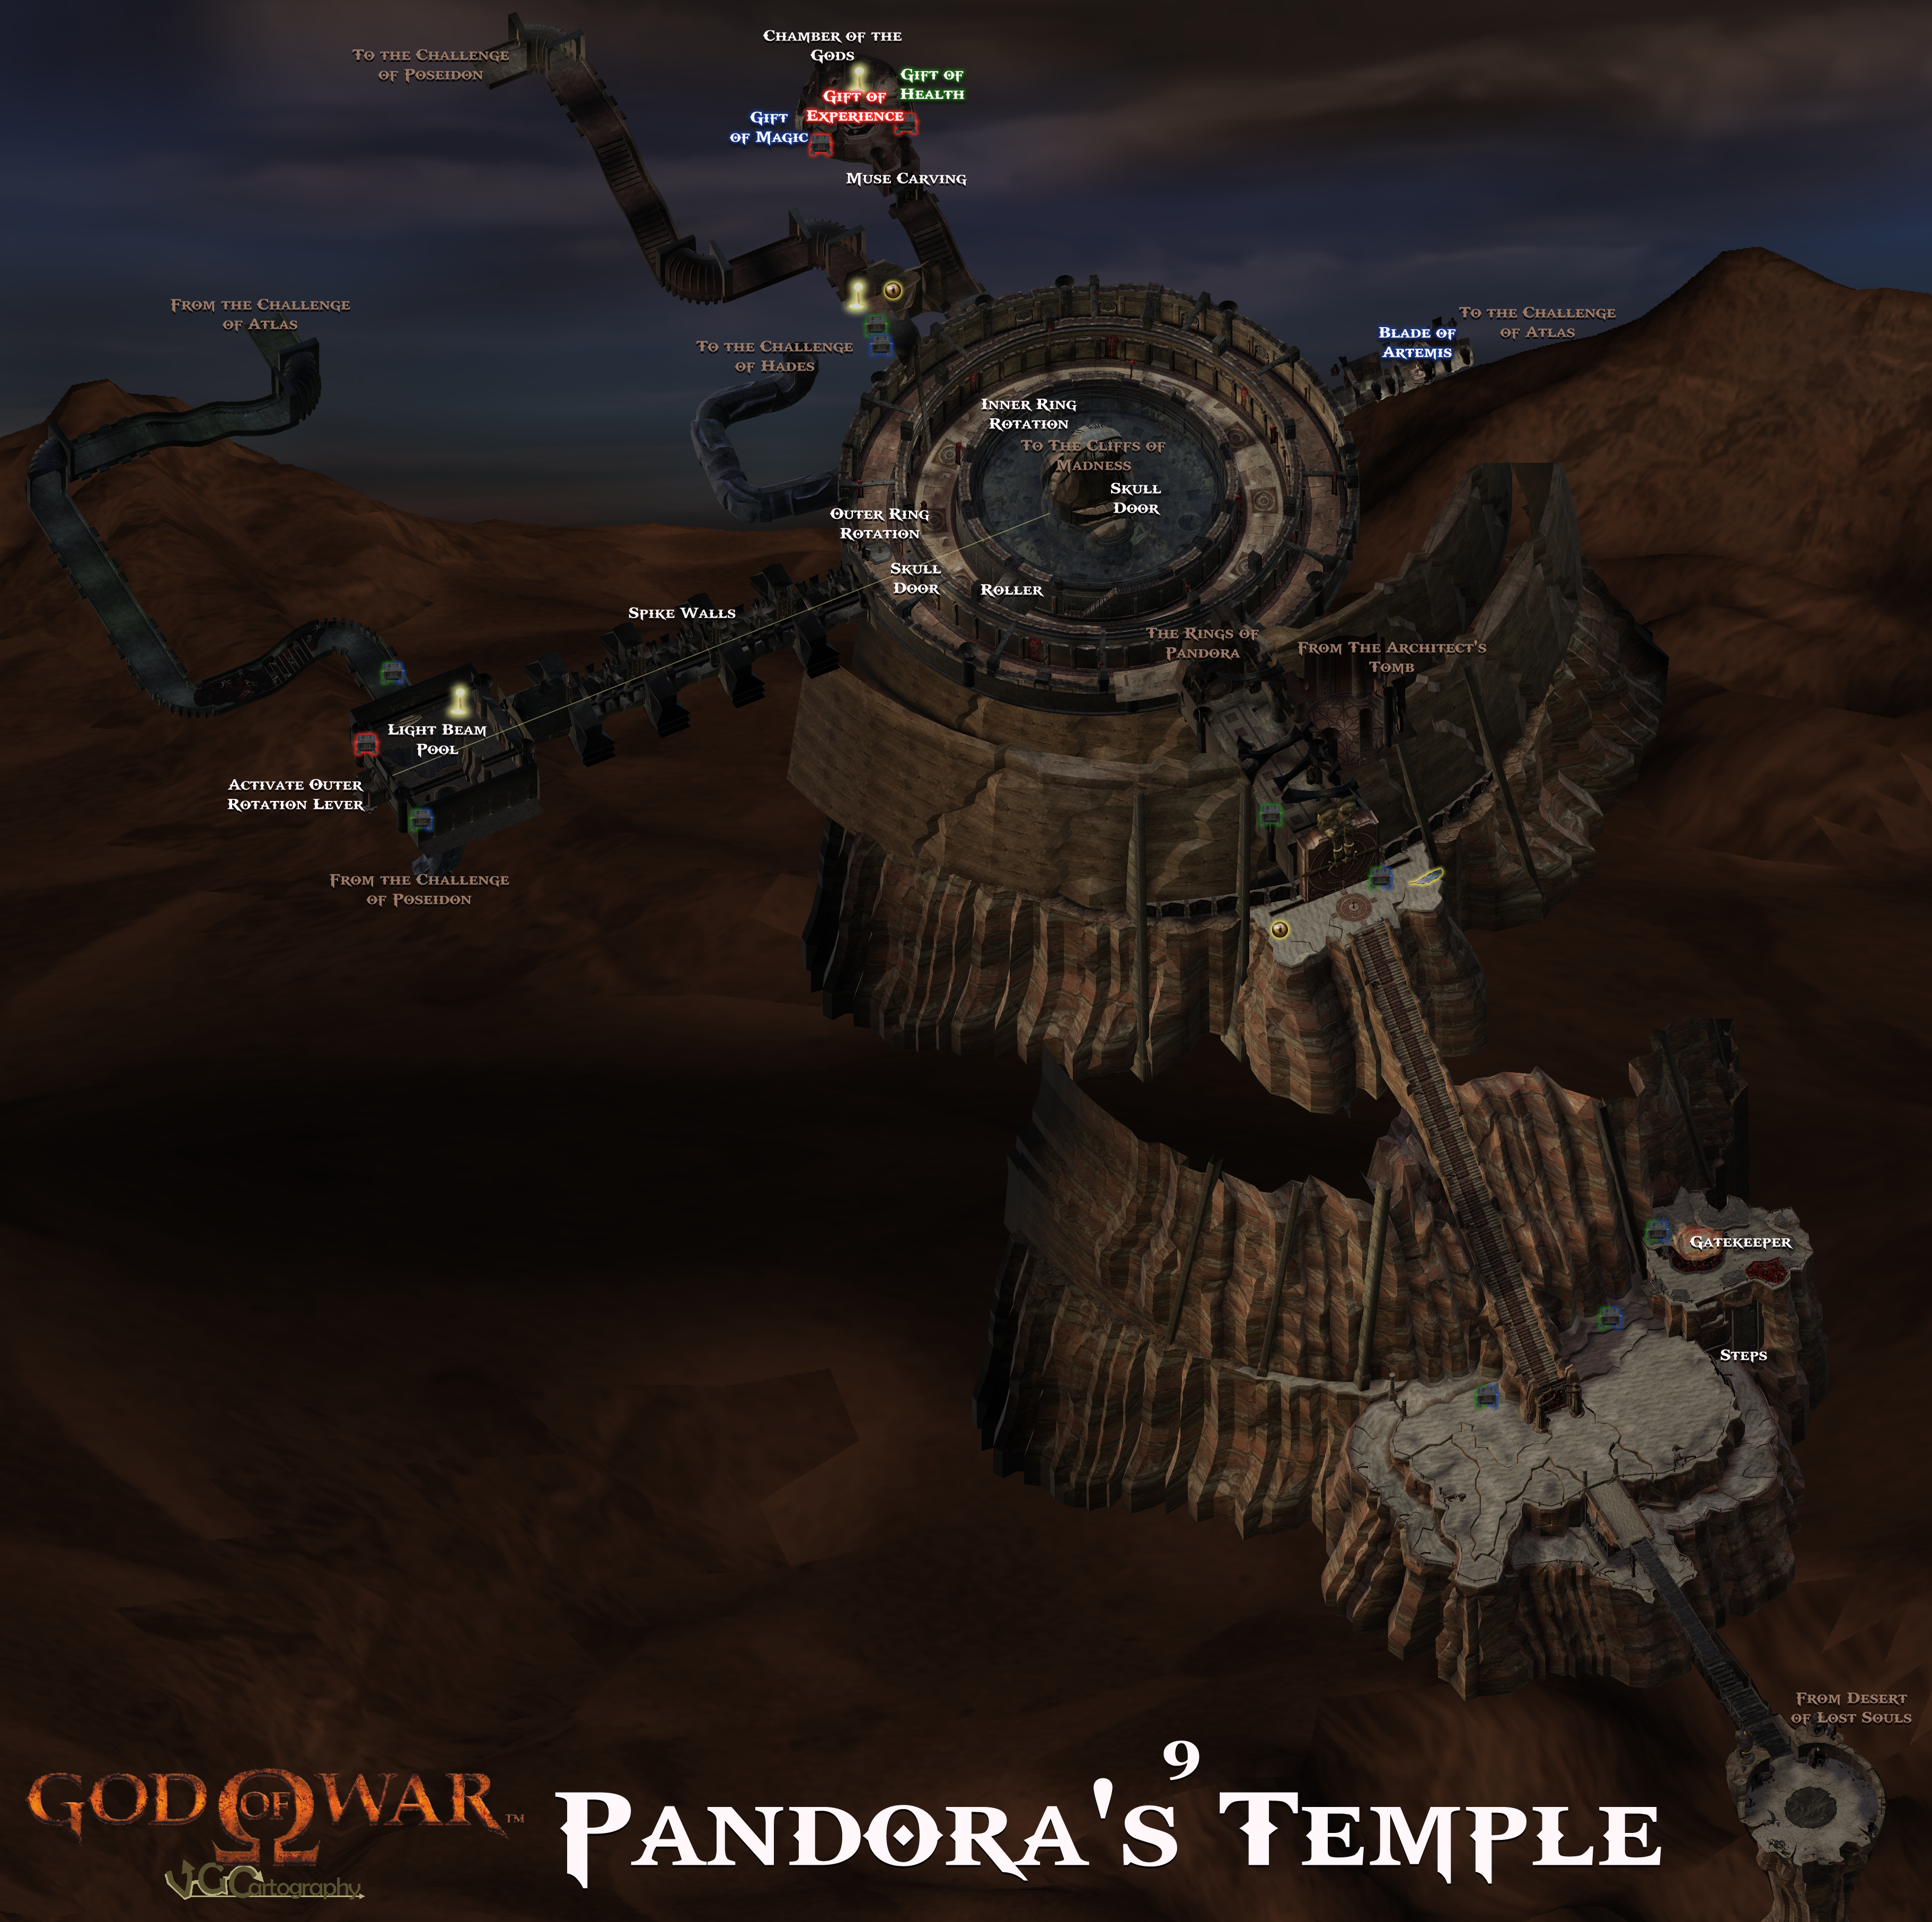
Pandora's Temple
Overview
5472 x 4026
6.95 MB
3645 x 3626
20.0 MB
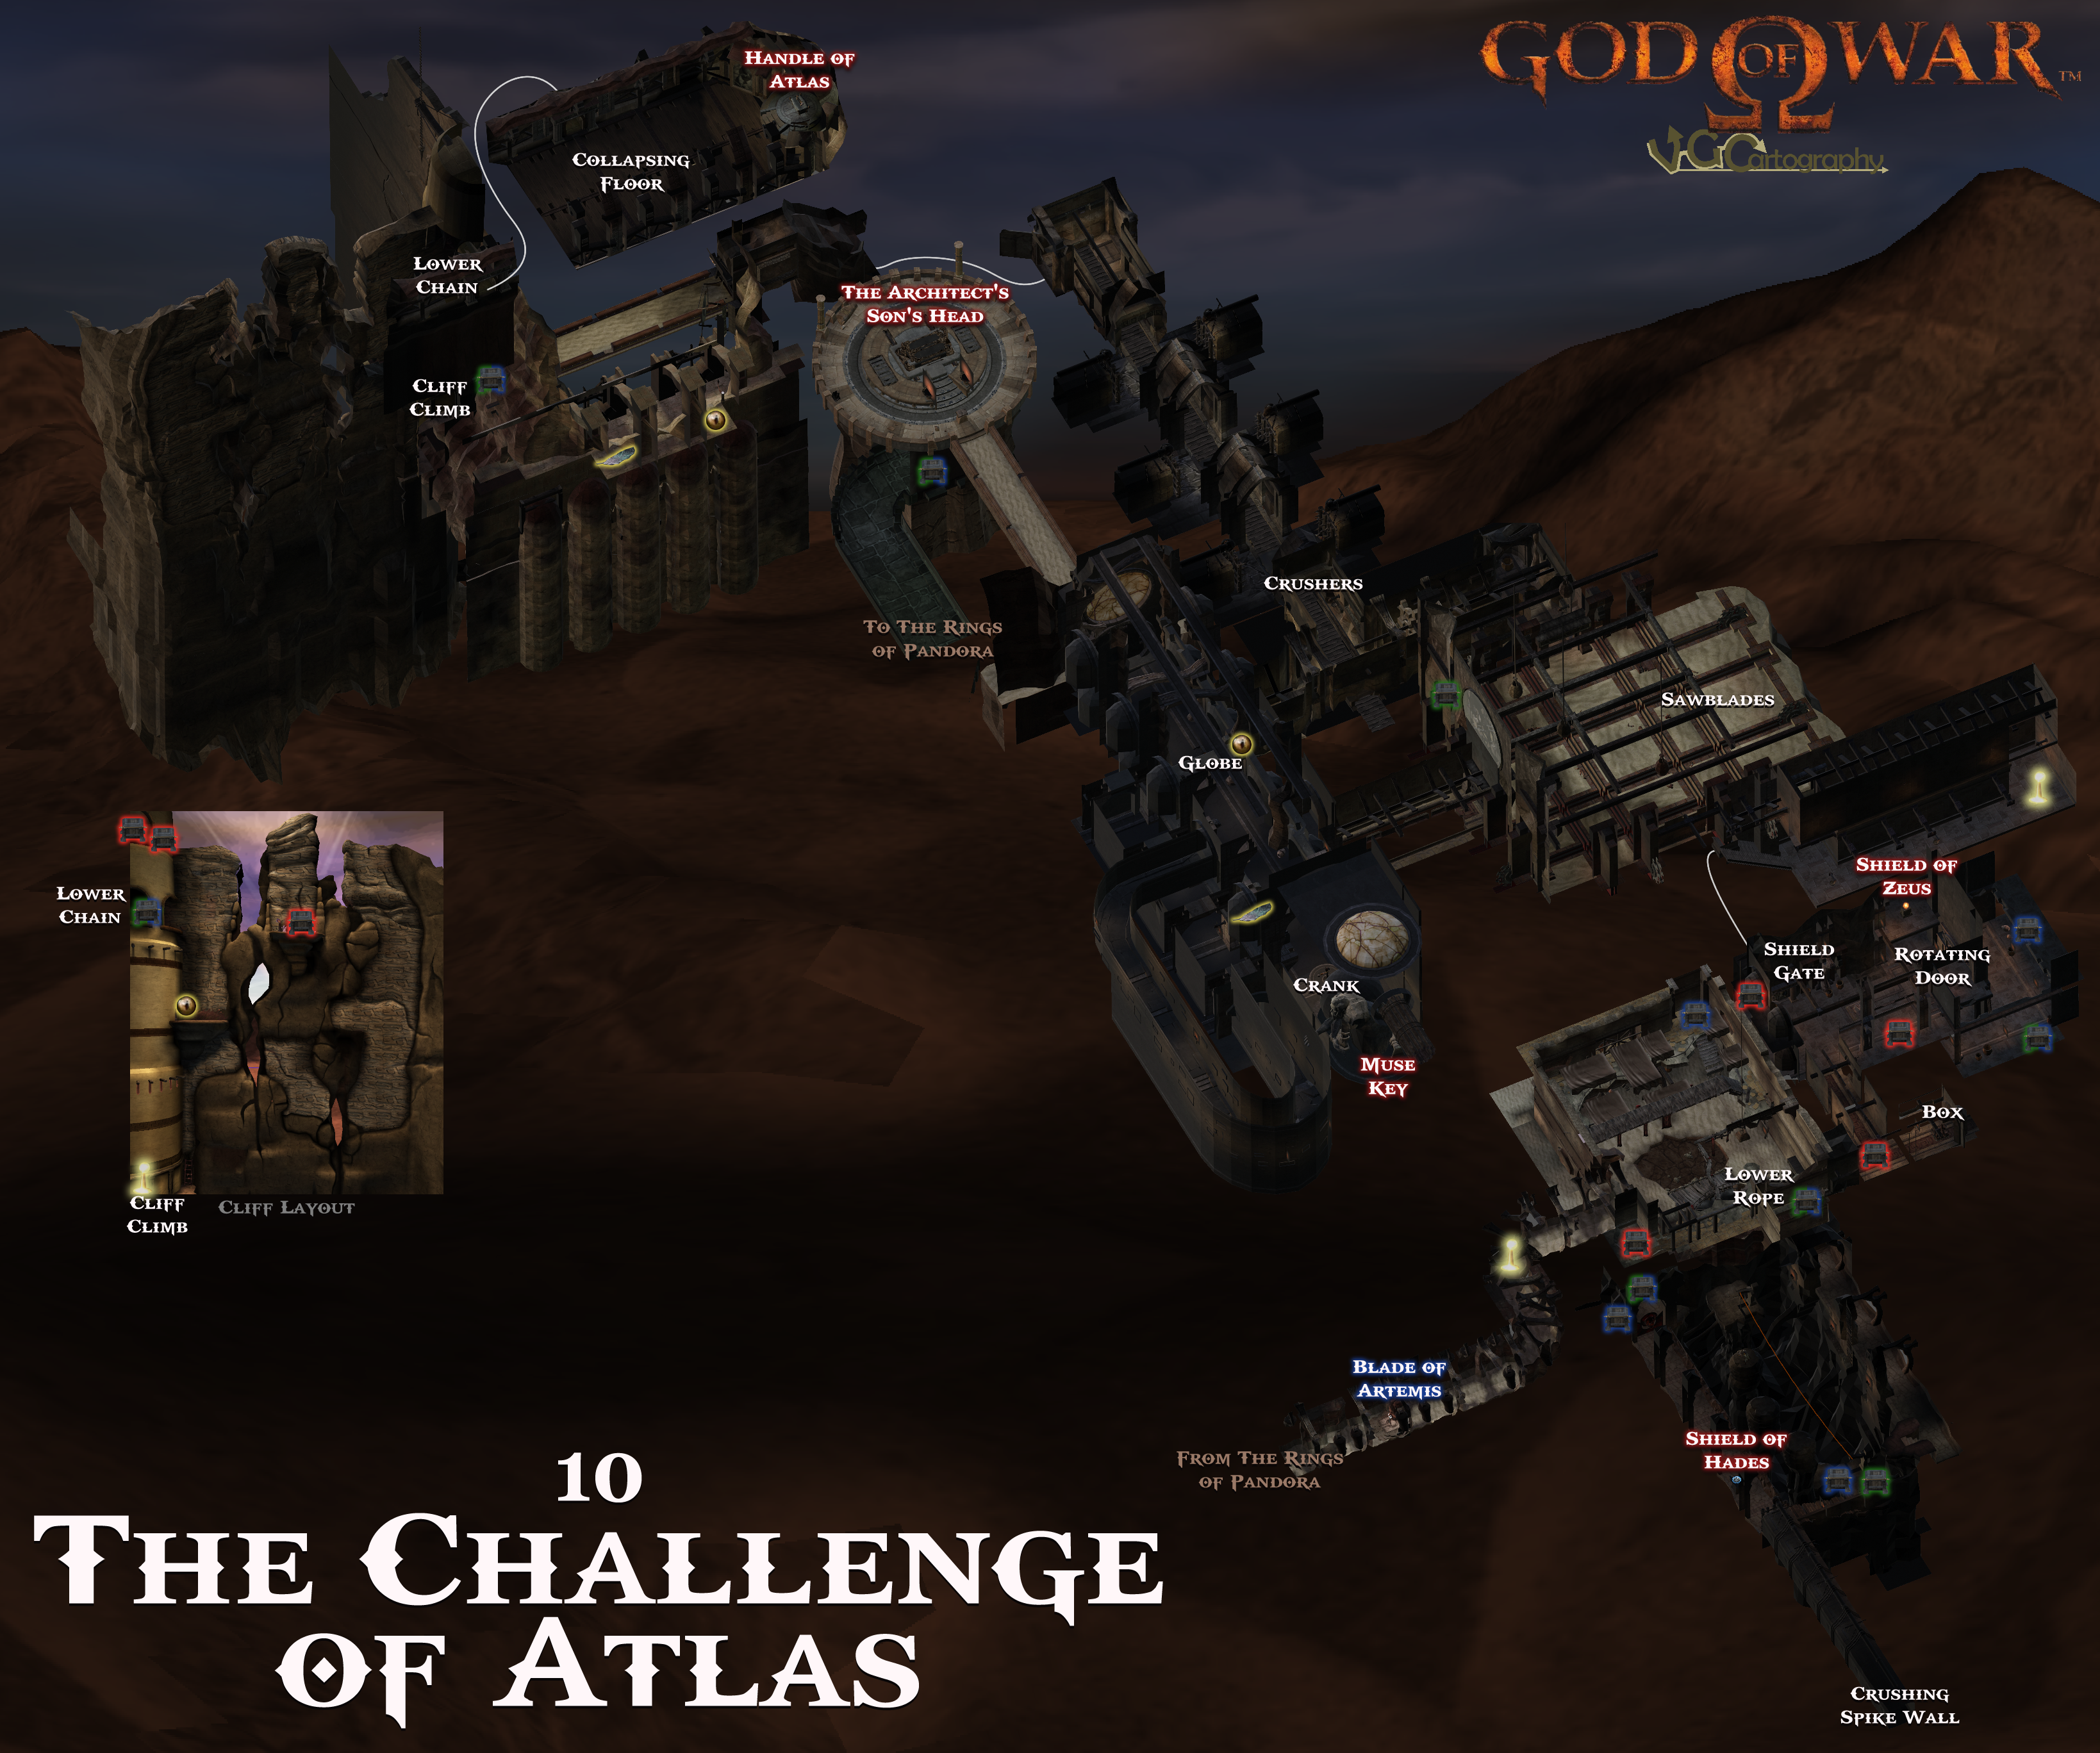
The Challenge Of Atlas
3277 x 2736
12.7 MB
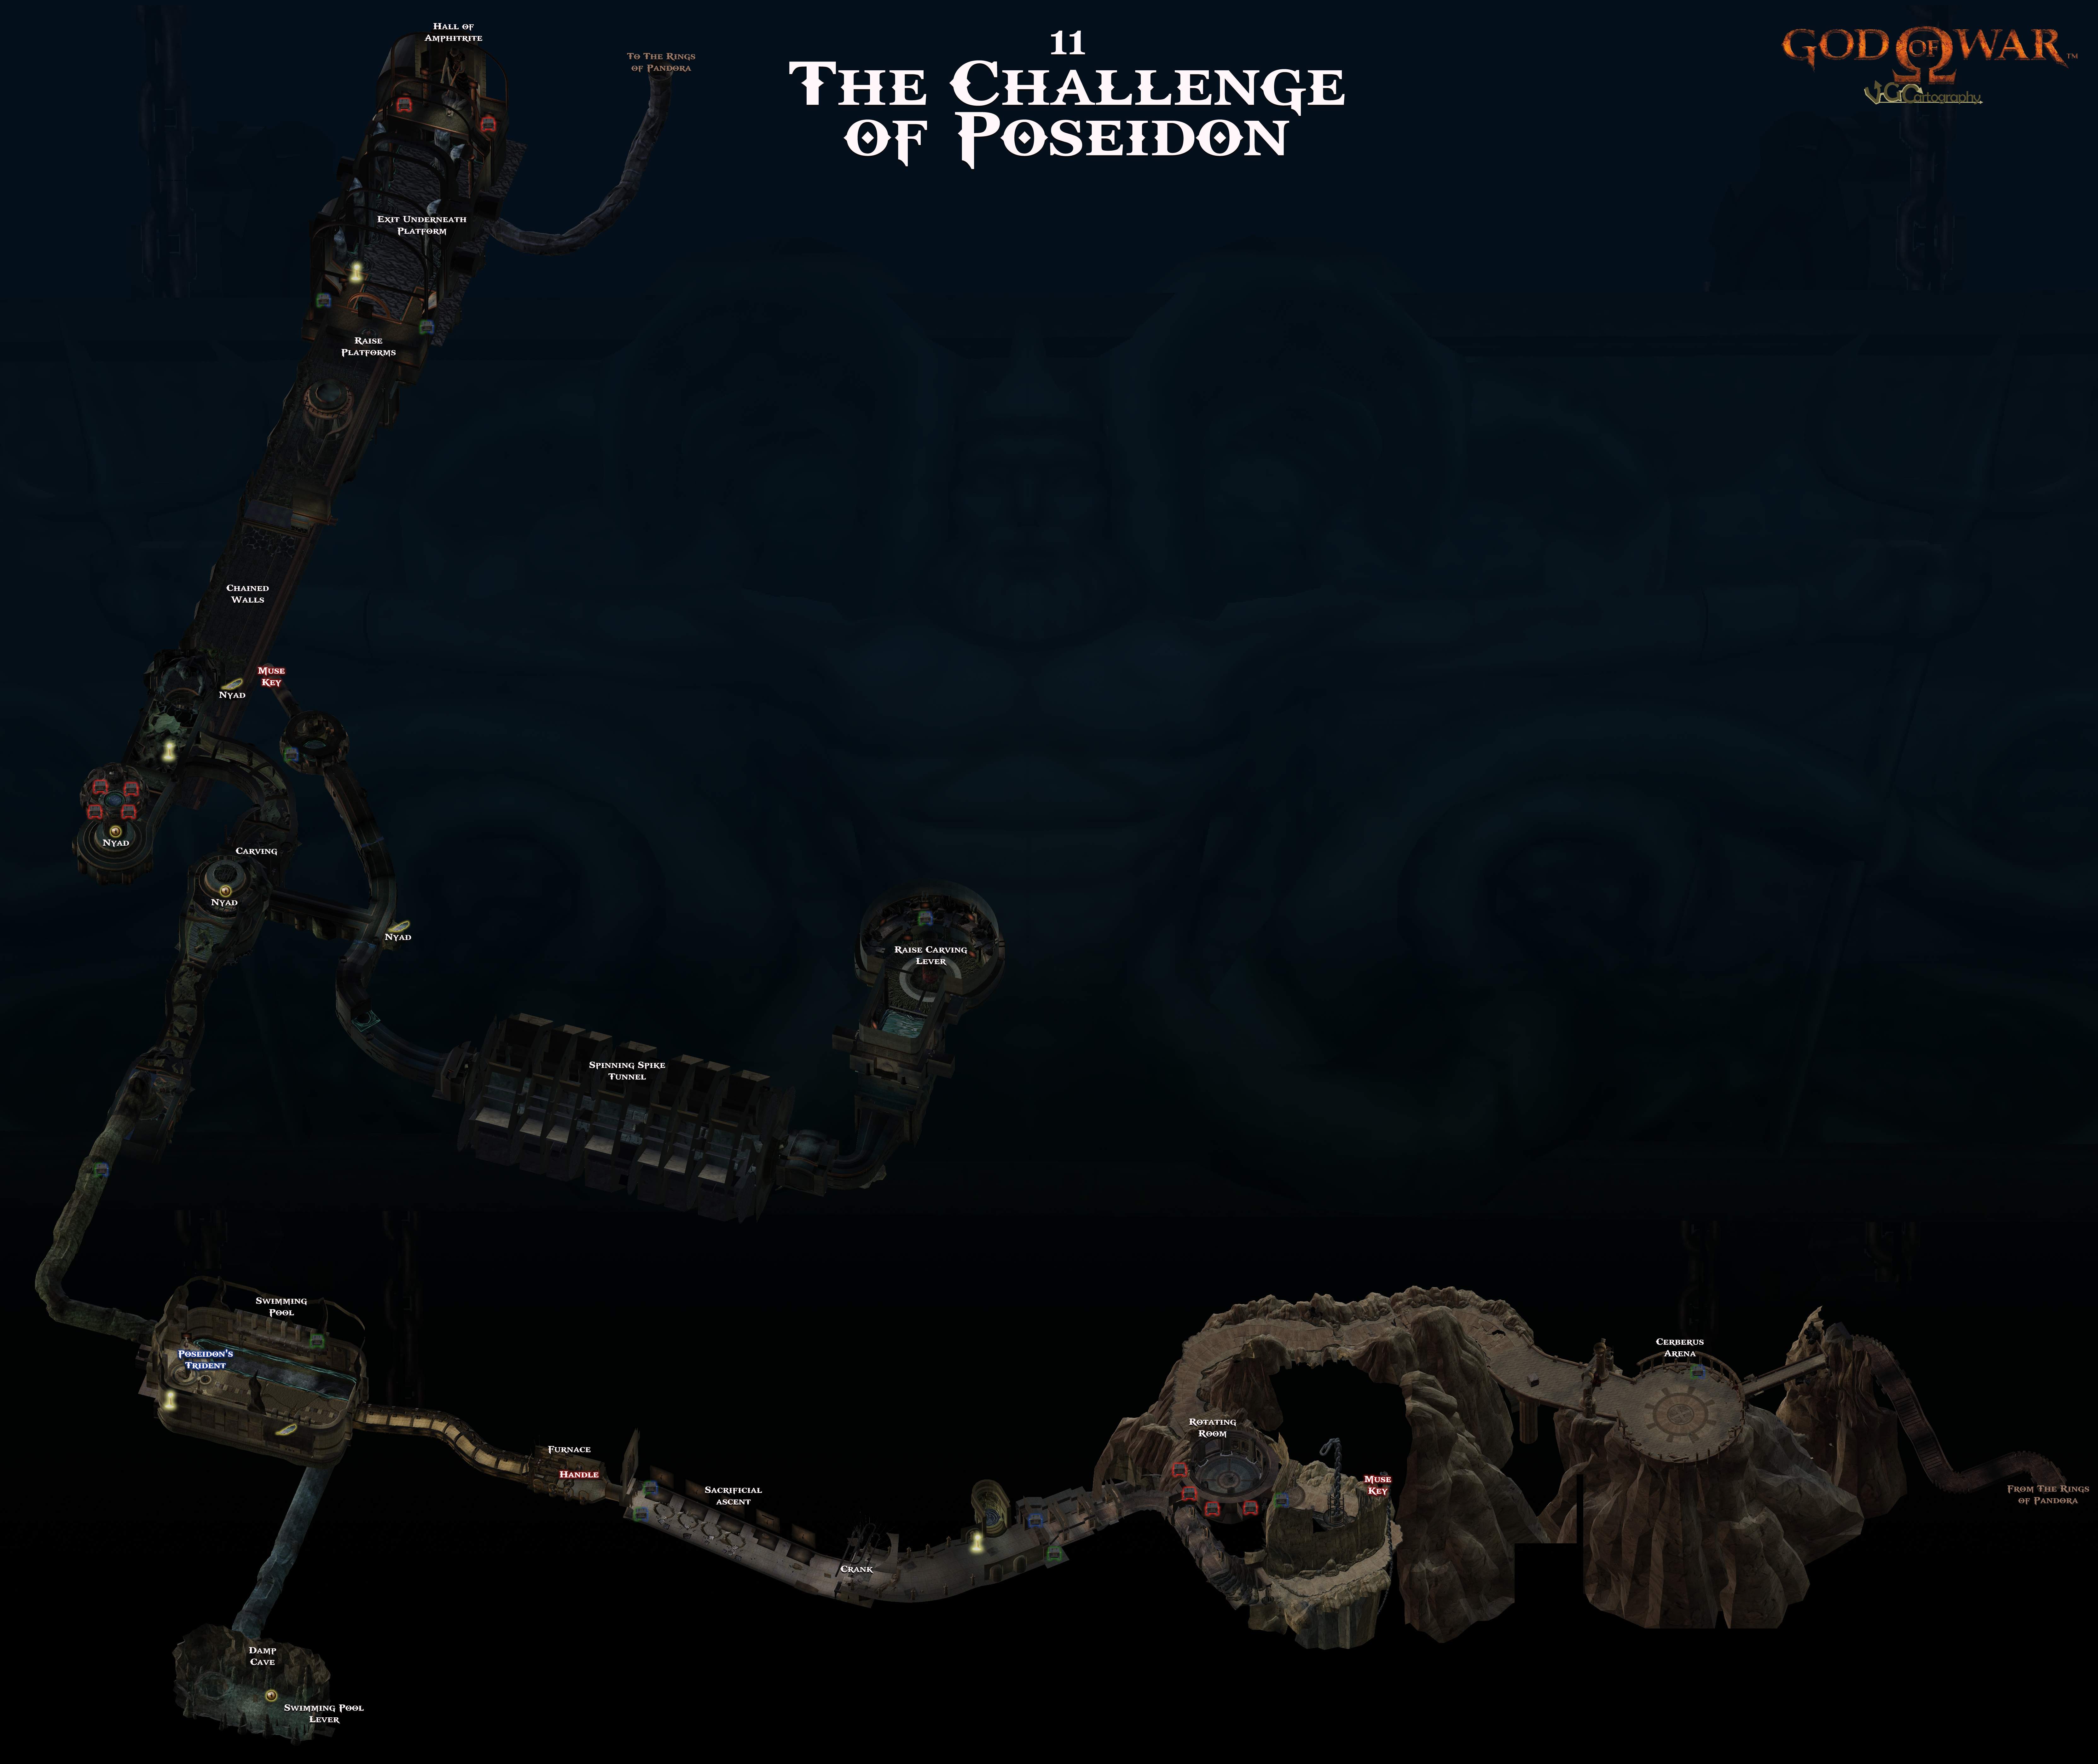
The Challenge Of Poseidon
6656 x 5596
26.2 MB
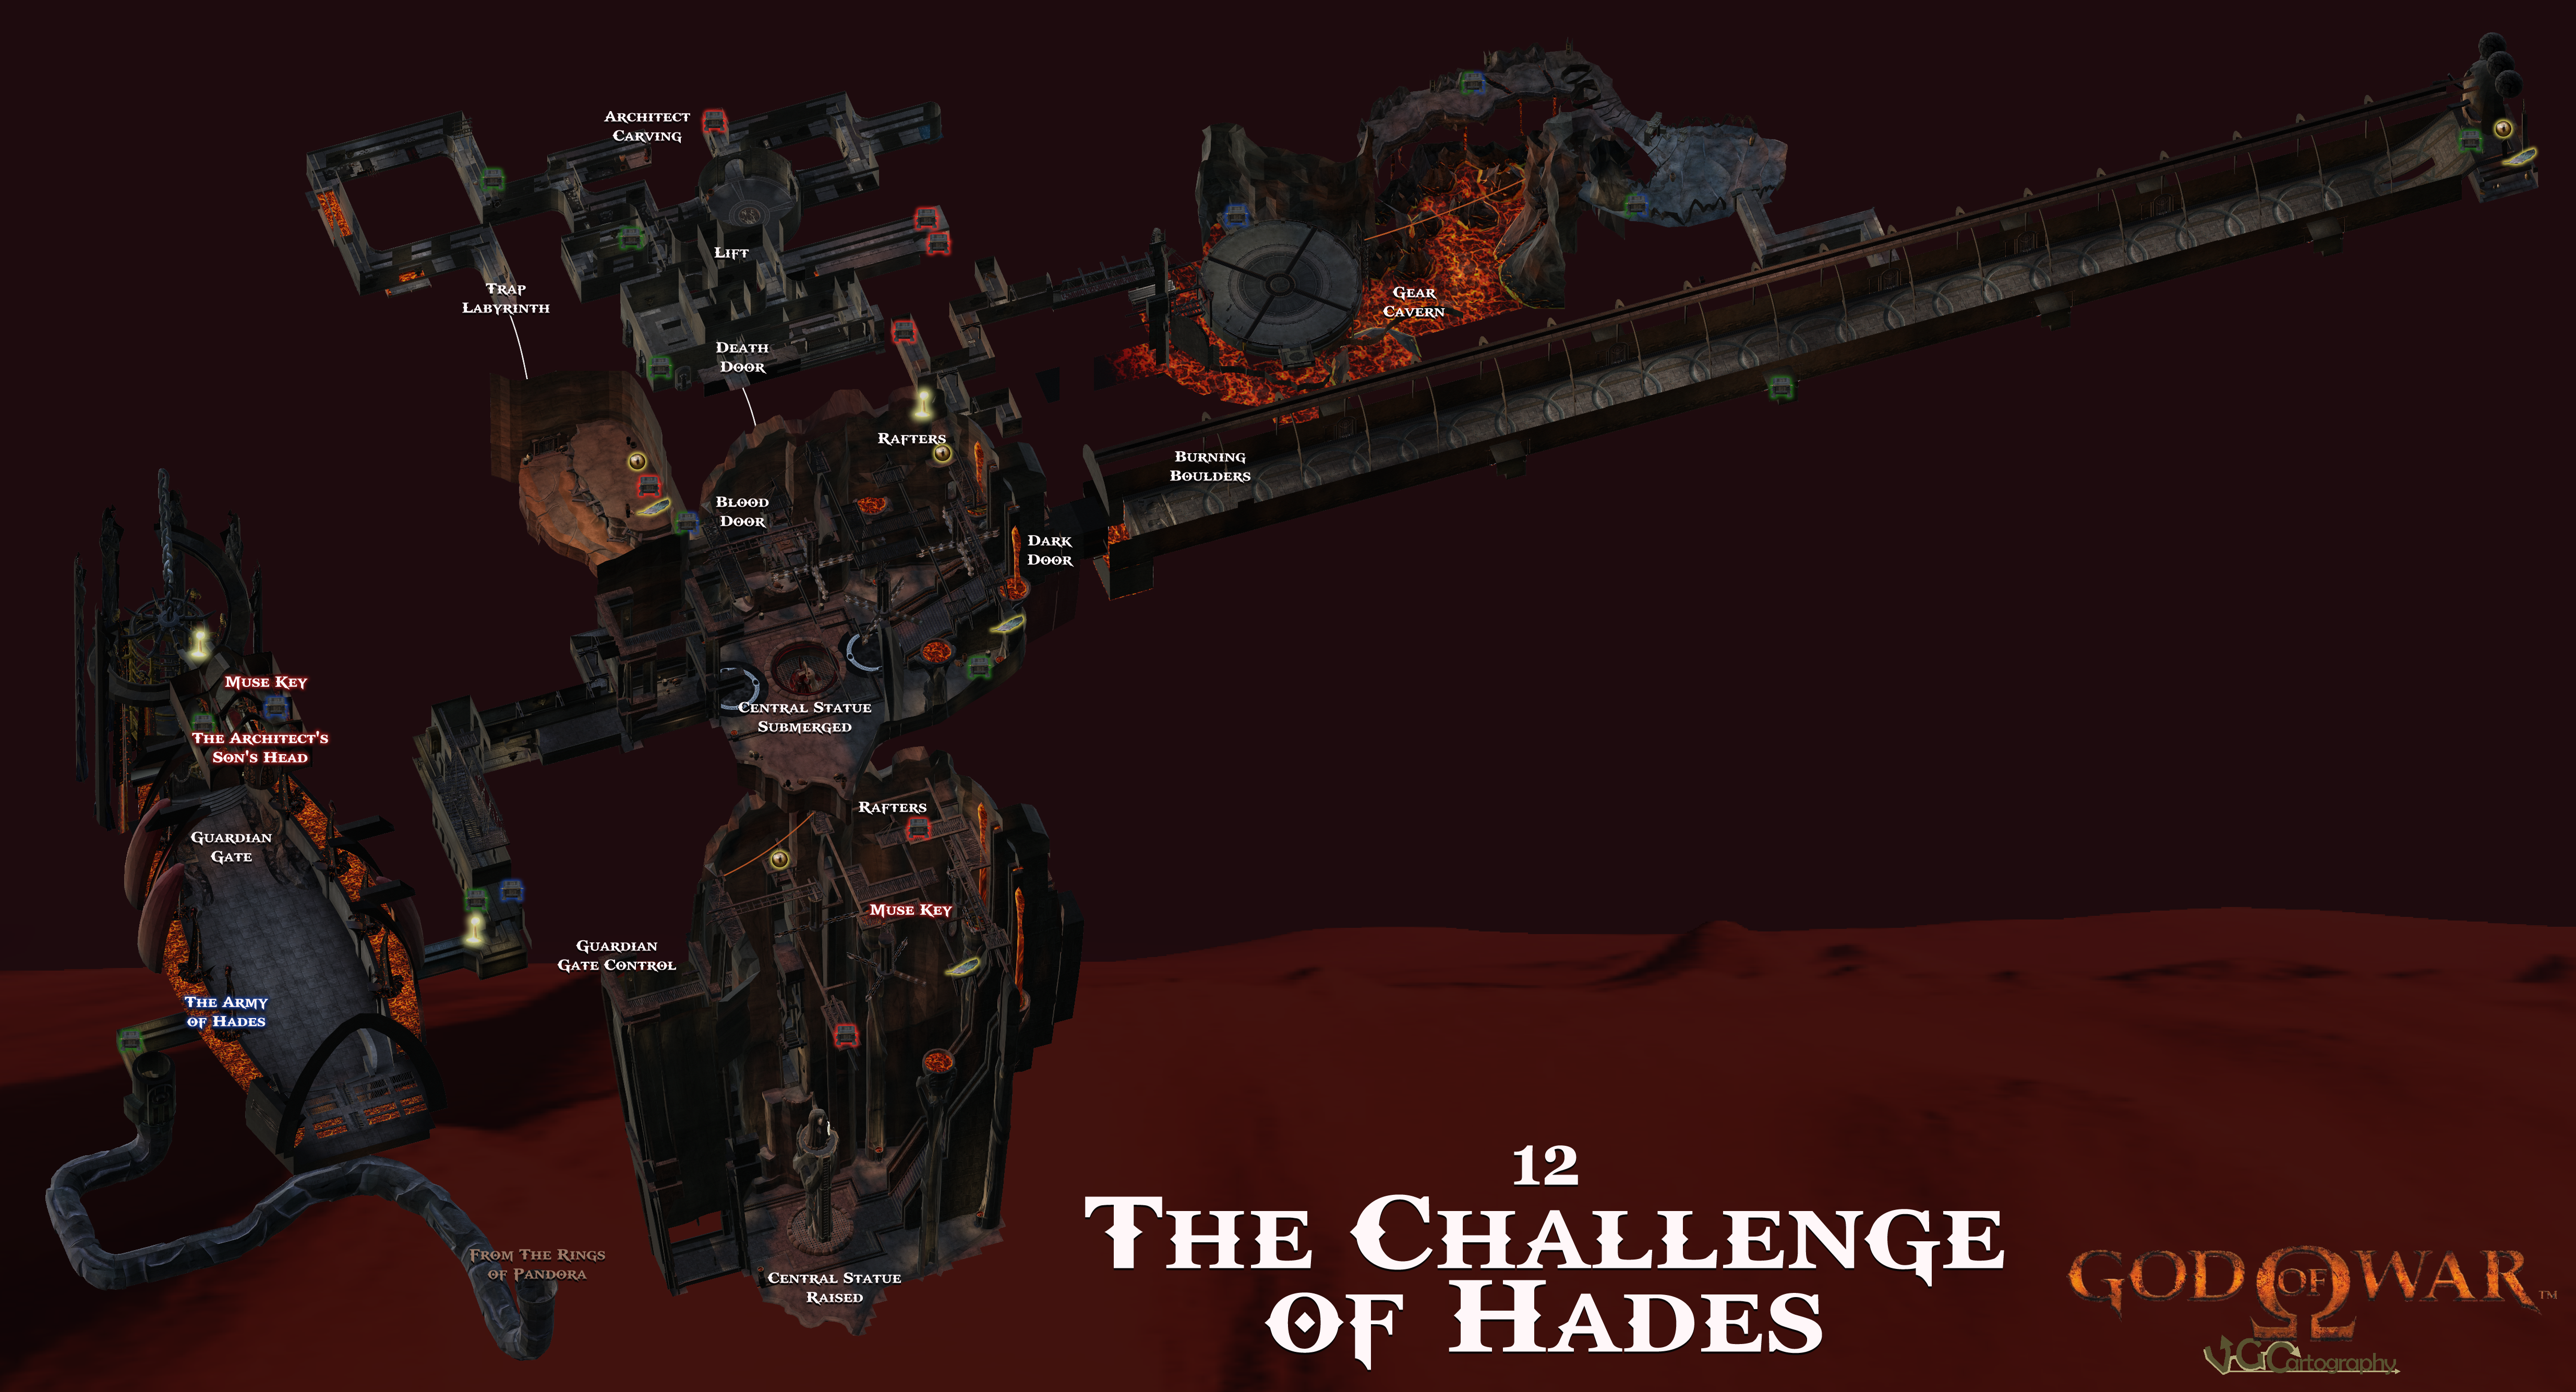
The Challenge Of Hades
4938 x 2669
18.4 MB
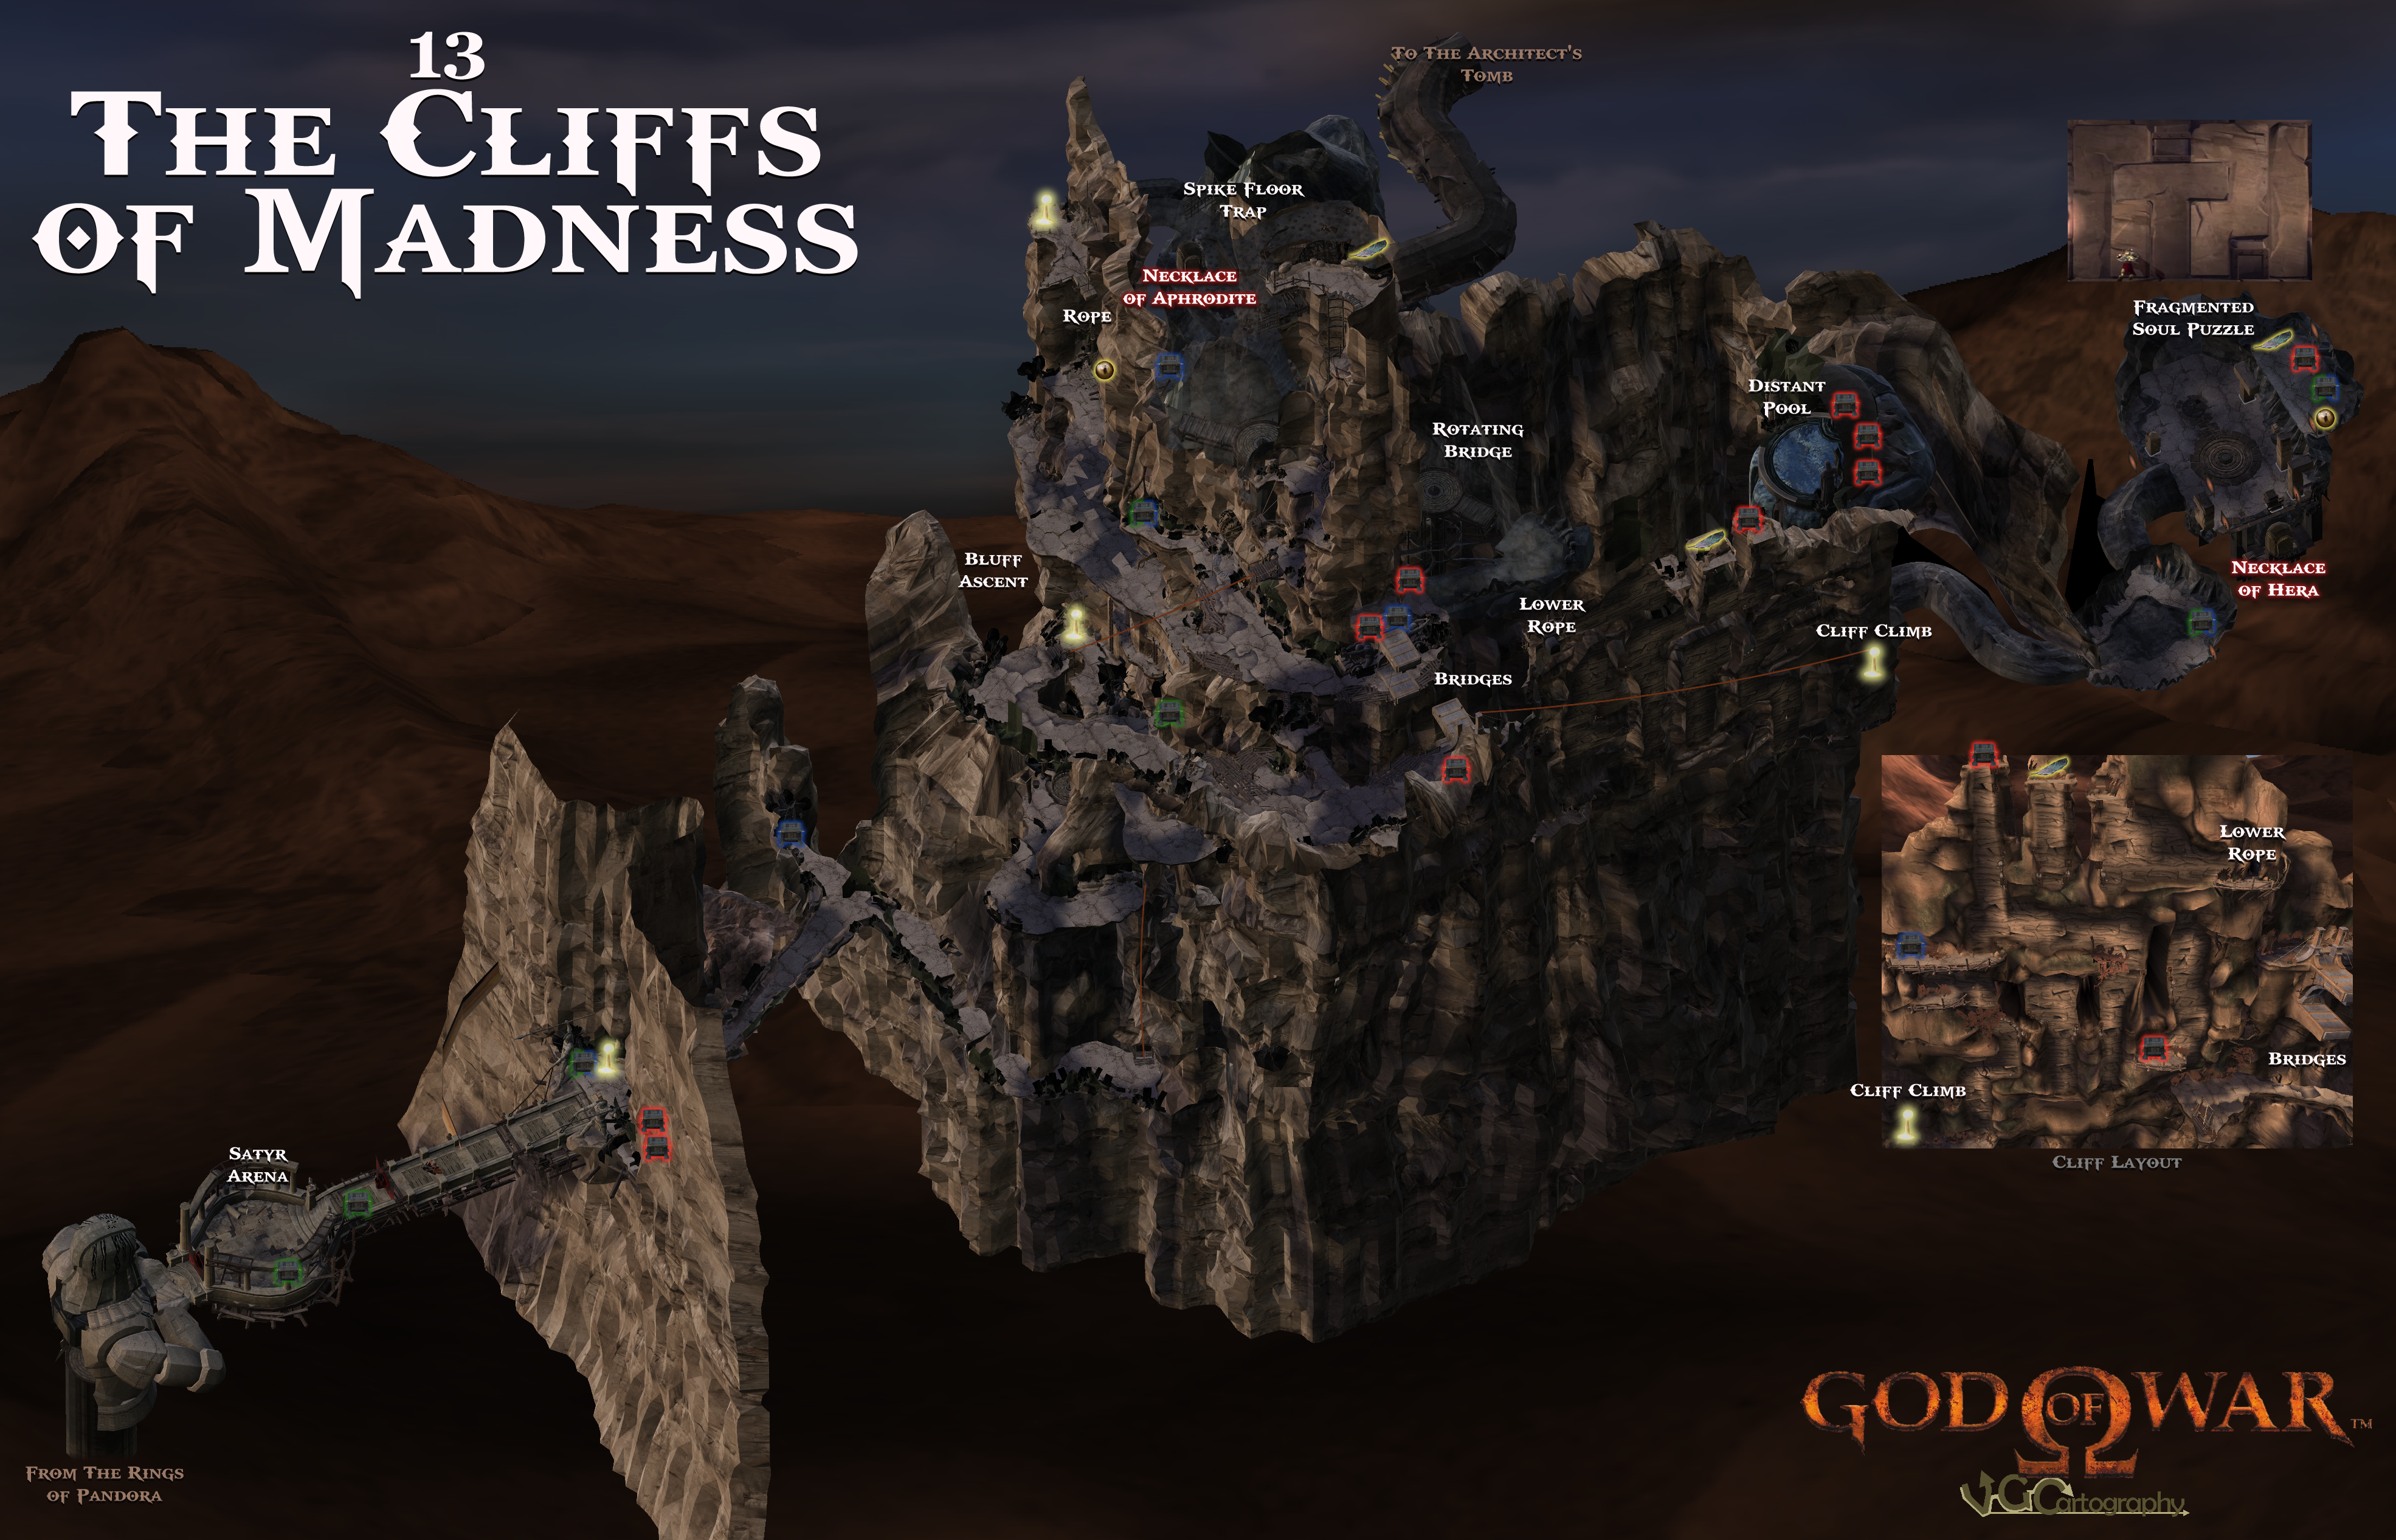
The Cliffs Of Madness
3941 x 2533
19.6 MB
The Architect's Tomb
4041 x 2929
15.5 MB
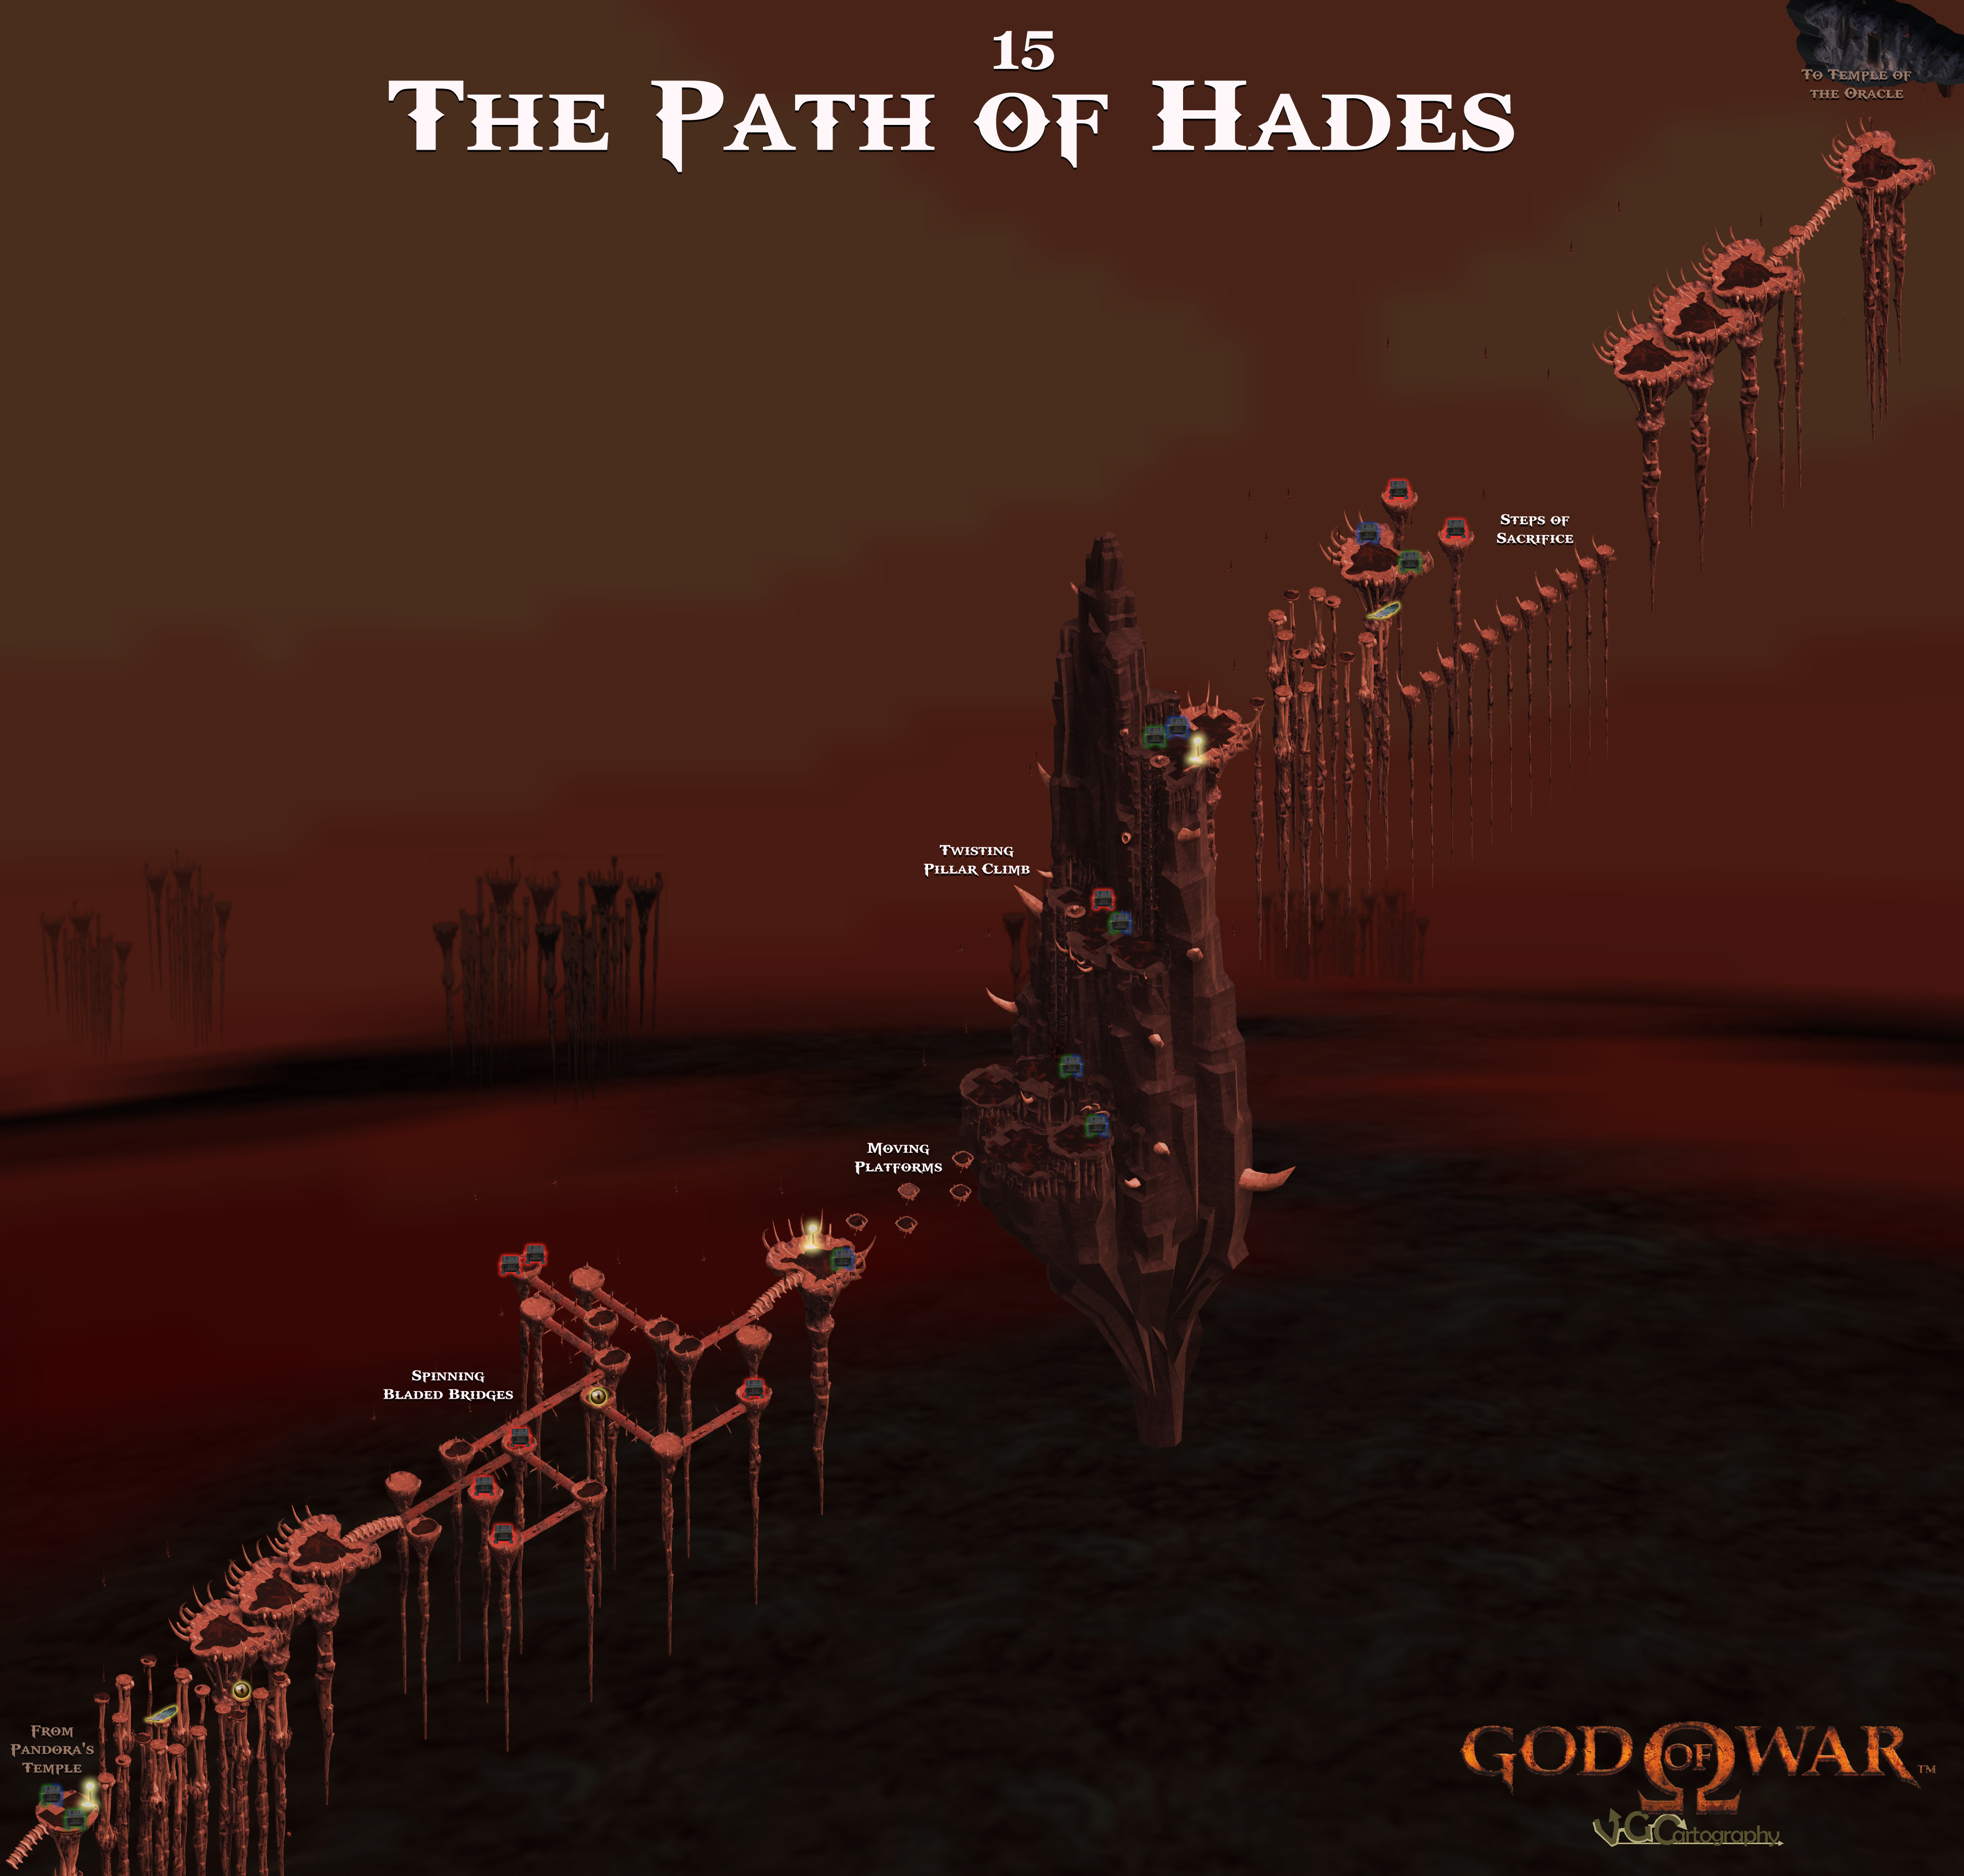
The Path Of Hades
3883 x 3710
4.93 MB
Grand Theft Auto III Maps
© 2001 Rockstar Games / DMA
Liberty City
1629 x 1210
2.50 MB
Liberty City (100% Completion Reference)
3390 x 2409
8.41 MB
Liberty City (Simple)
3795 x 2752
mechaskrom
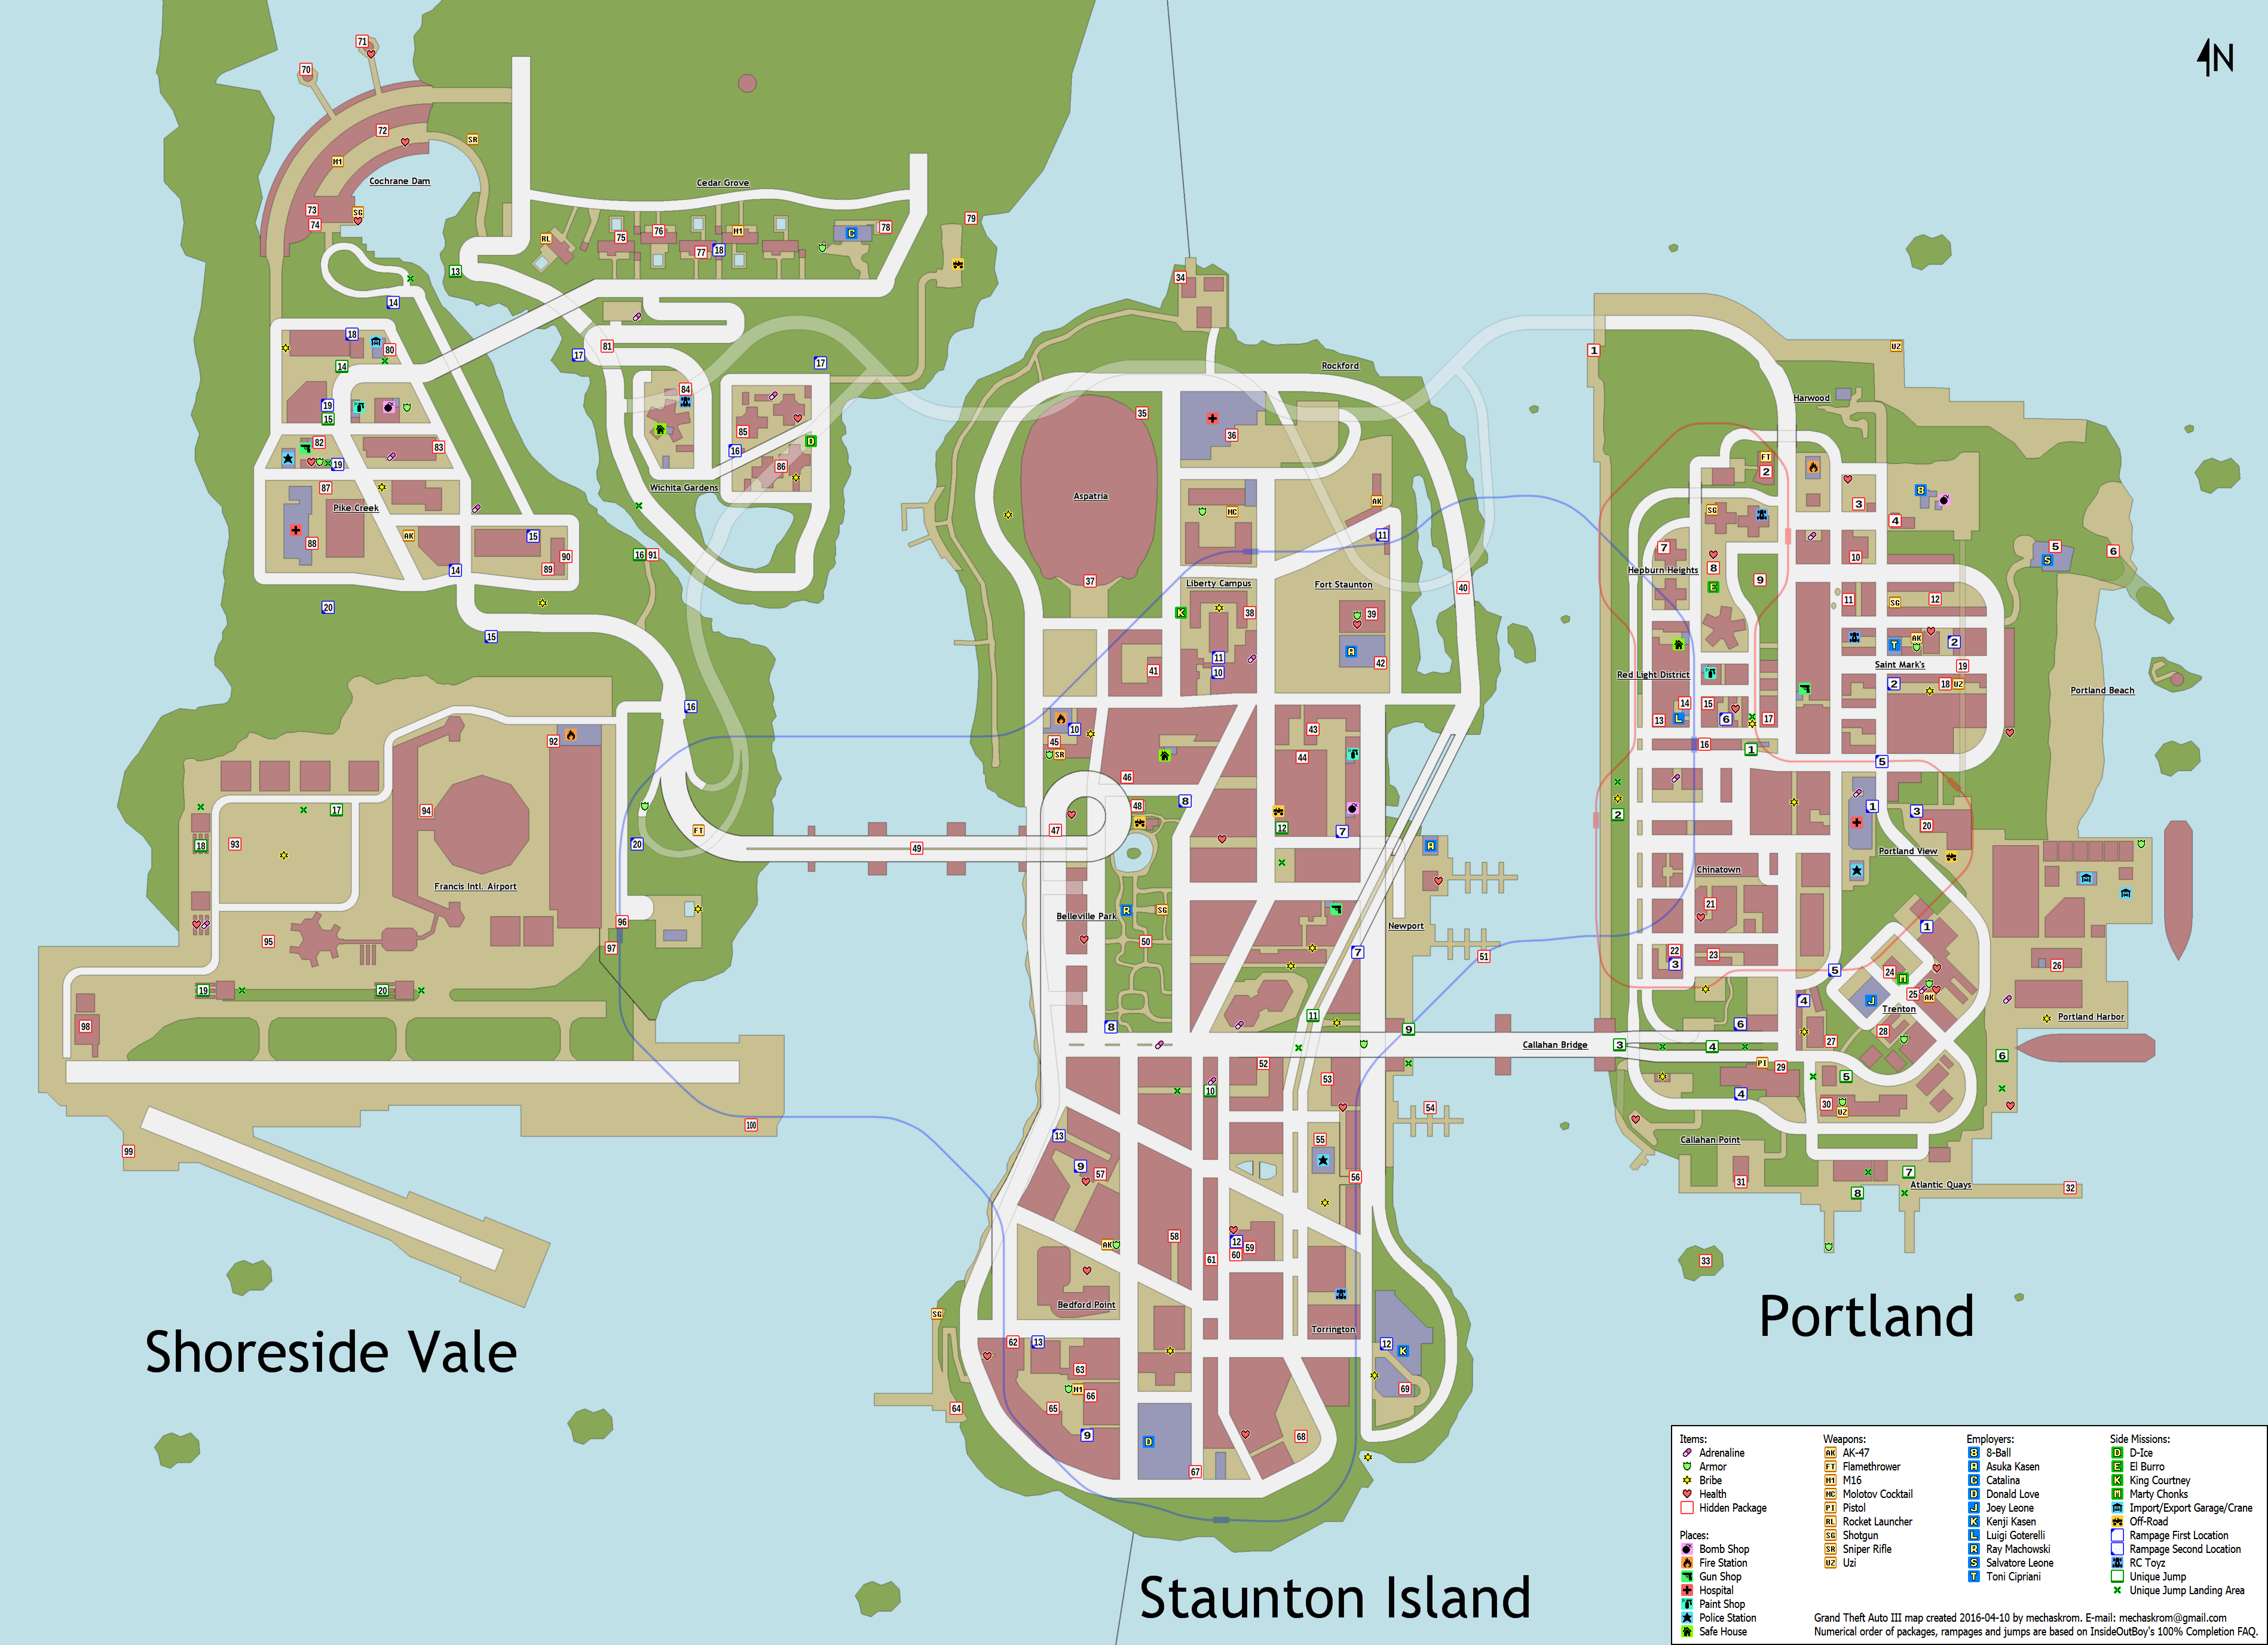
Portland
Portland (Hidden Packages)
781 x 733
26.4 kB
Pulverized2000
Staunton Island
Staunton Island (Hidden Packages)
1019 x 977
16.4 kB
Shoreside Vale
Shoreside Vale (Hidden Packages)
1139 x 977
26.3 kB
Grand Theft Auto: San Andreas Maps
© 2004 Rockstar Games, Inc. / Take-Two Interactive Software, Inc.
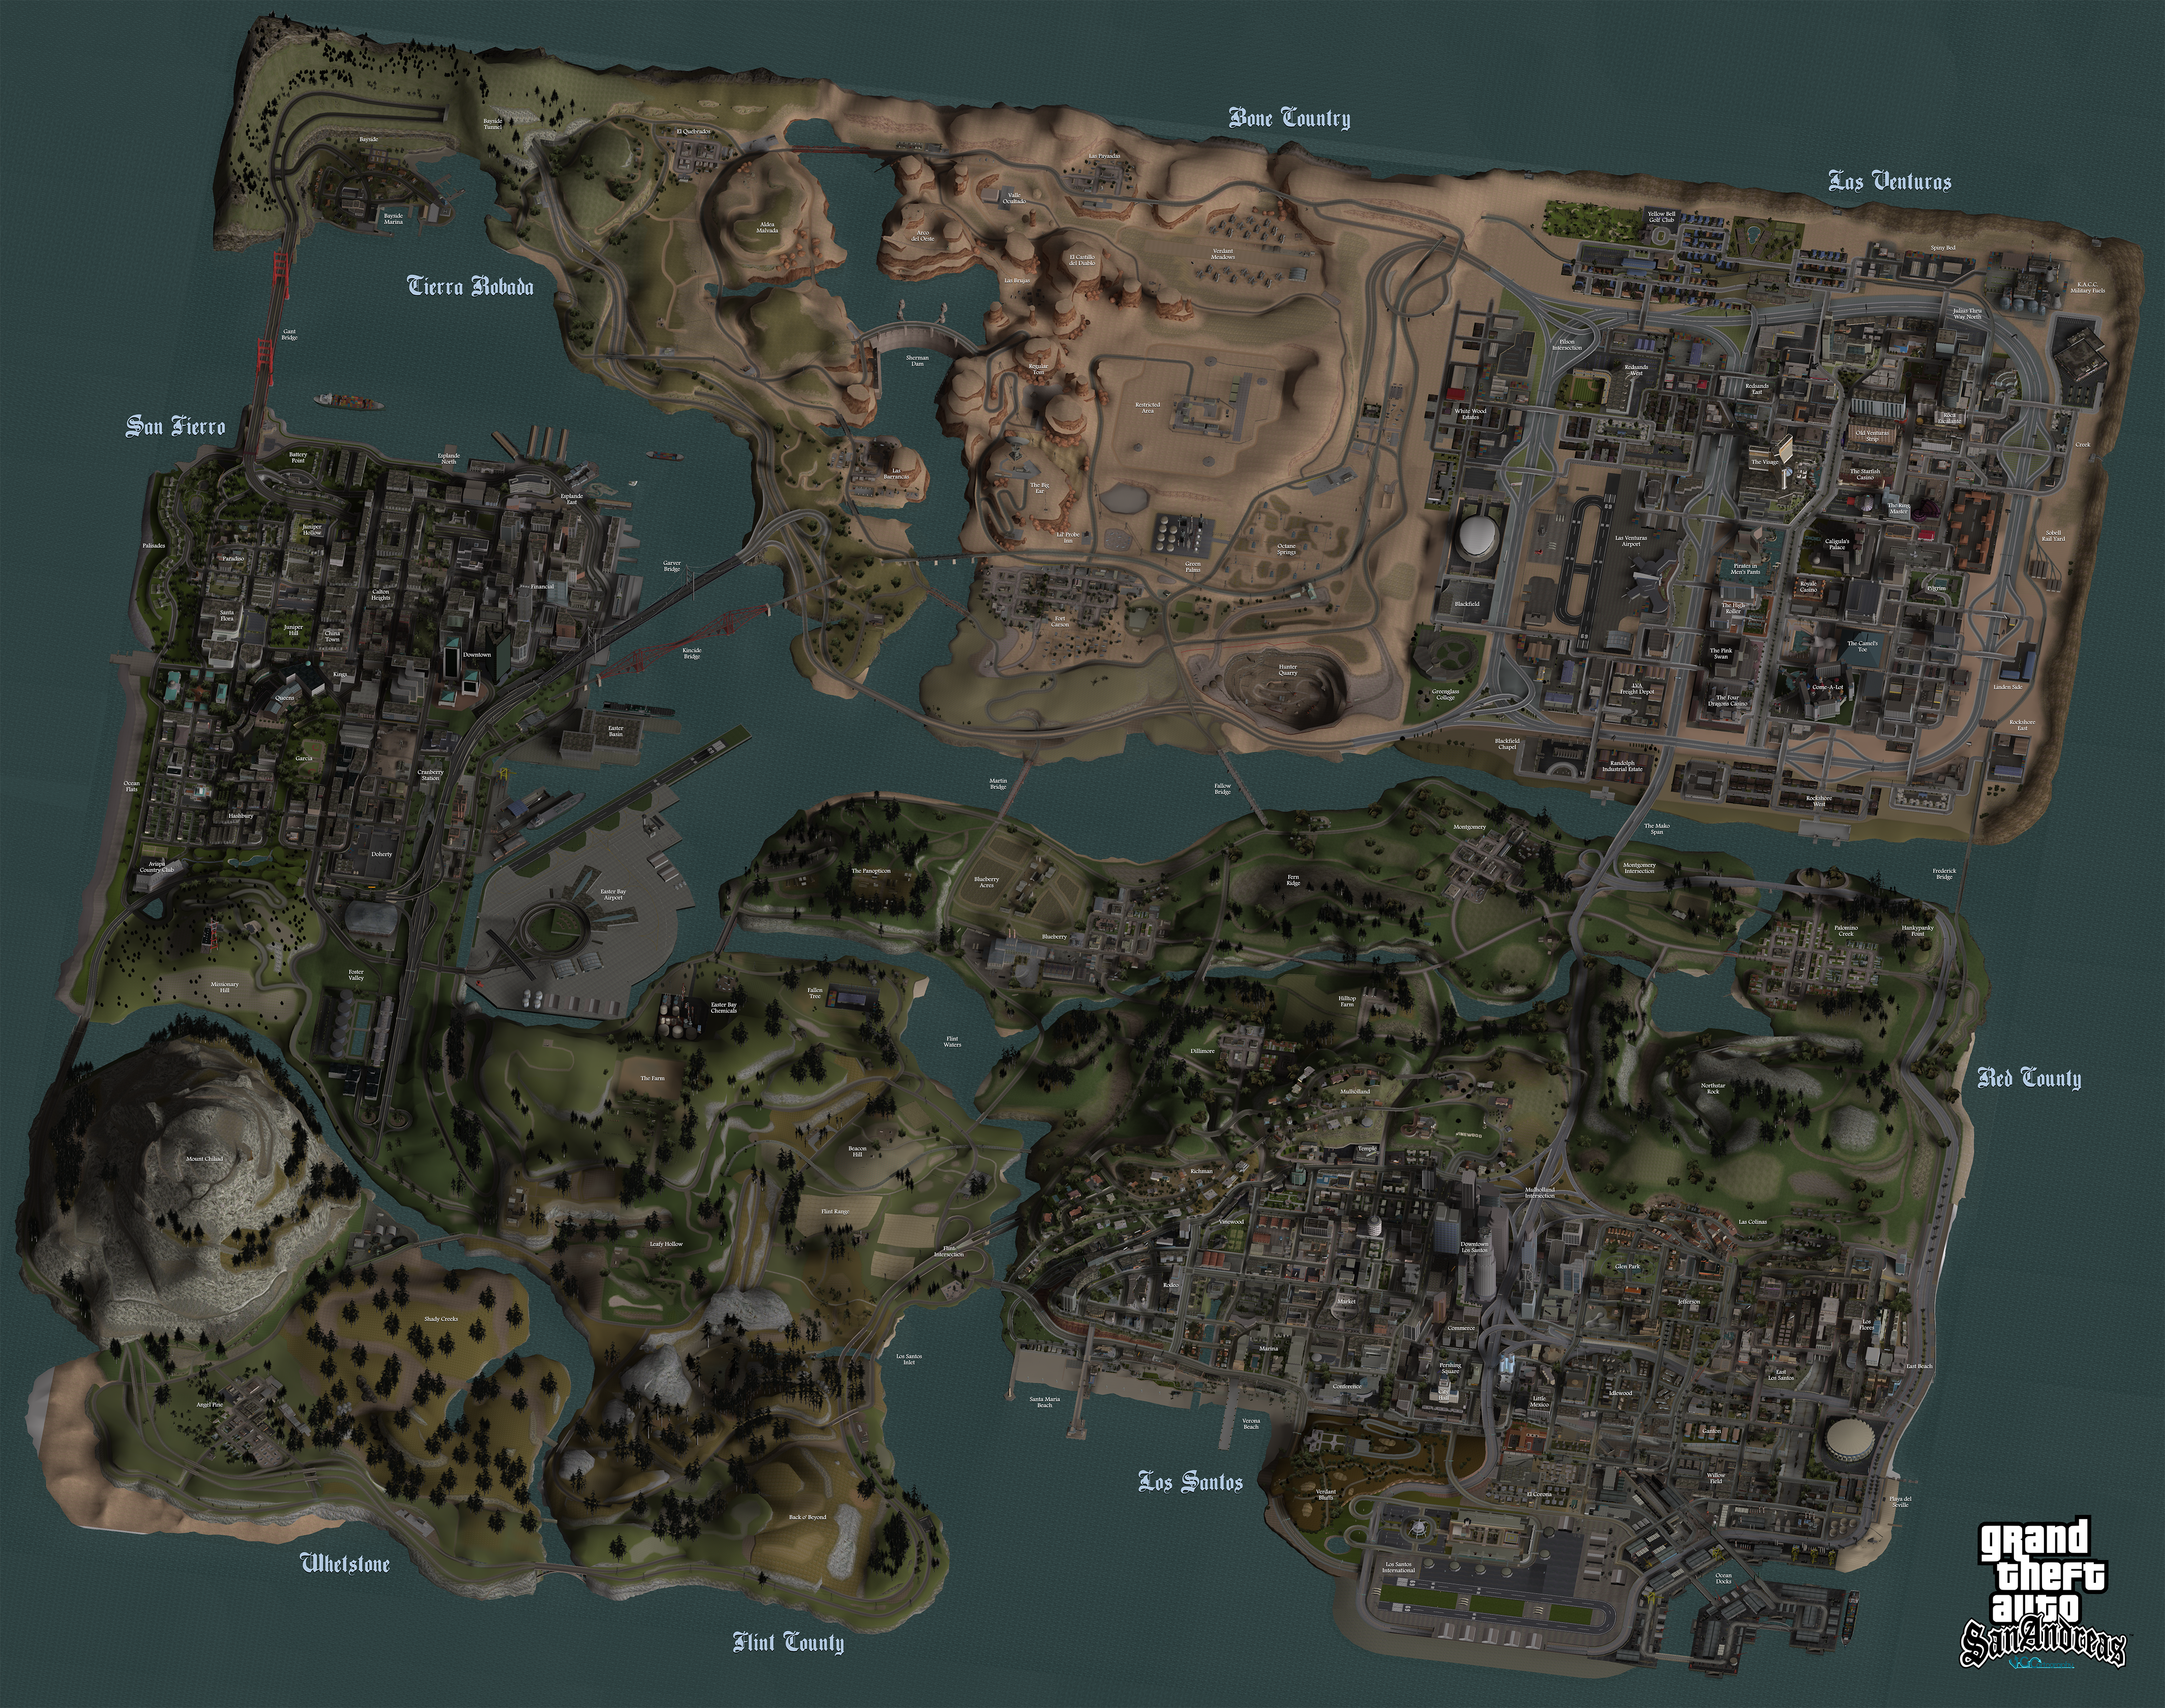
San Andreas
4260 x 3361
22.2 MB
Grand Theft Auto: Vice City Maps
© 2002 Rockstar Games
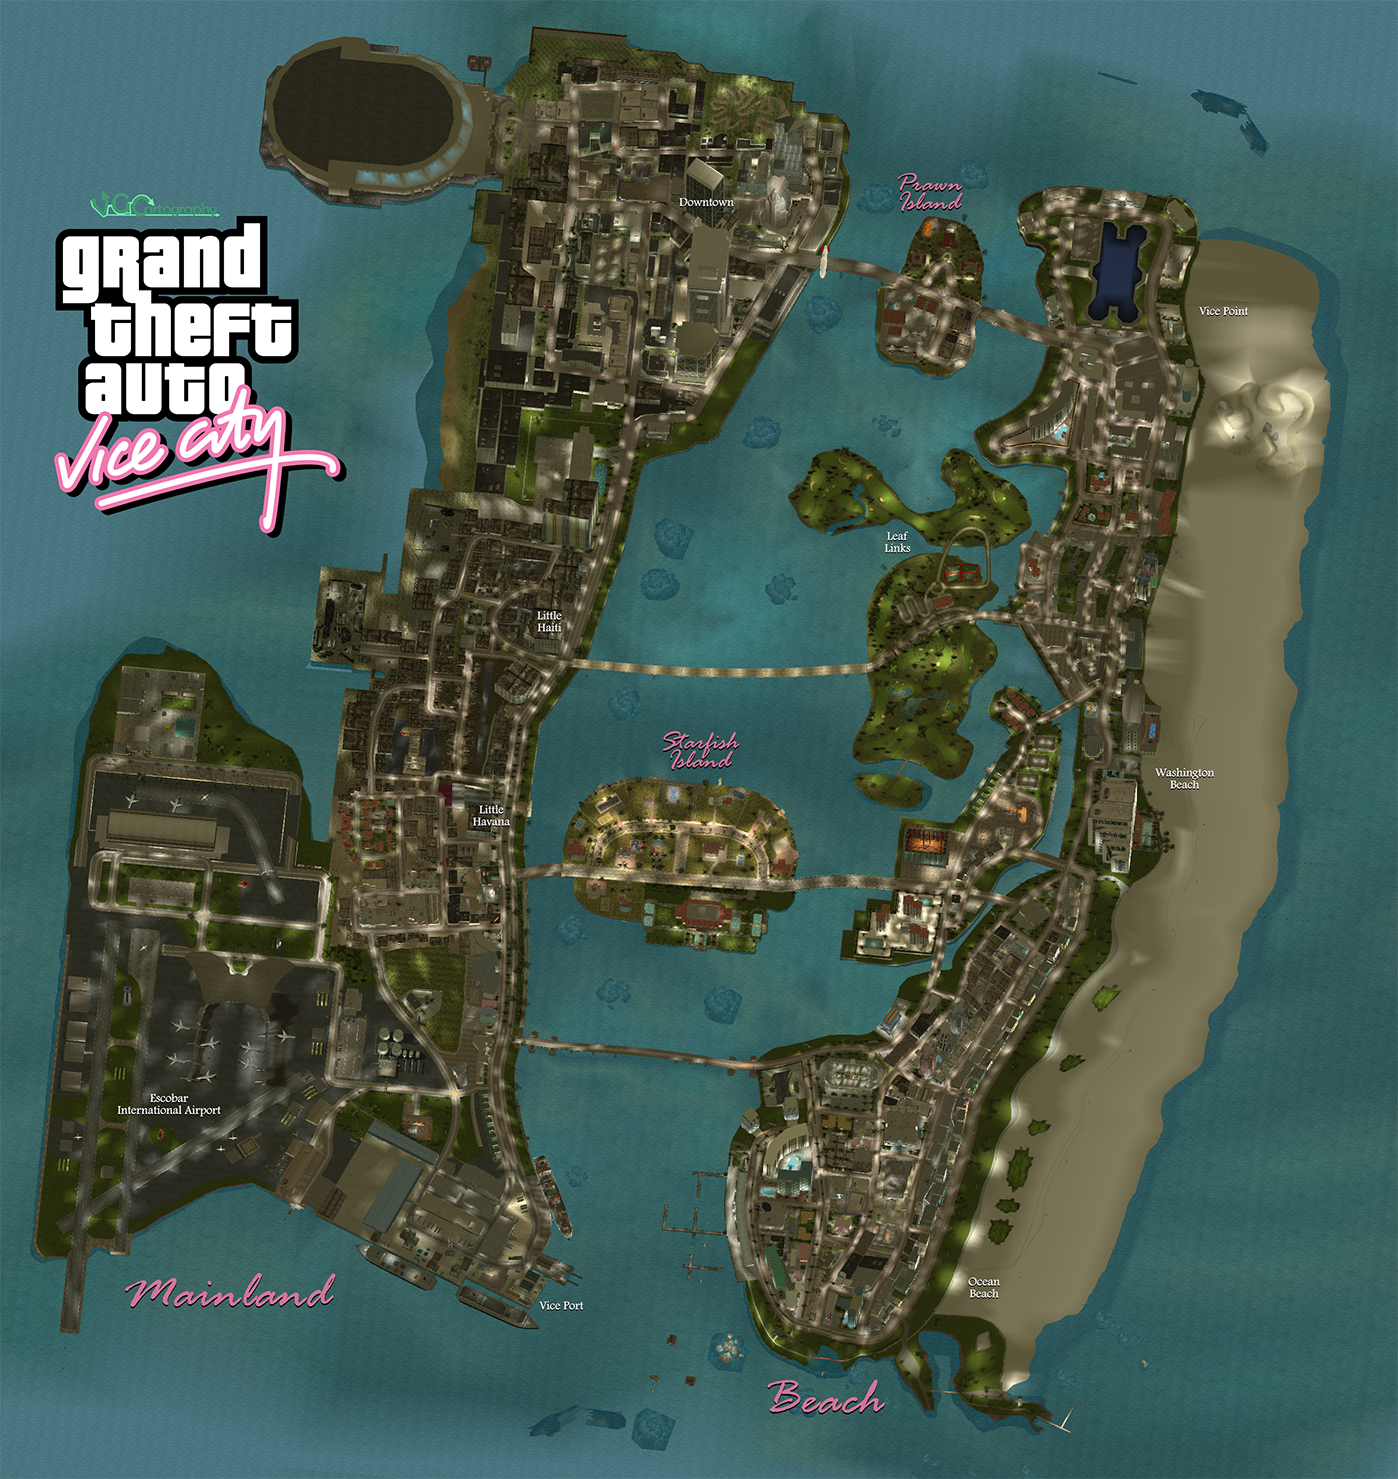
Vice City
1398 x 1479
3.38 MB
Vice City (100% Completion Reference)
3447 x 3010
4.97 MB
Vice City (In-Game Map)
768 x 768
Will Mallia
H
I
J
Jak And Daxter: The Precursor Legacy Maps
© 2001 Naughty Dog / SCEA
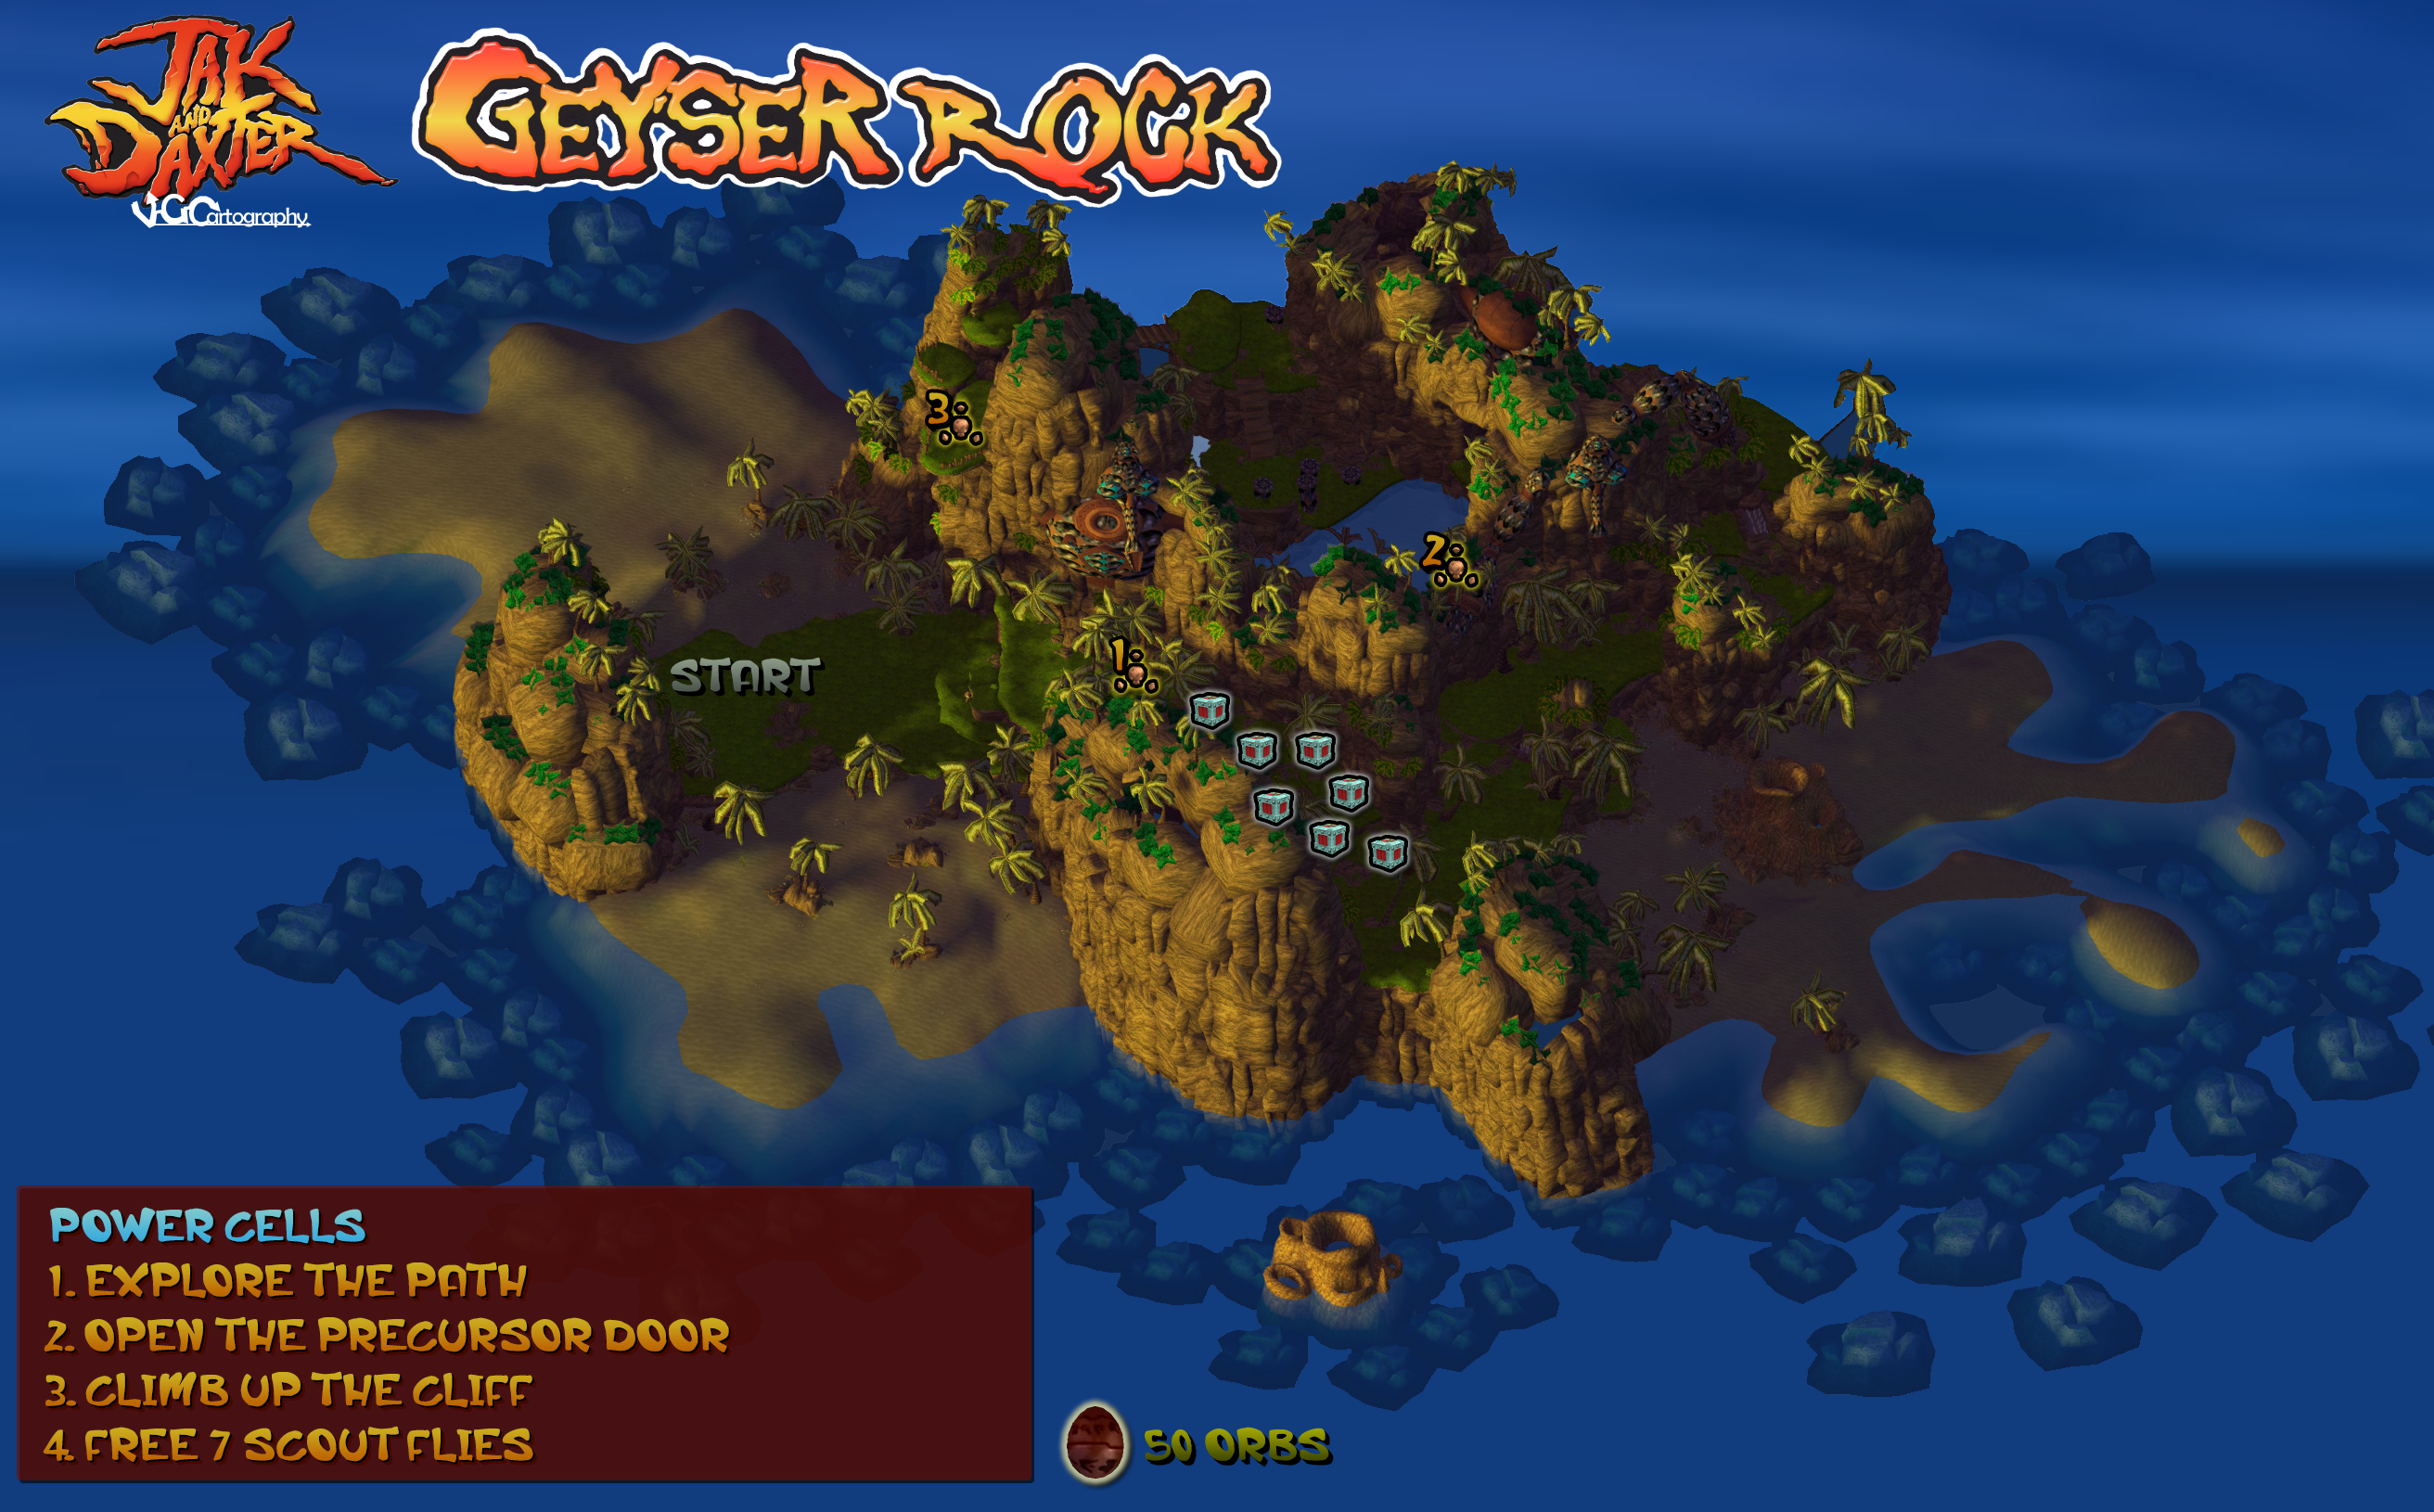
Geyser Rock
2624 x 1630
3.44 MB
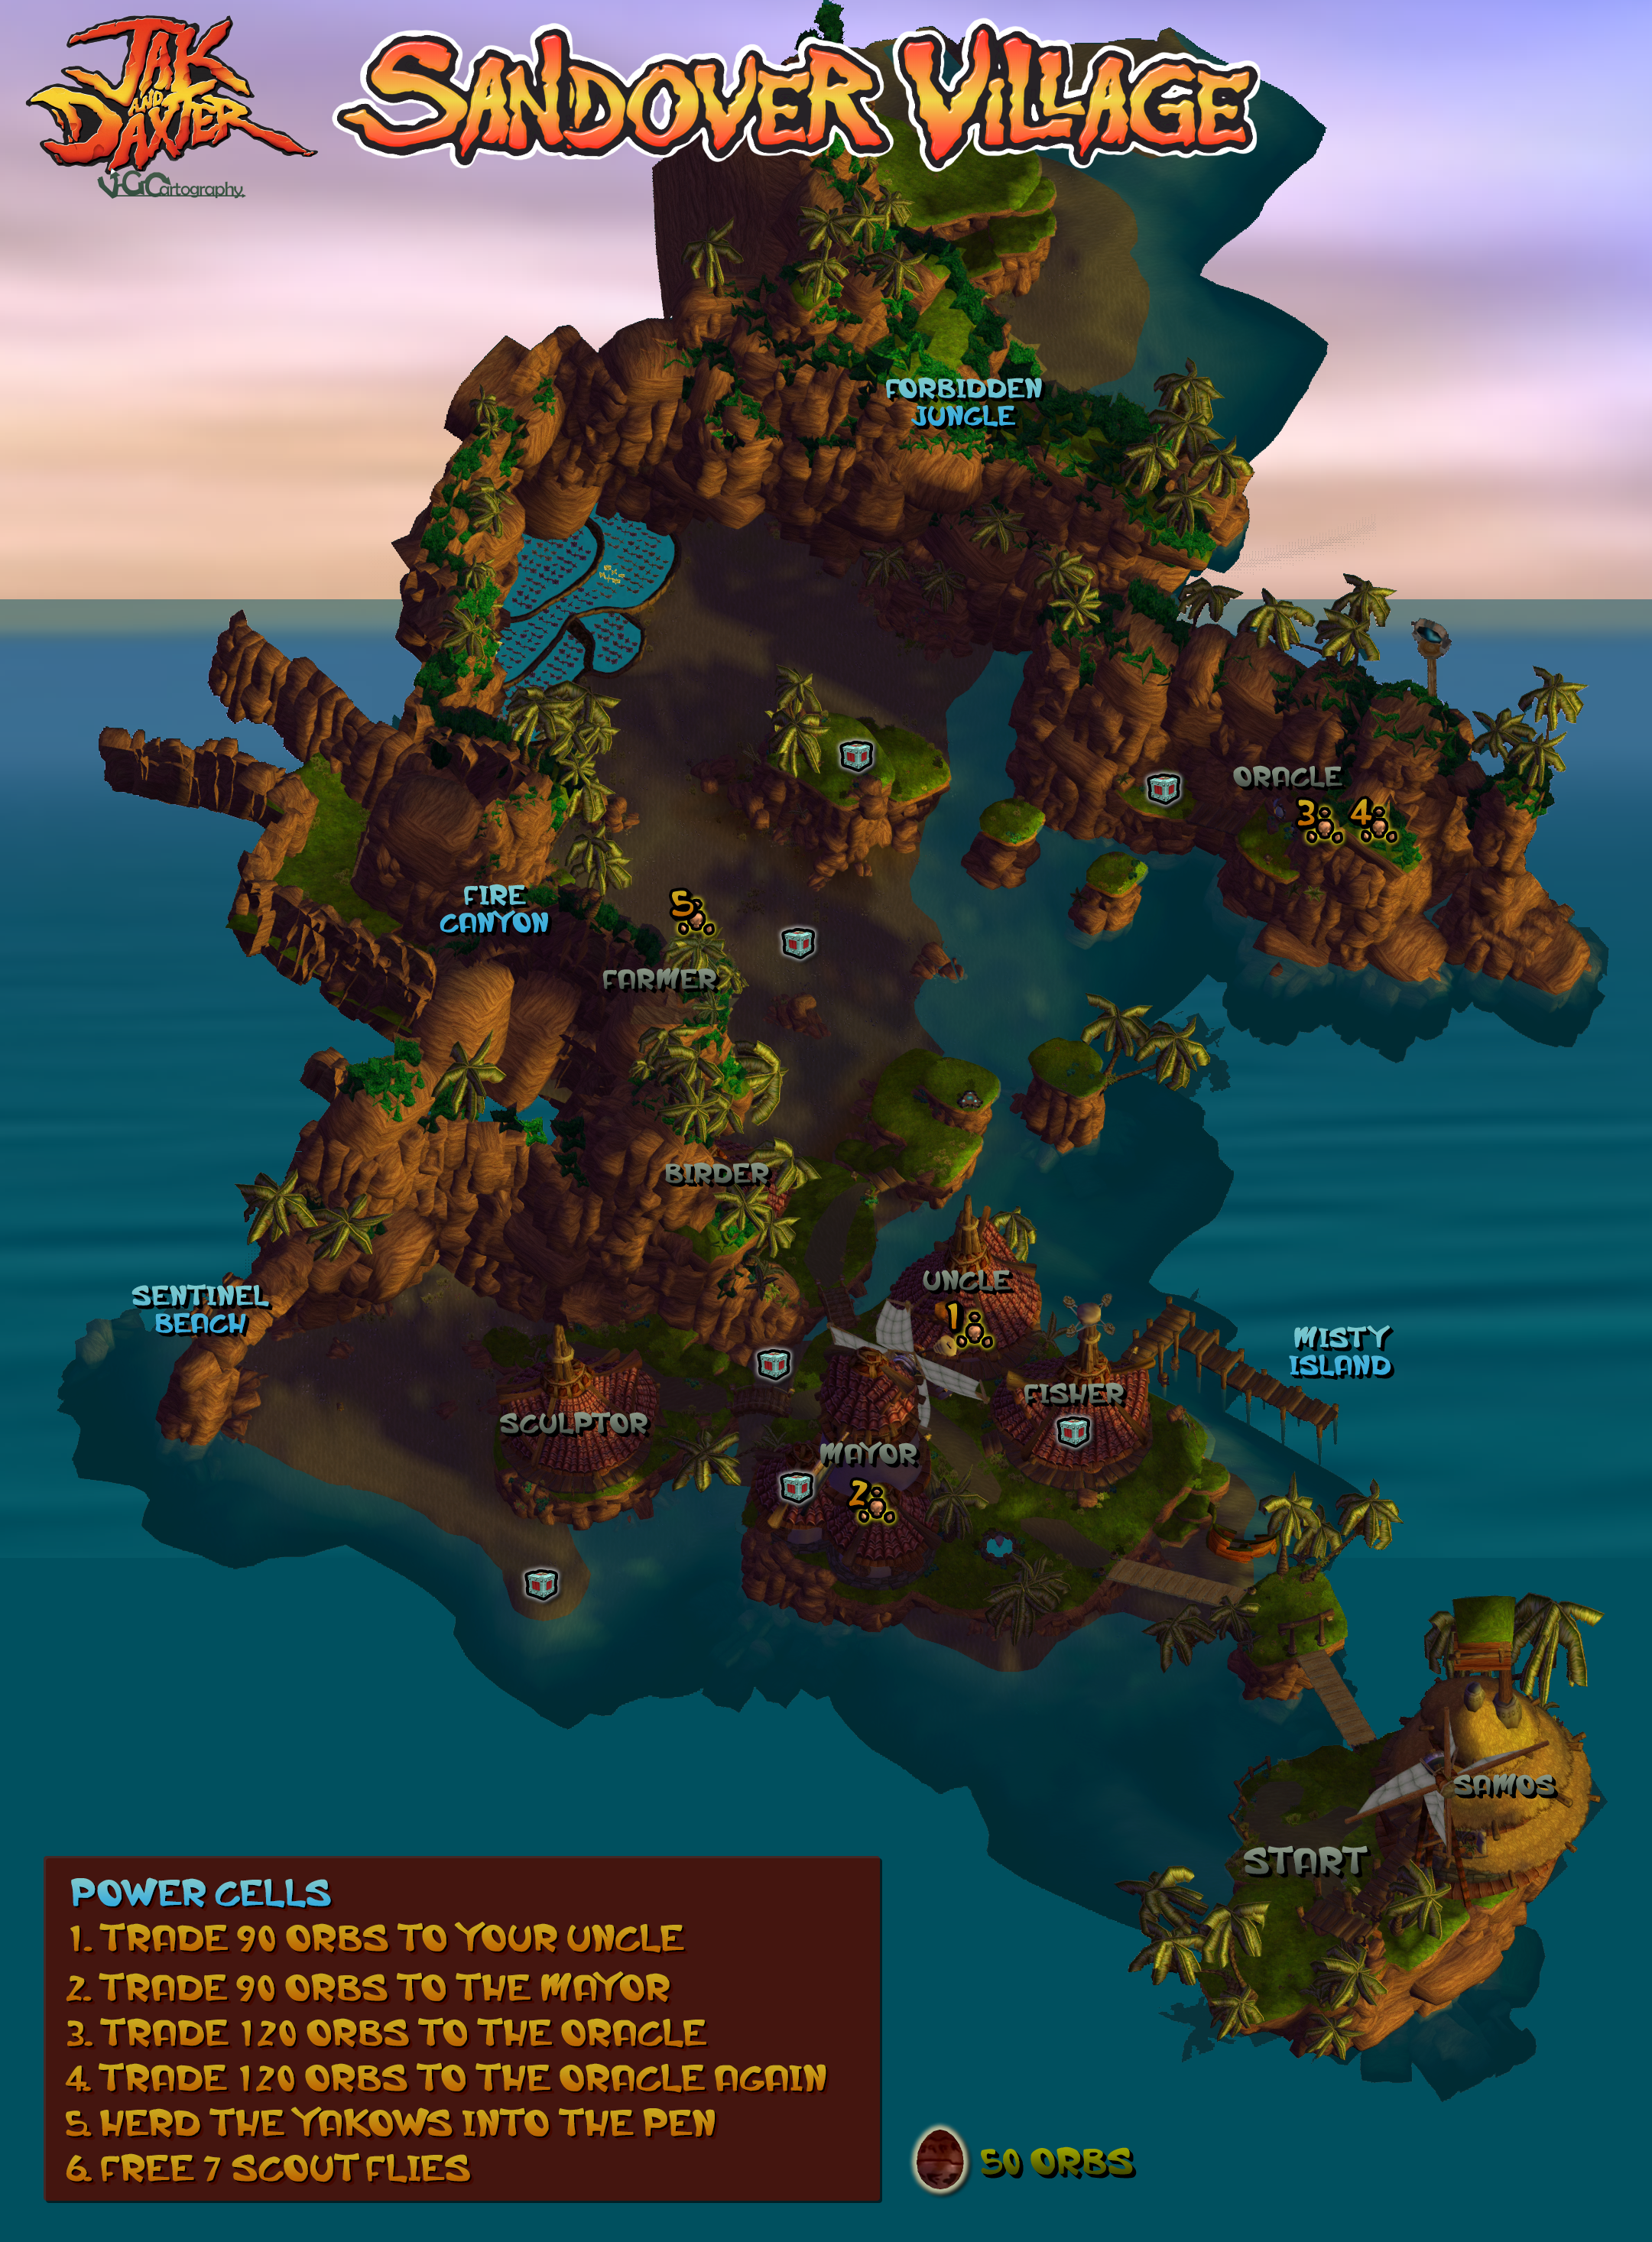
Sandover Village
2161 x 2933
4.81 MB
Sentinel Beach
2951 x 1919
4.51 MB
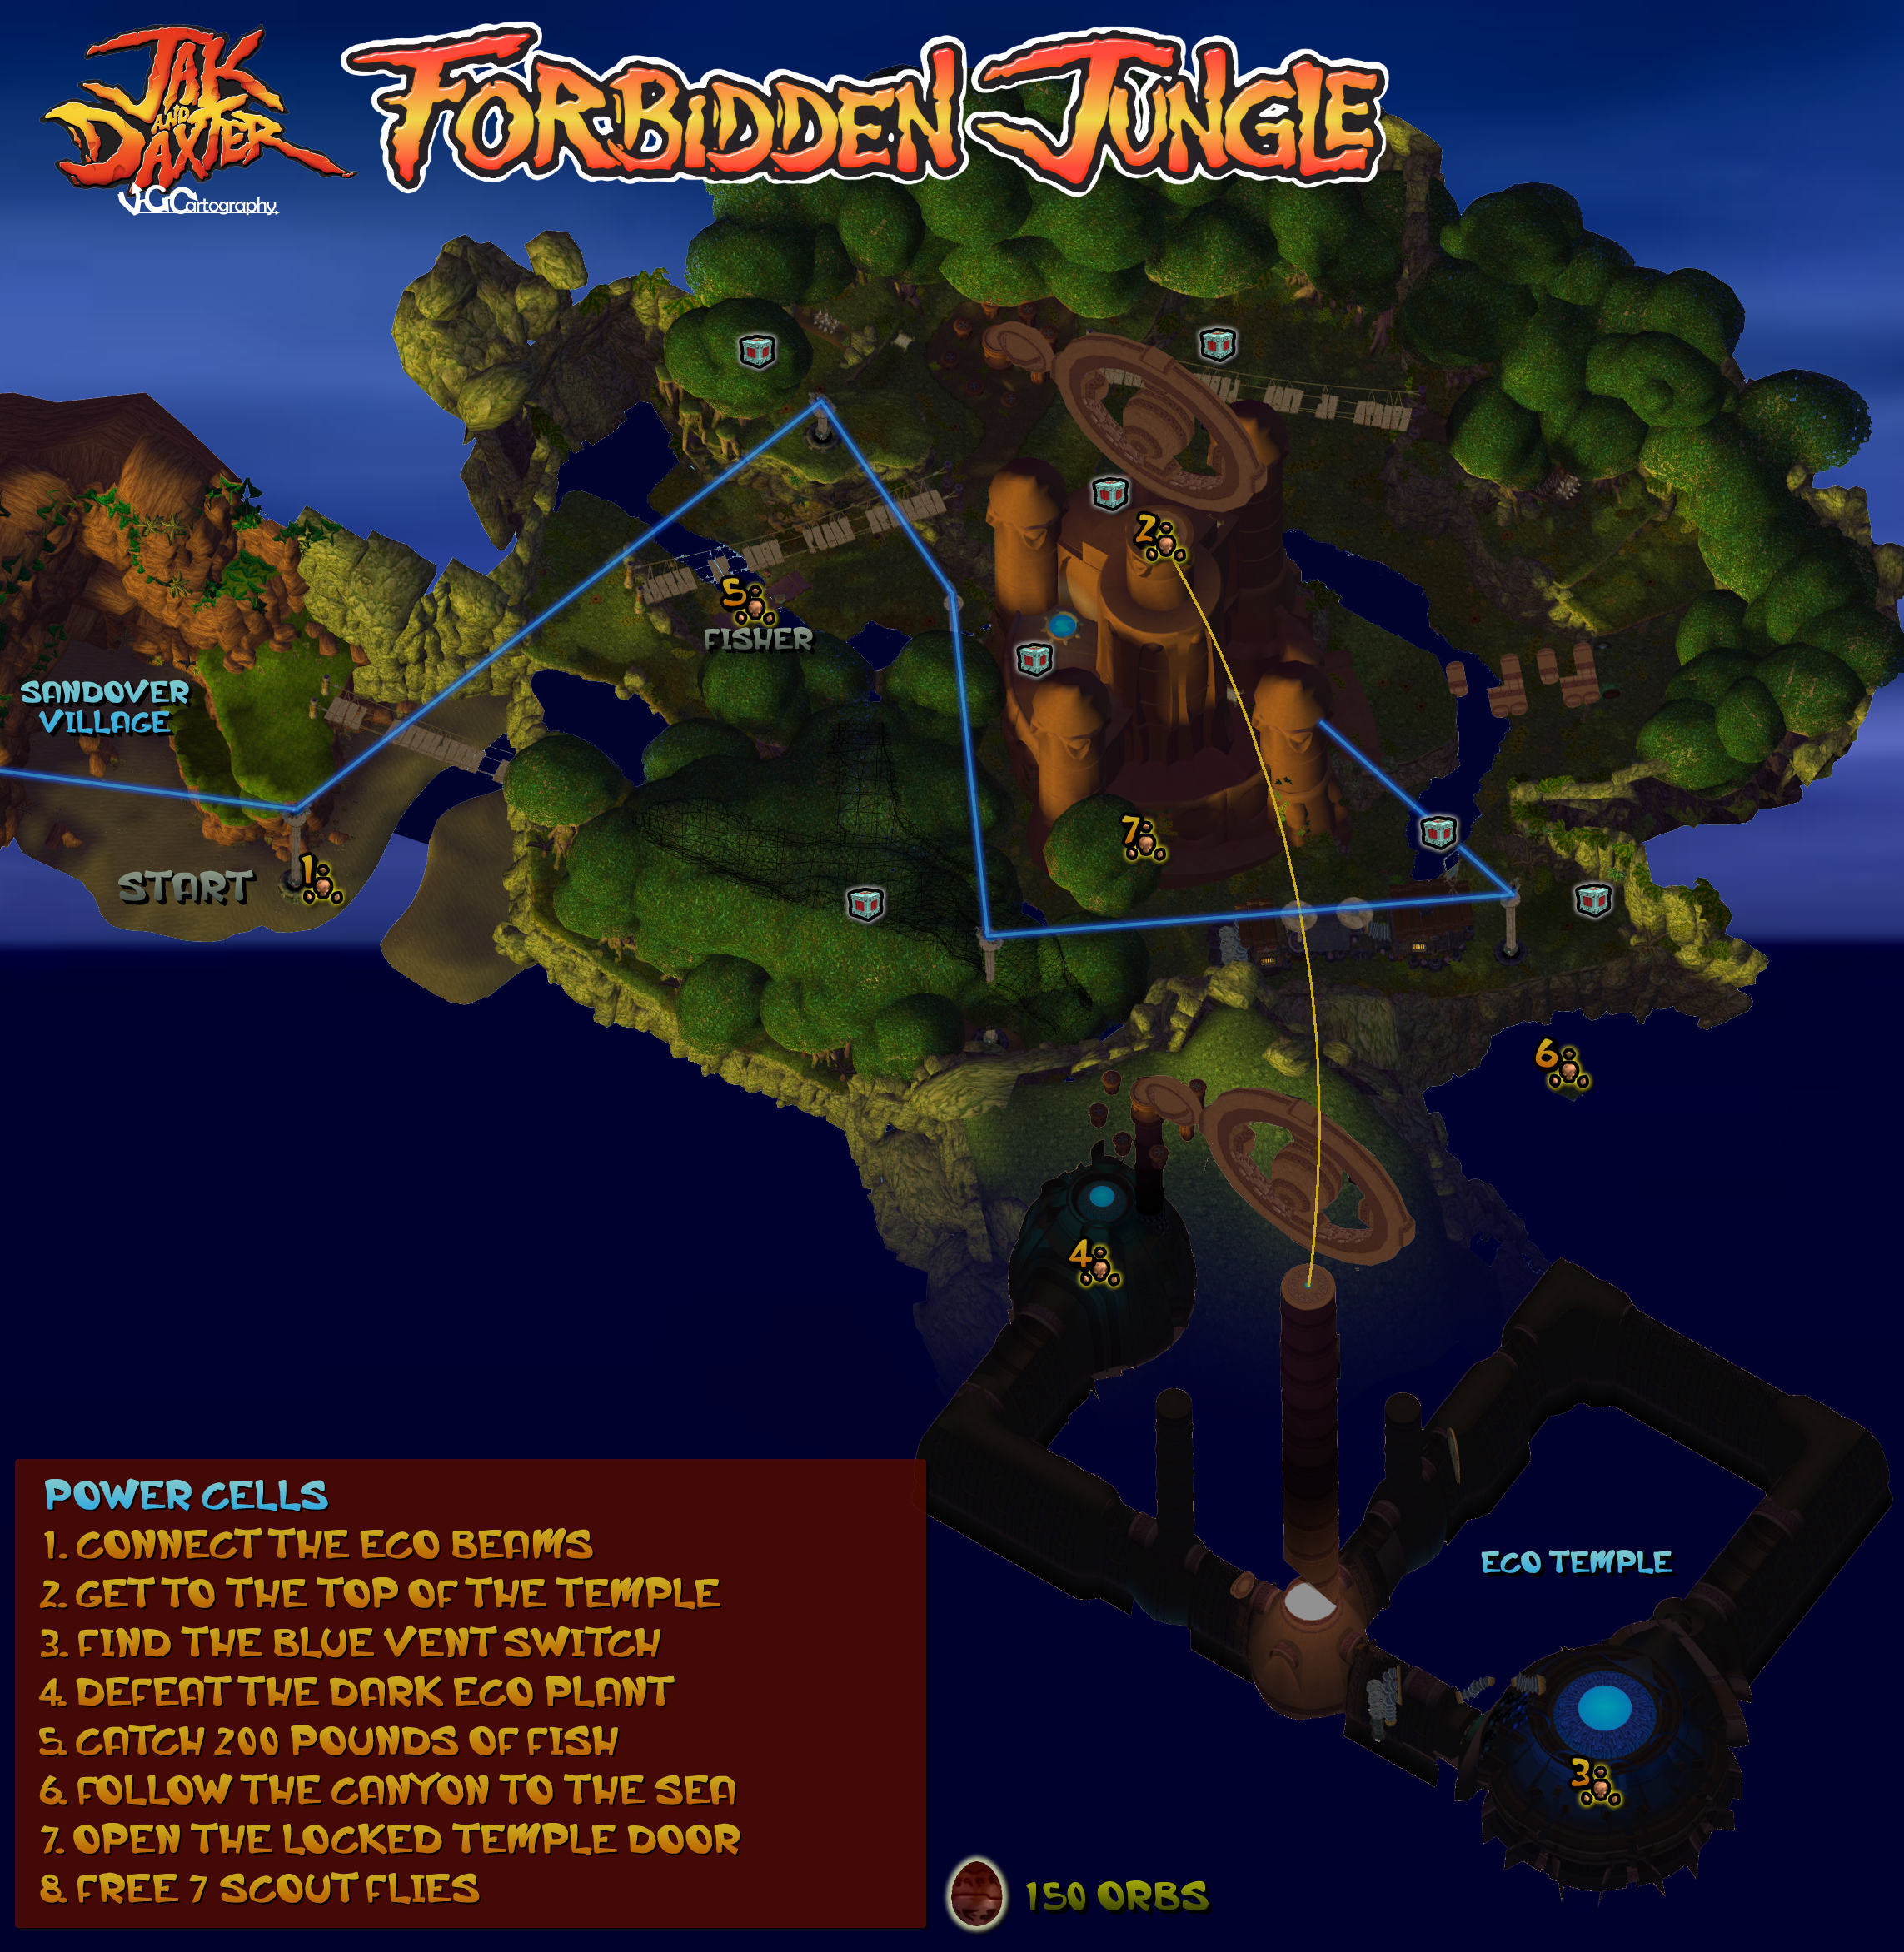
Forbidden Jungle
2286 x 2344
4.35 MB
Misty Island
2532 x 2600
3.92 MB
Fire Canyon
3858 x 1994
2.64 MB
Pecursor Basin
2575 x 1918
4.13 MB
Boggy Swamp
2606 x 1919
K
L
Lunatic Dawn: Tempest (J) Maps
© 2001 ARTDiNK
768 x 512
325 kB
M
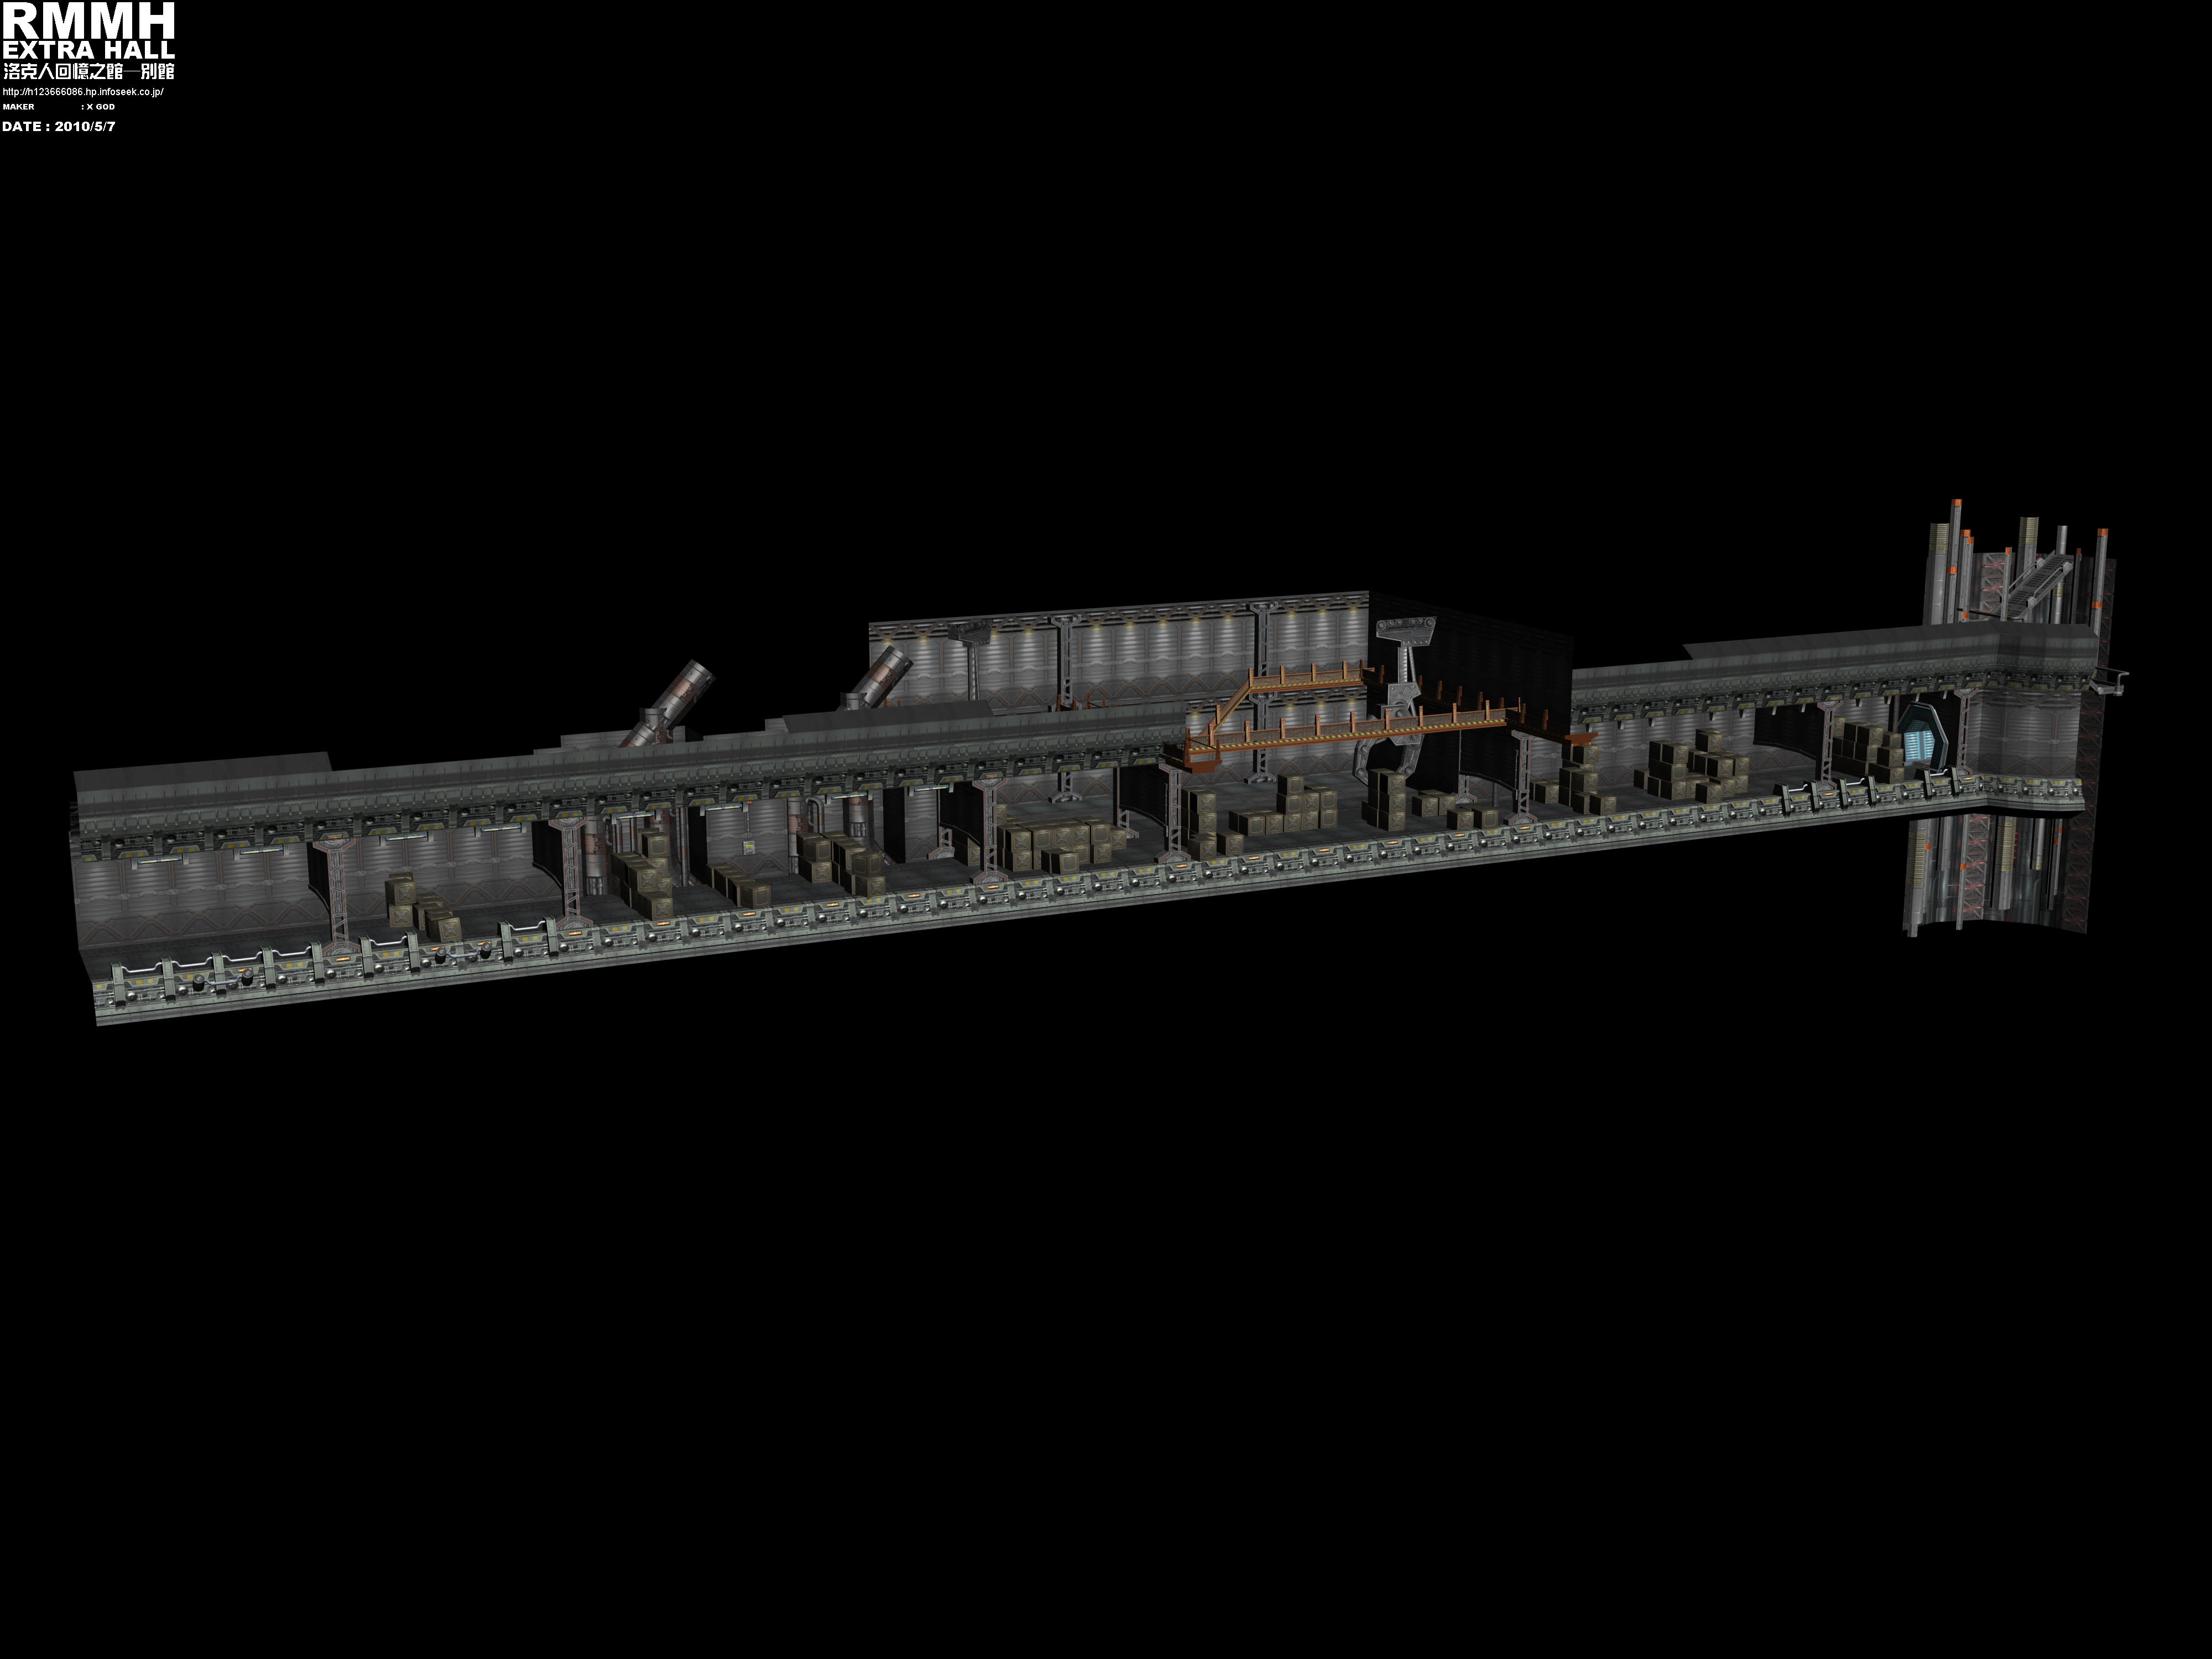
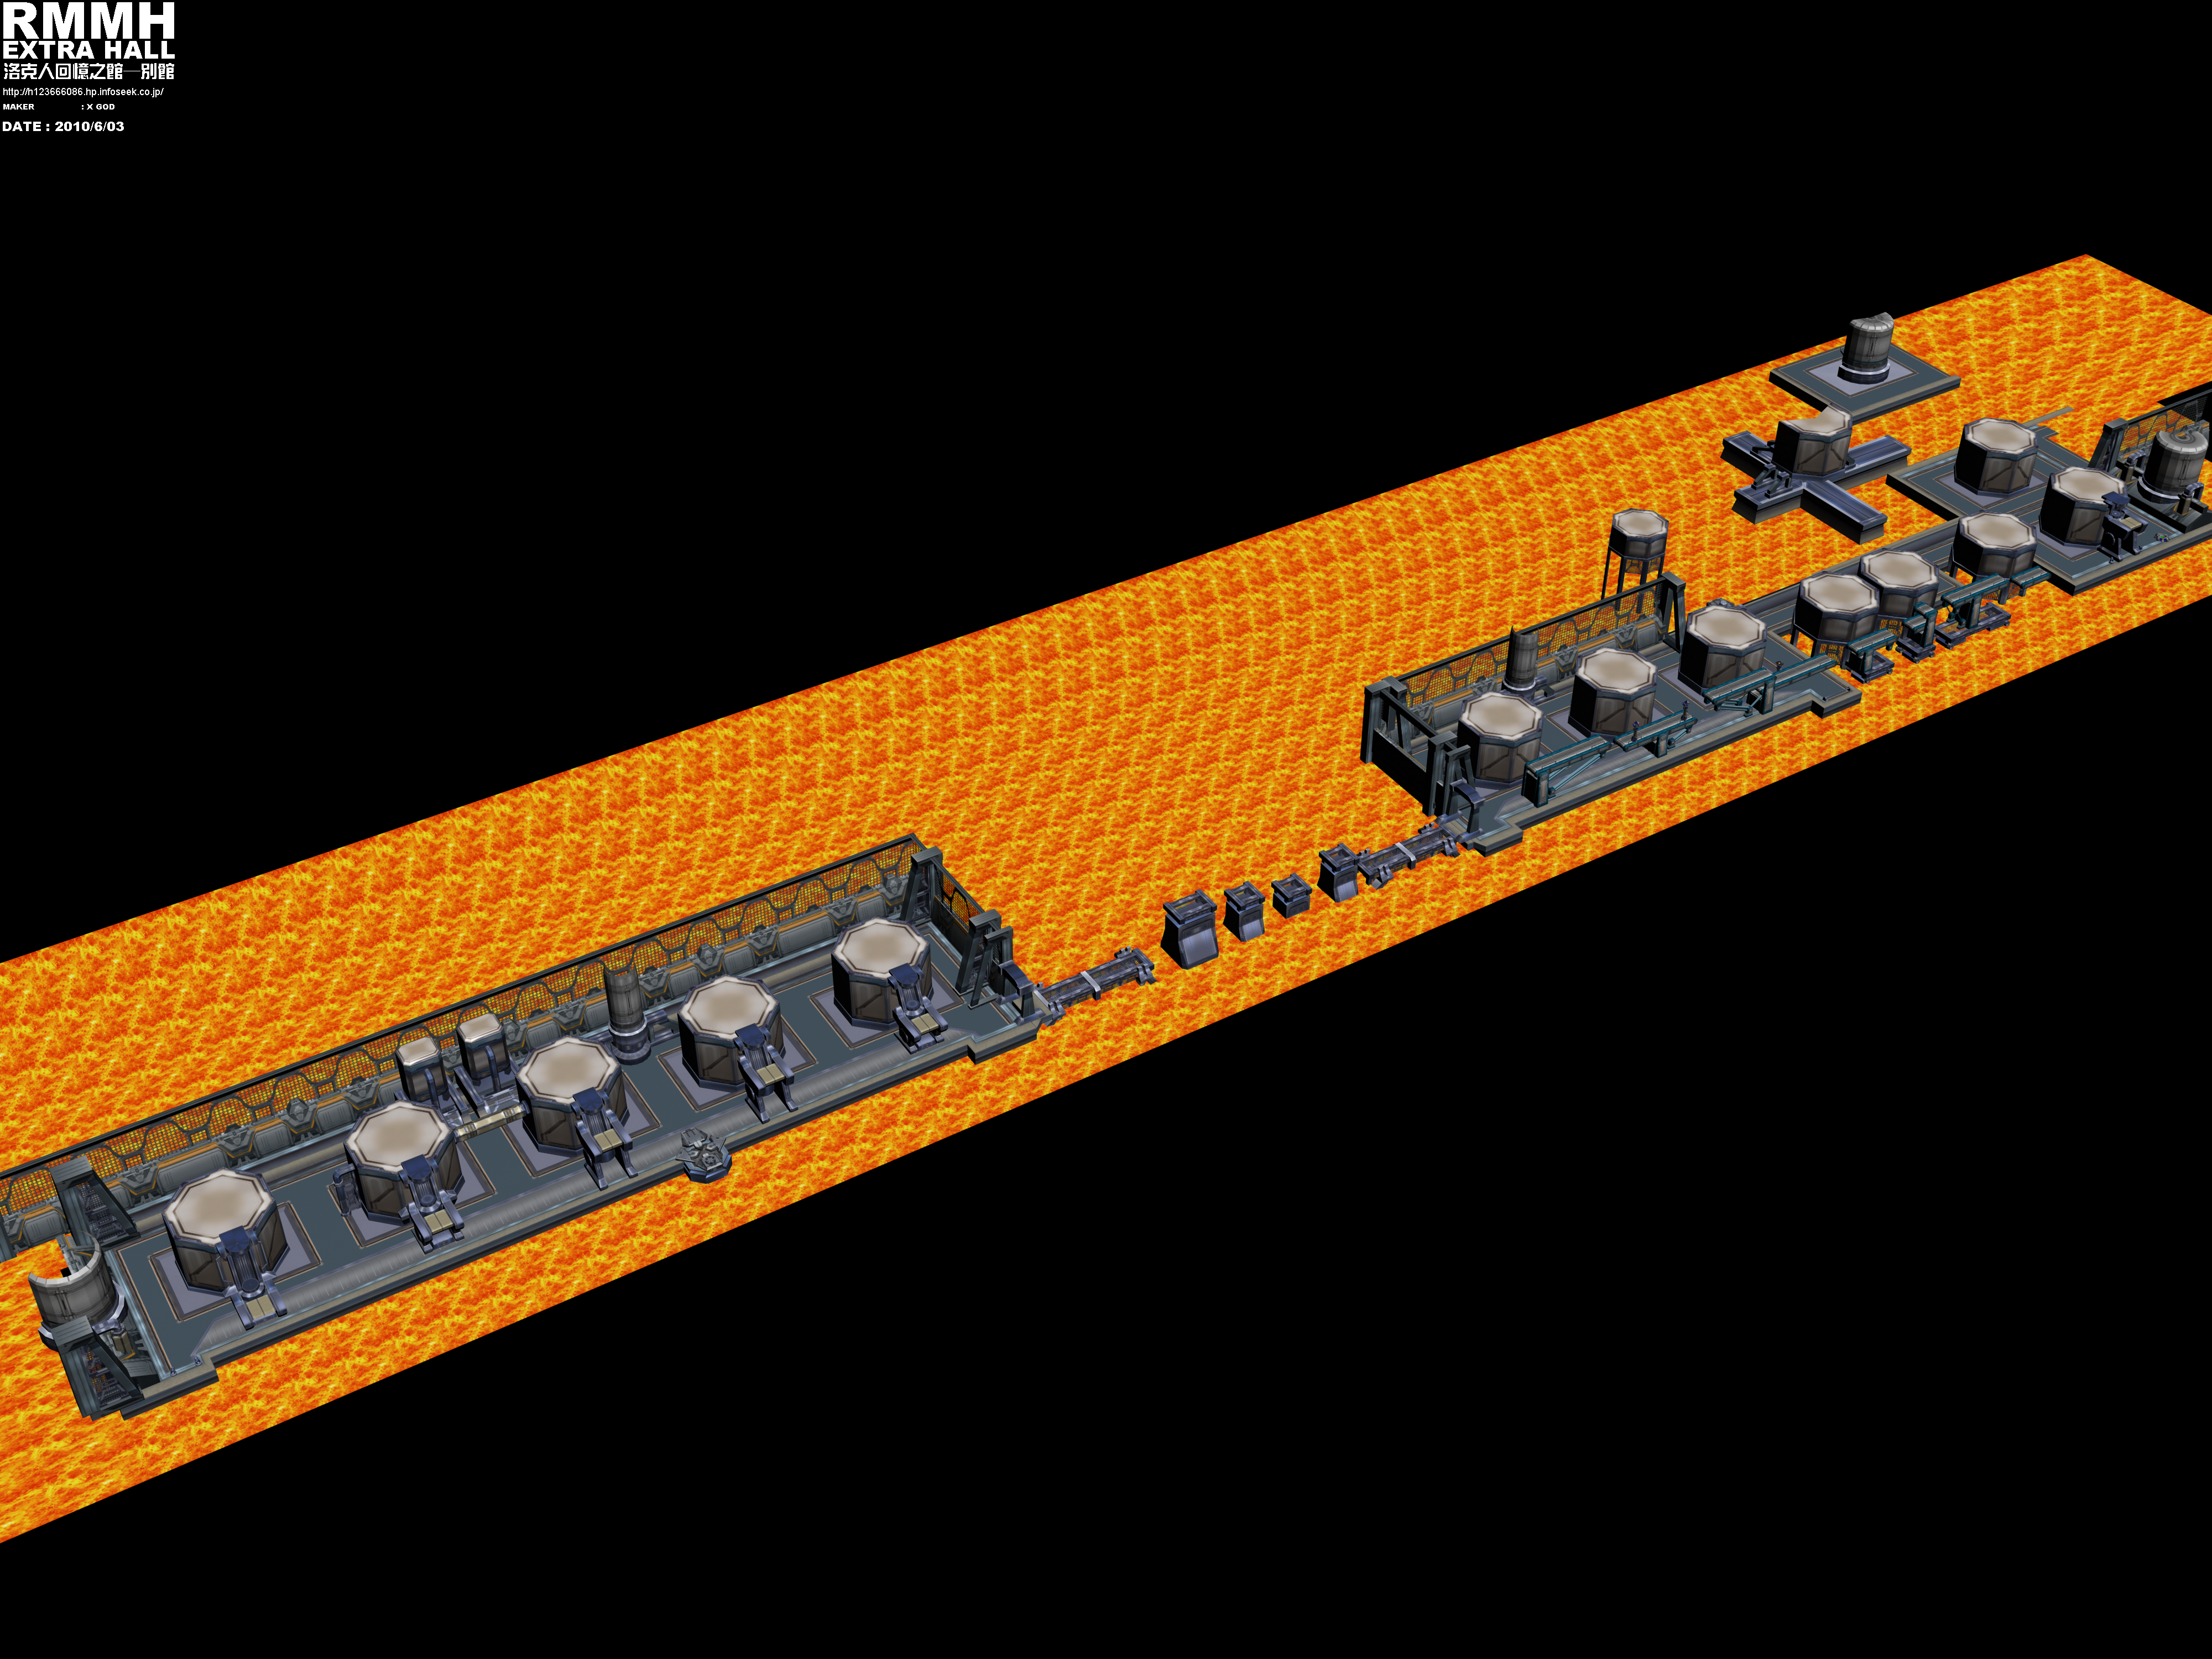
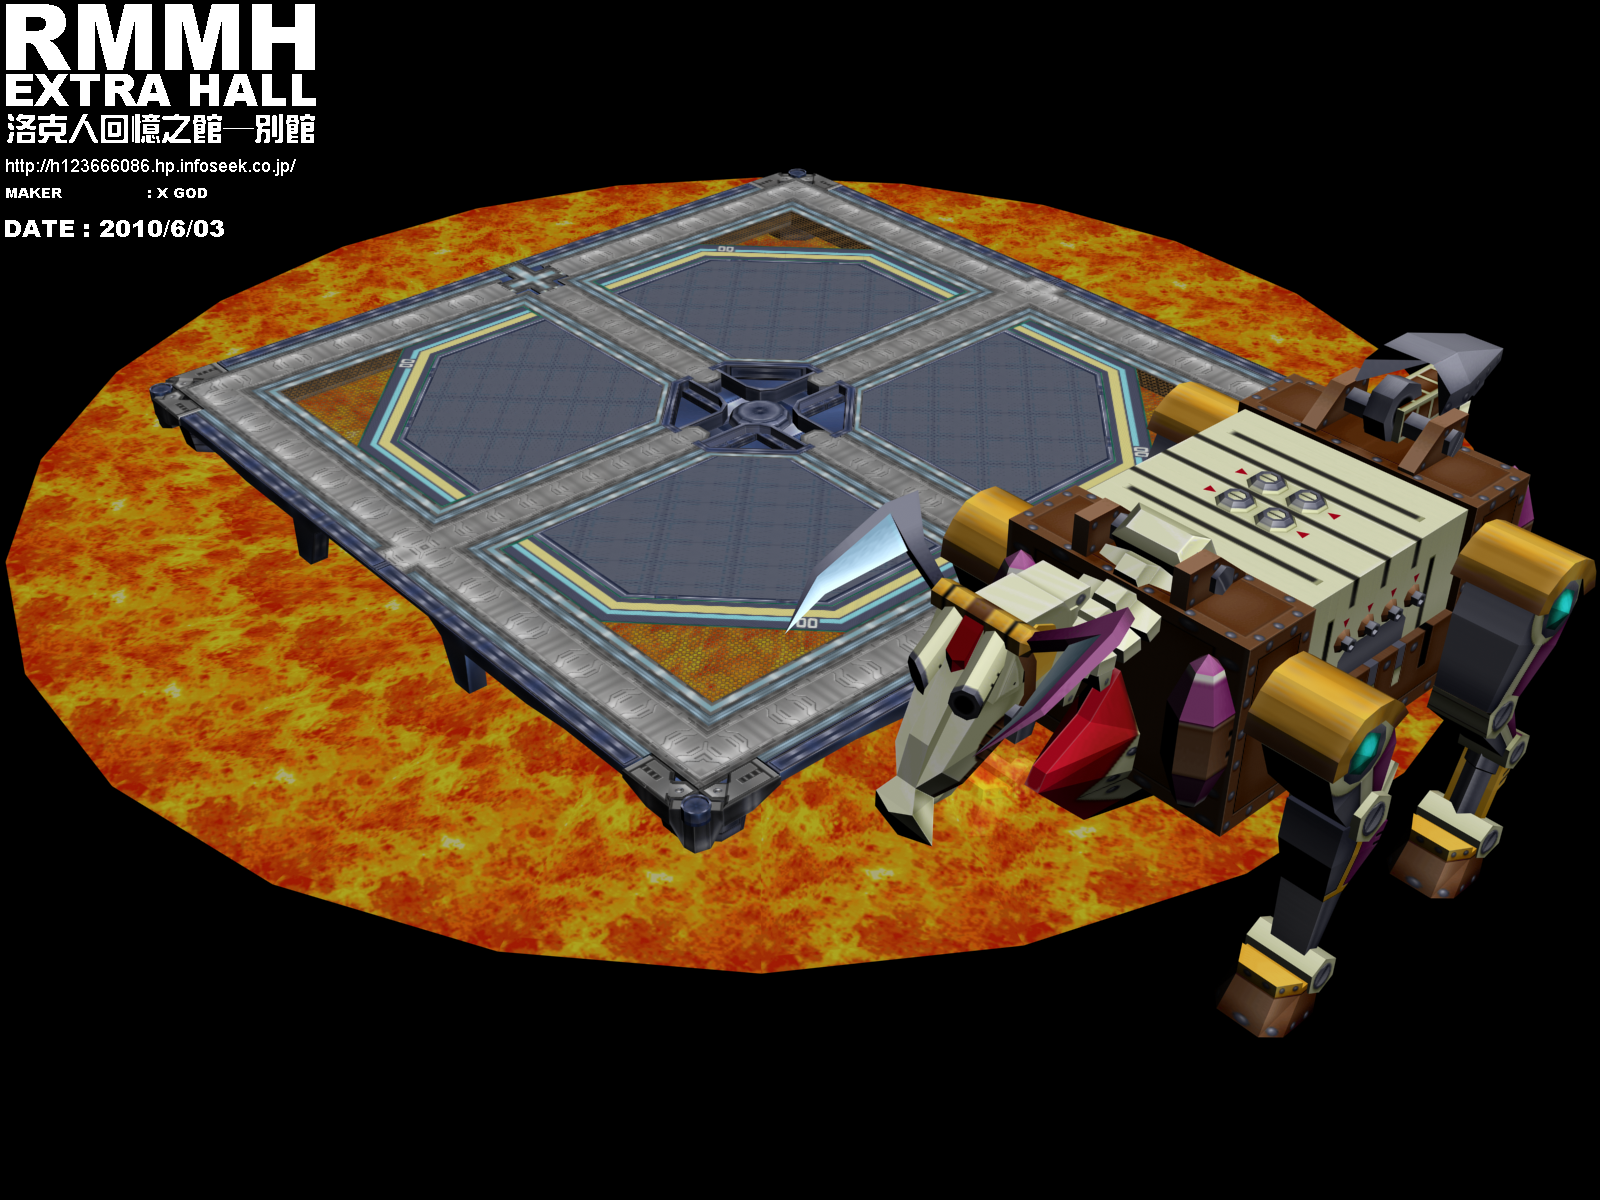
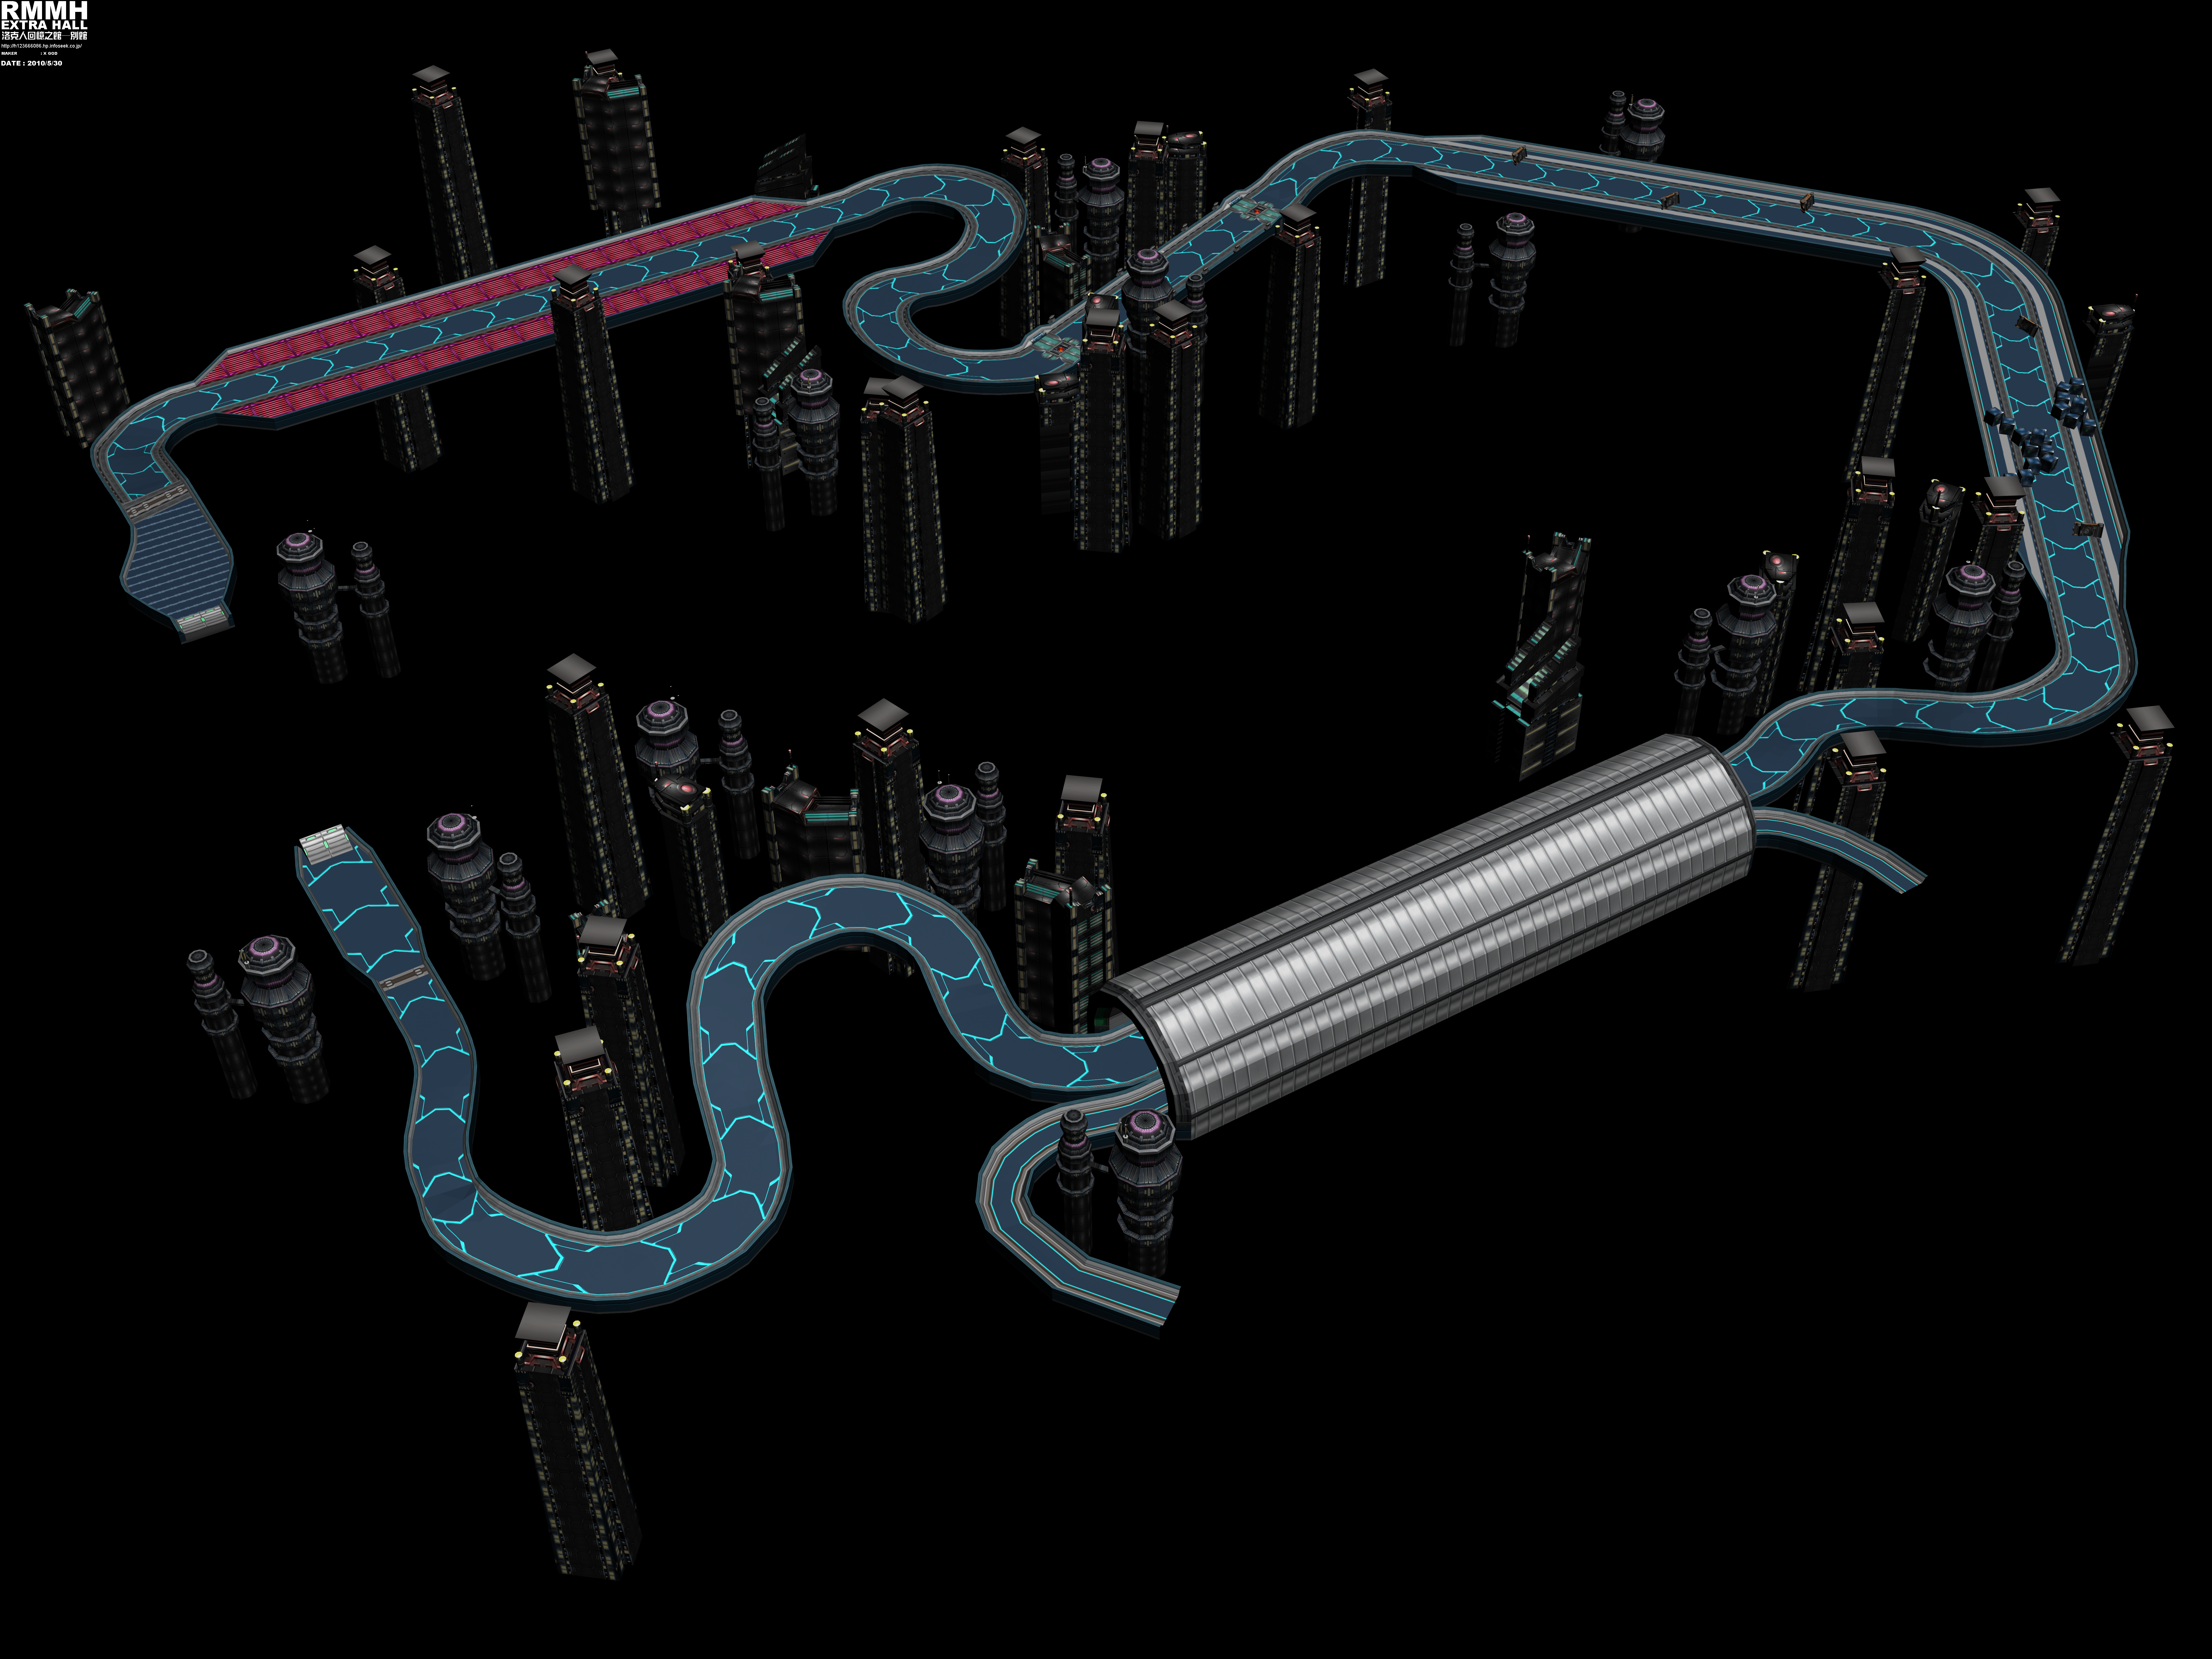
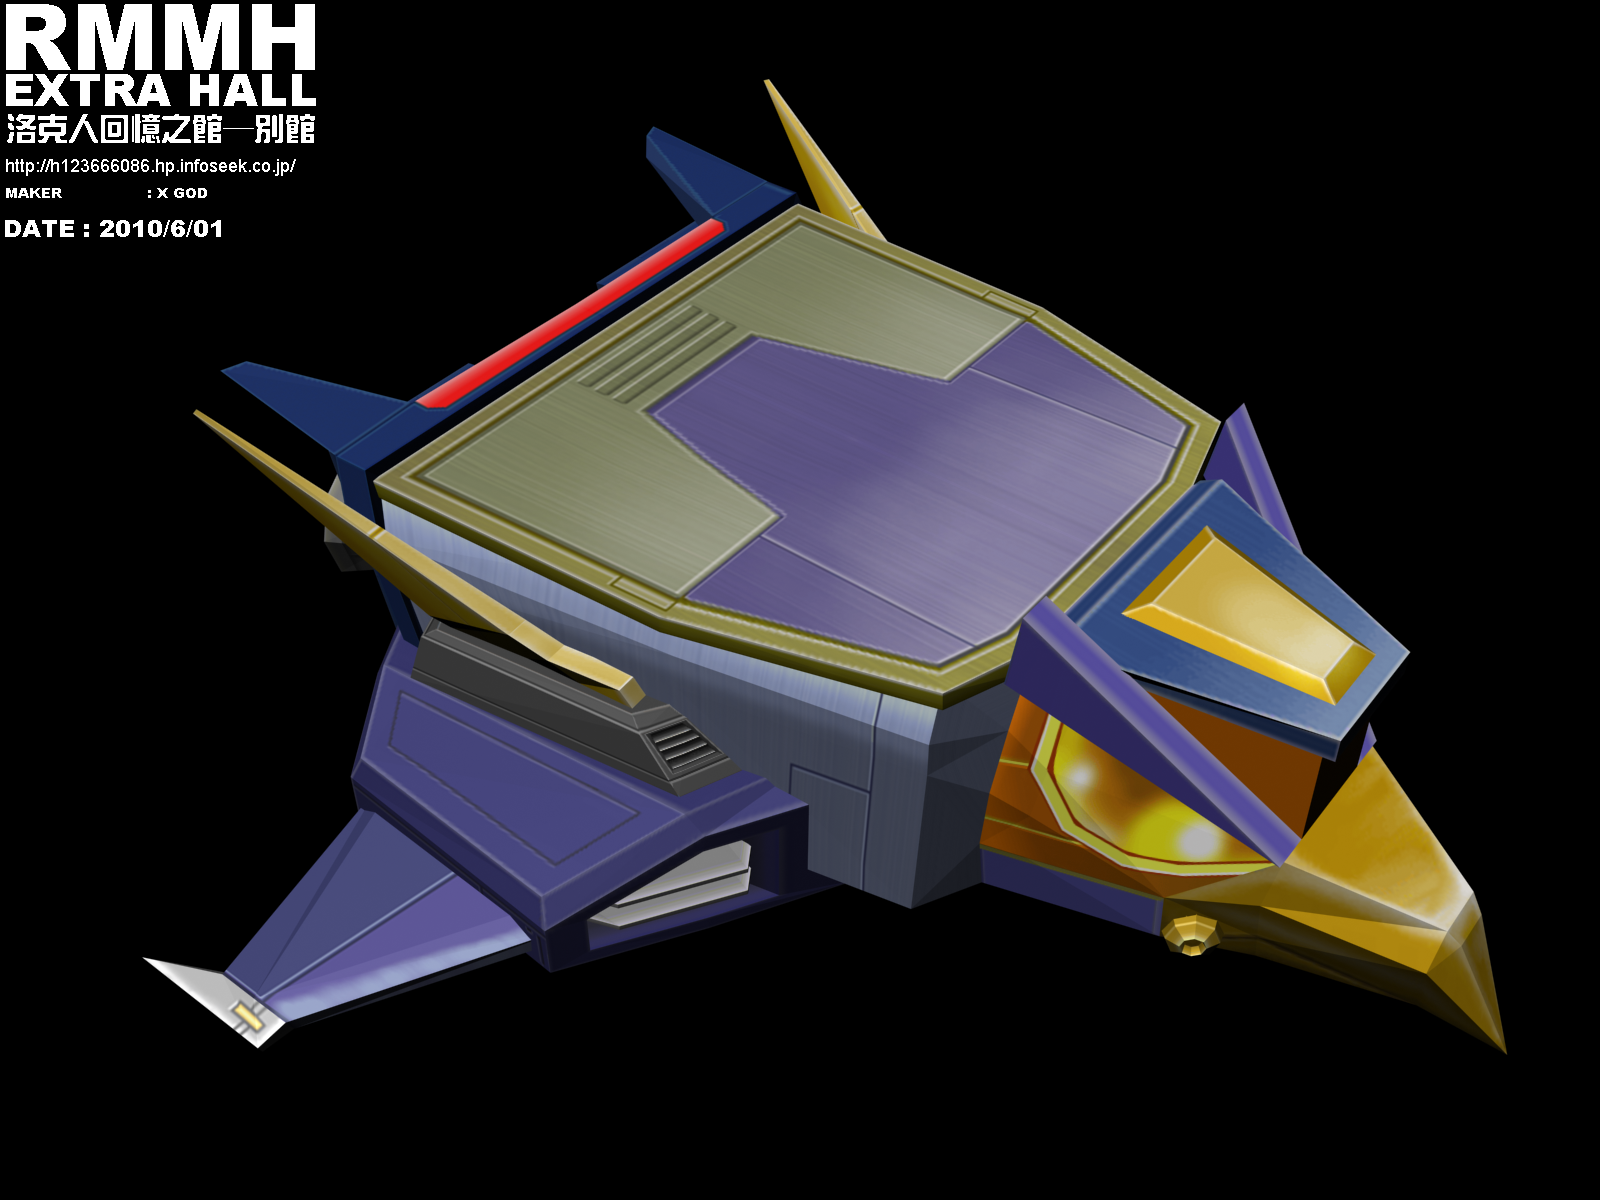
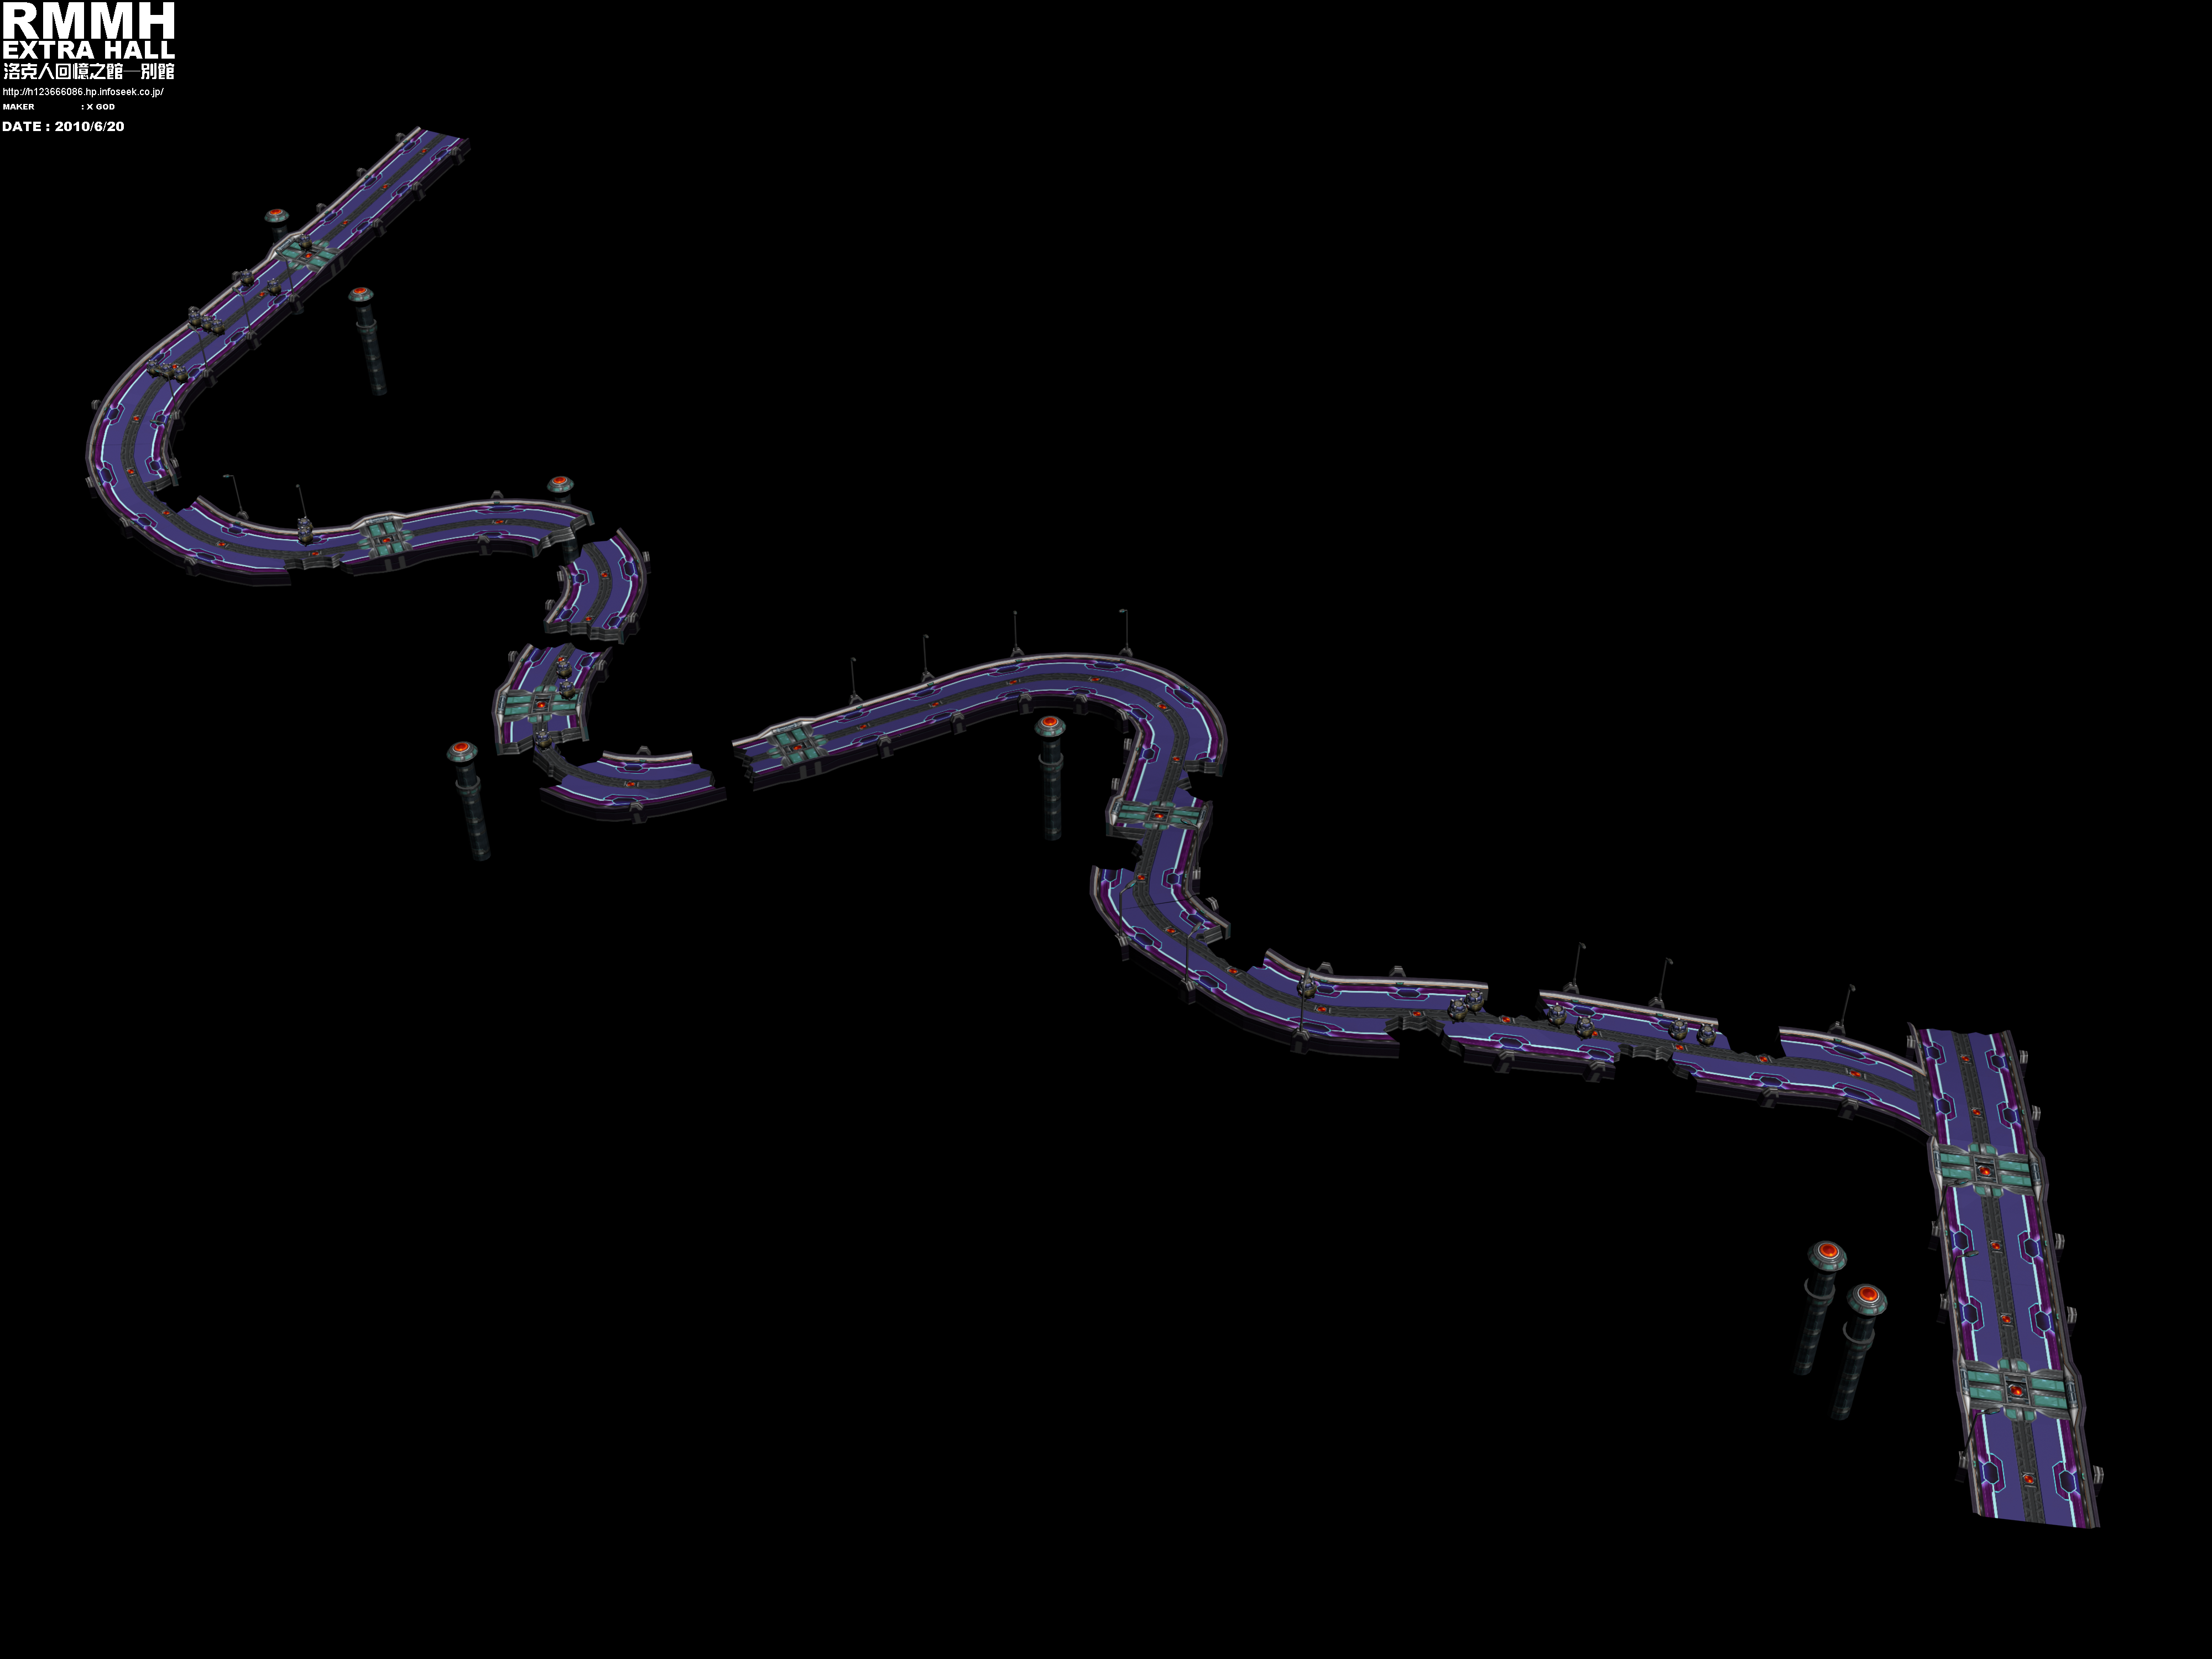
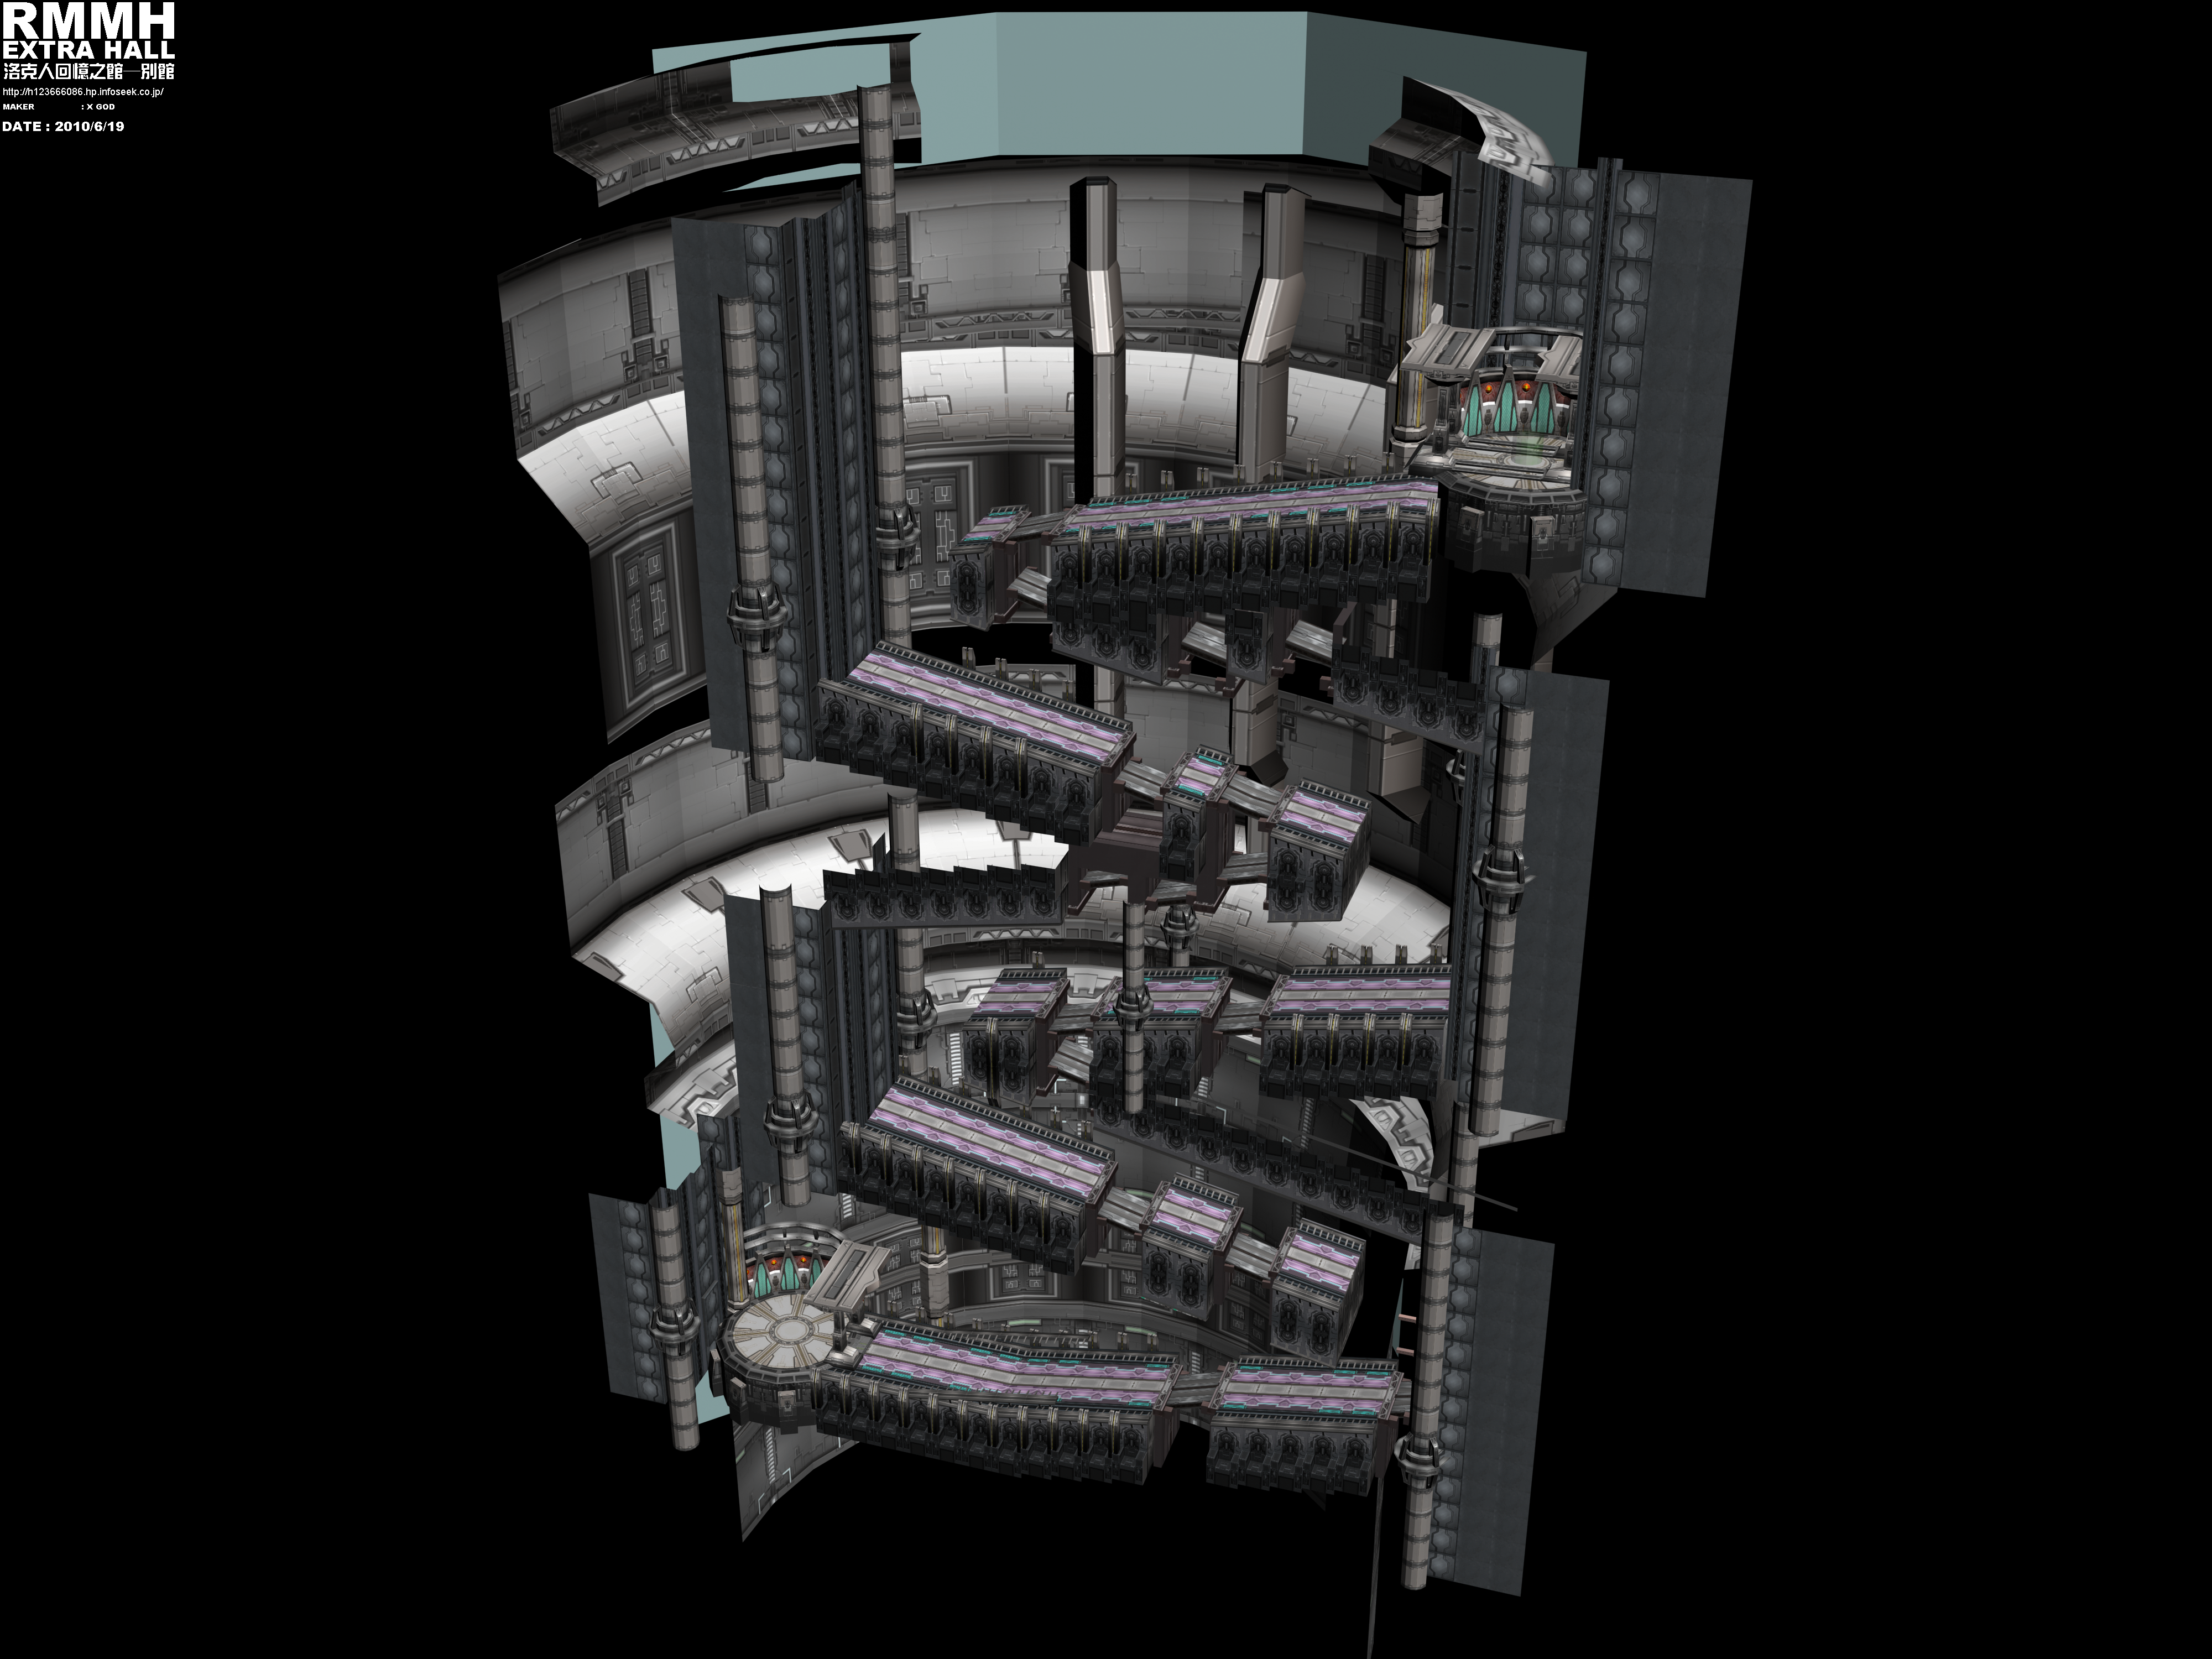
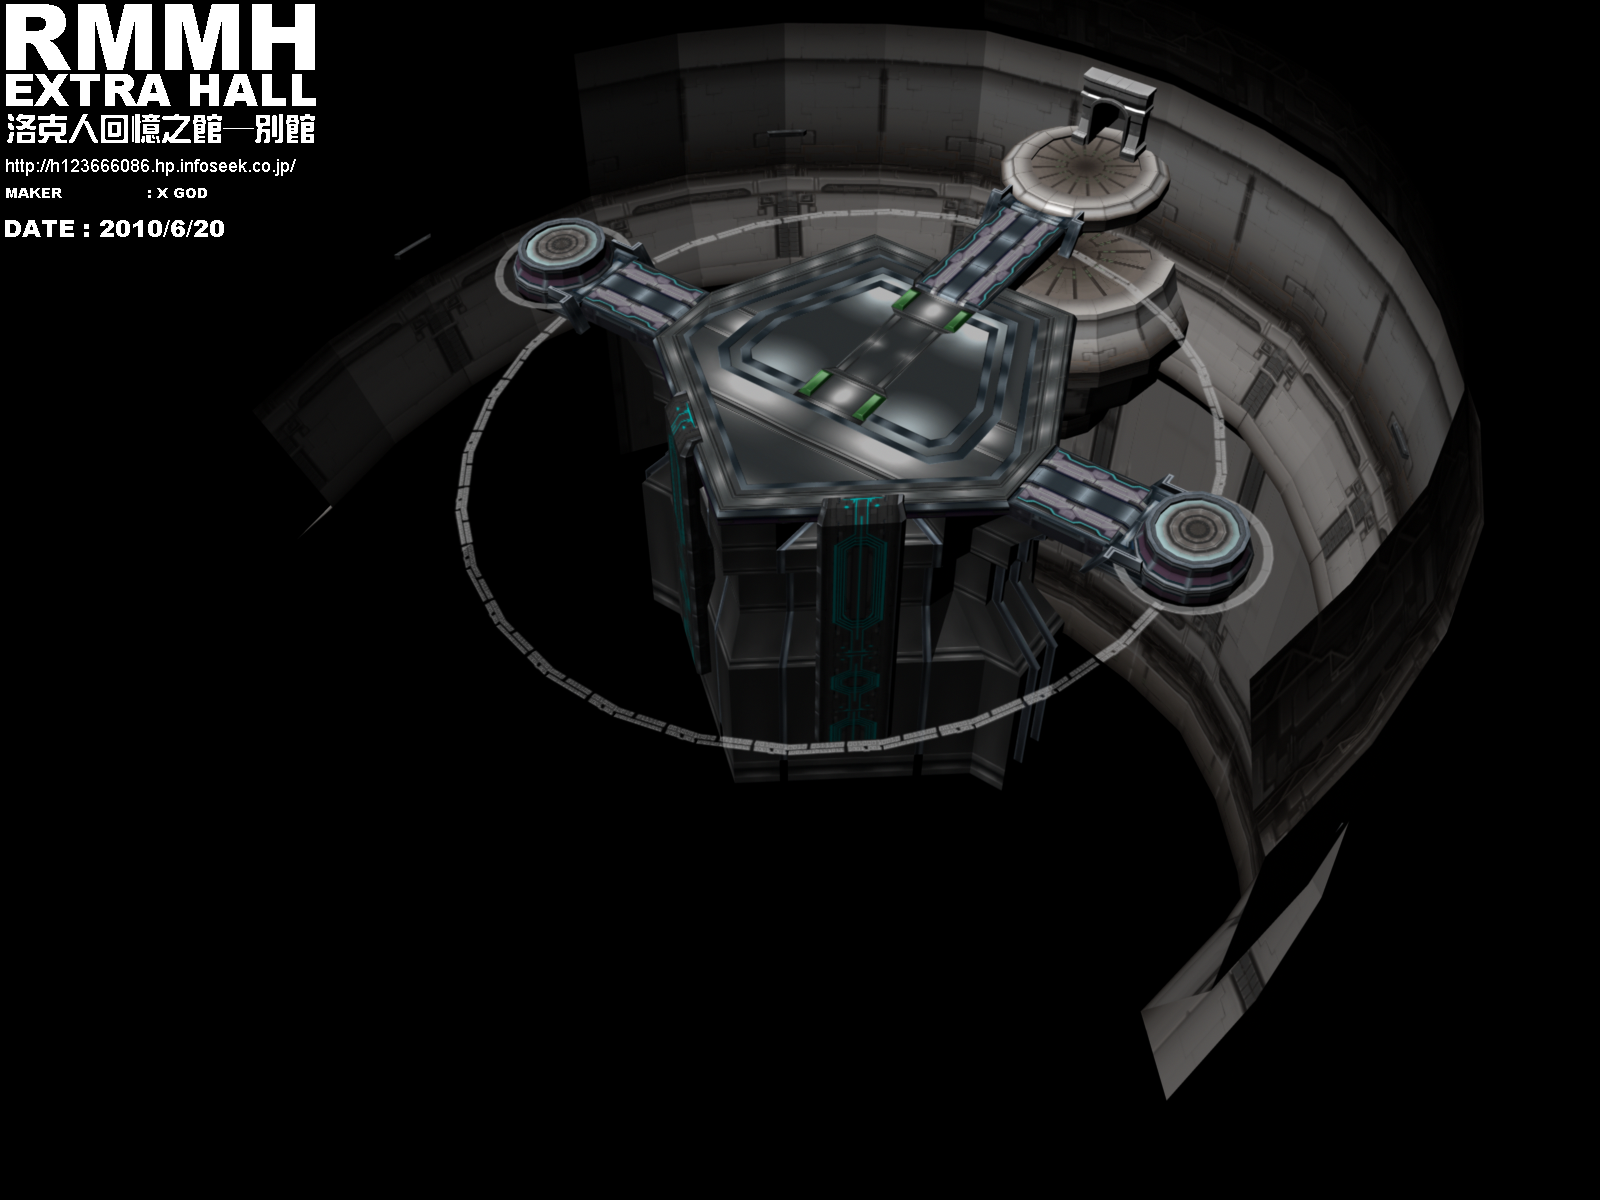
Mega Man X 7 Maps
© 2003 Capcom, Co., Ltd. / Capcom U.S.A., Inc.
Intro Stage
Area 1
4000 x 3000
2.12 MB
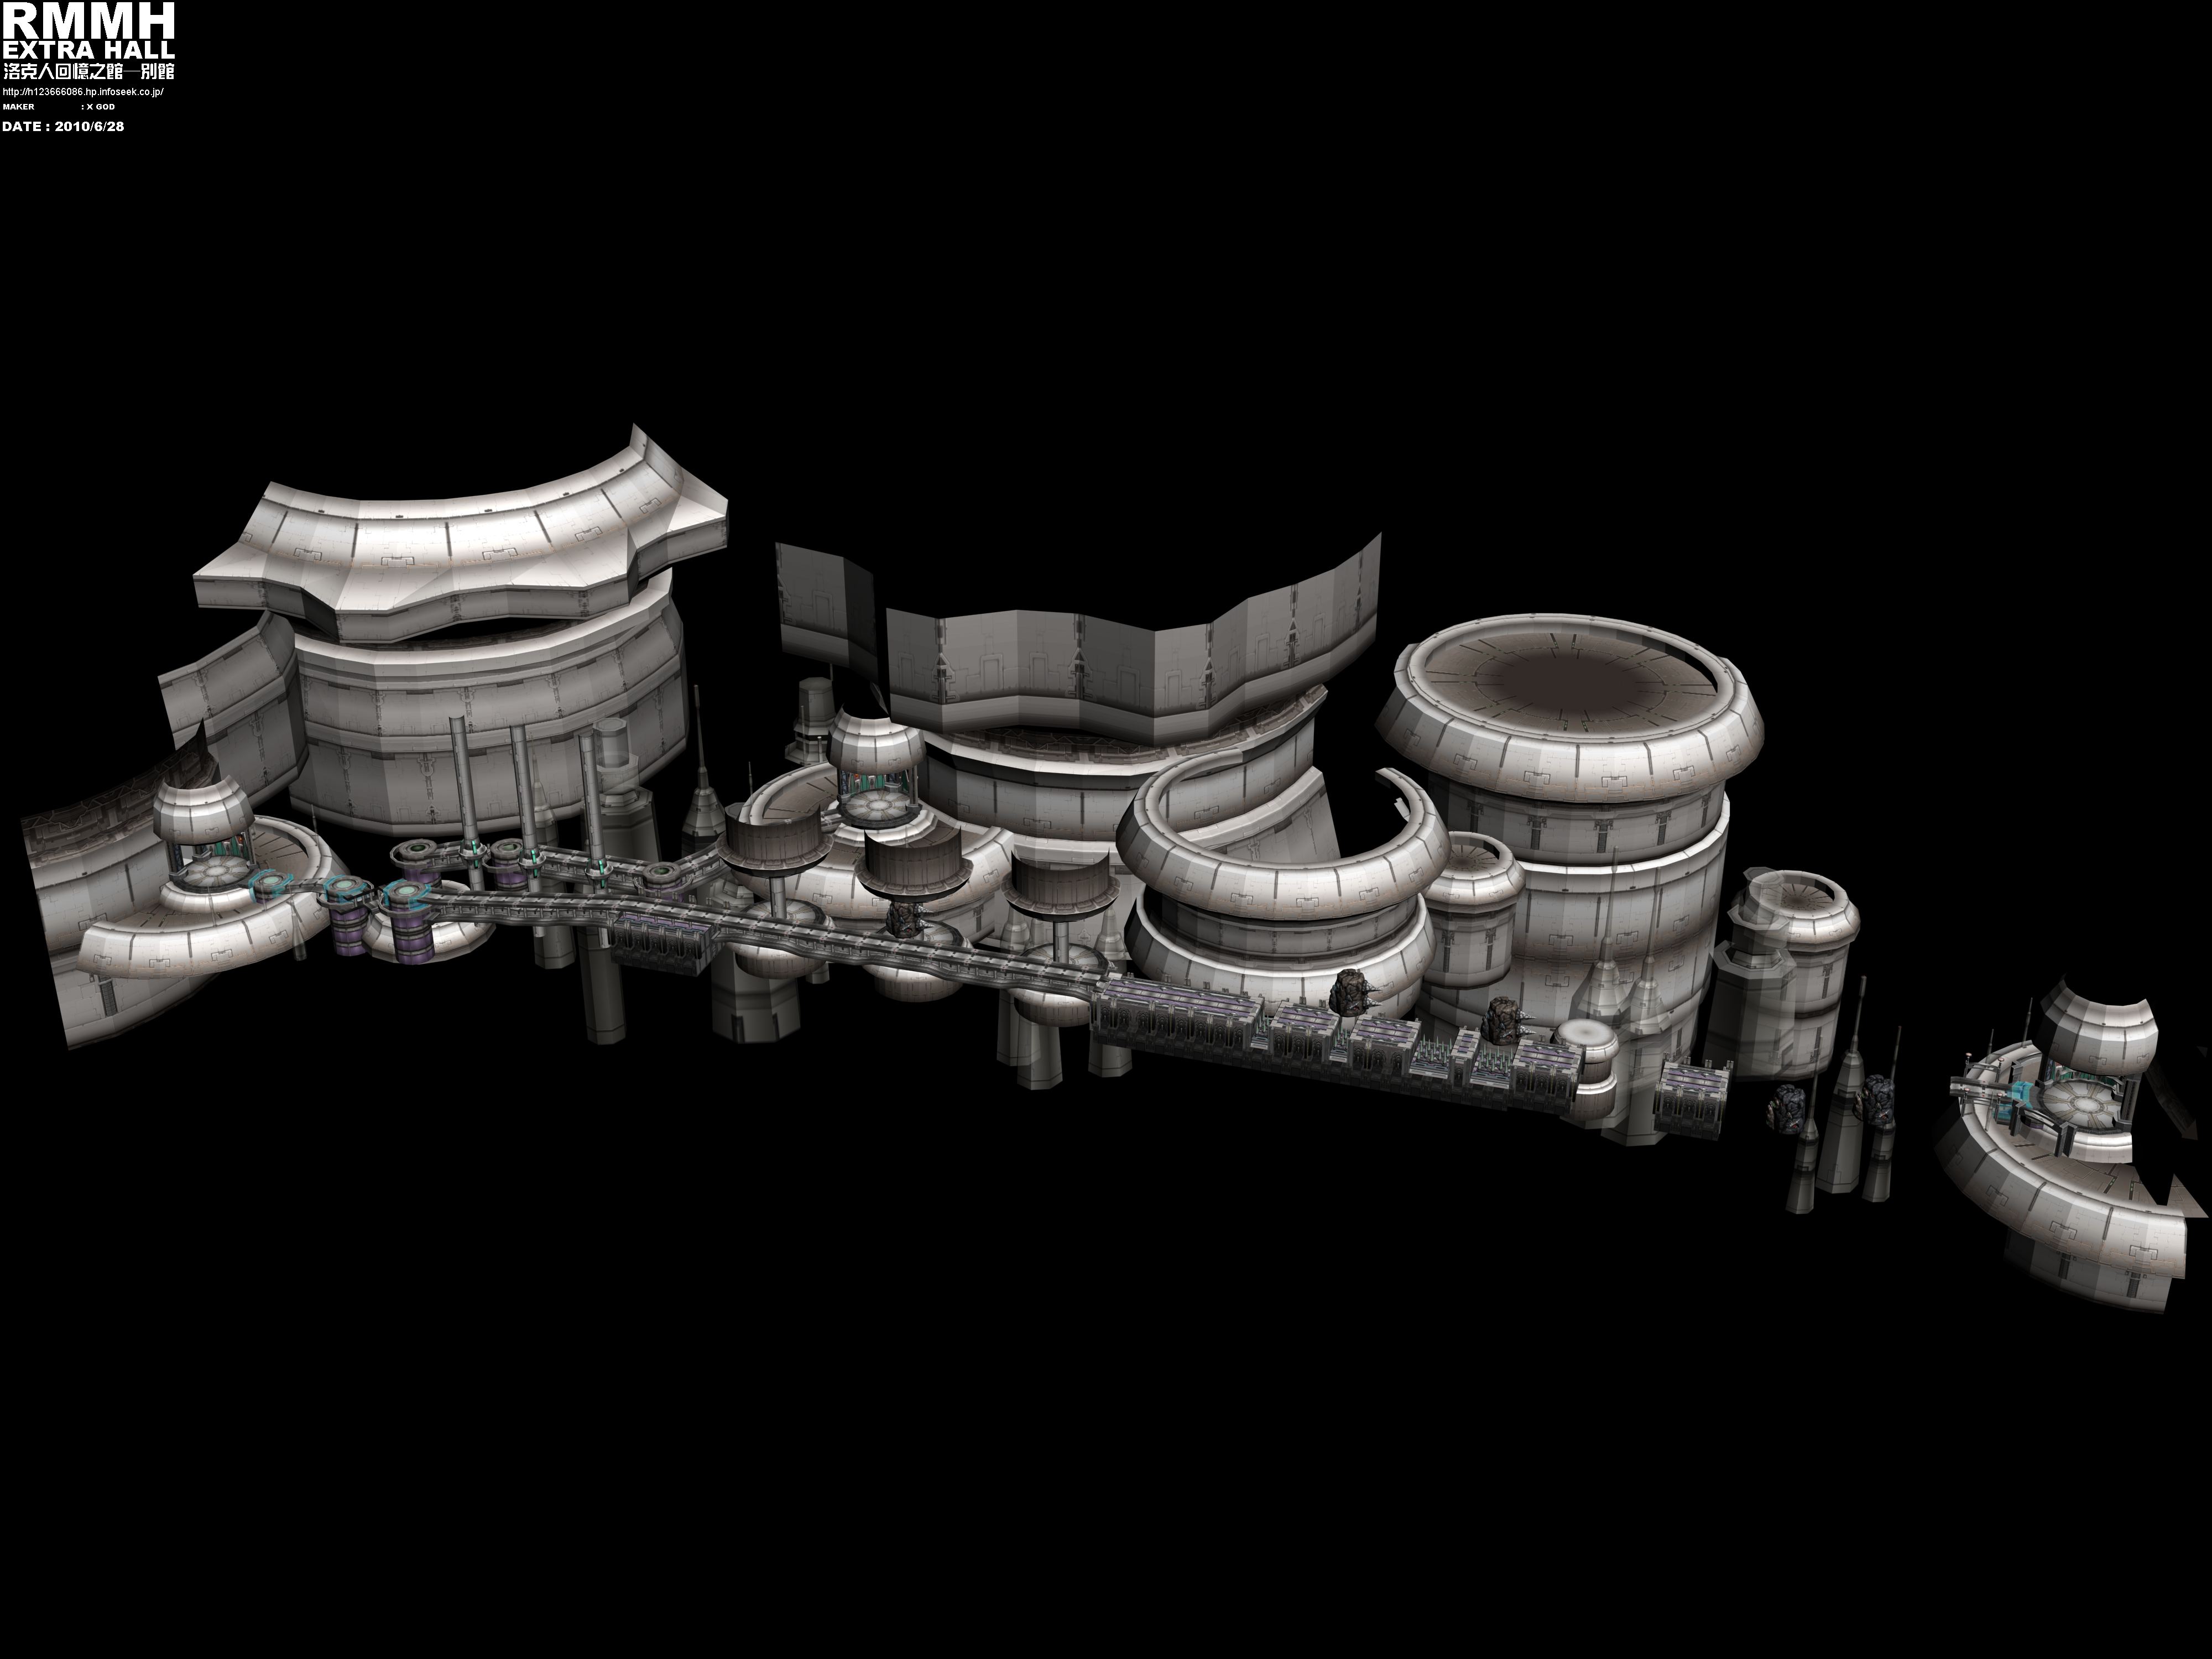
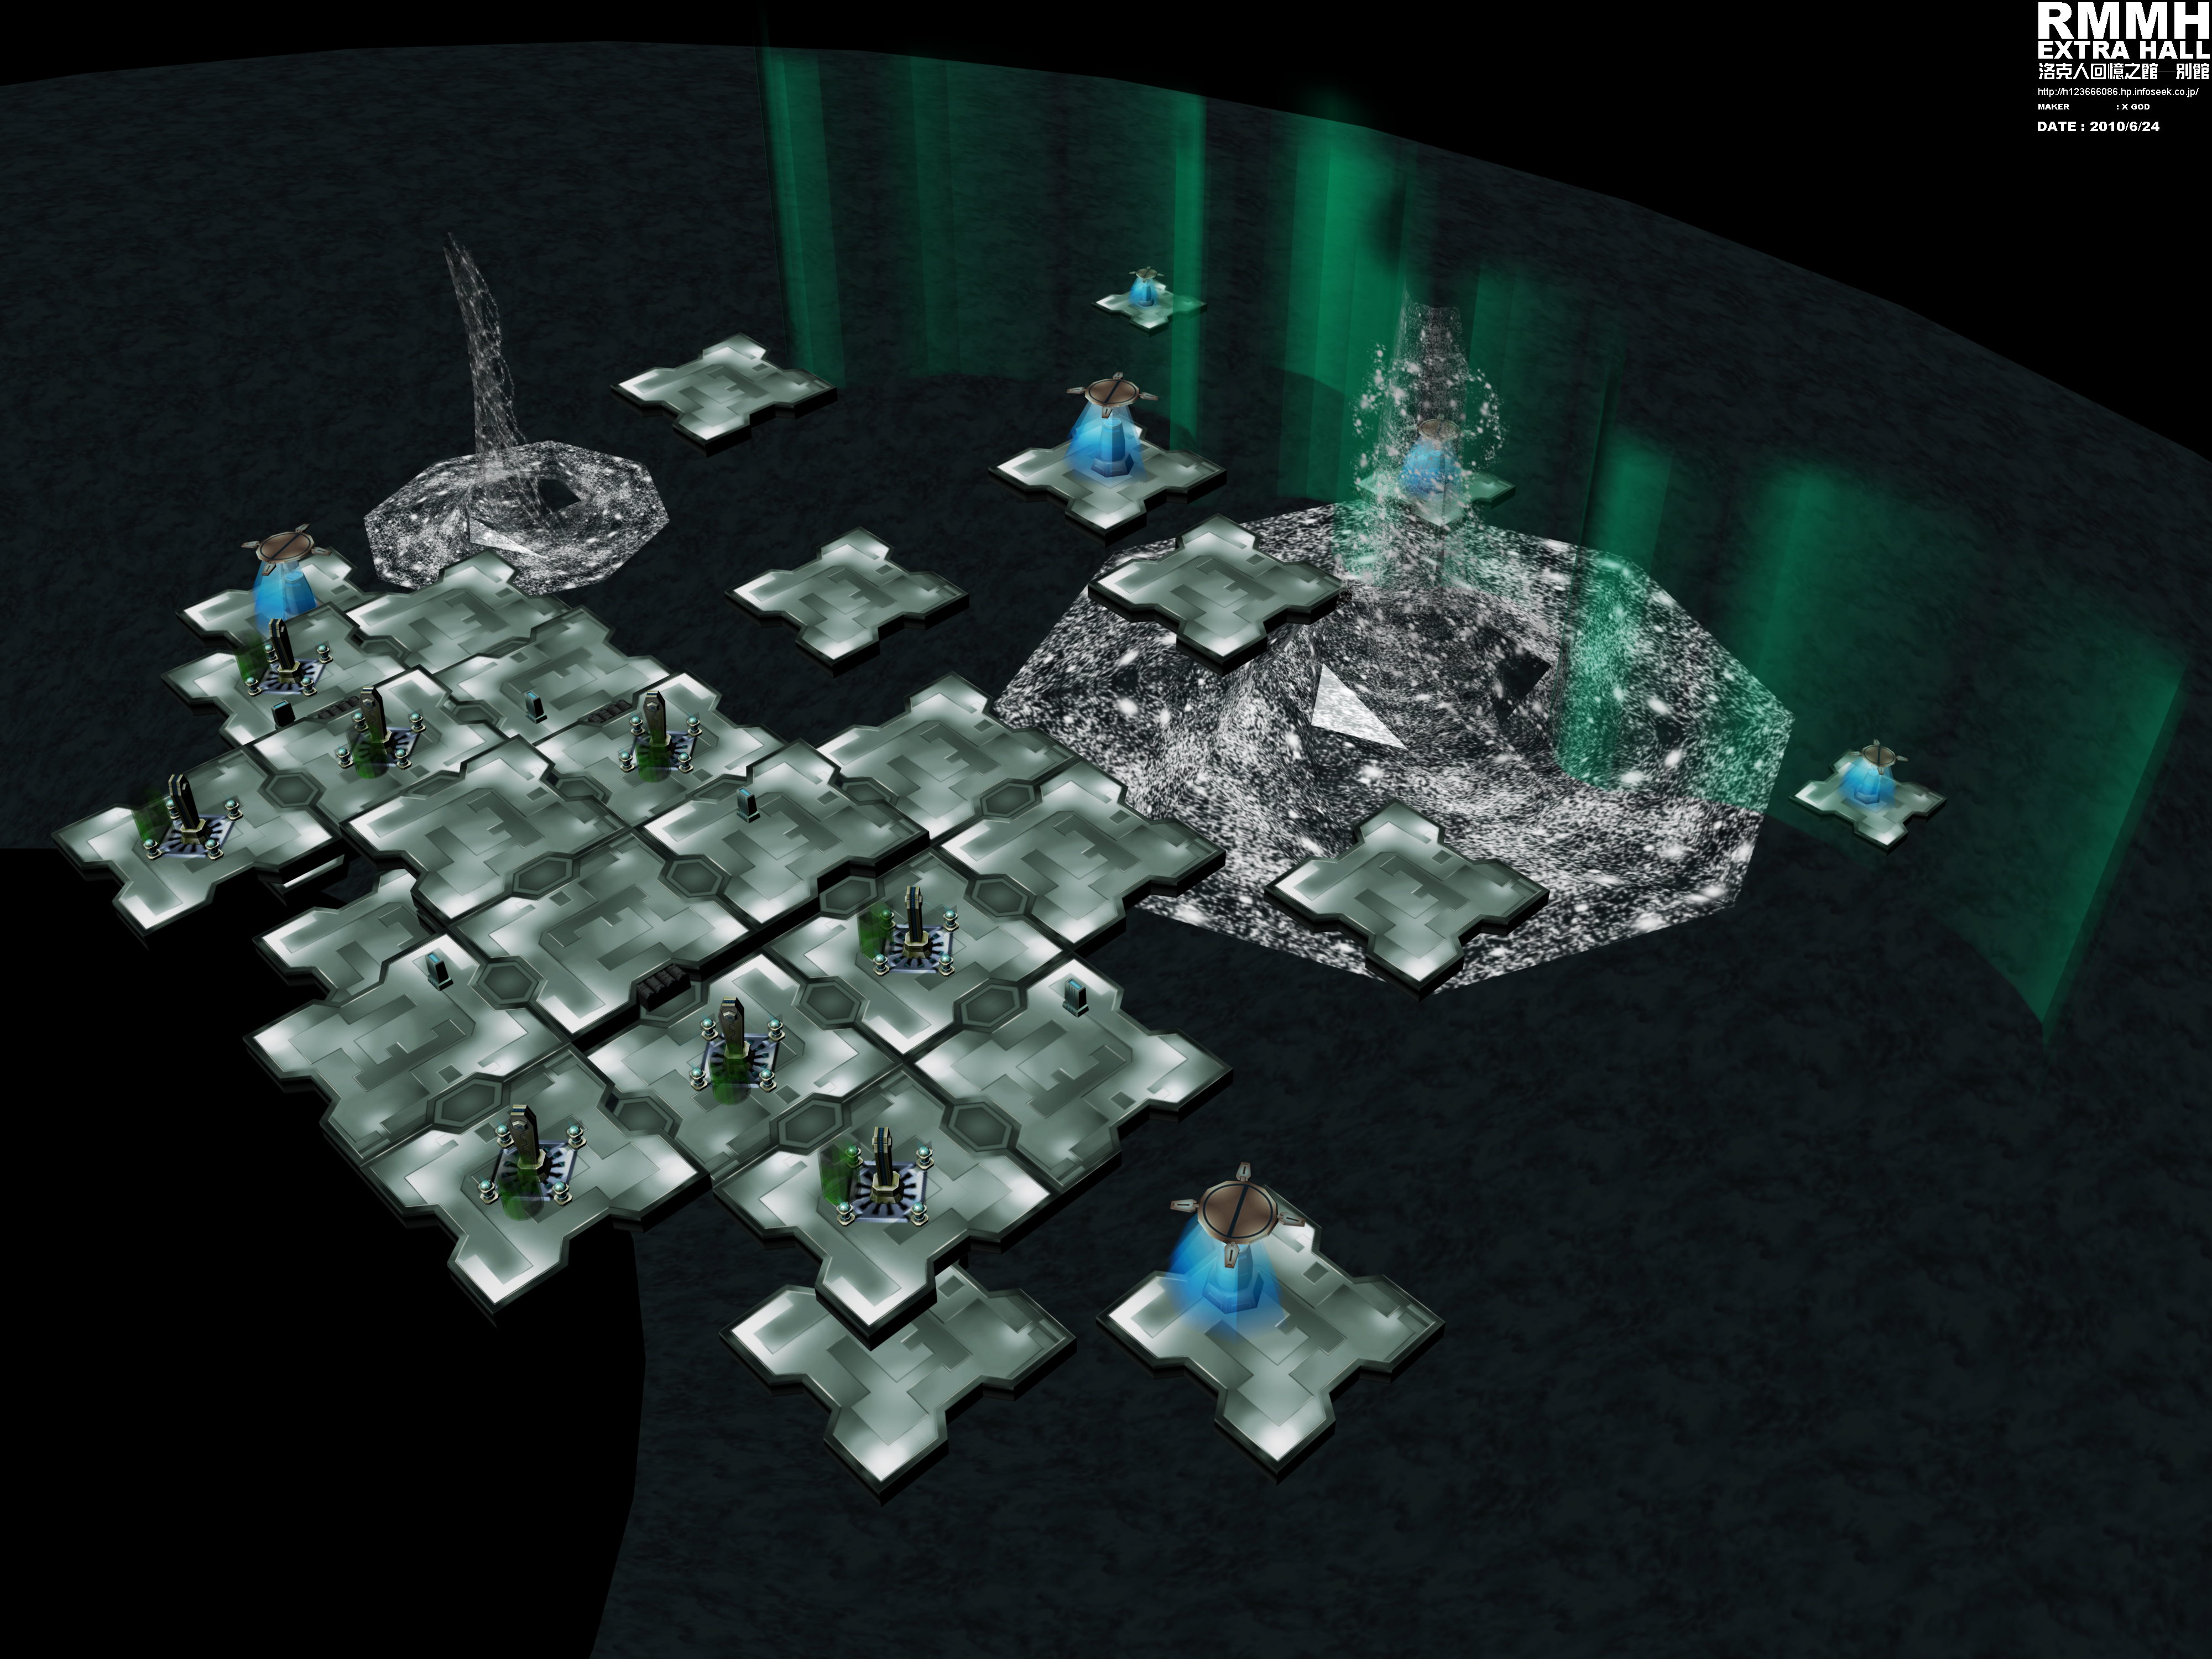
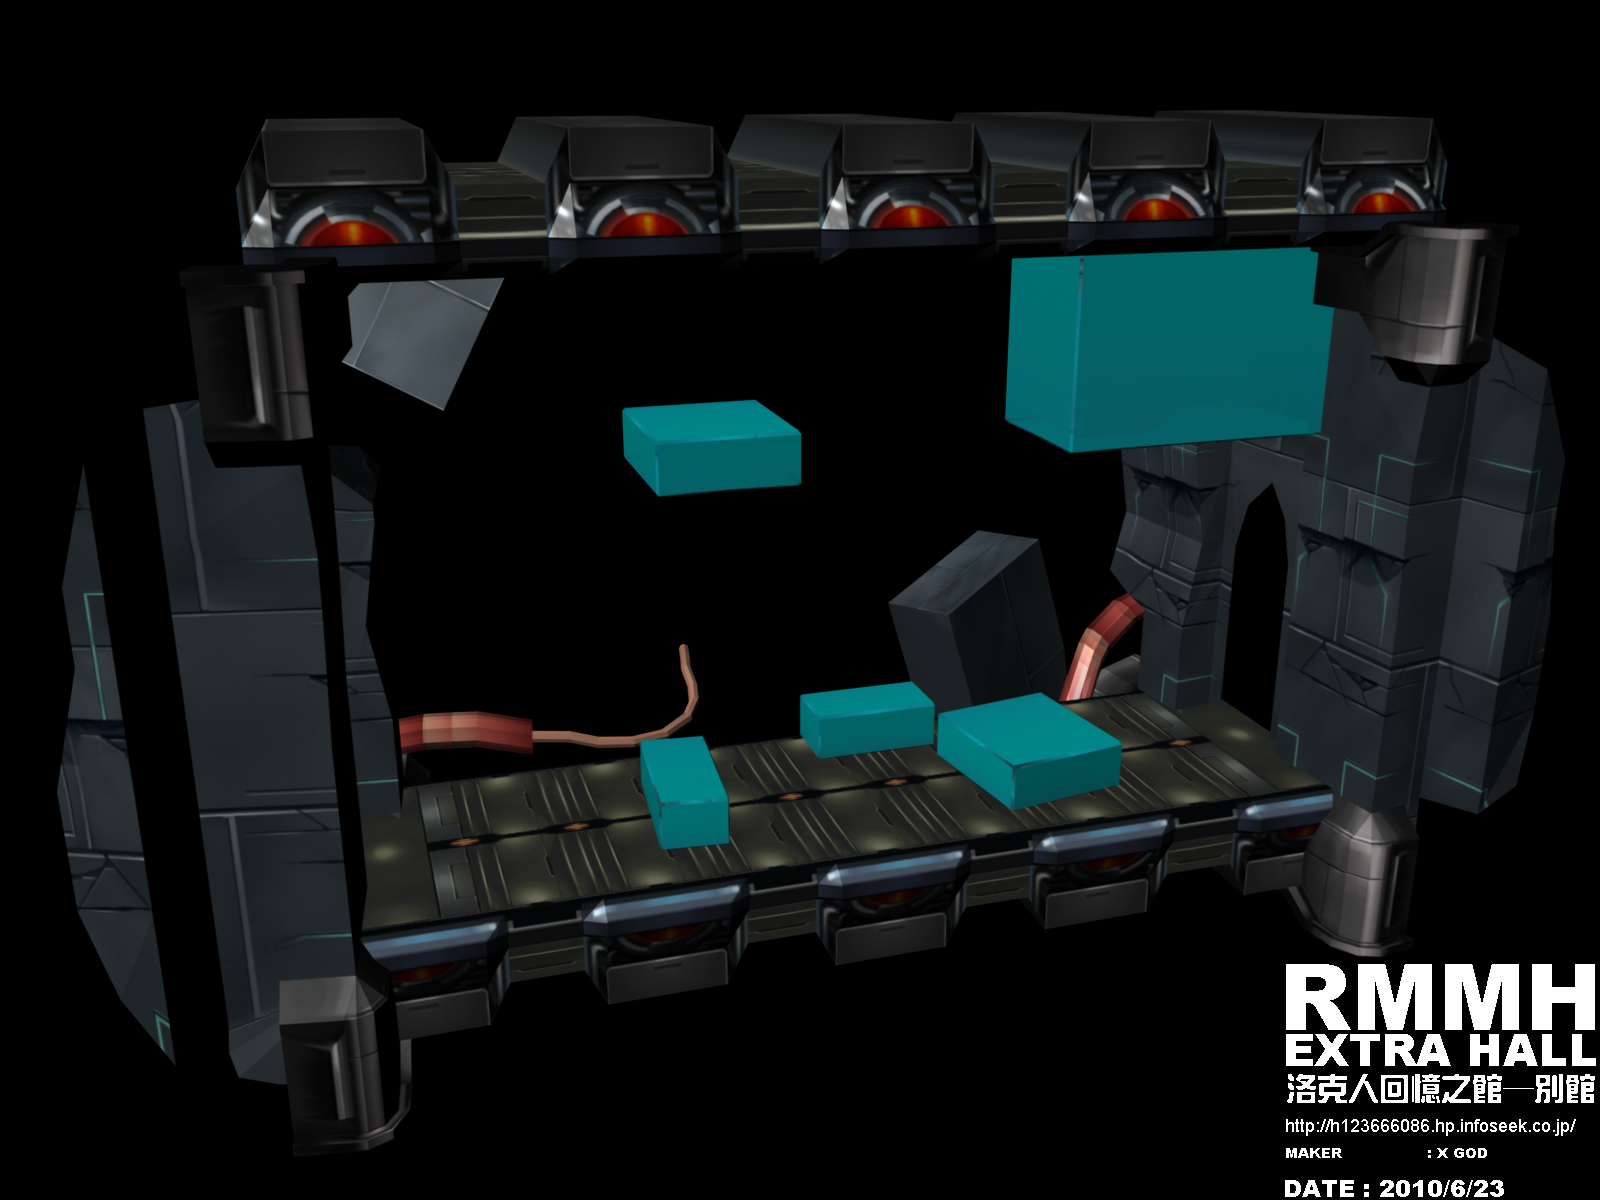
X GOD for the RockMan Memorial Hall - Extra Hall
Area 2
1.94 MB
Area 3 (Part 1)
7.97 MB
Area 3 (Part 2)
5.66 MB
Area 3 (Part 3)
7.49 MB
Flame Hyenard
5.60 MB
8.32 MB
Area 3
1600 x 1200
Ride Boarski
8000 x 6000
13.8 MB
650 kB
Snipe Anteator
4.21 MB
Area 2 (Obverse)
5.28 MB
Area (Reverse)
5.22 MB
1.18 MB
Soldier Stonekong
Area 1 (Part 1)
6.22 MB
Area 1 (Part 2)
10.1 MB
1.26 MB
Splash Warfly
928 kB
Area 4
2.53 MB
Area 5
1.84 MB
Tornado Tonion
7.34 MB
8.08 MB
1.41 MB
Vanishing Gungaroo
379 kB
717 kB
5.21 MB
Wind Crowrang
6.23 MB
4.09 MB
4.20 MB
736 kB
Palace Road
1.83 MB
1.44 MB
Crimson Palace
6.11 MB
9.63 MB
Area 4 (Left-1)
3.00 MB
Area 4 (Left-2)
4.39 MB
Area 4 (Right)
4.59 MB
891 kB
Area 6
3.05 MB
Area 7
11.9 MB
Area 8
968 kB
Area 9
6.36 MB
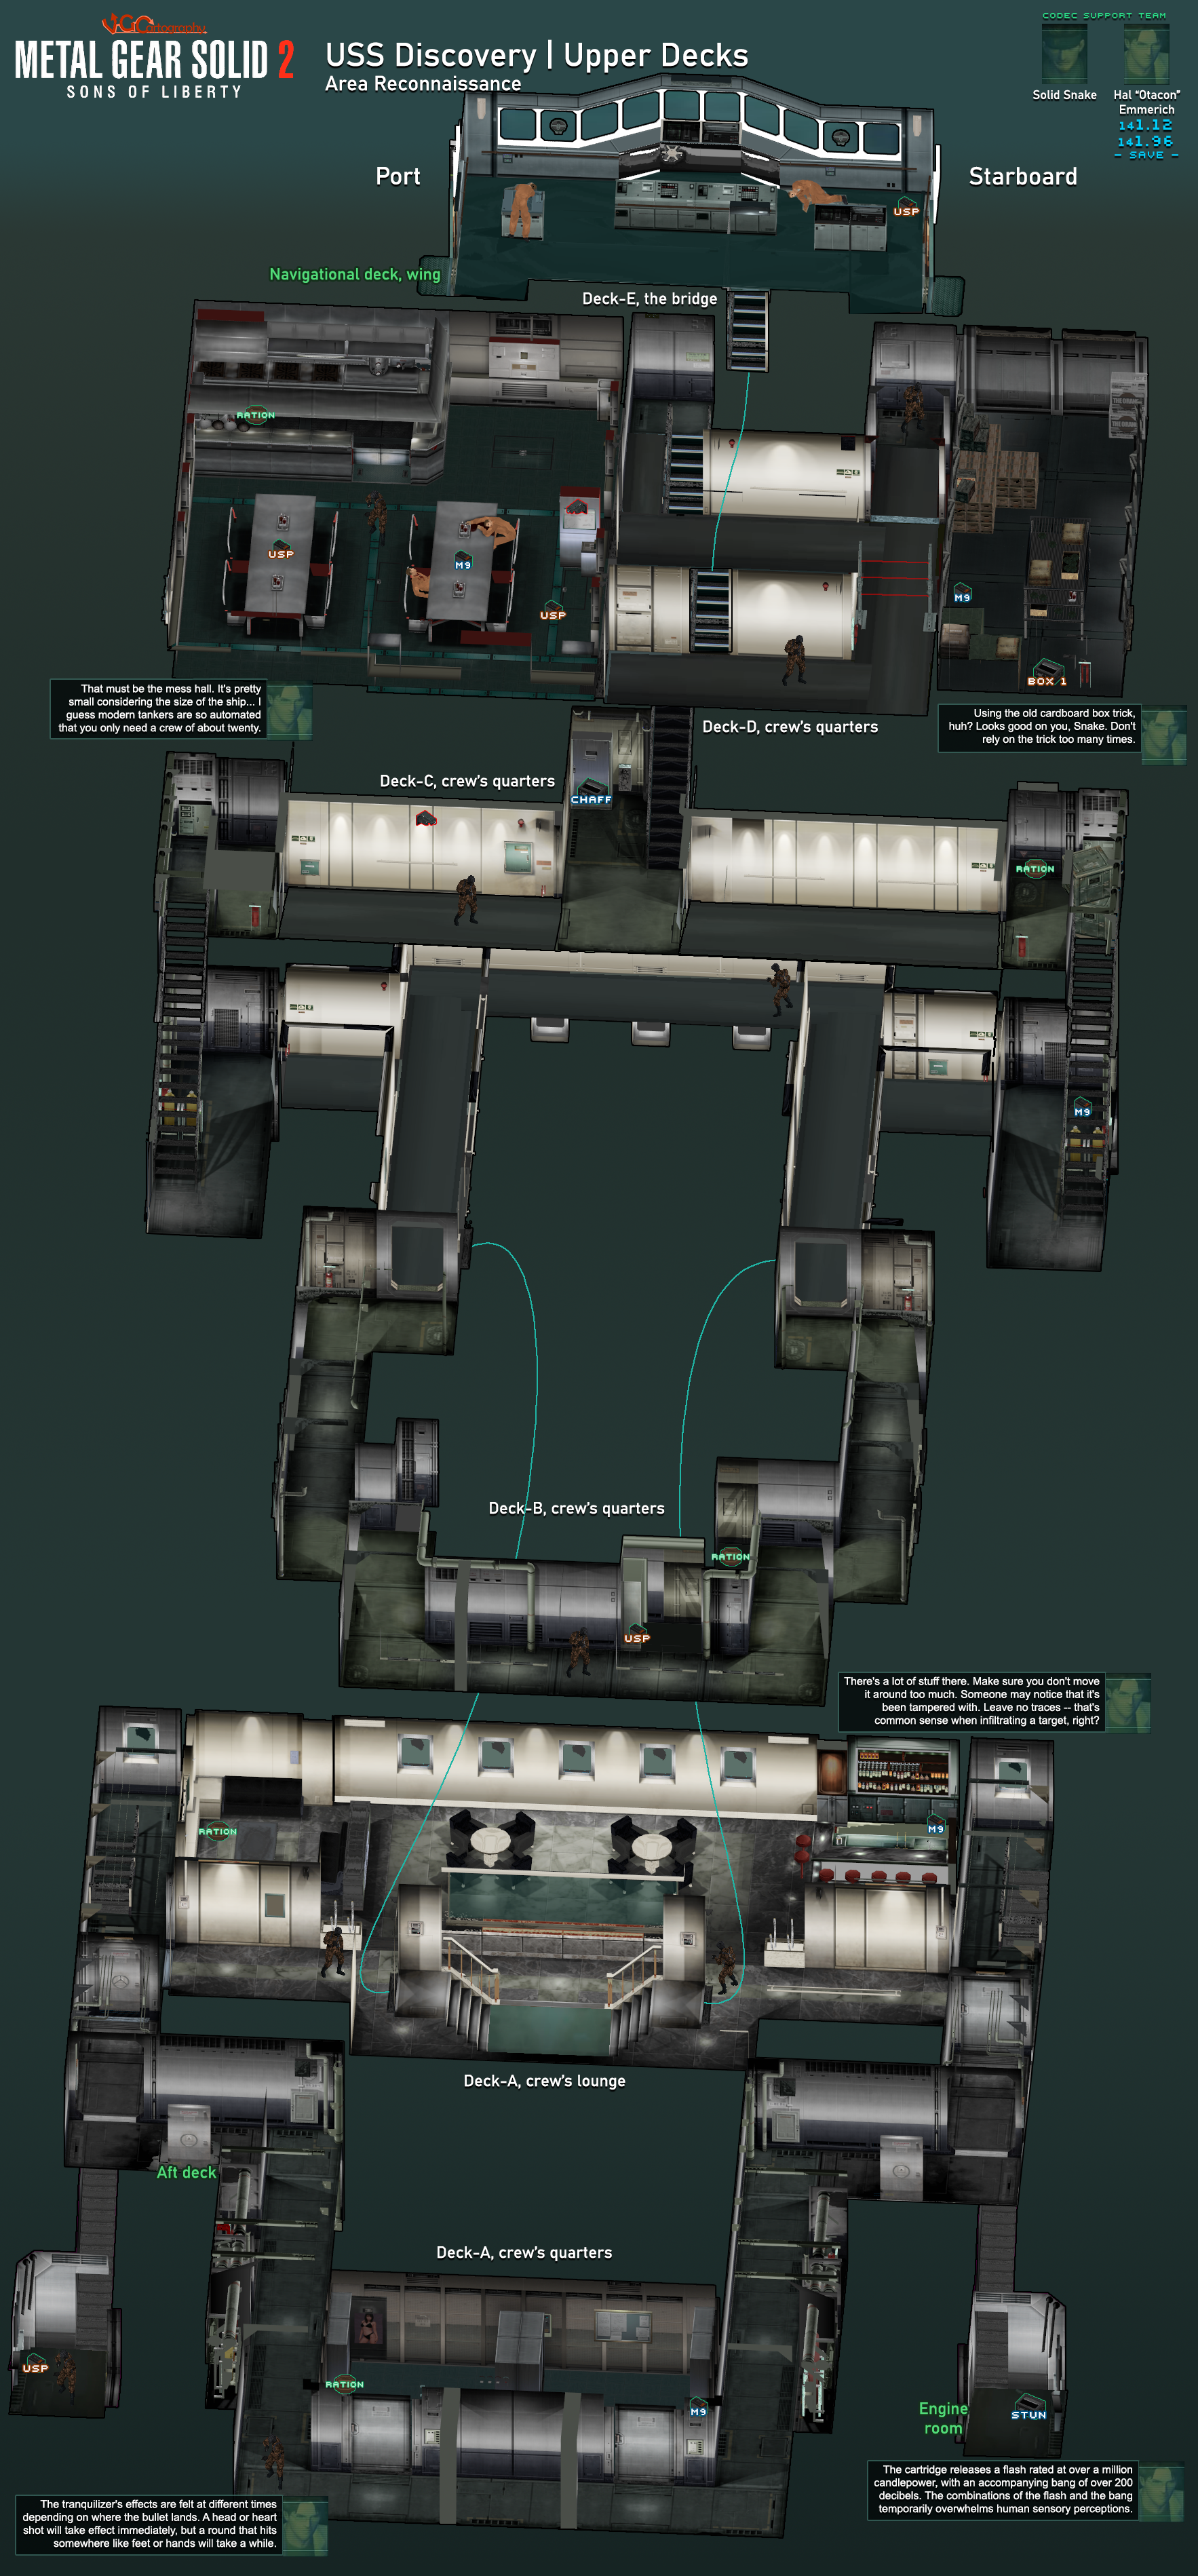
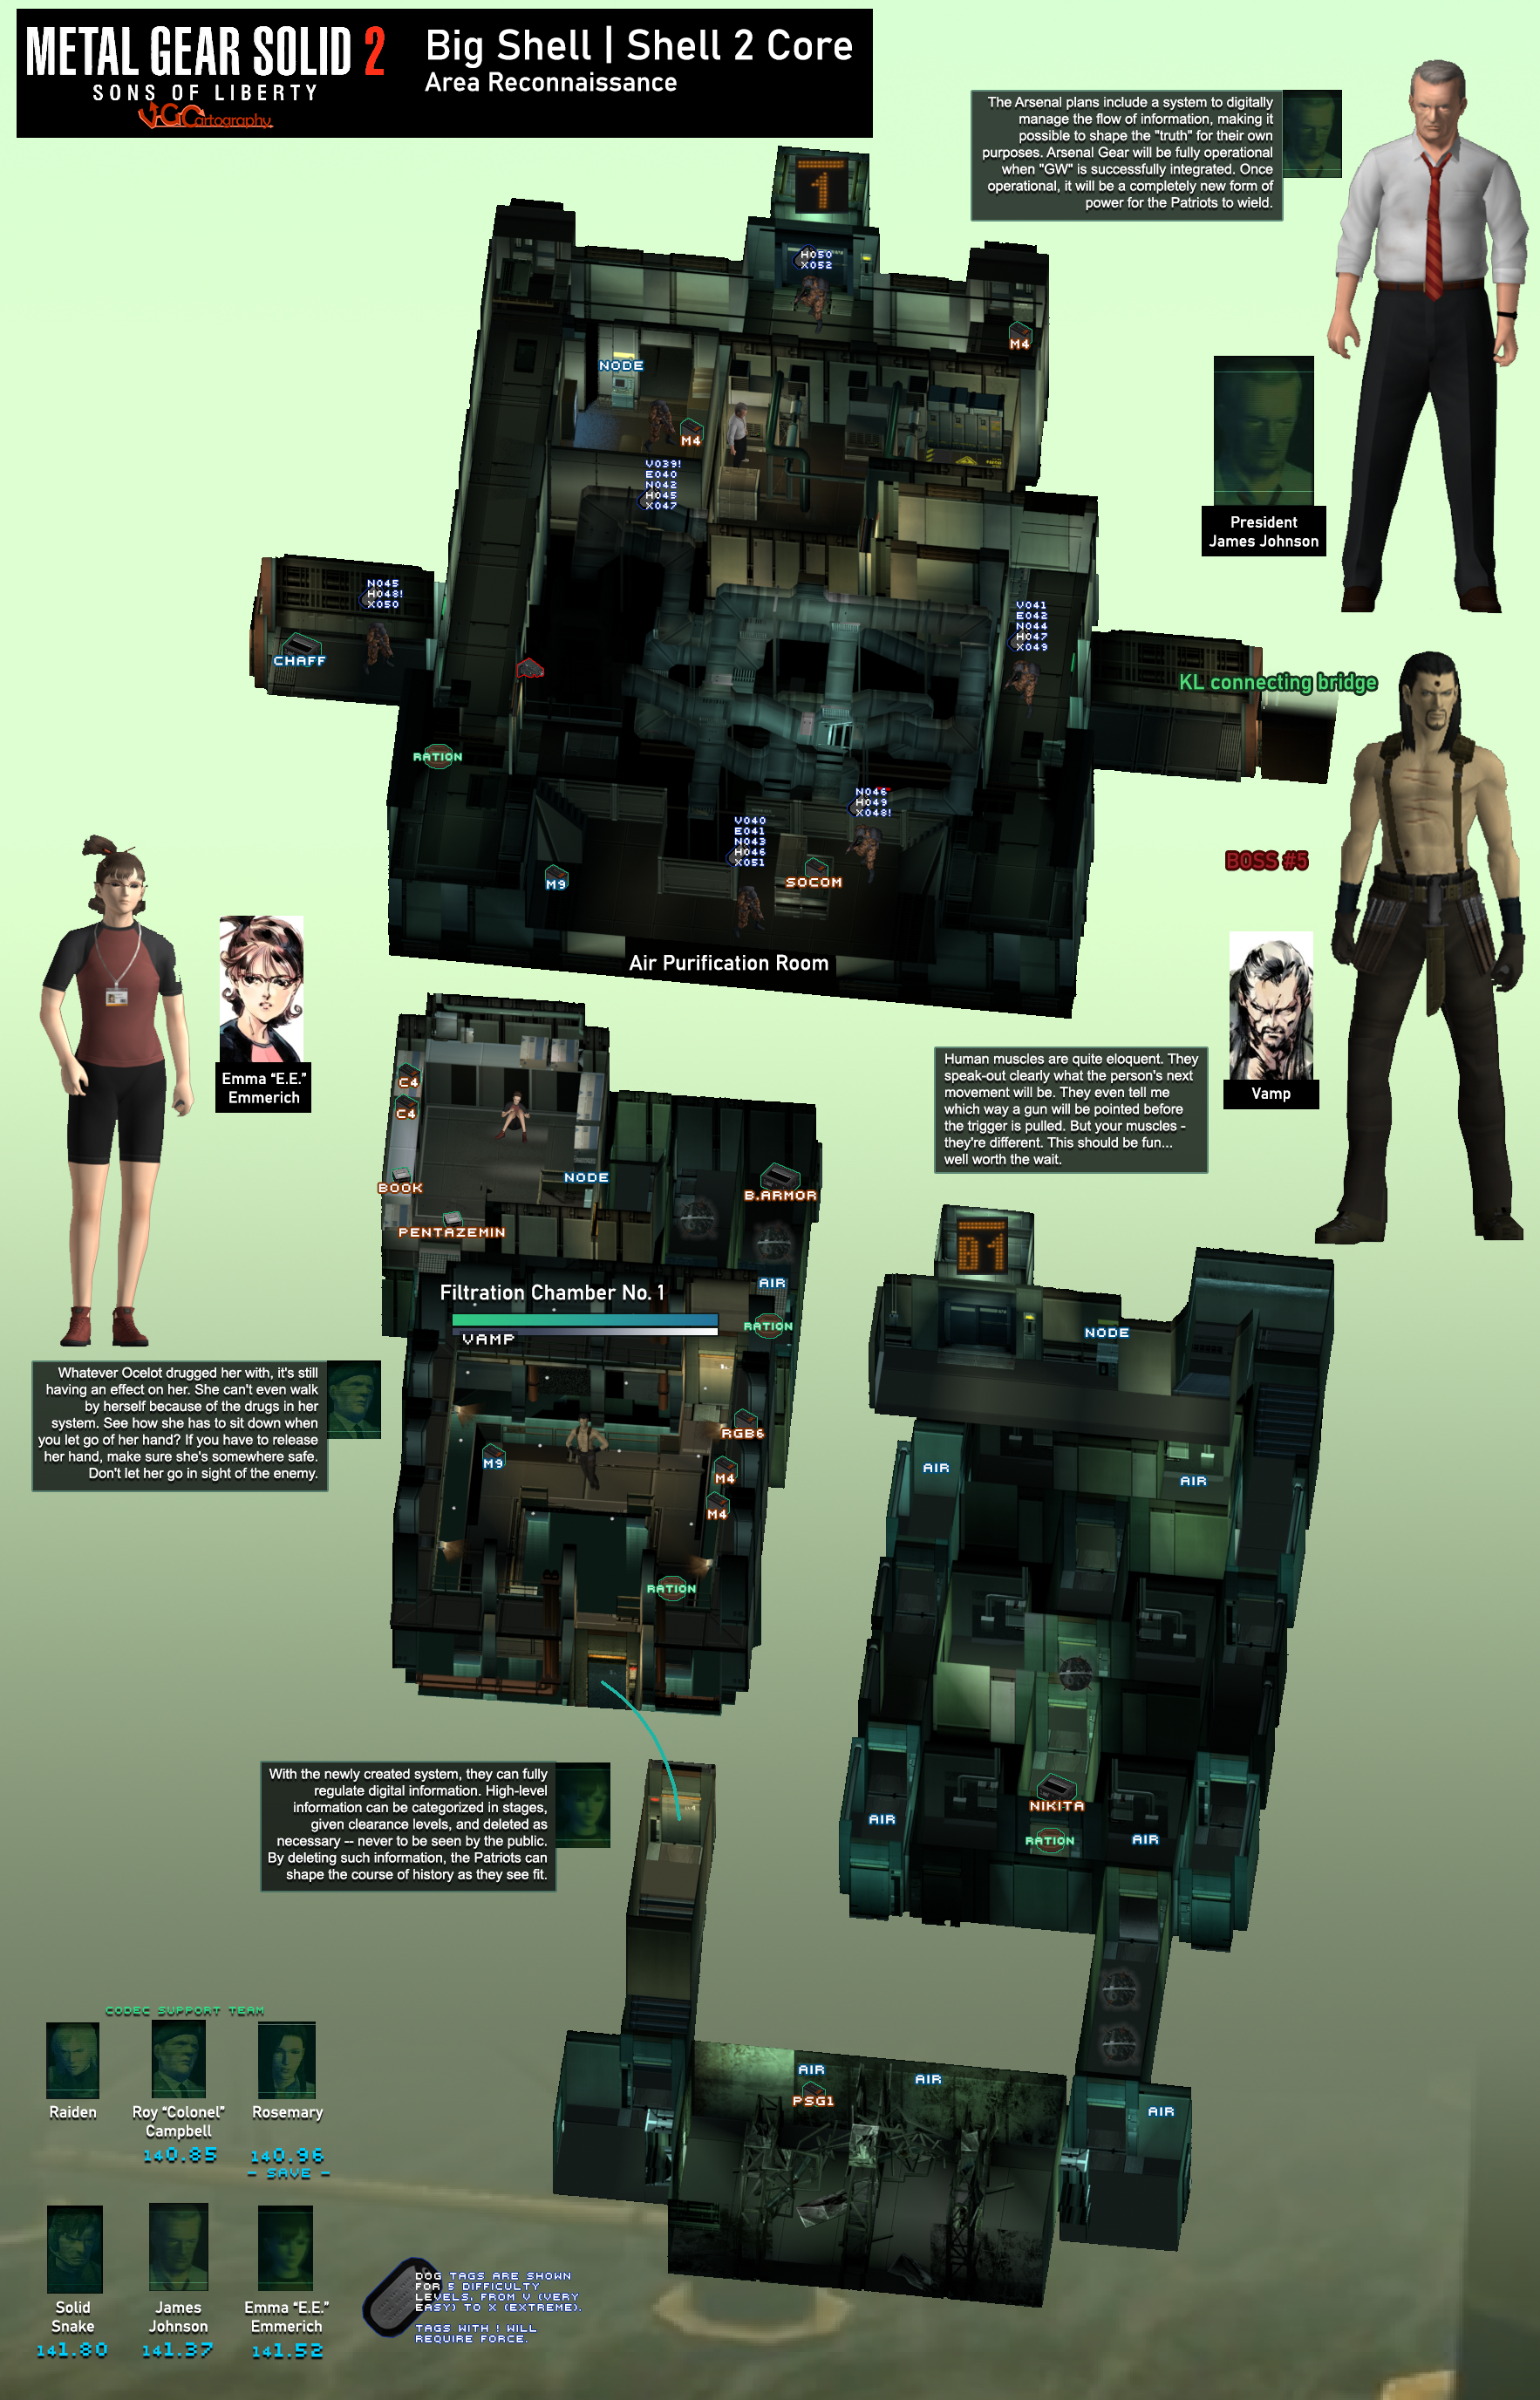
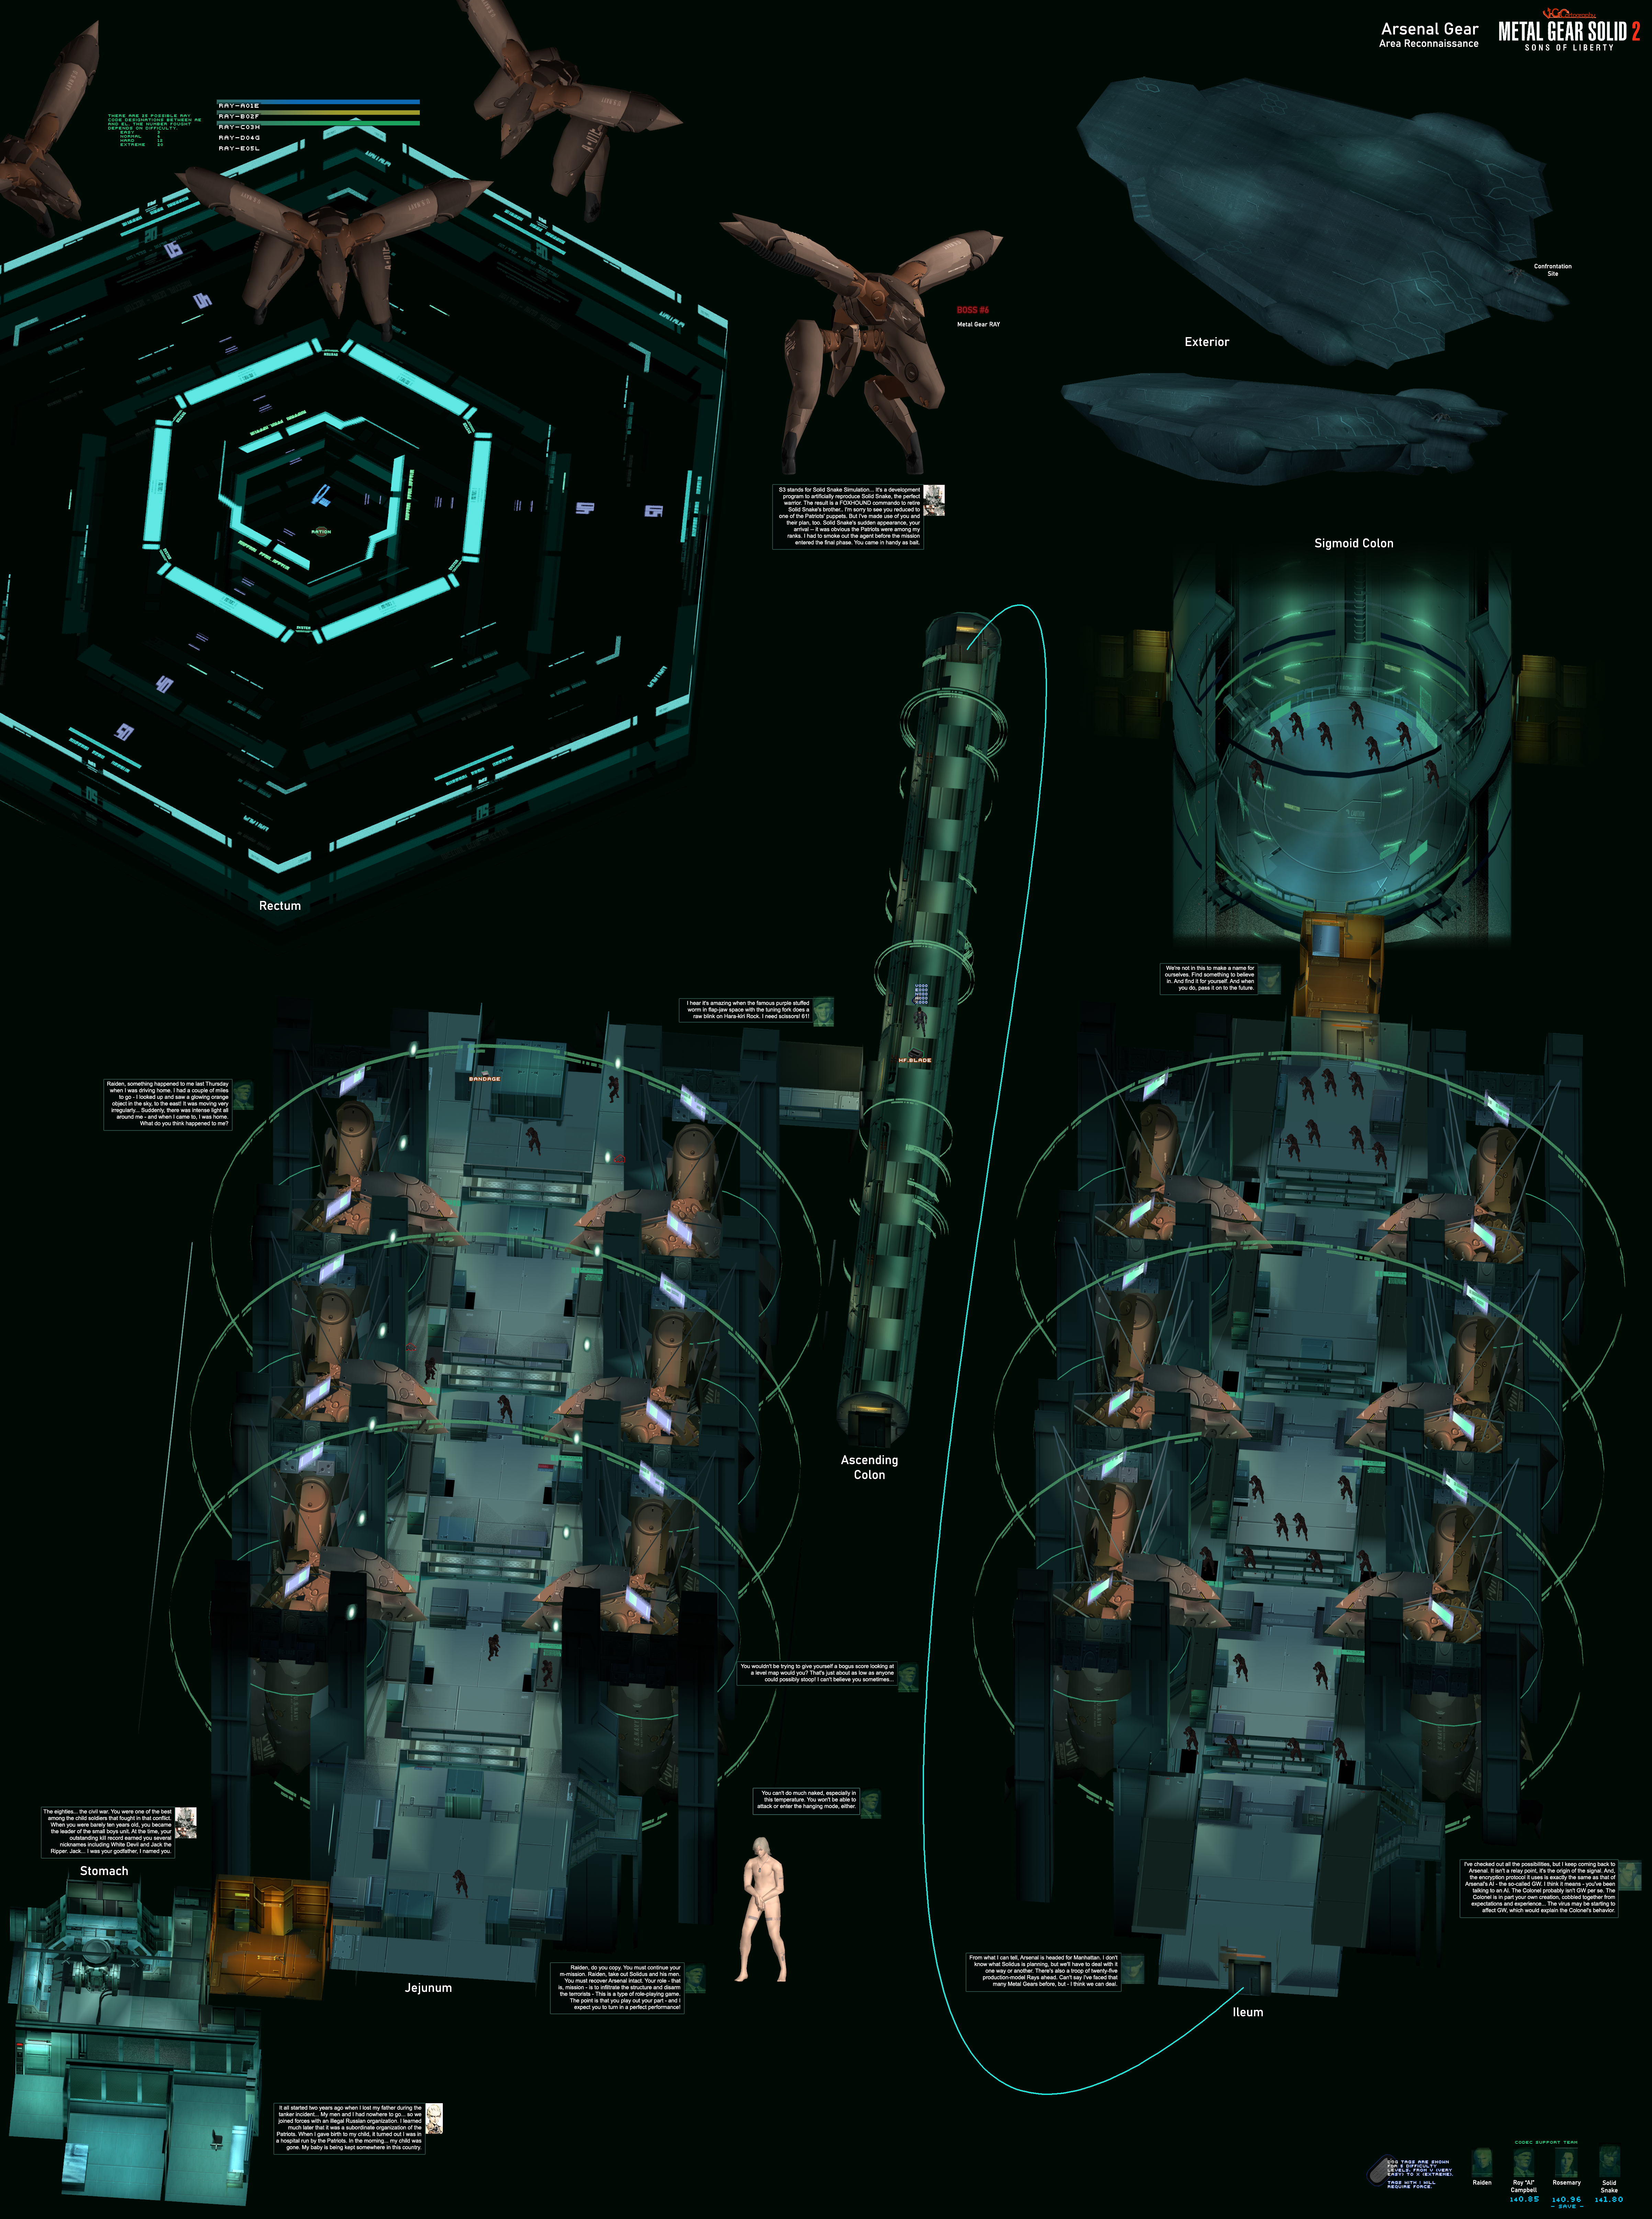
Metal Gear Solid 2: Sons Of Liberty Maps
© 1987, 2001 Konami Computer Entertainment Japan
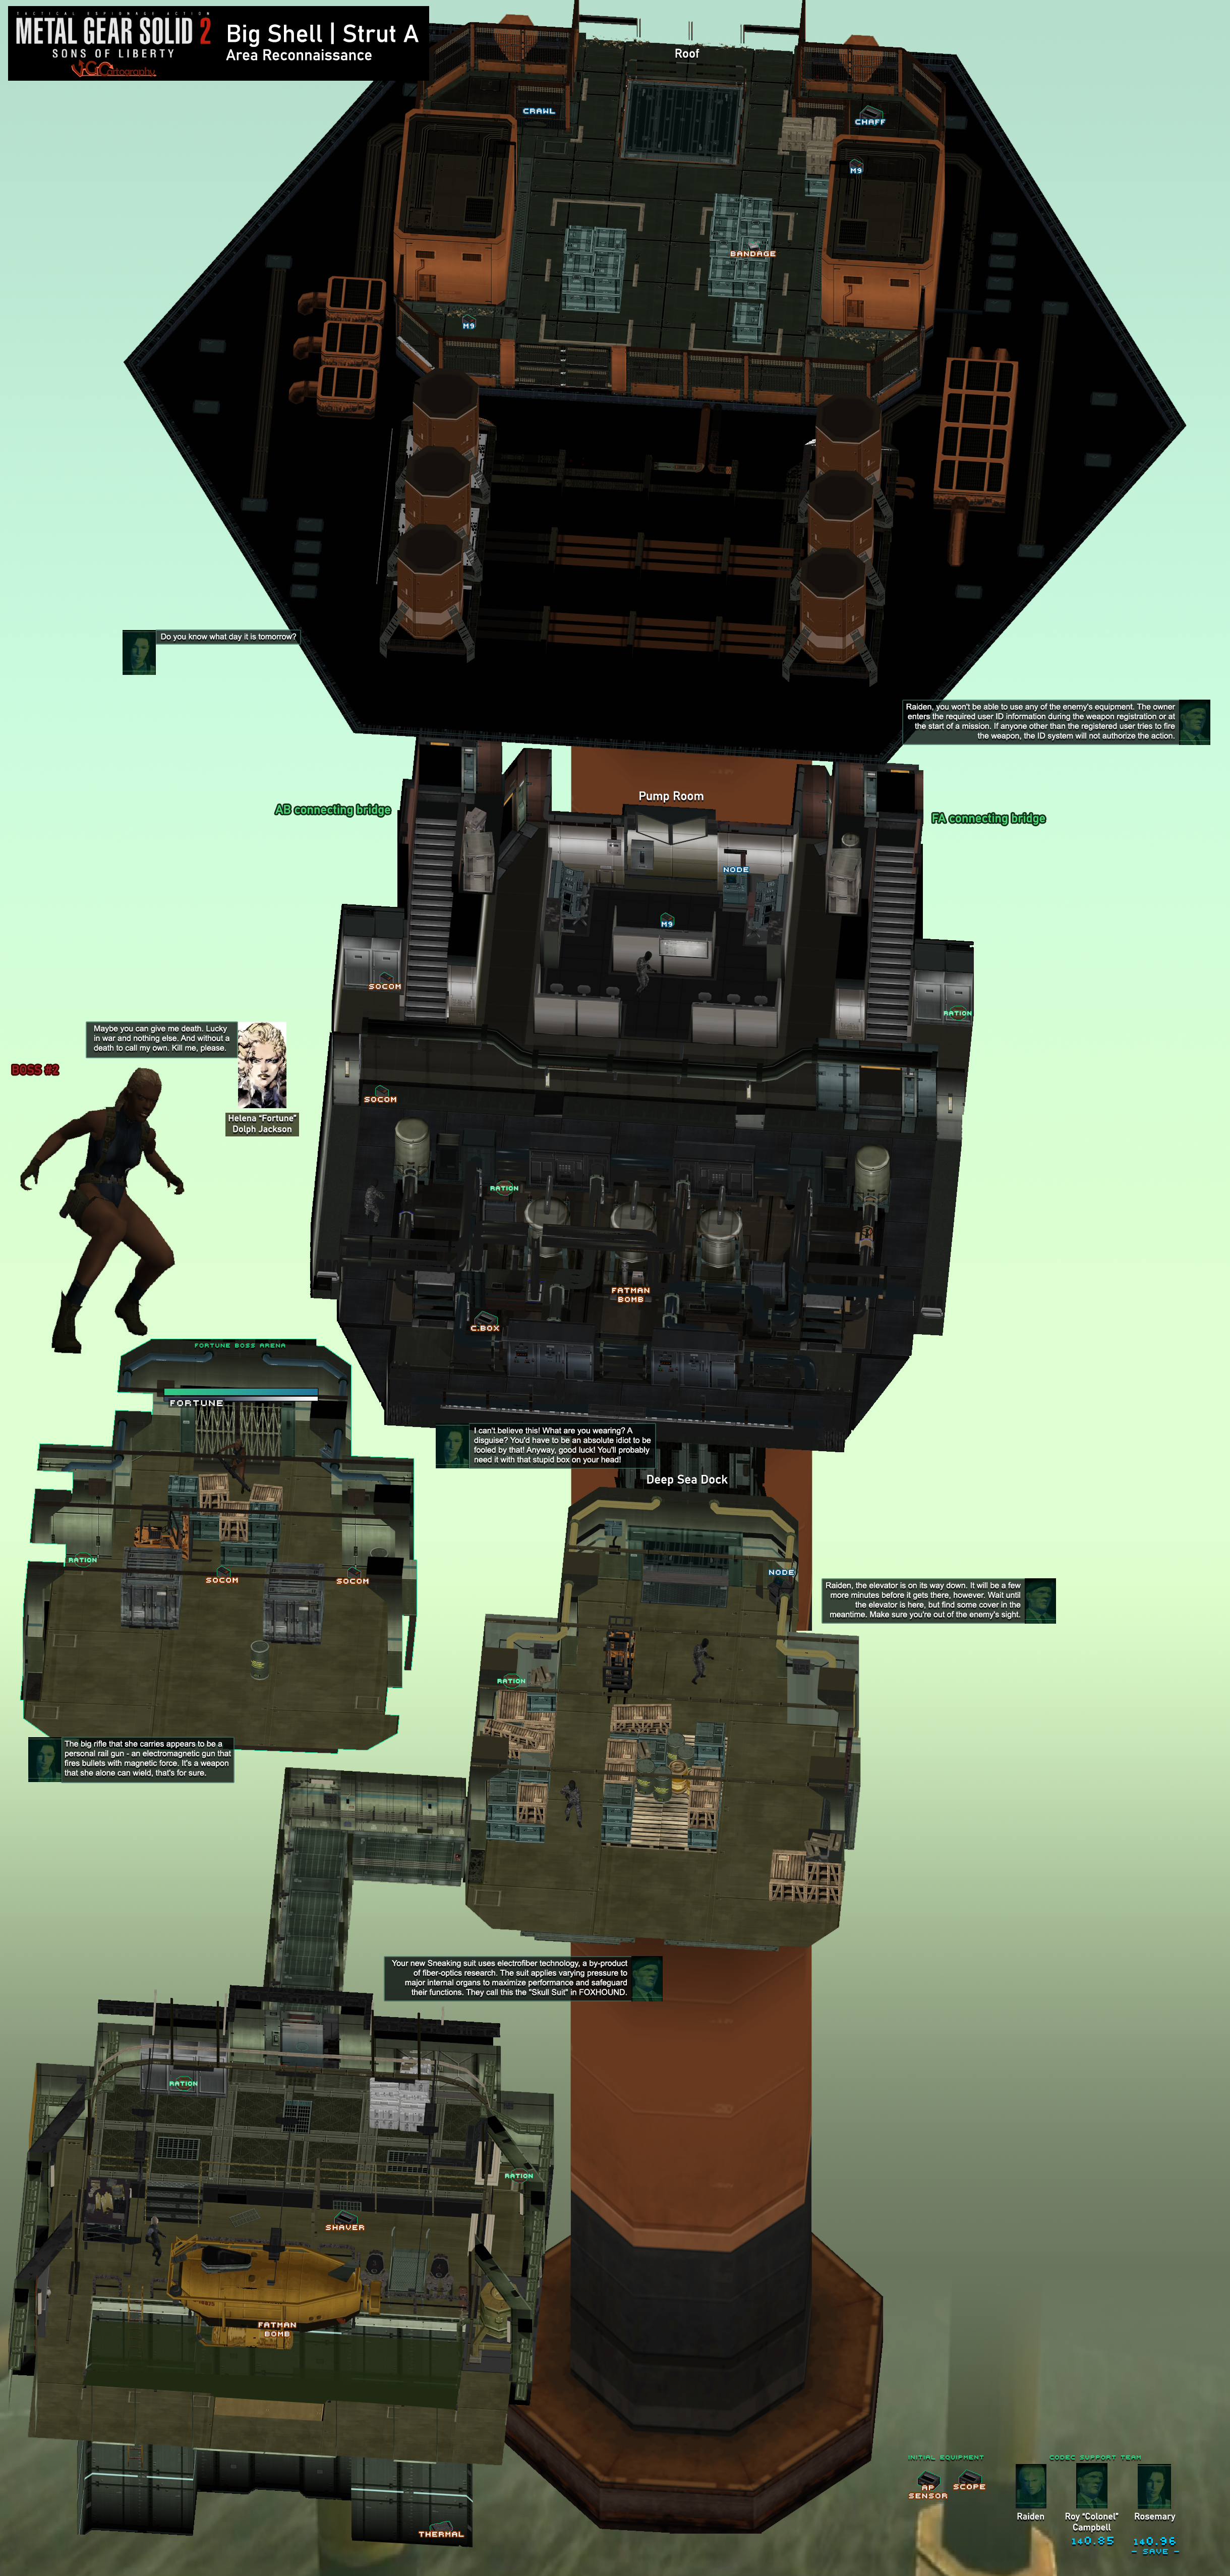
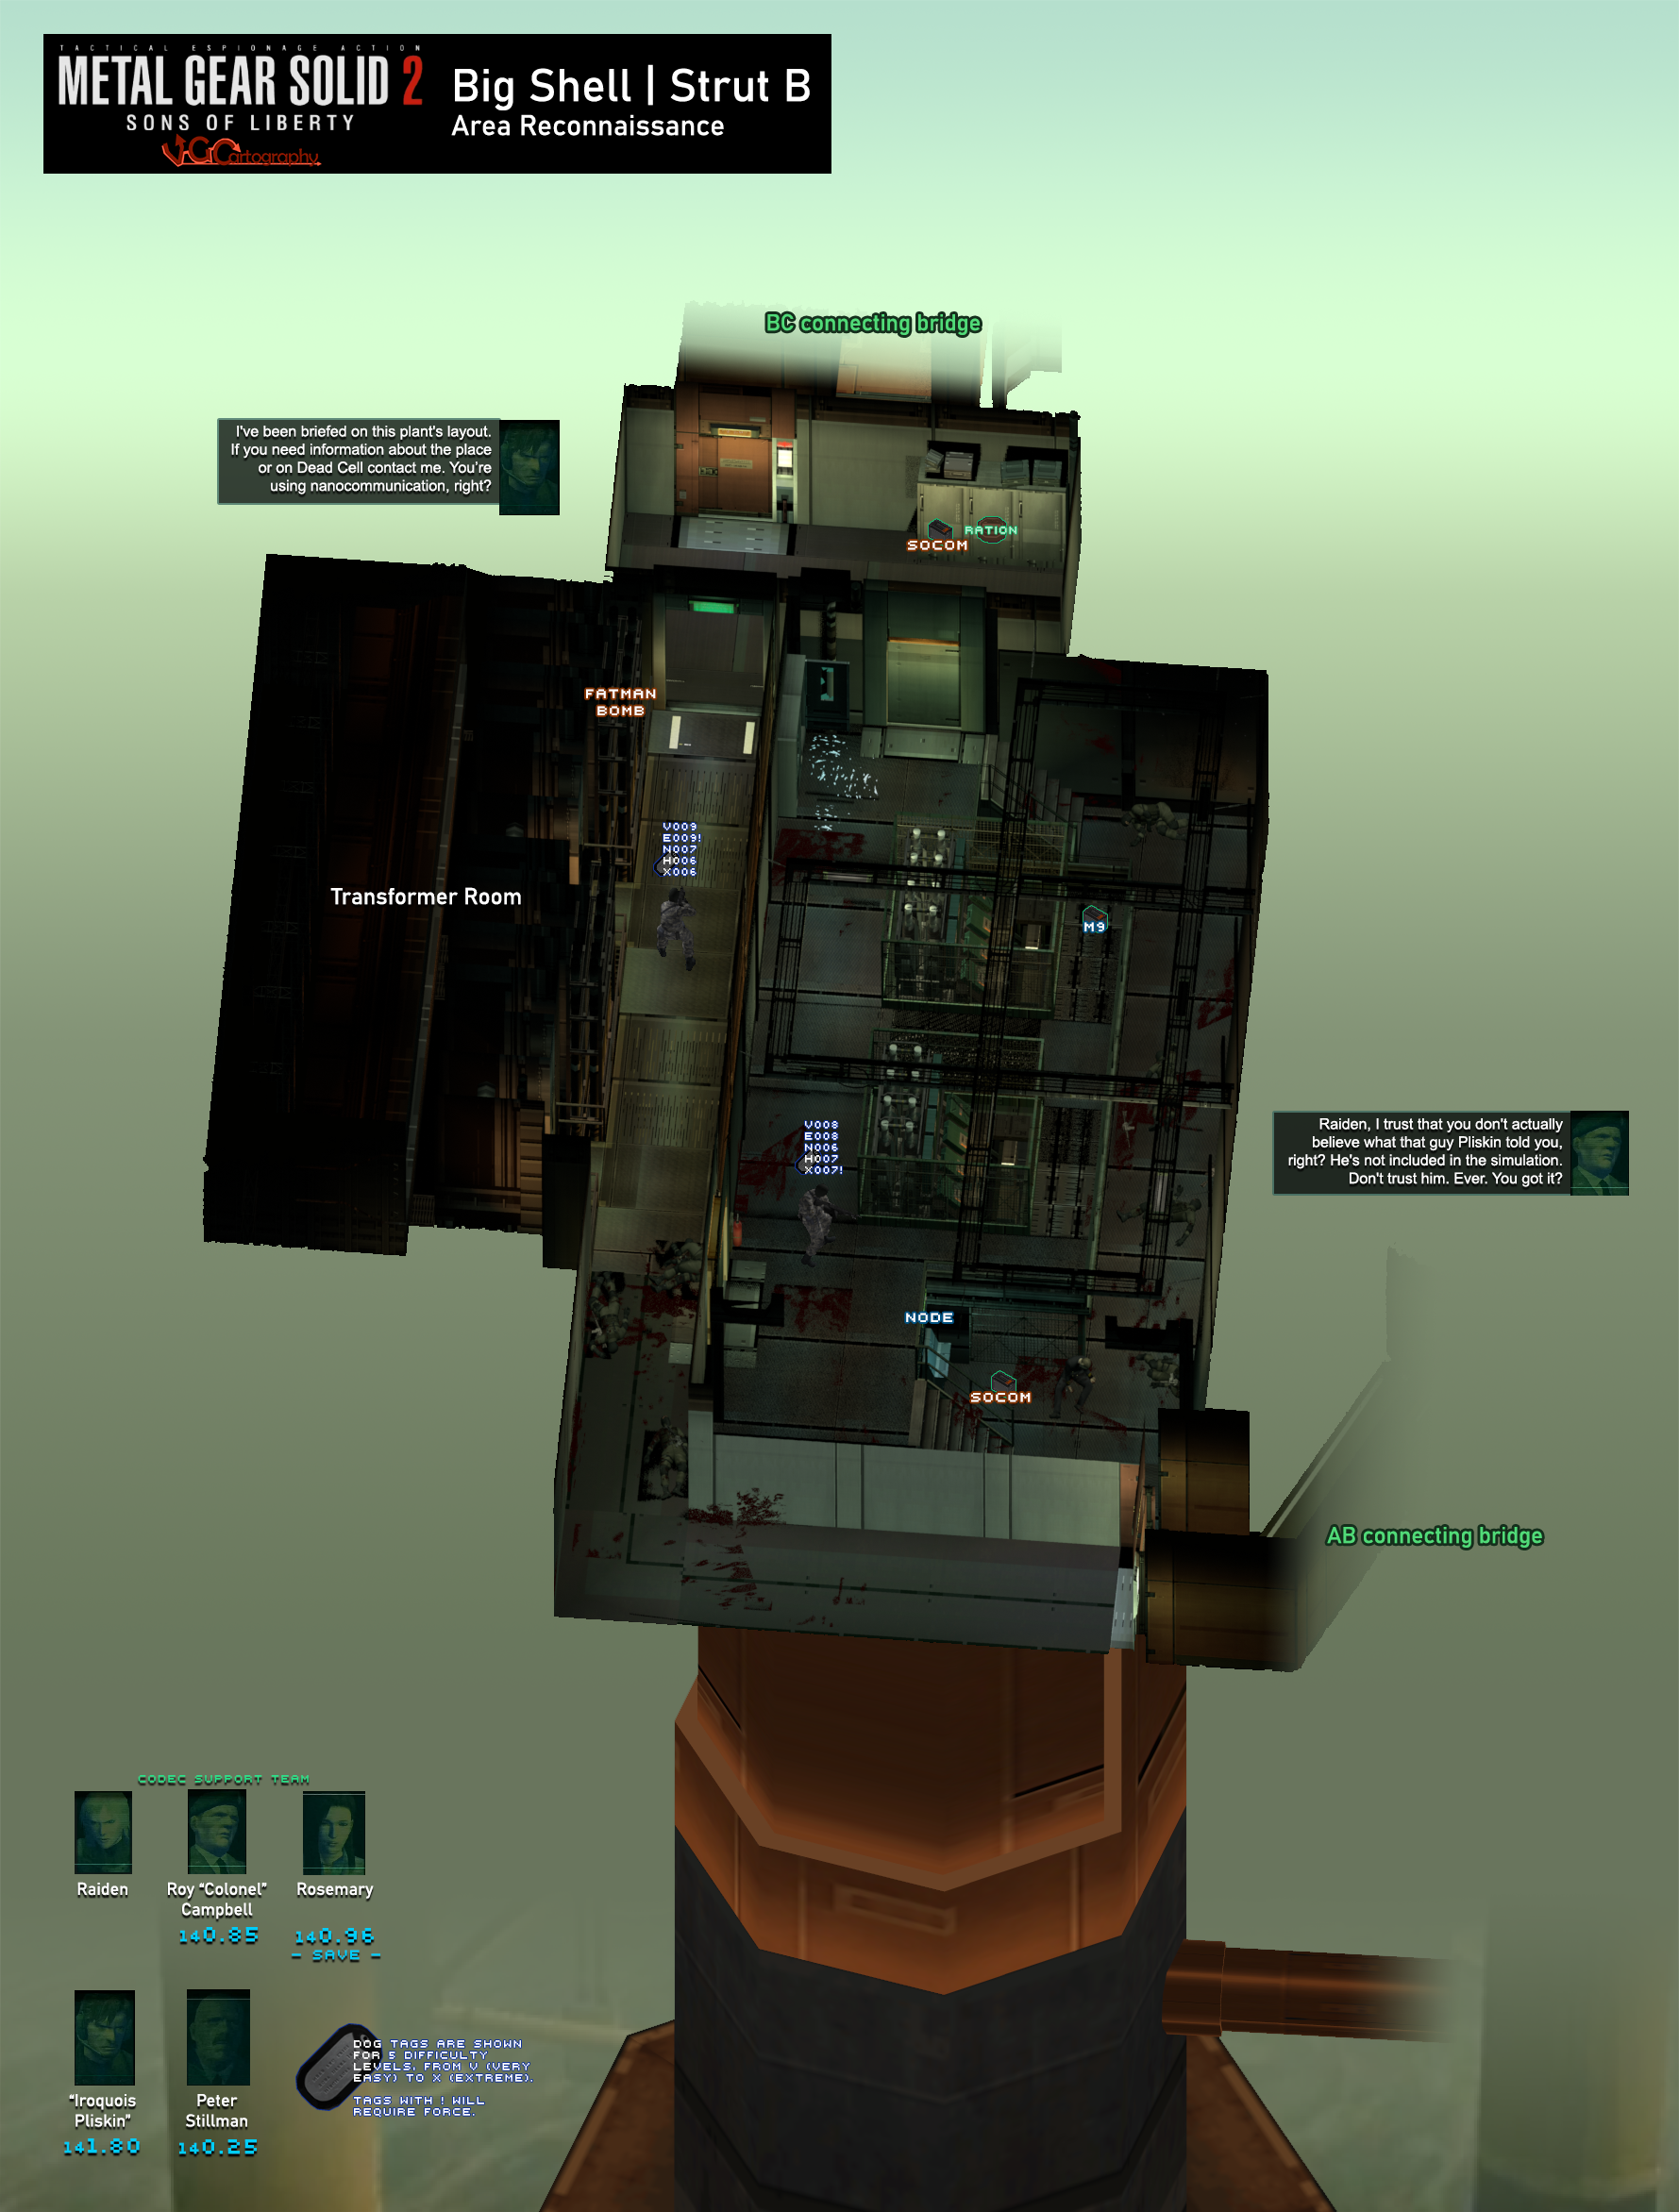
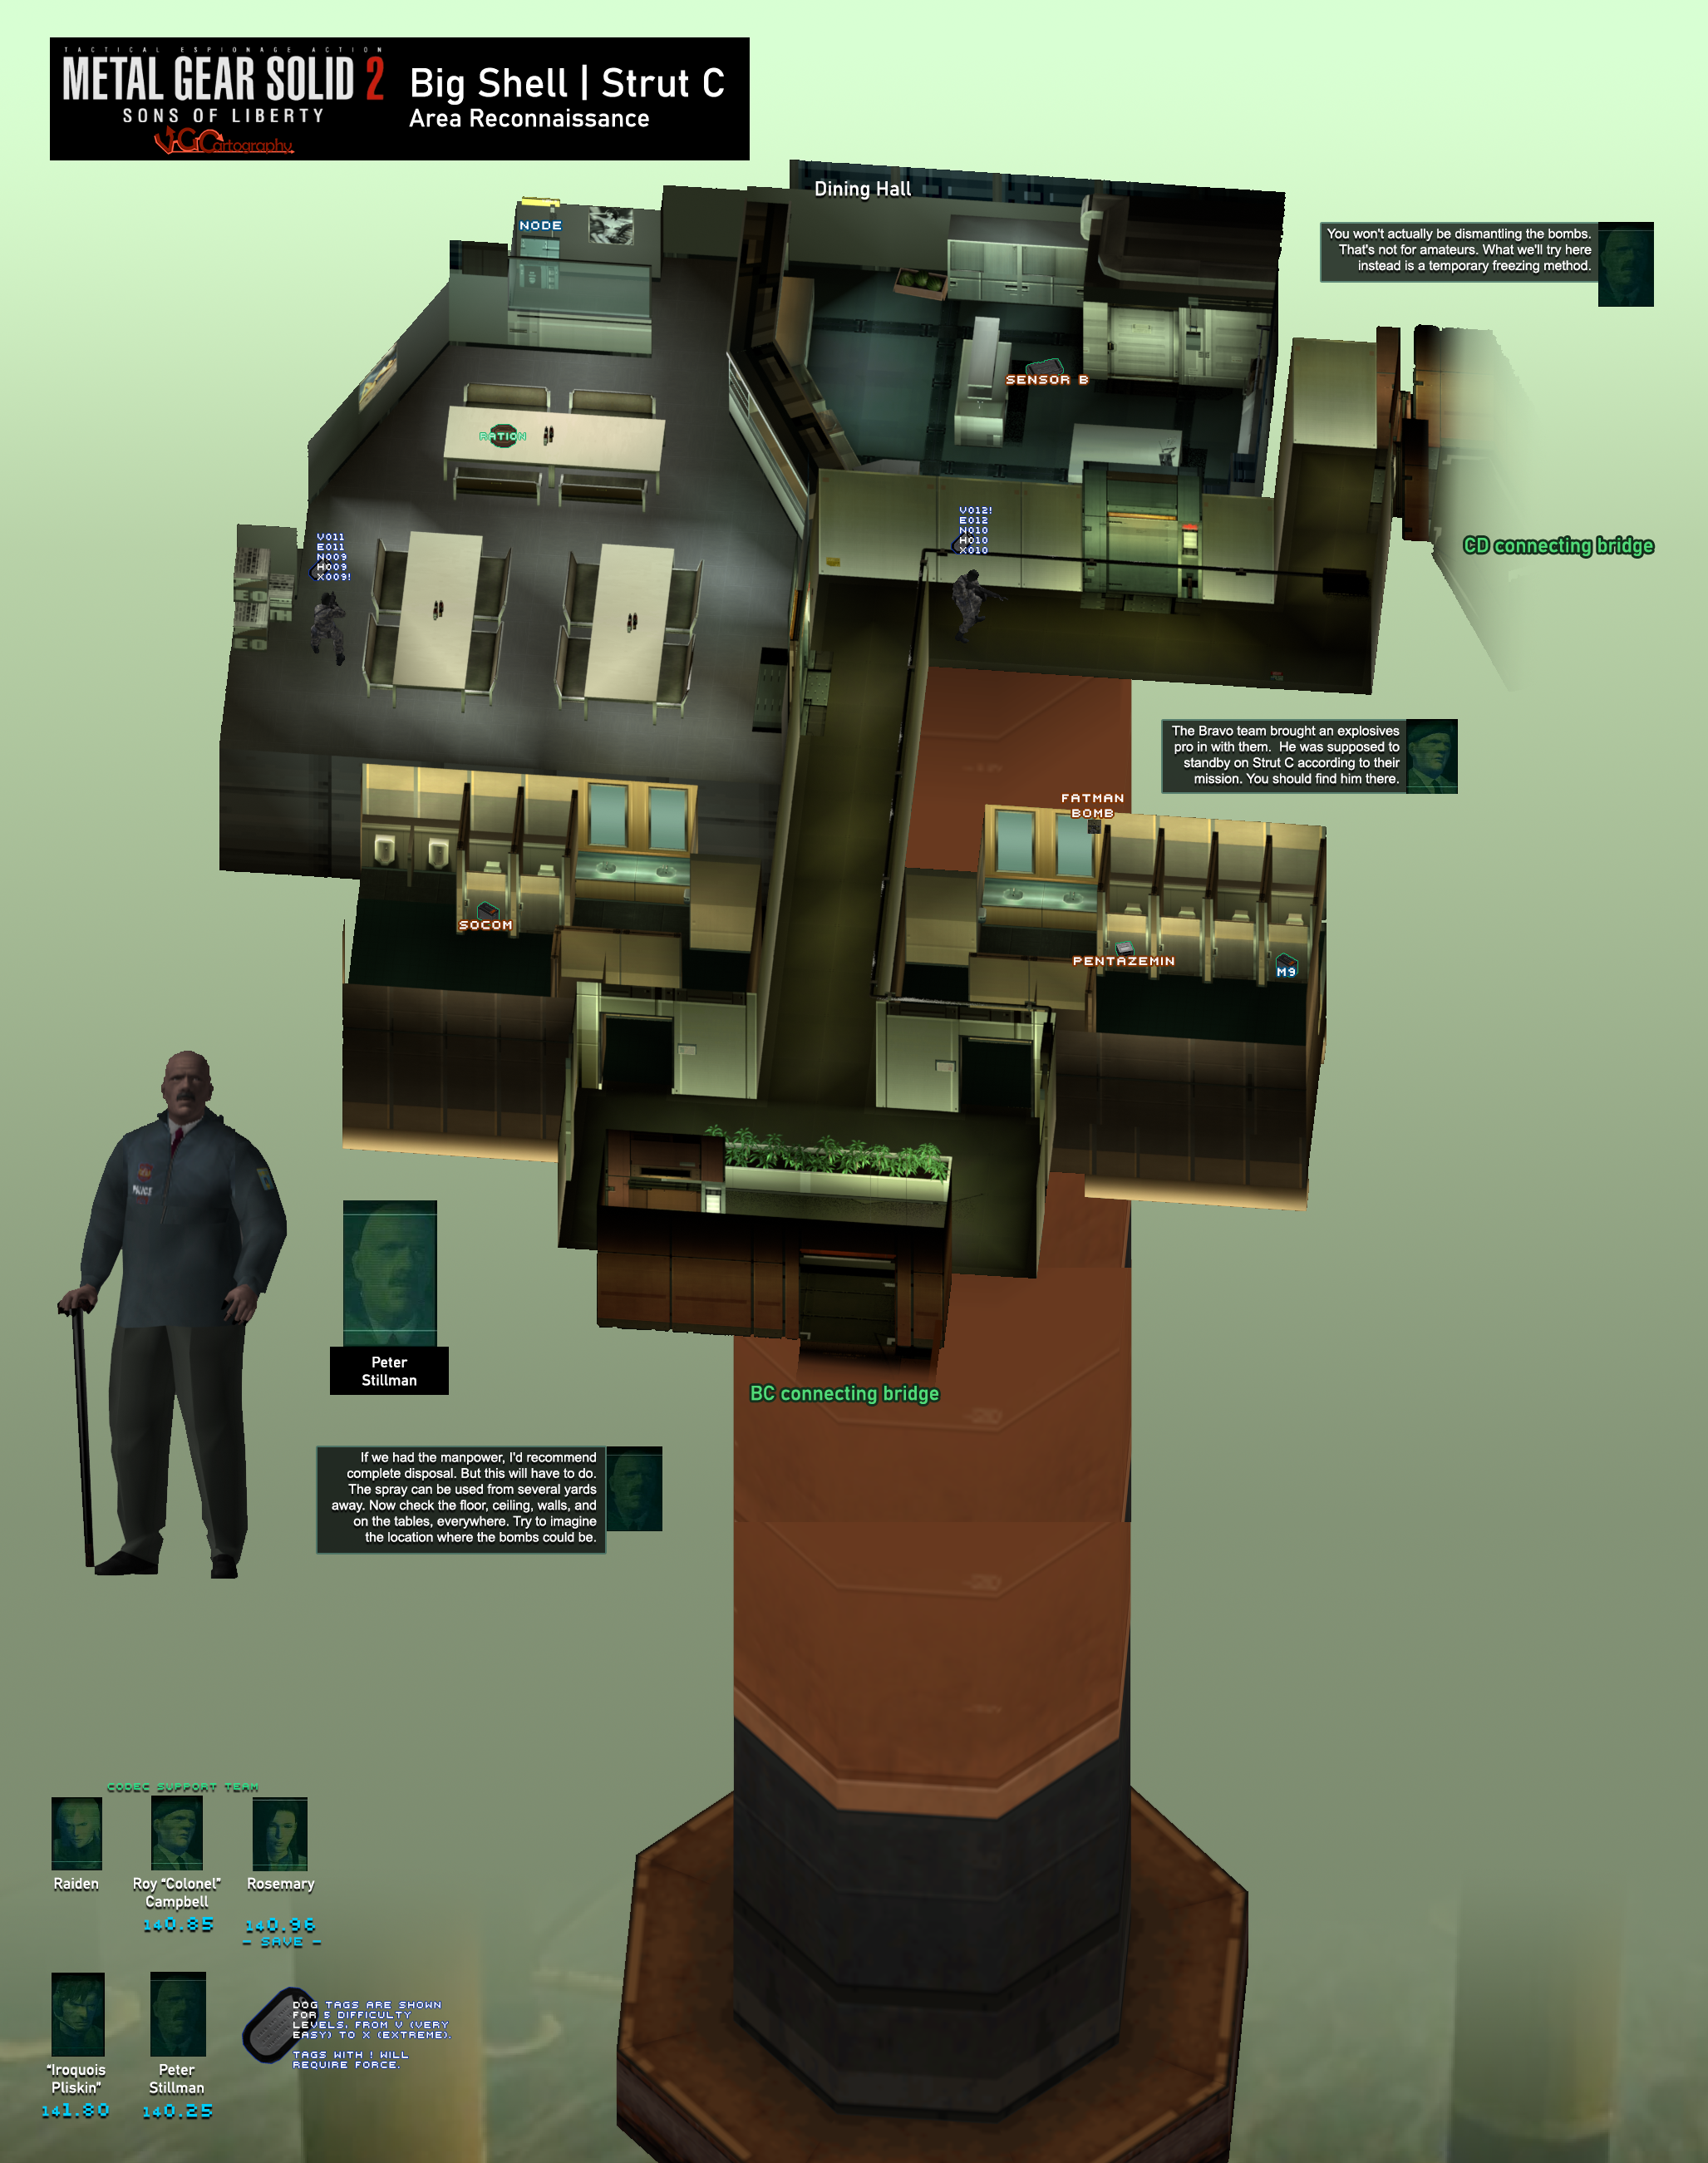
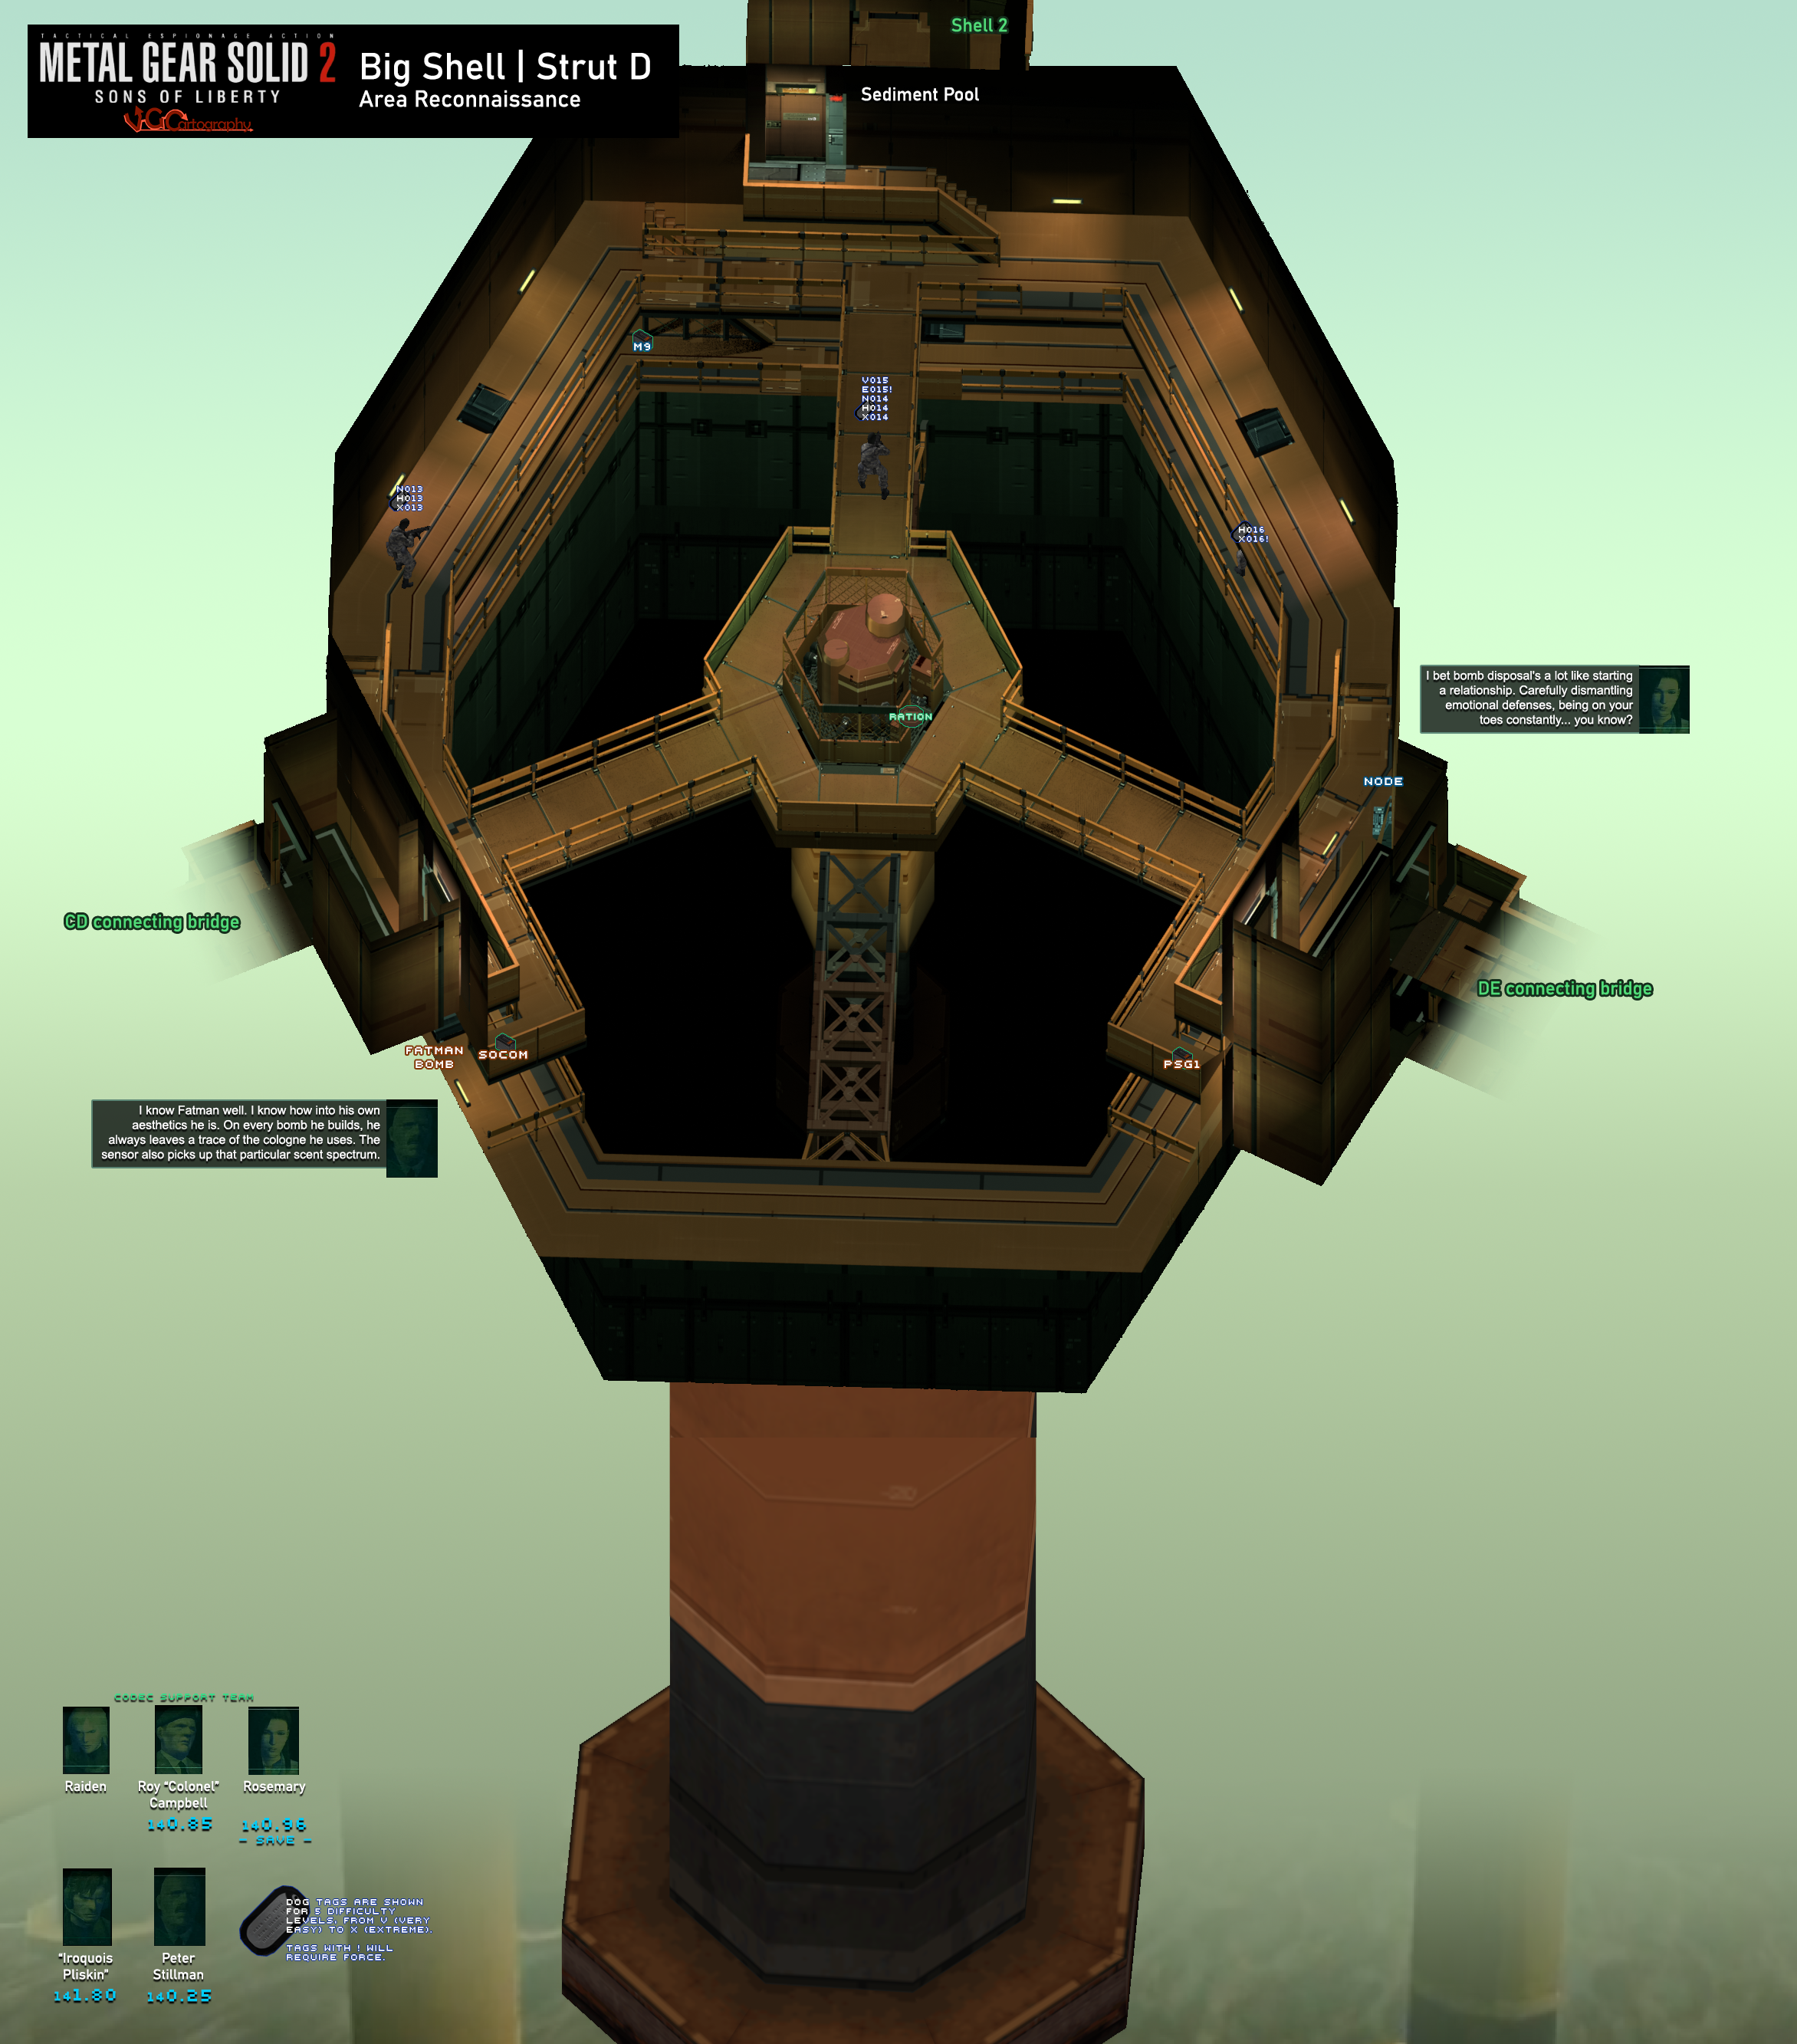
Big Shell Incident (Mission Layout)
3733 x 4000
13.1 MB
USS Discovery
Main Deck
2782 x 3089
9.33 MB
Upper Decks
1766 x 4559
5.91 MB
Lower Decks
2342 x 6833
12.2 MB
Big Shell
Strut A
2439 x 5107
9.81 MB
Strut B
1779 x 2344
2.36 MB
Strut C
2055 x 2602
3.29 MB
Strut D
2344 x 2666
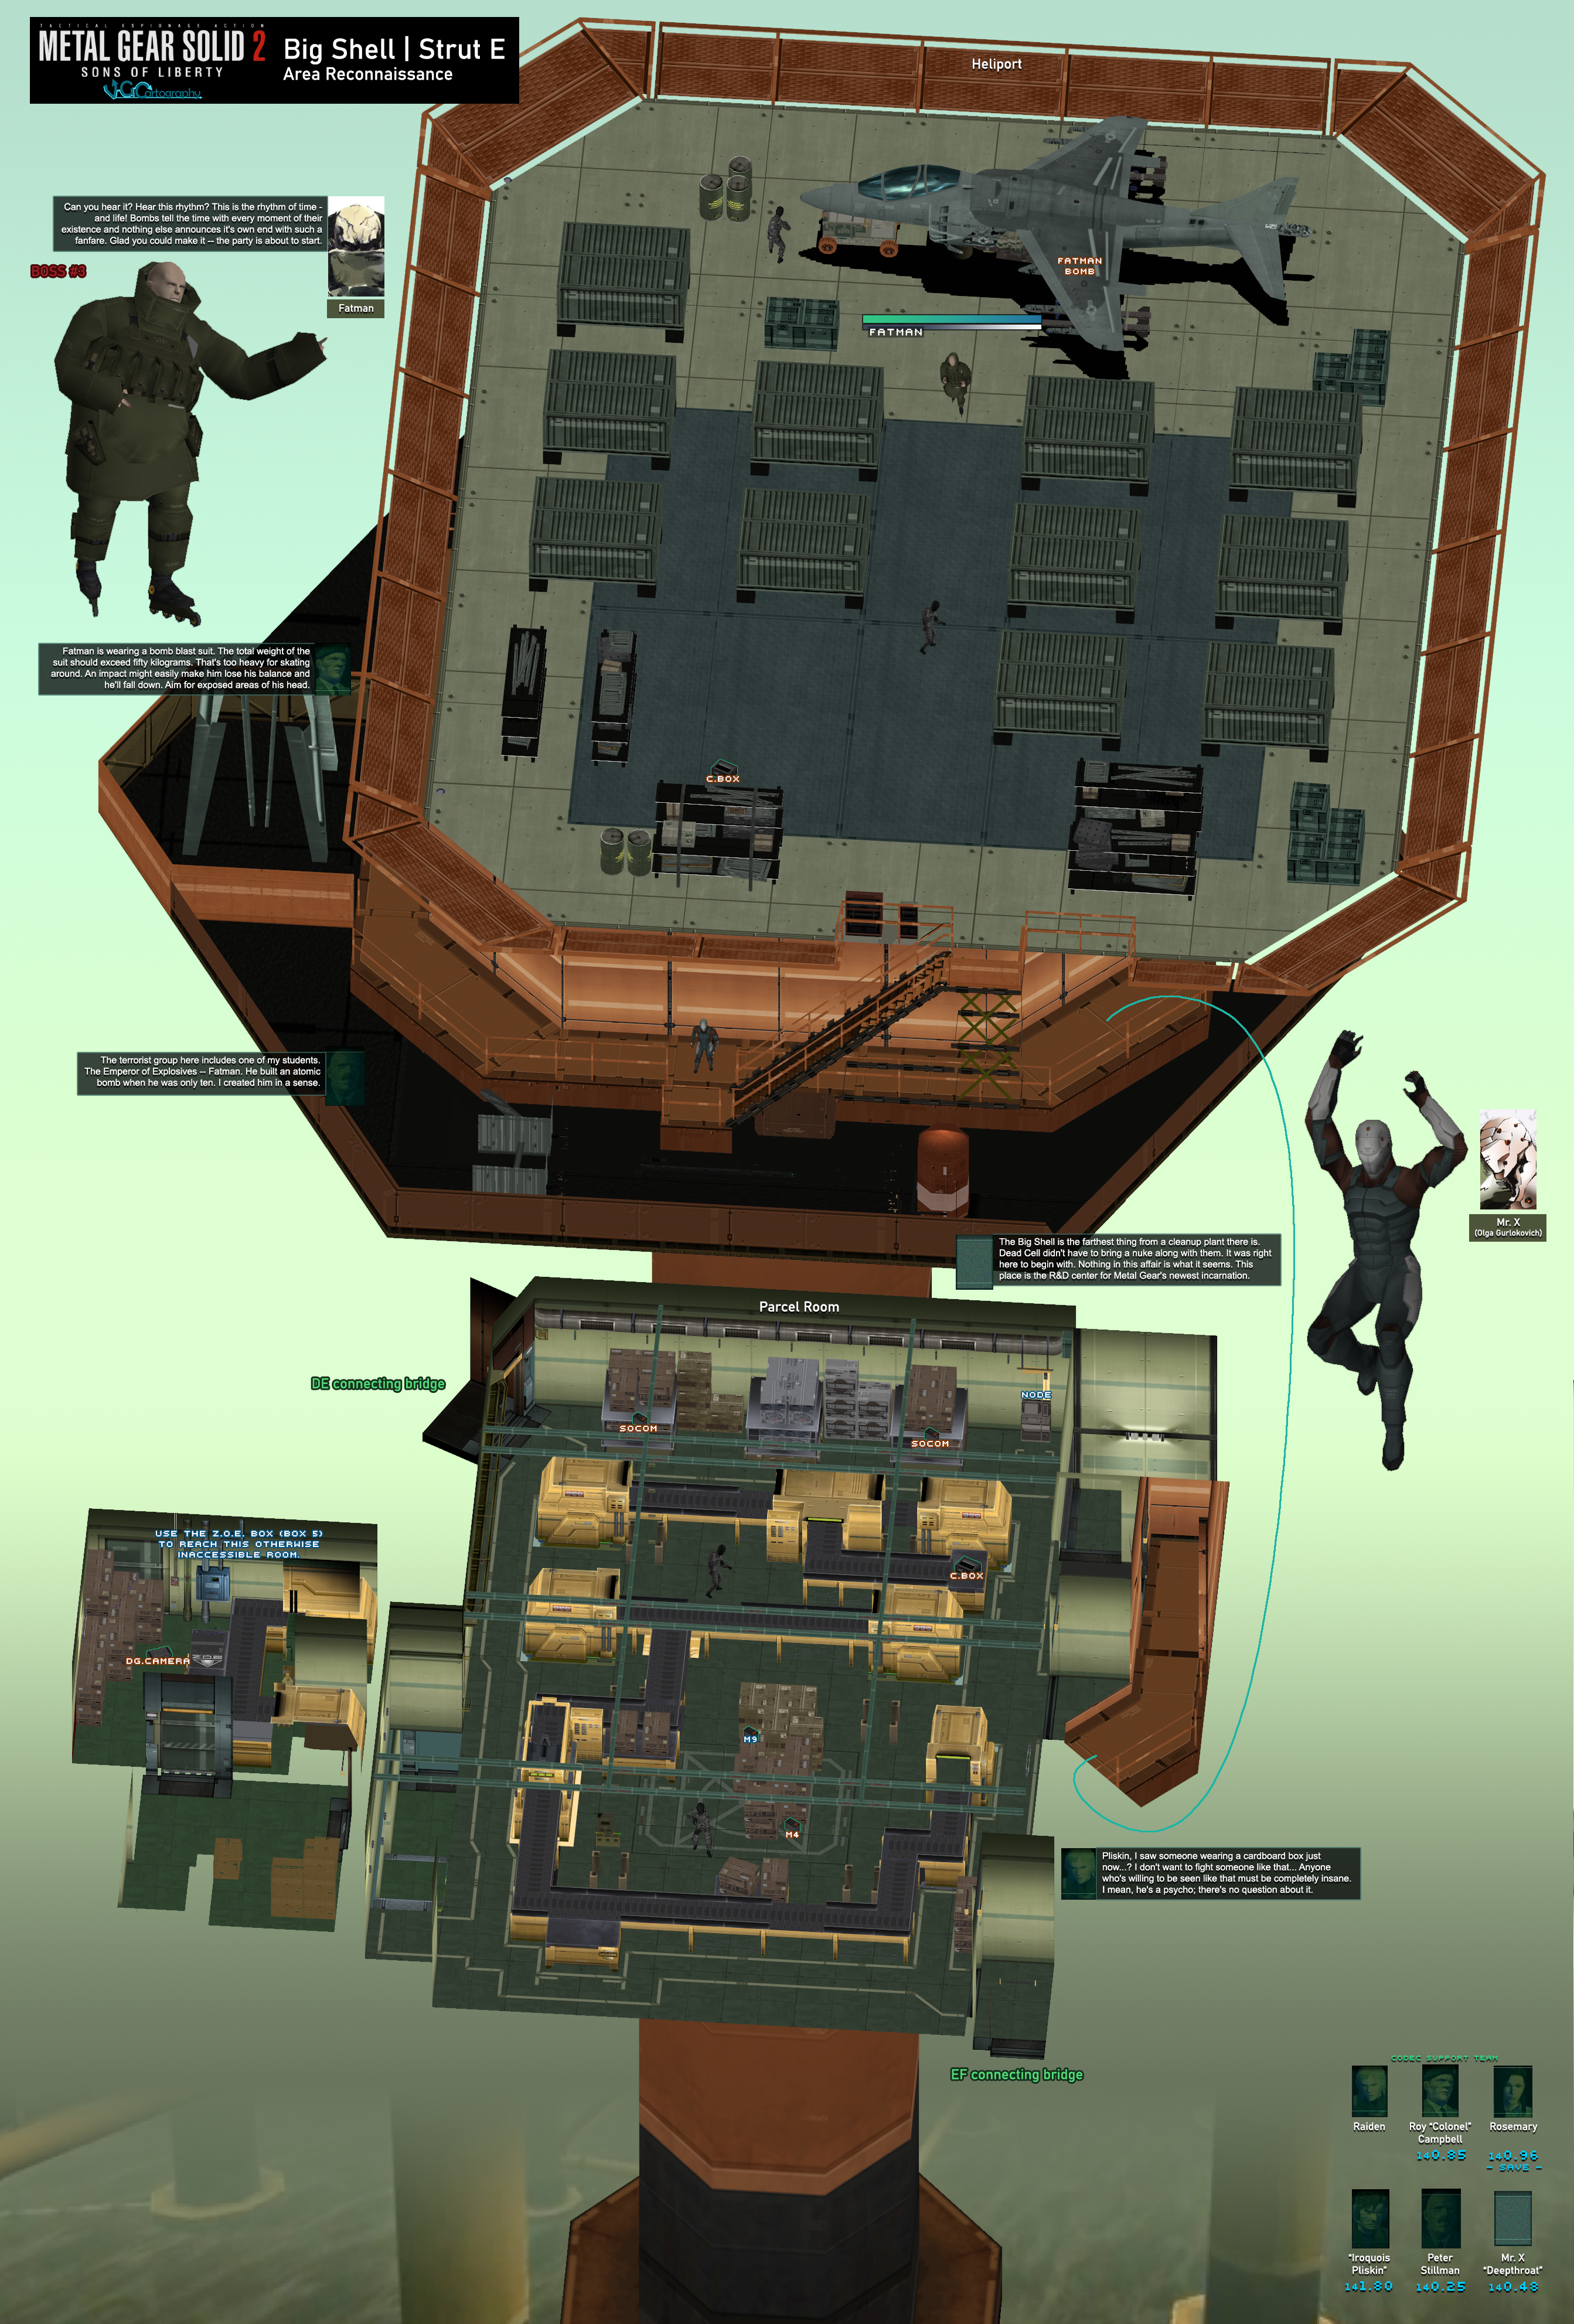
Strut E
2686 x 3966
8.02 MB
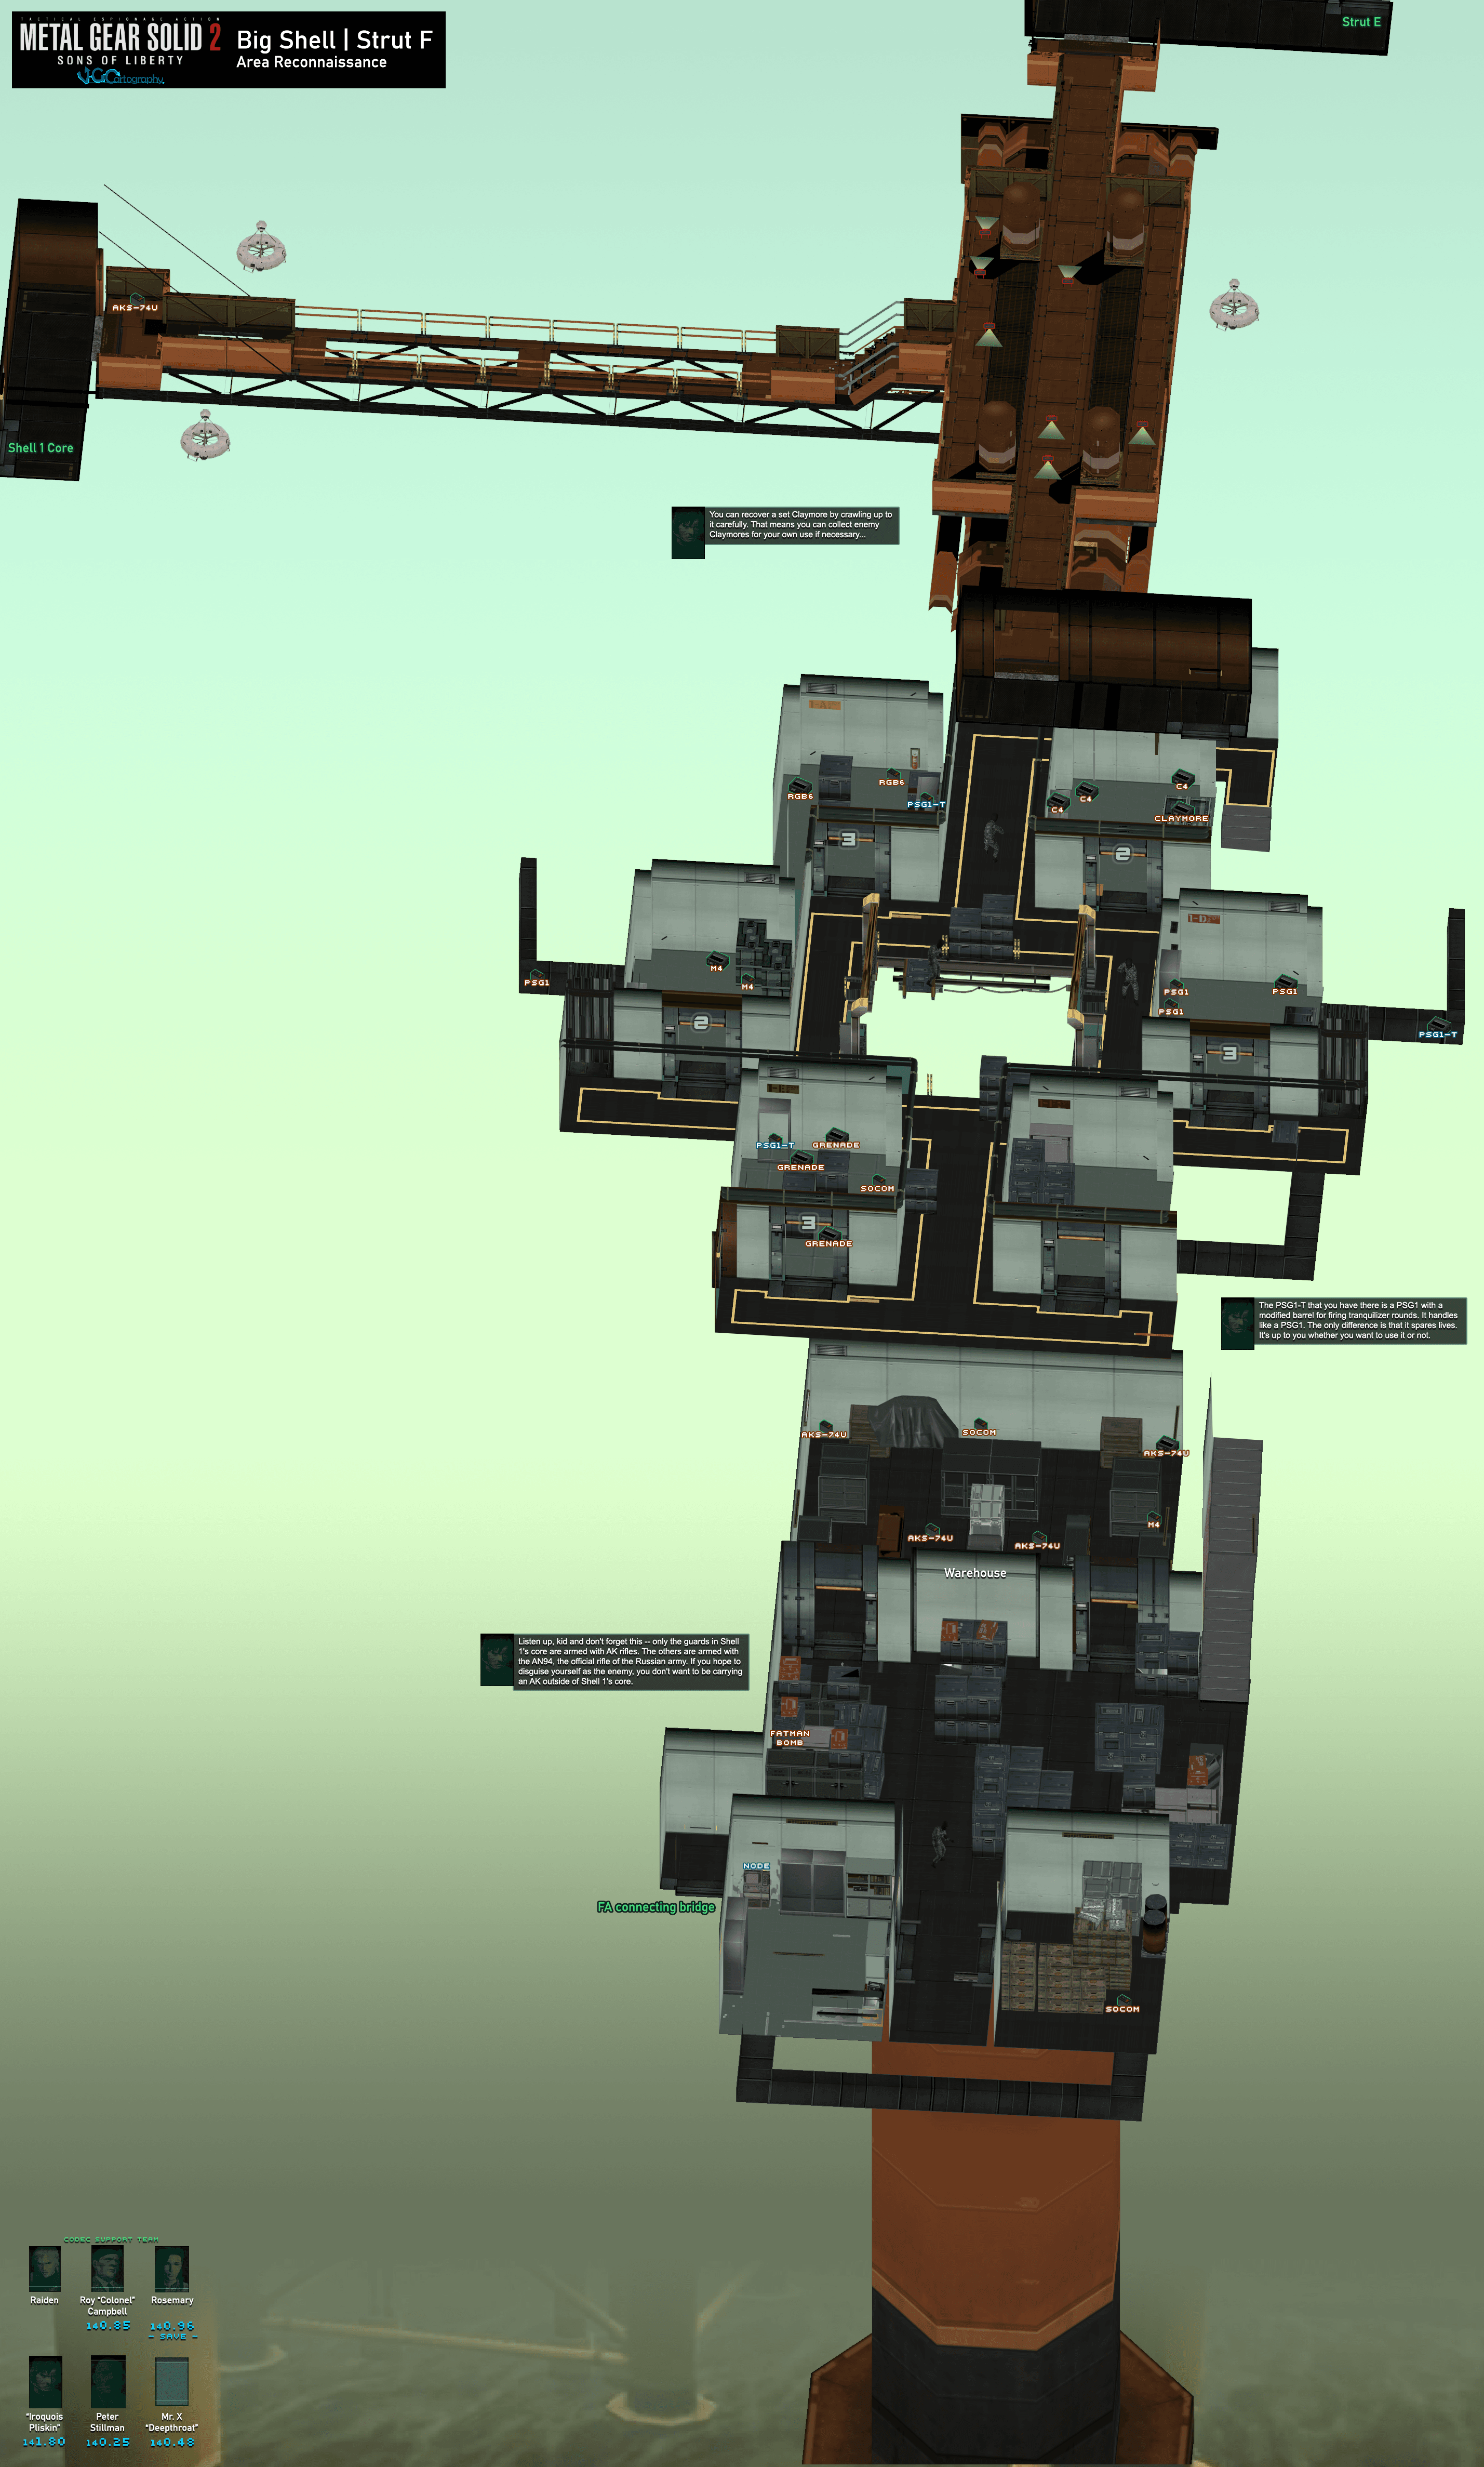
Strut F
2092 x 3423
3.91 MB
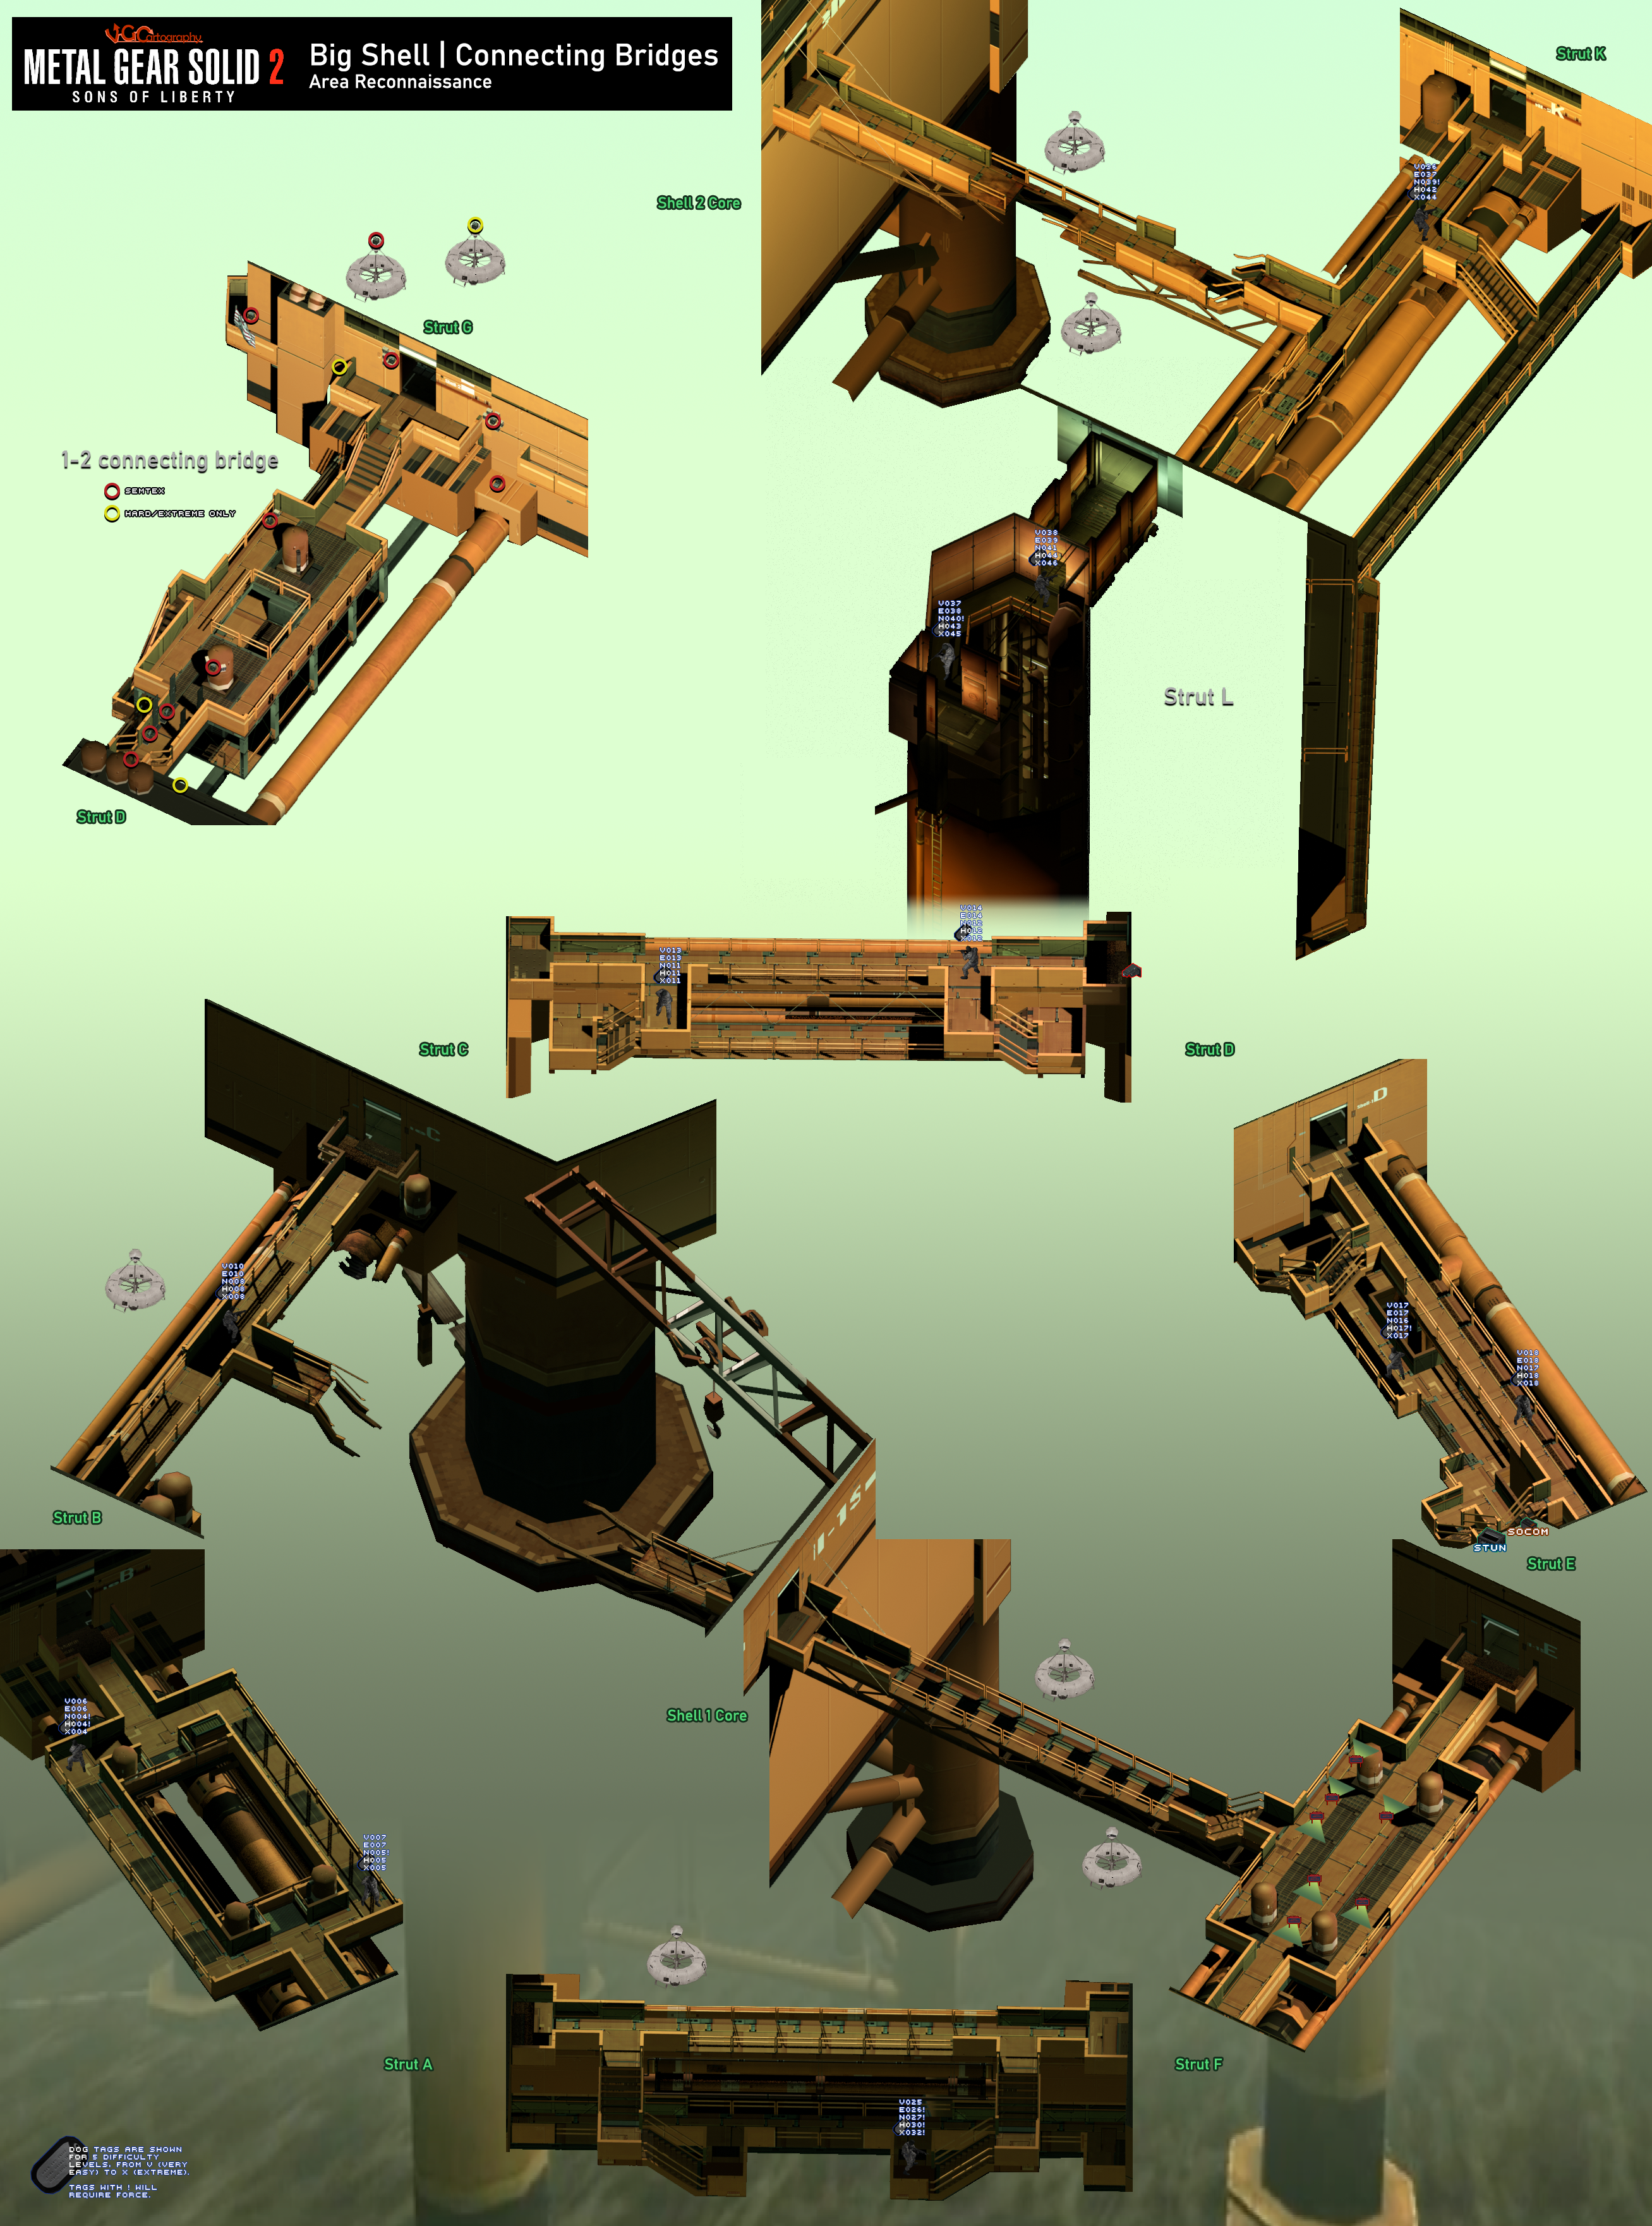
Connecting Bridges
2615 x 3523
6.58 MB
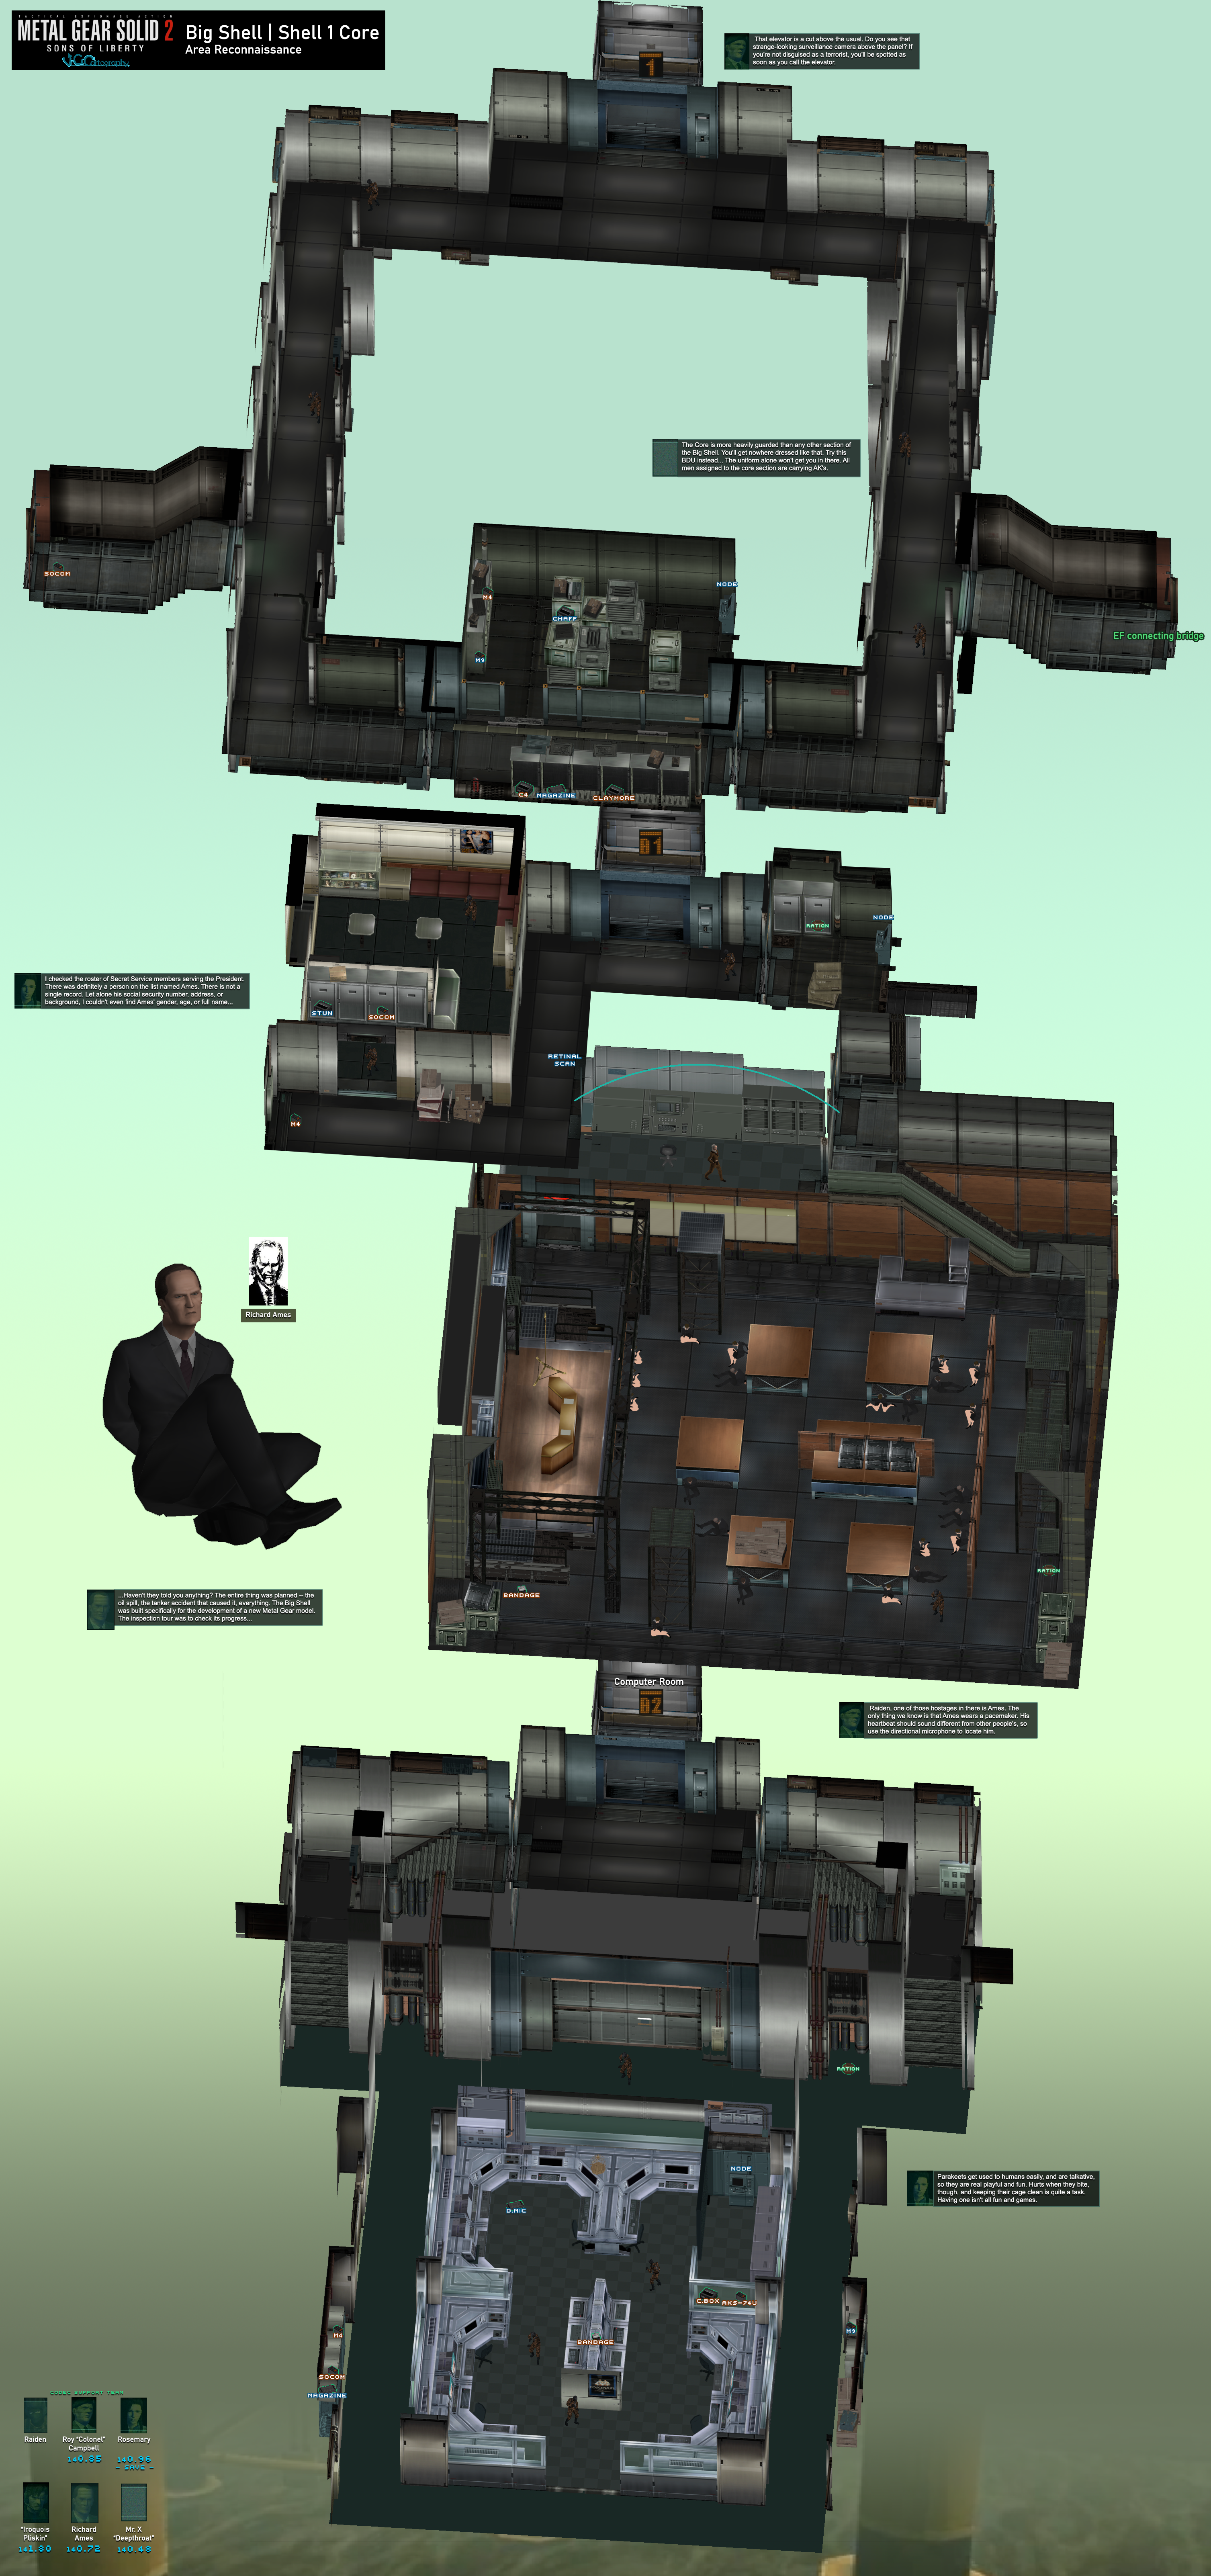
Shell 1 Core
3014 x 6411
Shell 2 Core
1766 x 2752
2.95 MB
Arsenal Gear
4809 x 6458
14.0 MB
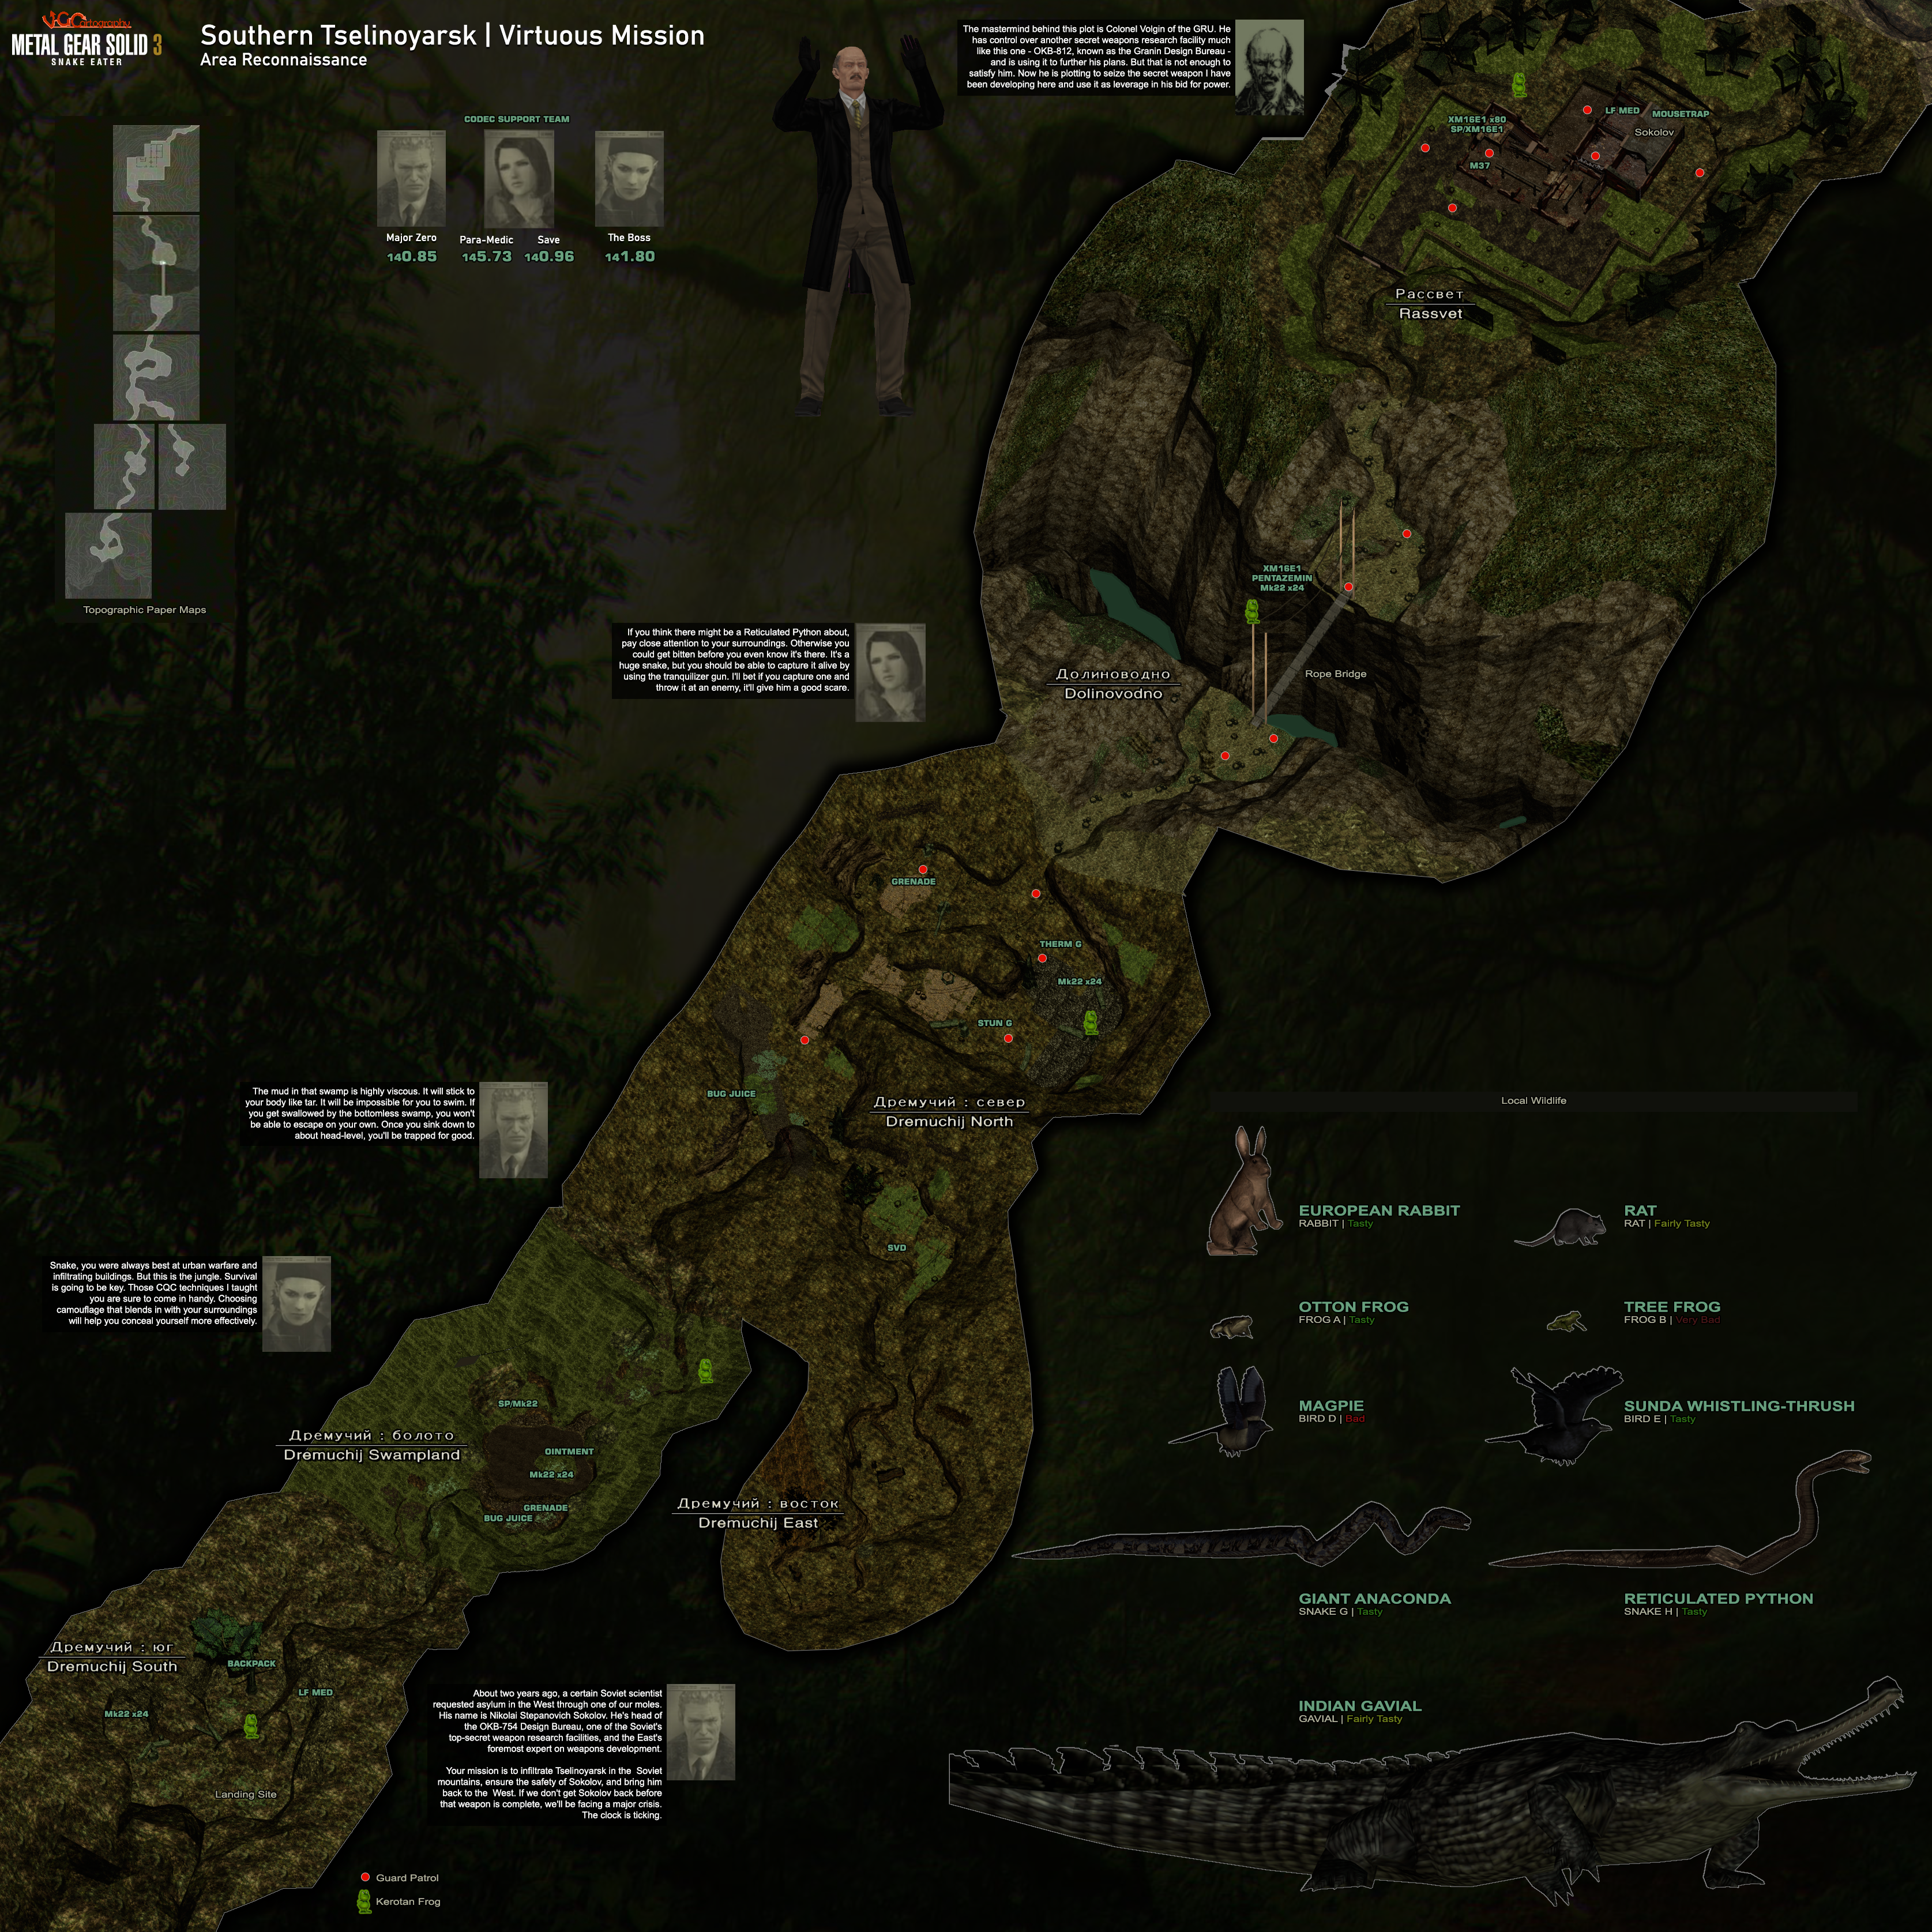
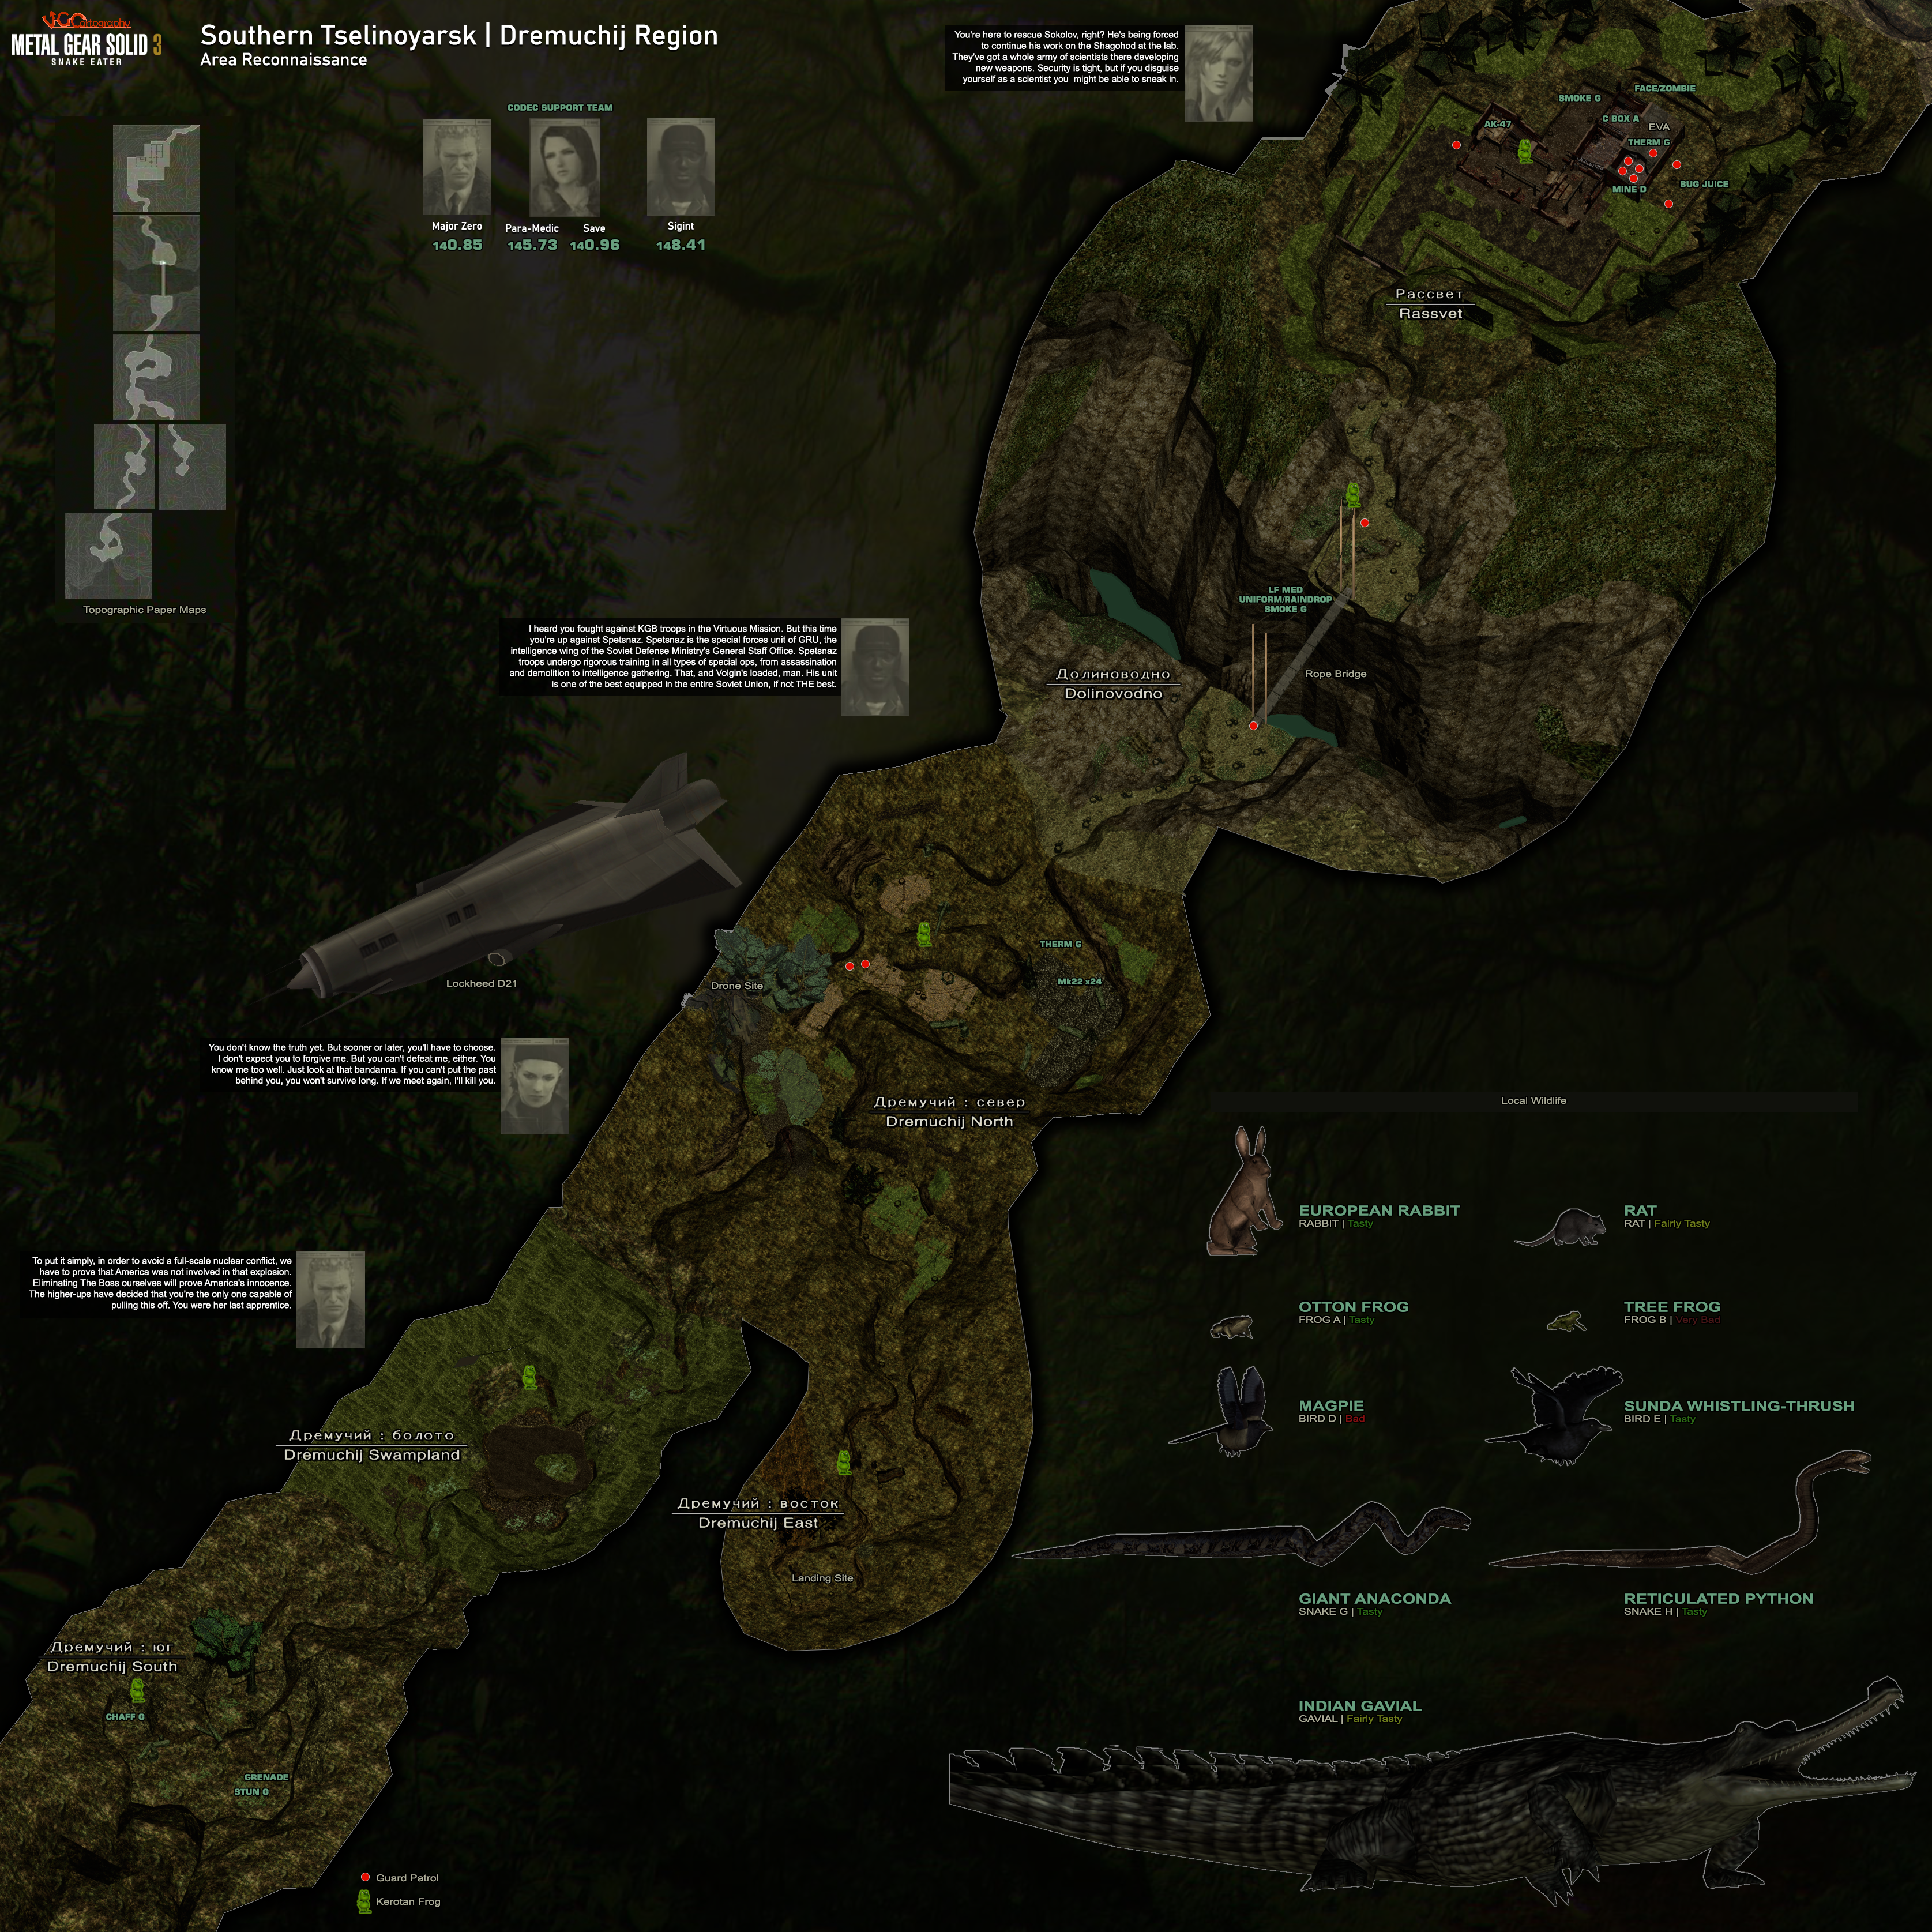
Metal Gear Solid 3: Snake Eater Maps
© 1987, 2004 Konami Computer Entertainment Japan
Virtuous Mission
3350 x 3350
11.4 MB
Dremuchij Region
11.3 MB
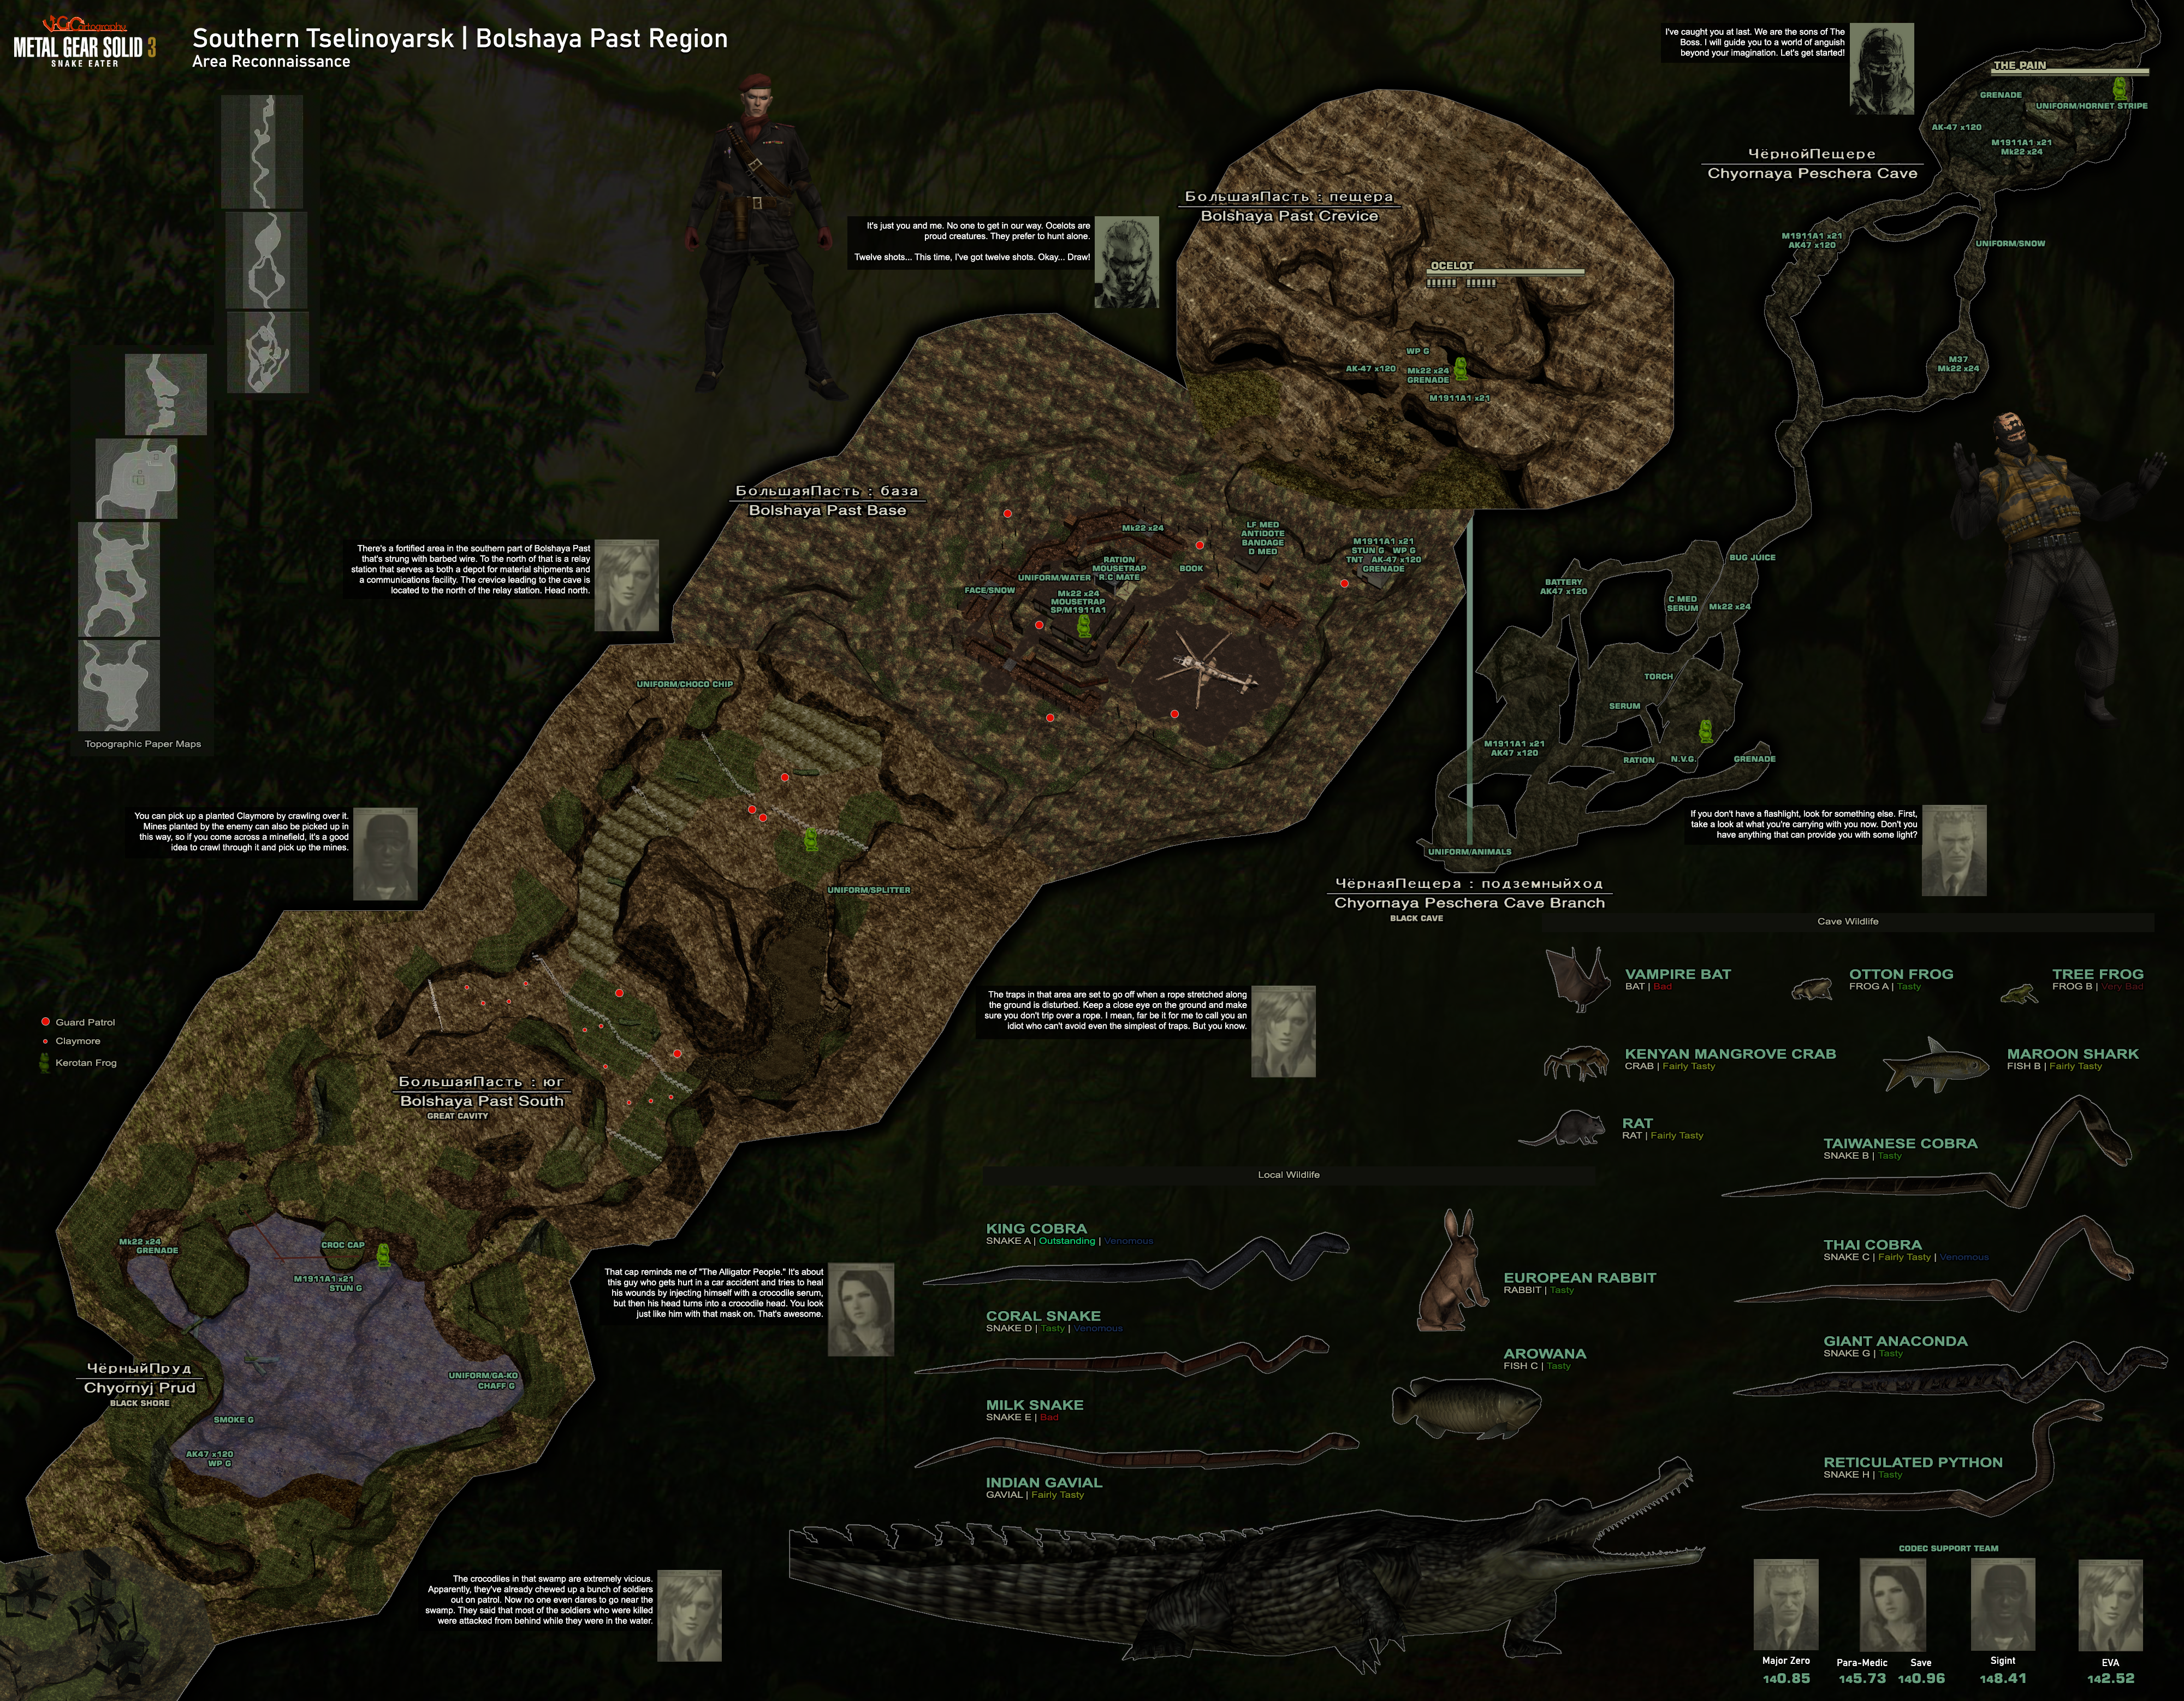
Bolshaya Past Region
4000 x 3115
Ponizovje Marsh
3268 x 3533
9.92 MB
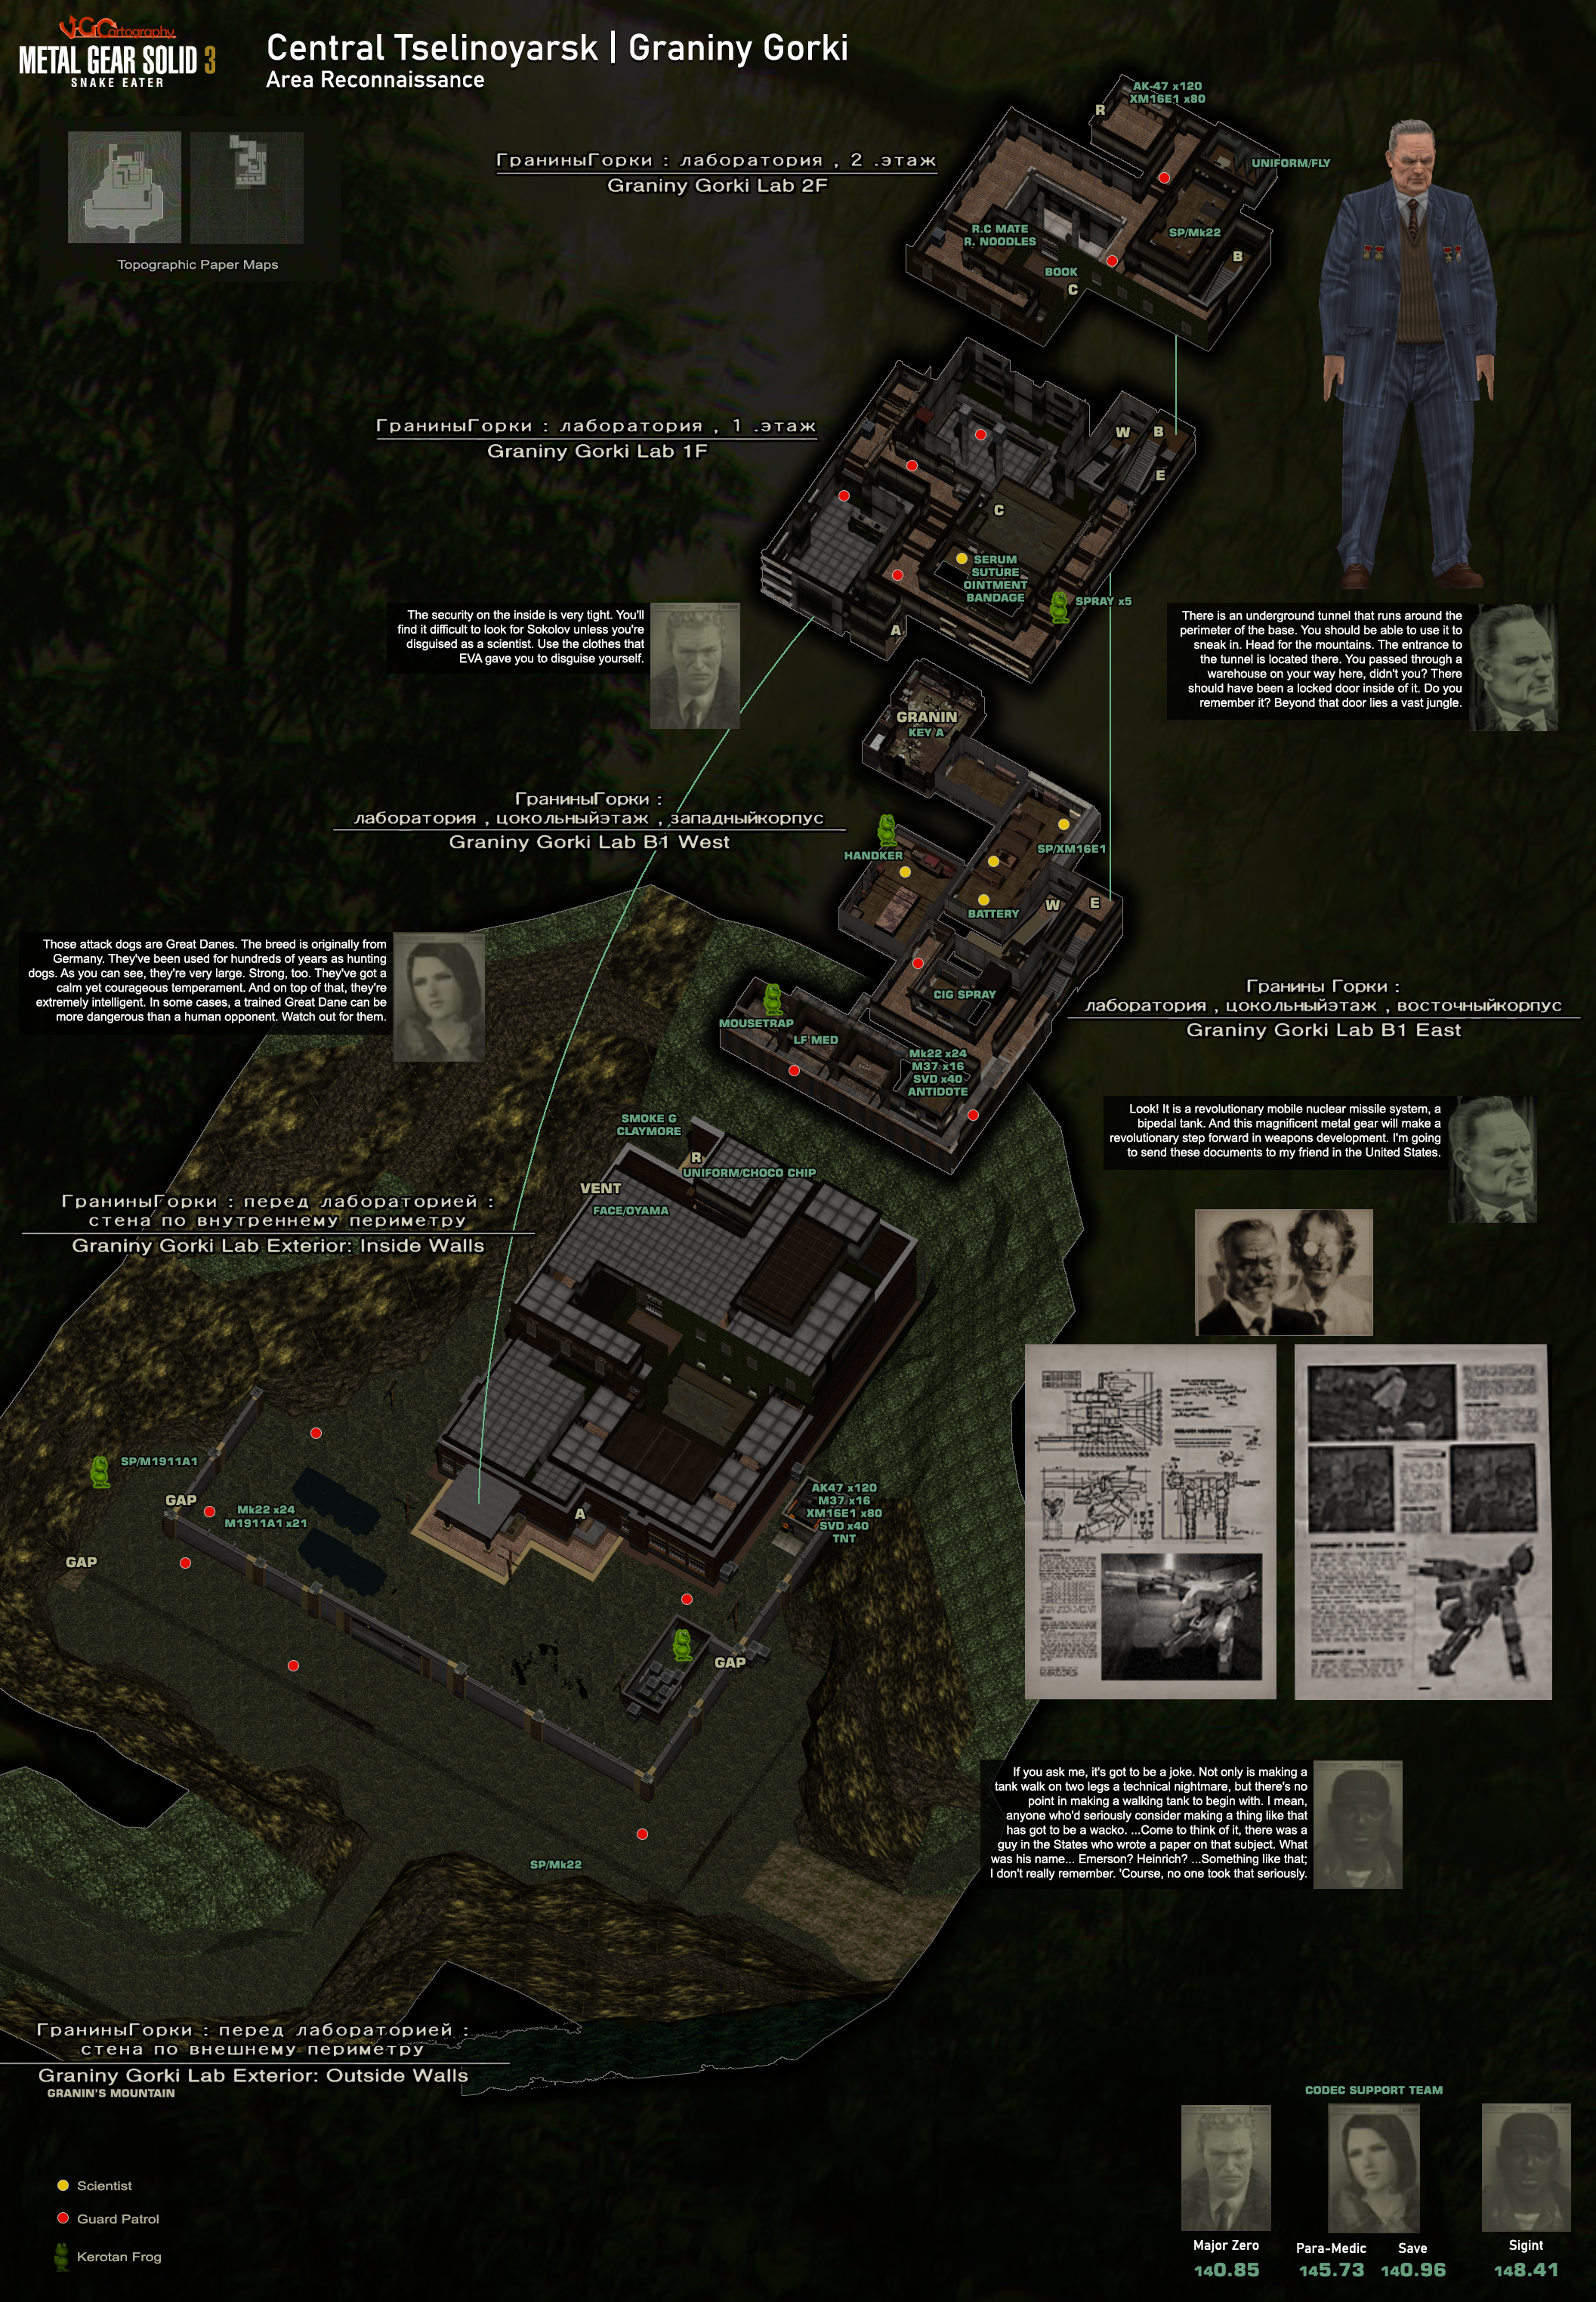
Graininy Gorki
2113 x 3048
6.45 MB
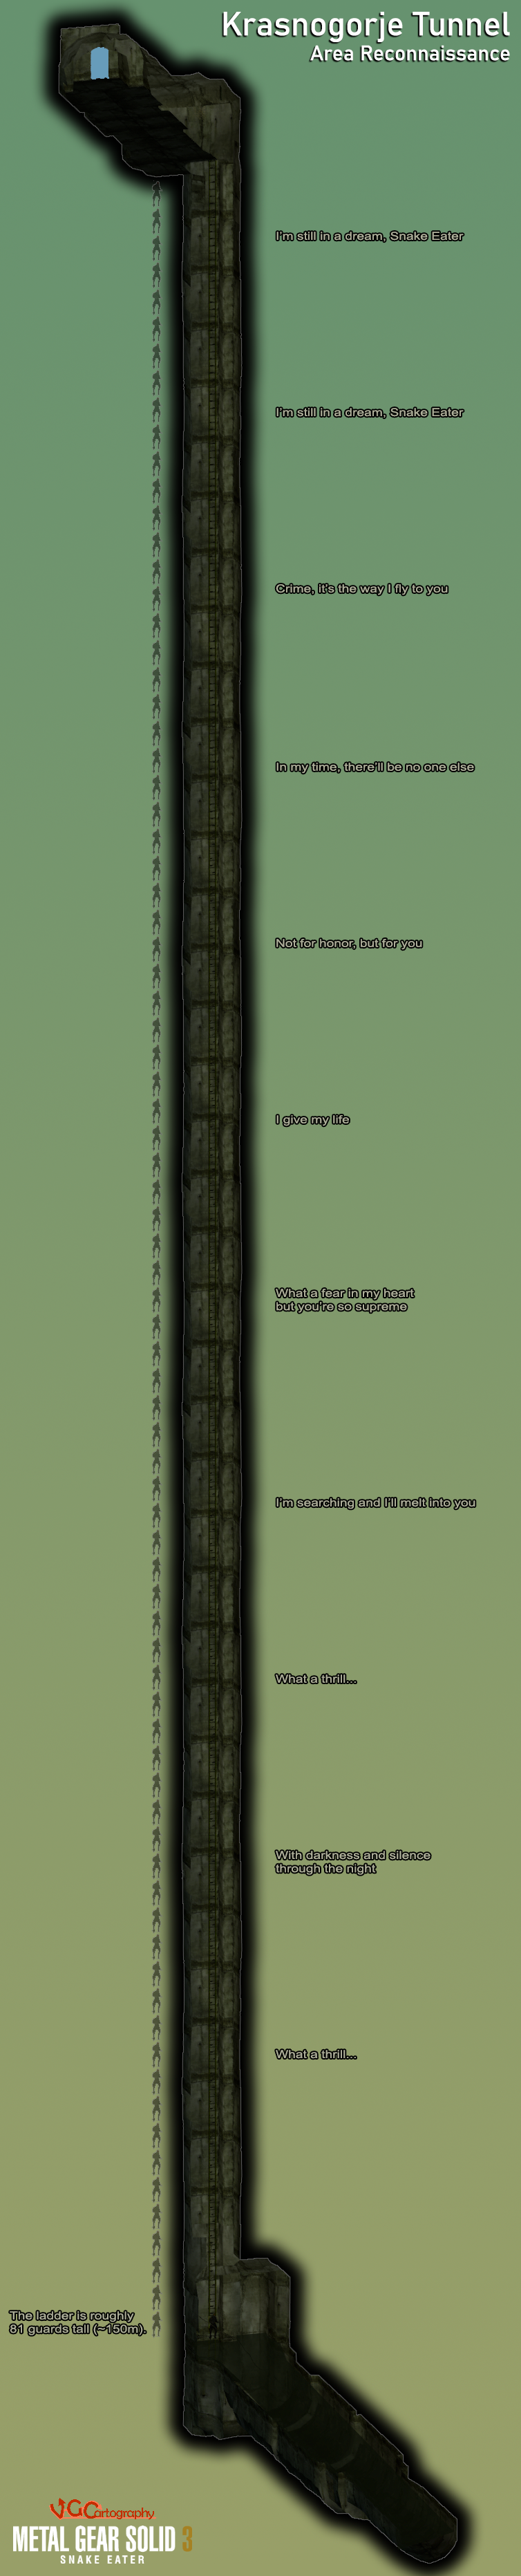
Krasnogorje Tunnel
754 x 3726
Groznyj Grad
3000 x 3374
9.58 MB
N
O
P
Q
R
S
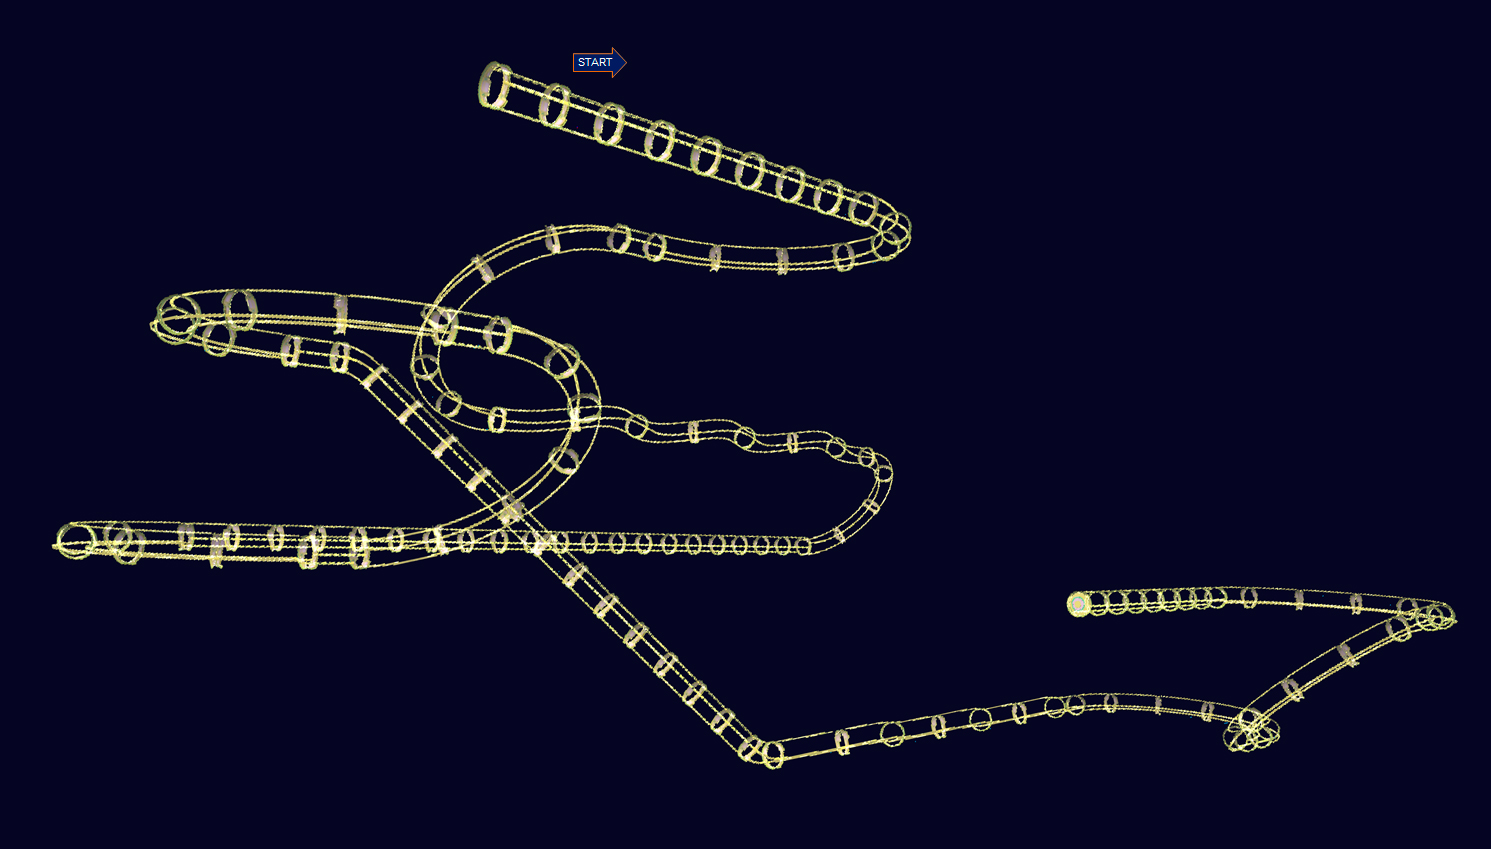
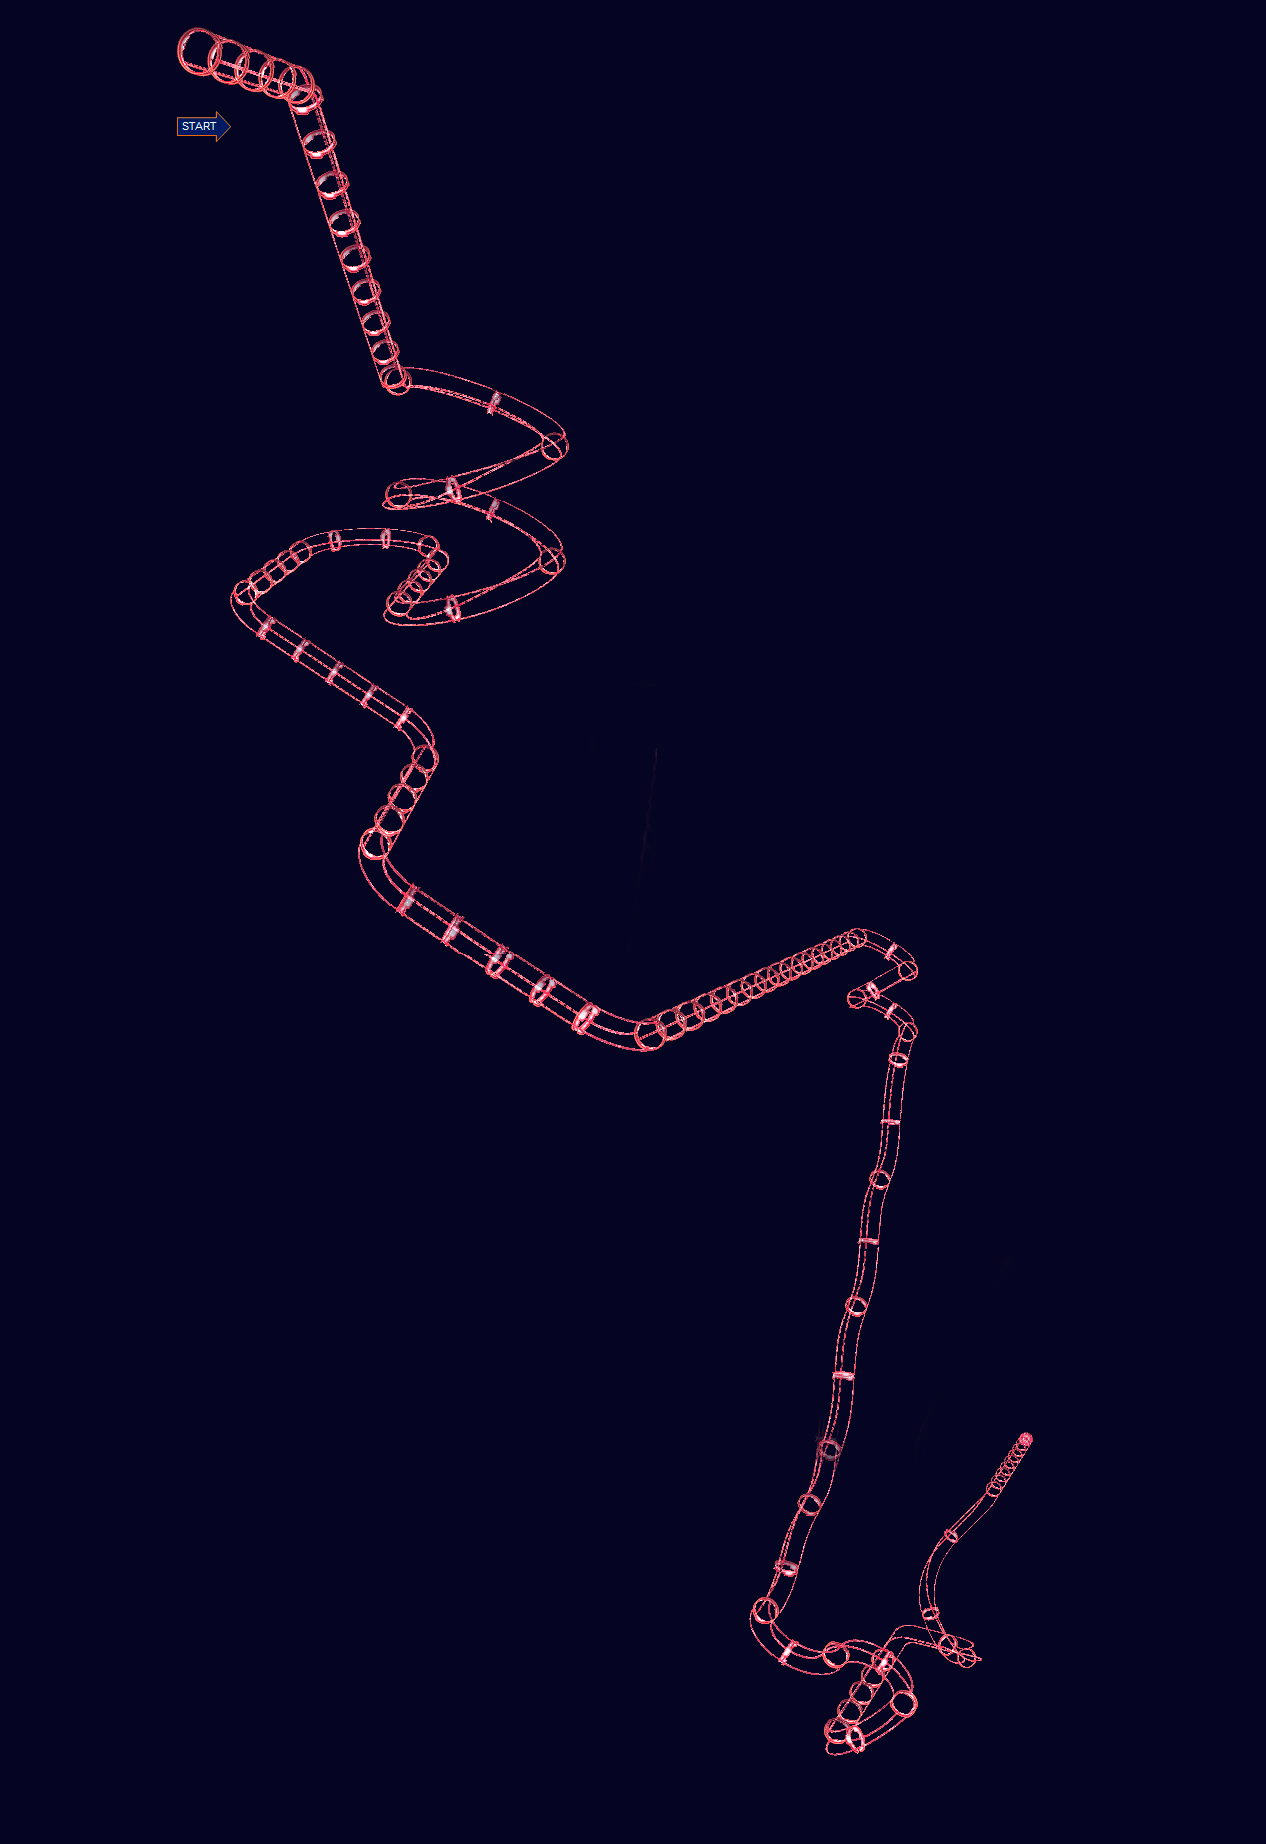
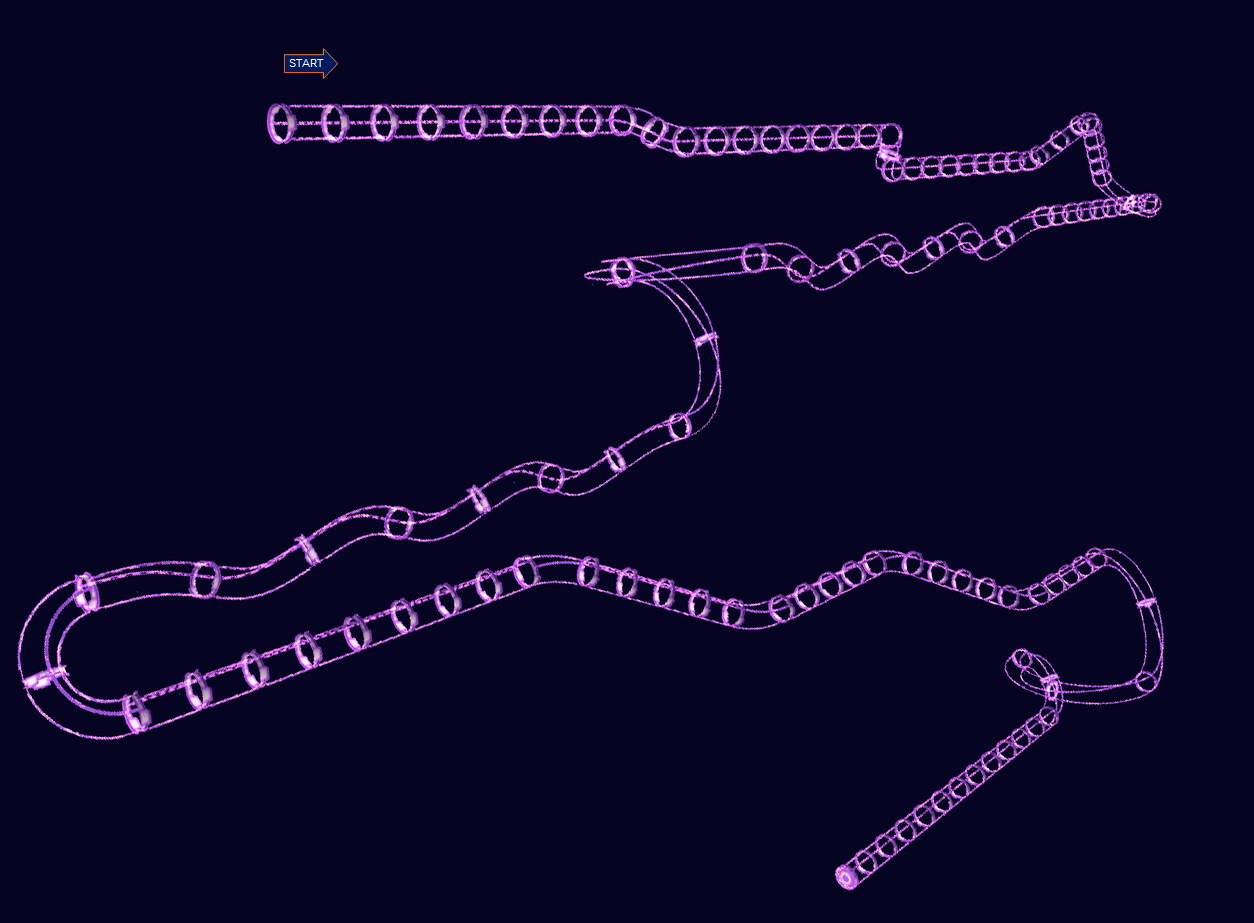
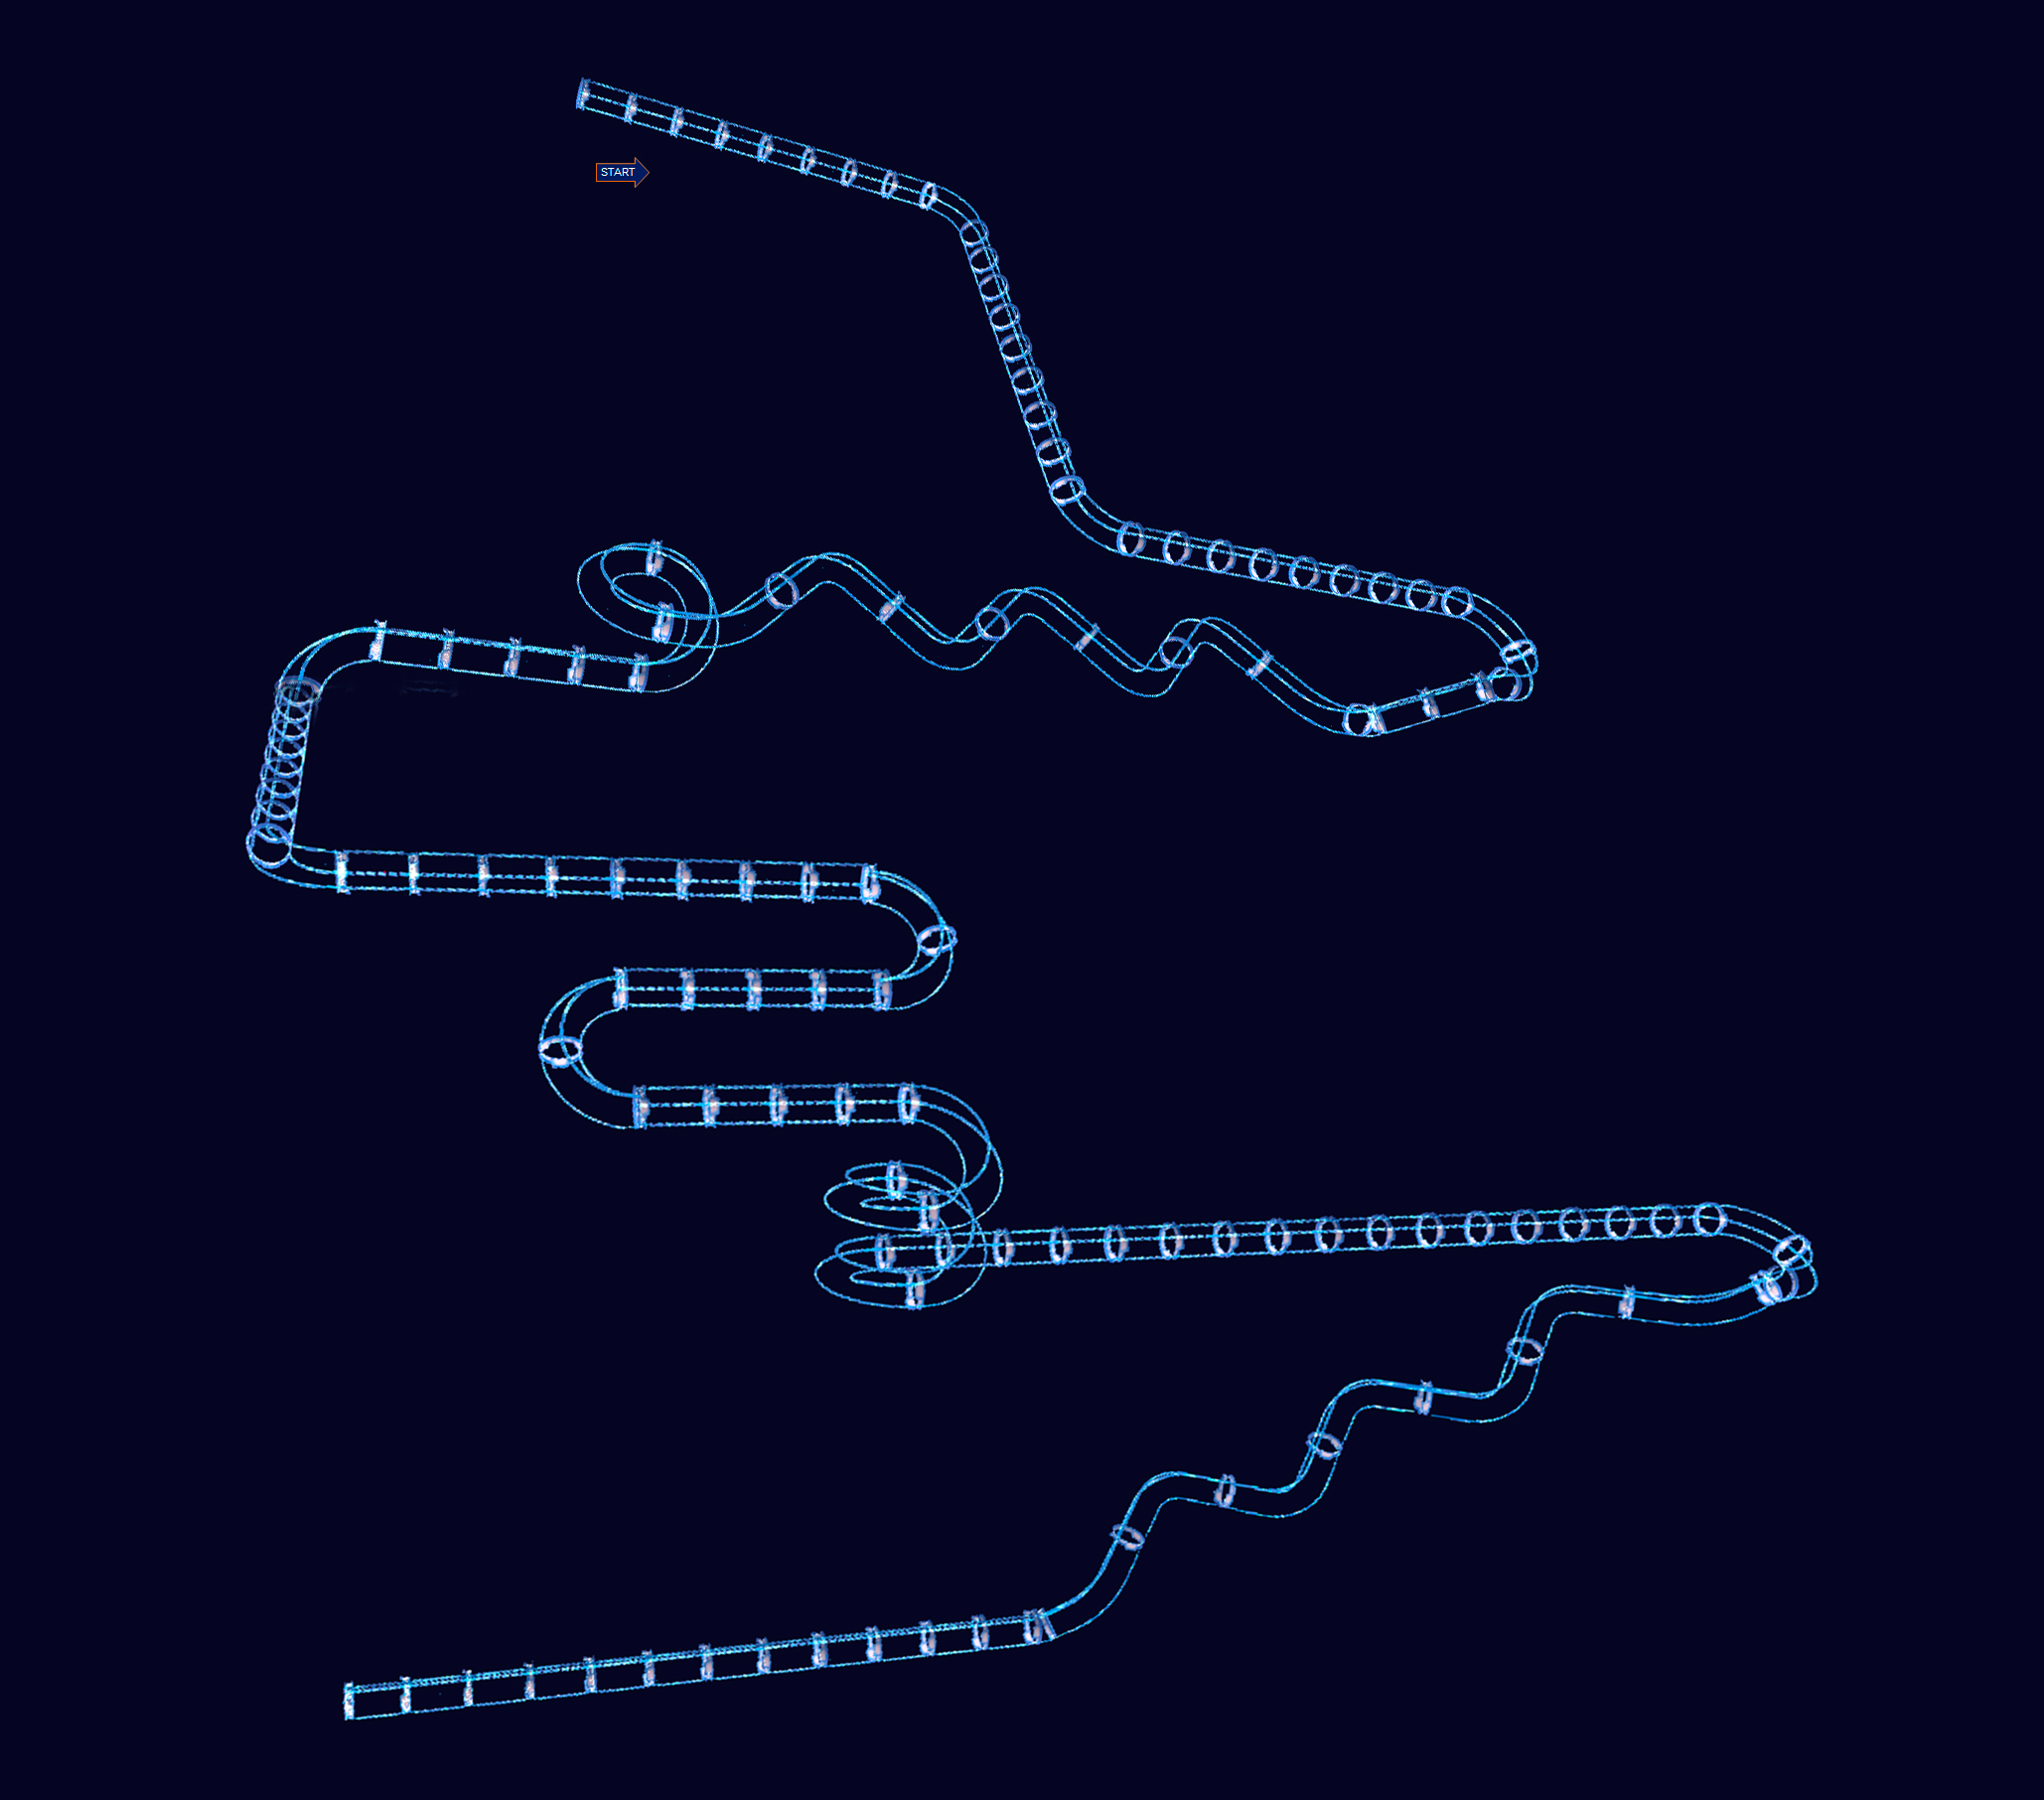
Shadow The Hedgehog Maps
© 2005 Sega Corporation
Game Schematic
2747 x 718
115 kB
G.E.R.
Game Schematic (Ending Spoilers)
PSD
Stage 1
Westopolis
11919 x 5506
15.4 MB
Stage 2
Digital Circuit
13000 x 7670
8.22 MB
Glyphic Canyon
10605 x 12203
14.5 MB
Lethal Highway
8856 x 10679
18.2 MB
Black Bull
1146 x 951
476 kB
Stage 3
Cryptic Castle
10390 x 4486
7.43 MB
Egg Breaker
1539 x 873
1.46 MB
Prison Island
10000 x 2604
Circus Park
7000 x 8036
7.62 MB
Stage 4
Central City
9445 x 3917
7.09 MB
The Doom
4471 x 5067
11.1 MB
Heavy Dog
1044 x 765
621 kB
Sky Troops
17382 x 2101
4.92 MB
Mad Matrix
8223 x 5745
6.40 MB
1920 x 896
Death Ruins
7514 x 3322
4.34 MB
971 x 801
696 kB
Stage 5
The ARK
5798 x 8568
4.73 MB
Air Fleet
12462 x 1093
5.29 MB
Iron Jungle
3817 x 5344
1.03 MB
1425 x 951
974 kB
Space Gadget
10000 x 6075
6.44 MB
Lost Impact
3707 x 2723
4.67 MB
Blue Falcon
1176 x 855
728 kB
Stage 6
GUN Fortress
5000 x 9005
2.83 MB
GUN Fortress - Black Doom Or Sonic & Diablon
1362 x 920
742 kB
Black Comet
10265 x 4618
2.45 MB
Black Comet - Egg Dealer
1296 x 846
821 kB
Black Comet - Sonic & Diablon
880 kB
Lava Shelter
10000 x 2476
1.90 MB
Lava Shelter - Egg Dealer
466 kB
Cosmic Fall
12900 x 3336
13.3 MB
Cosmic Fall - Egg Dealer
1194 x 924
936 kB
Cosmic Fall - Black Doom
3072 x 3010
674 kB
Final Haunt
10432 x 4159
3.13 MB
Final Haunt - Black Doom Or Sonic & Diablon
1140 x 849
610 kB
Stage 7
The Last Way
5000 x 2364
1.39 MB
Devil Doom
926 x 922
619 kB
2P Multiplayer
1293 x 915
505 kB
1362 x 963
567 kB
1287 x 963
647 kB
Non-Playable Locations
2437 x 5582
6.33 MB
Debug Stages
4247 x 1791
2.74 MB
Unused
4382 x 3187
1.25 MB
3000 x 2455
2.32 MB
666 x 666
Shining Force Neo Maps
Ucritos (In-Game Map)
3076 x 2396
192 kB
Feldland (In-Game Map)
2232 x 3016
184 kB
Hail Prison (In-Game Map)
784 x 1872
44.2 kB
Eranore (In-Game Map)
2328 x 2820
Dark Castle (In-Game Map)
1236 x 1828
77.5 kB
Shin Megami Tensei - Devil Summoner: Raidou Kuzunoha Vs. The Soulless Army Maps
© 1995, 2006 Atlus Co., Ltd.
Tokyo
646 kB
Shinoda
512 x 512
Shin Megami Tensei - Devil Summoner 2: Raidou Kuzunoha Vs. King Abaddon Maps
© 2009 Atlus
676 kB
Silent Hill 2 Maps
© 1999, 2001 Konami Computer Entertainment Tokyo
Blue Creek Apartments
1198 x 743
Star Fighters
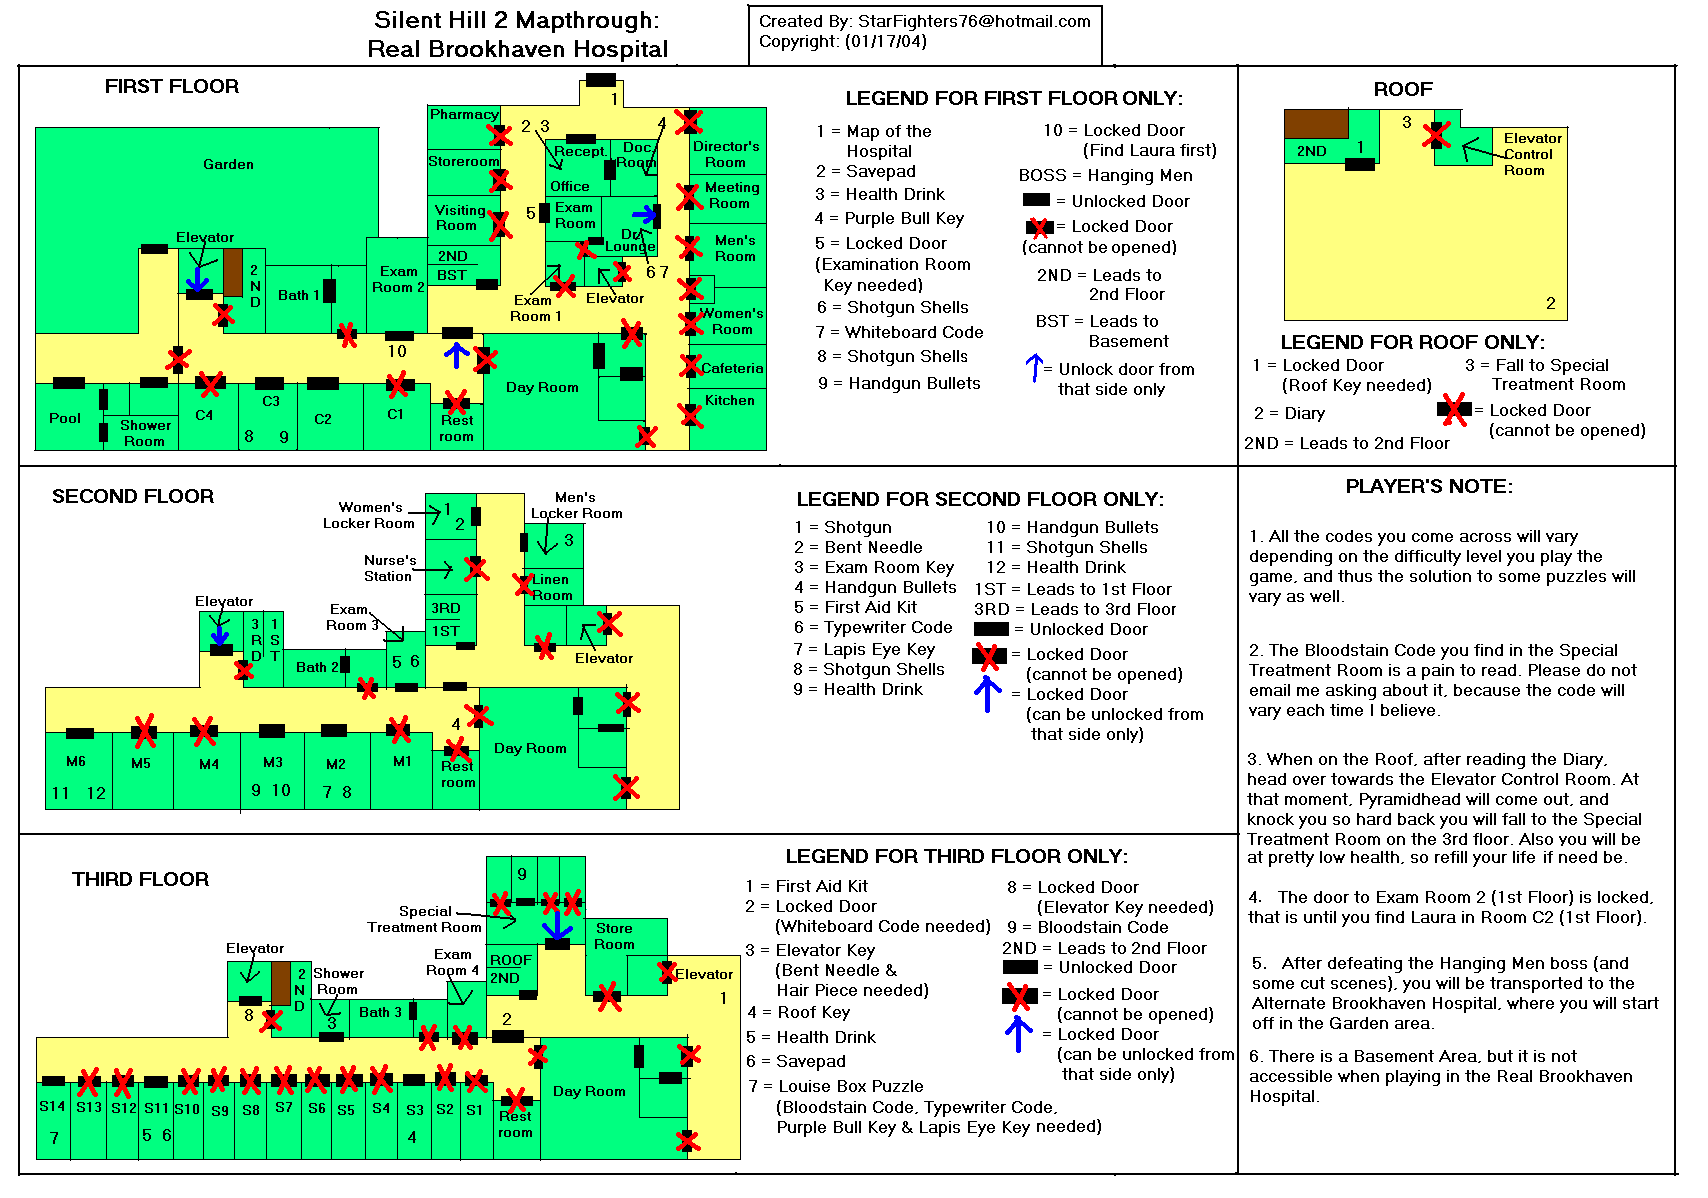
Brookhaven Hospital
1708 x 1198
39.9 kB
Brookhaven Hospital (Alternate)
1403 x 1166
34.6 kB
Historical Society & Sewers
802 x 1094
9.80 kB
Labyrinth
1318 x 1319
19.4 kB
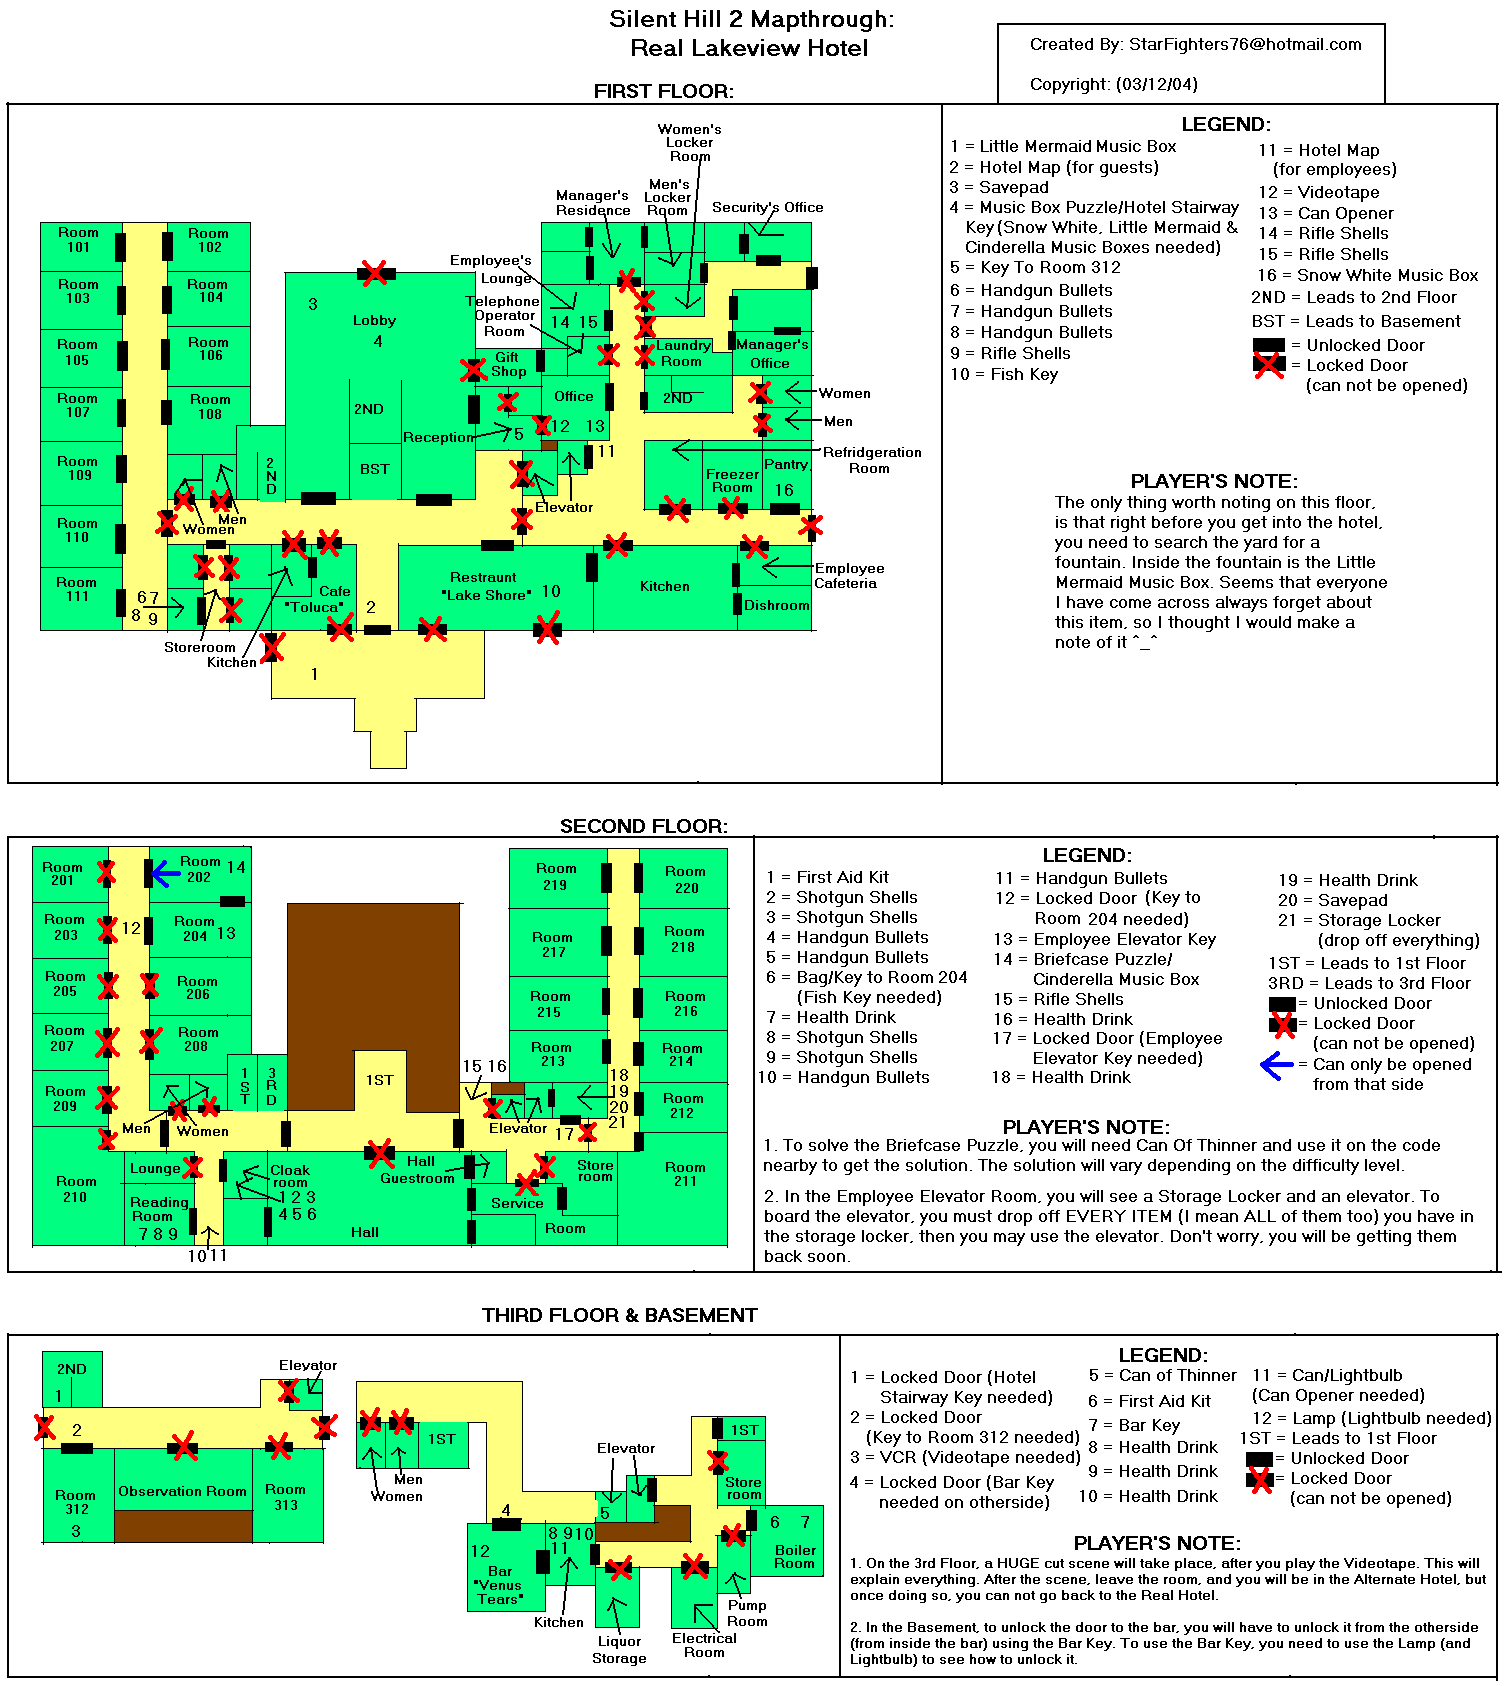
Lakeview Hotel
1510 x 1686
45.3 kB
Lakeview Hotel (Alternate)
1305 x 1691
36.6 kB
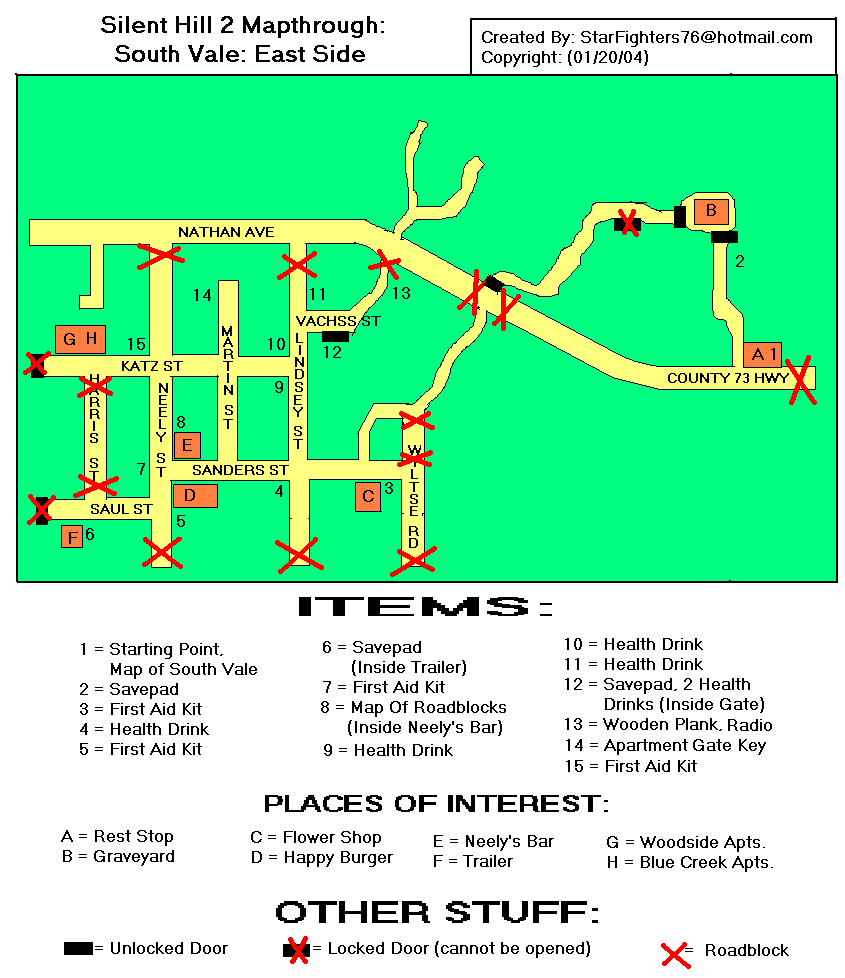
South Vale
East
845 x 978
13.0 kB
East (Alternate)
893 x 975
12.9 kB
West
1218 x 1086
18.3 kB
West (Alternate)
1290 x 1089
21.8 kB
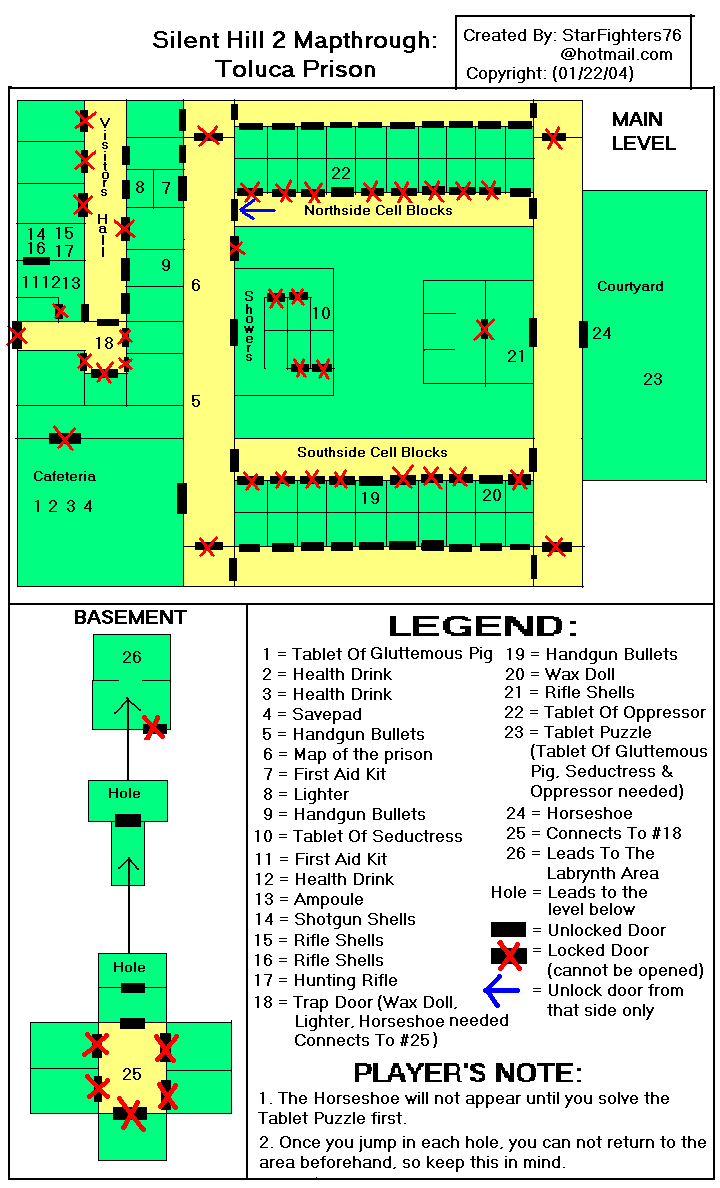
Toluca Prison
720 x 1188
16.1 kB
Woodside Apartments
1599 x 977
22.3 kB
Baldwin Mansion
1186 x 1258
28.4 kB
Blue Creek Apartments & South Vale (West)
773 x 1273
17.0 kB
Sonic Heroes Maps
© 2003 Sega / Sonic Team
Zone 1
Sea Gate
10000 x 1927
4.91 MB
Seaside Hill
15000 x 5176
54.8 MB
Ocean Palace
11100 x 2240
12.5 MB
Egg Hawk
1000 x 636
685 kB
Zone 2
Grand Metropolis
10000 x 3185
9.97 MB
Power Plant
8000 x 11314
17.9 MB
Team Battle 1
2646 x 1582
1.82 MB
Zone 3
Casino Park
10000 x 8448
12.3 MB
BINGO Highway
8000 x 4790
4.29 MB
Robot Carnival
1296 x 744
Zone 4
Rail Canyon
10000 x 3469
4.06 MB
Rail Canyon (Chaotix)
5650 x 8547
6.37 MB
Bullet Station
8218 x 7235
5.63 MB
Egg Albatross
3000 x 2375
Zone 5
Frog Forest
13000 x 4698
10.0 MB
Lost Jungle
5000 x 7096
11.2 MB
Team Battle 2
7467 x 4249
11.0 MB
Zone 6
Hang Castle
10000 x 7182
14.3 MB
Mystic Mansion
15000 x 8355
9.06 MB
Robot Storm
2925 x 1721
2.71 MB
Zone 7
Egg Fleet
15000 x 3610
4.04 MB
Final Fortress
20000 x 3044
4.43 MB
Egg Emperor
1500 x 1368
408 kB
Metal Madness
1200 x 774
283 kB
Special Stage
Act 1
1491 x 849
334 kB
Act 2
2232 x 879
538 kB
Act 3
1266 x 1844
Act 4
1254 x 923
Act 5
2058 x 1812
654 kB
Act 6
1630 x 1360
426 kB
Act 7
1676 x 2141
741 kB
Action Race (2P)
4000 x 2438
4.48 MB
2000 x 493
1.17 MB
3092 x 2368
Ring Race (2P)
Egg Treat
2328 x 2570
3.99 MB
Pinball Match
1500 x 2661
1.76 MB
Hot Elevator
510 x 1887
704 kB
Quick Race (2P)
Road Rock
1824 x 822
1.11 MB
Mad Express
7000 x 2435
1.27 MB
Terror Hall
5423 x 901
1.74 MB
Battle (2P)
City Top
1800 x 939
Casino Ring
1842 x 945
Turtle Shell
1383 x 918
Bobsled Race (2P)
Seaside Course
2168 x 1474
3.21 MB
City Course
3000 x 2186
Casino Course
5000 x 1743
4.37 MB
Expert Race (2P)
10670 x 2464
3.23 MB
4000 x 1484
1.16 MB
5000 x 2593
1.28 MB
Special Stage (2P)
1817 x 731
2192 x 1431
571 kB
2443 x 2538
881 kB
Debug Level
1623 x 906
481 kB
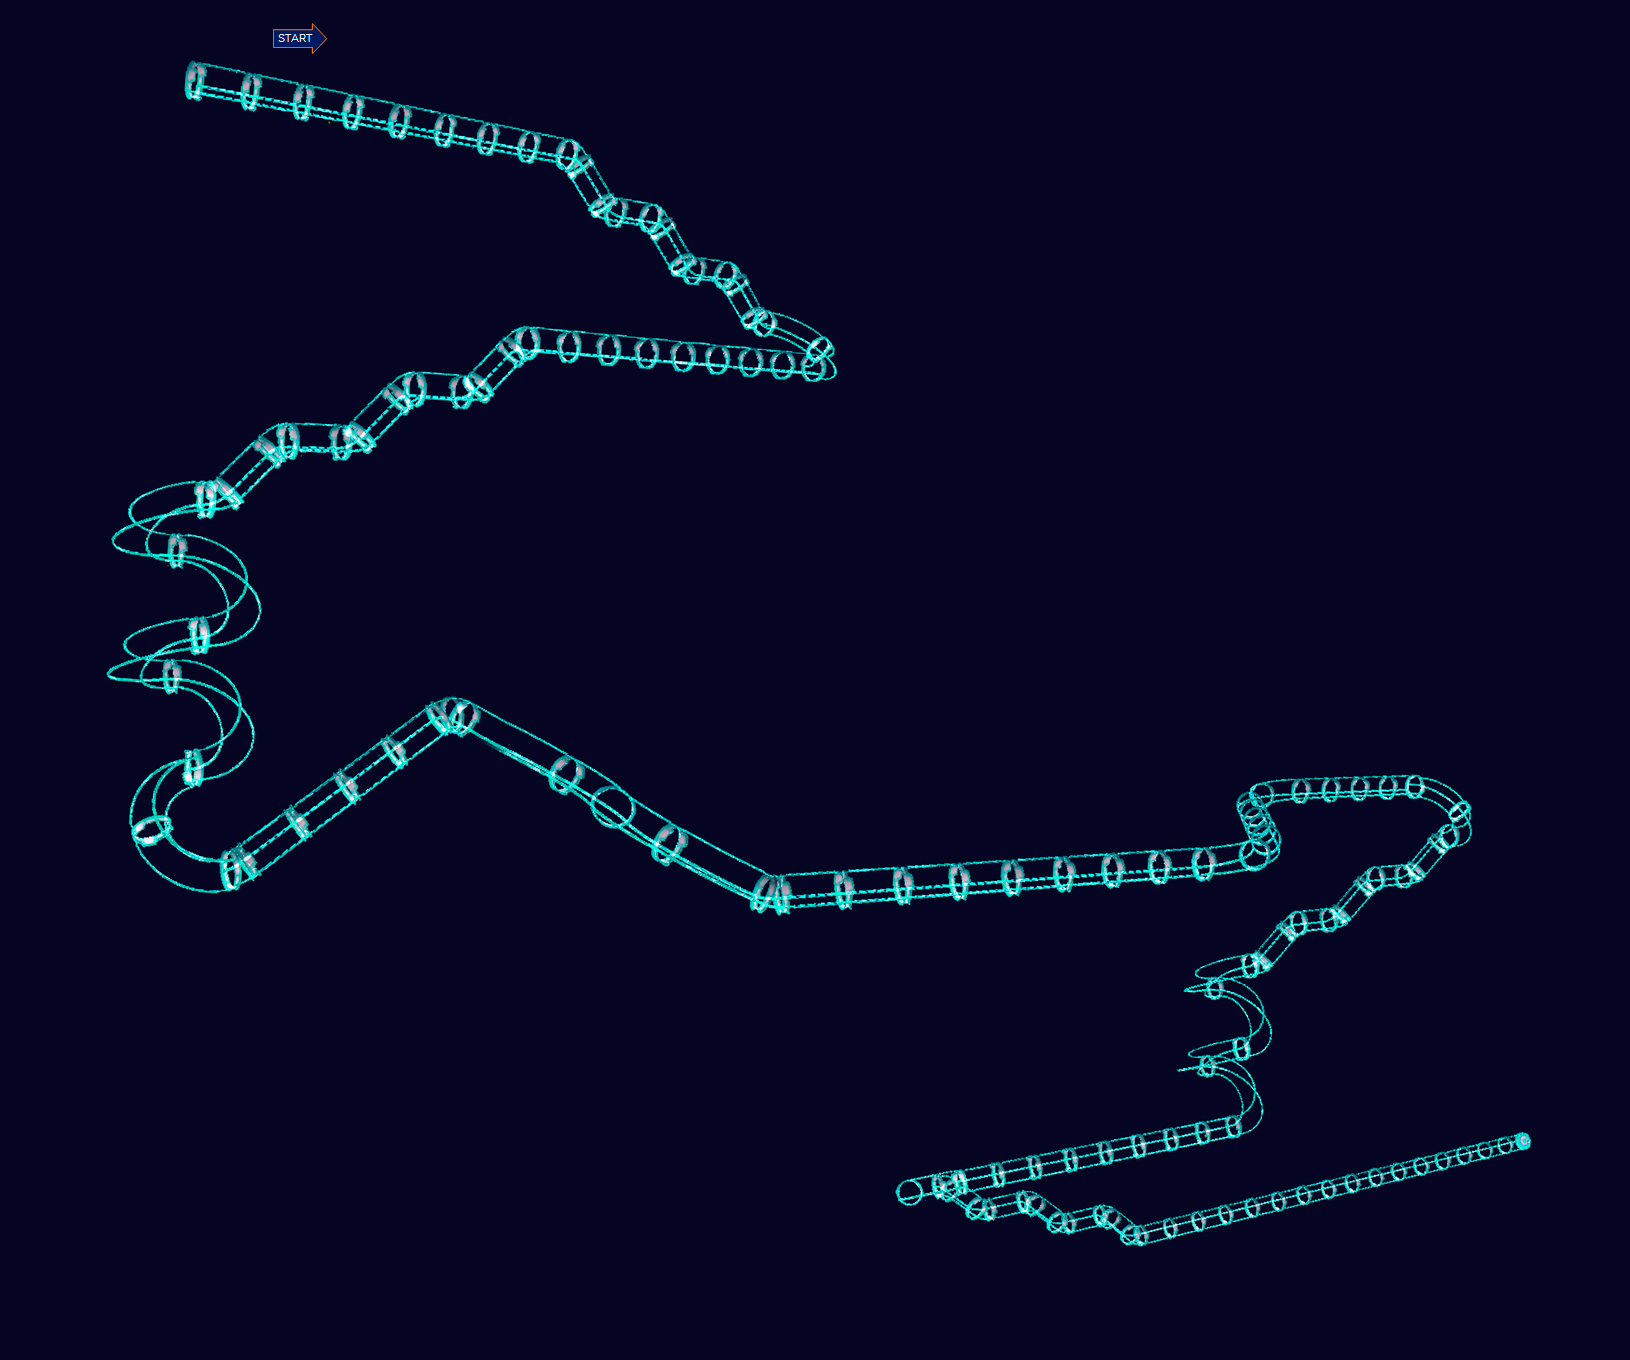
Standard Daisenryaku: Dengekisen (J) Maps
© Sammy / SystemSoft Alpha Corporation
Cairo
2048 x 1552
6.62 MB
London
6.52 MB
Narvik
7.48 MB
Ottawa
7.29 MB
Paris
6.98 MB
Praha
7.44 MB
Warsaw
7.30 MB
Standard Daisenryaku: Ushinawareta Shouri (J) Maps
© Sammy / SystemSoft Alpha Corporation / Sega
Beograde
7.05 MB
Berlin
7.50 MB
Budapest
7.04 MB
Dussel
Iraklion
6.79 MB
Kharkov
7.22 MB
Kiev
Konigsberg
7.16 MB
Leningr
6.91 MB
6.75 MB
Moscow
7.10 MB
Stalingrad
6.81 MB
Tunis
6.63 MB
7.25 MB
T
Tomb Raider: Angel Of Darkness Maps
© & TM 2003 Core Design Ltd / Eidos Interactive Limited
Parisian Backstreets
2279 x 1986
5.53 MB
Derelict Apartment Block
1332 x 1597
2.13 MB
Industrial Rooftops
3112 x 2149
6.43 MB
Margot Carvier's Apartment
1336 x 984
Parisian Ghetto
4200 x 2800
14.7 MB
The Serpent Rouge
1558 x 1377
St. Aicard's Church
2128 x 2079
Bouchard's Hideout
1656 x 1853
2.25 MB
Louvre Storm Drains
2358 x 2092
3.22 MB
Louvre Galleries
3569 x 3348
12.4 MB
The Archaeological Dig
2169 x 2087
3.80 MB
Tomb Of Ancients
1791 x 1810
2.69 MB
Hall Of Seasons
4211 x 4173
16.1 MB
2614 x 4173
10.8 MB
Neptune's Hall
1275 x 1239
1.20 MB
The Breath Of Hades
1451 x 1413
The Sanctuary Of Flame
1791 x 1666
Wrath Of The Beast
1225 x 1392
Galleries Under Siege
2833 x 2546
6.31 MB
Von Croy's Apartment
1969 x 2087
4.15 MB
The Monstrum Crime Scene
3263 x 1986
The Strahov Fortress
3125 x 2348
6.77 MB
The Bio-Research Facility
4840 x 3785
15.7 MB
The Sanitarium
2588 x 2499
5.11 MB
Maximum Containment
2854 x 2189
5.26 MB
Aquatic Research Area
3950 x 2565
The Vault Of Trophies
4000 x 2839
8.61 MB
Boaz Returns
1538 x 1600
The Lost Domain
3386 x 2403
4.54 MB
Eckhardt's Lab
3740 x 1483
4.89 MB
Tomb Raider: Anniversary Maps
© 2007 Crystal Dynamics / Eidos Interactive Limited
Croft Manor
2149 x 2734
6.54 MB
Mountain Caves
2176 x 2500
4.80 MB
Tony Hawk's Pro Skater 3 Maps
© 1999-2001 Activision, Inc. / Neversoft Entertainment, Inc.
Canada
2513 x 1545
U
V
W
Wild Arms: Alter Code: F Maps
© 2005 Media Vision / Agetec Inc.
World Map (In-Game Map)
848 x 864
452 kB
X
Y
Z

(PS2).png)
(PS2).png)
.png)
.png)
(PS2).png)
(PS2).png)
.png)
.png)
(PS2).png)
.png)
.png)
.png)
.png)
.png)
(PS2).png)
.png)
.png)
.png)
.png)
.png)
.png)
.png)
.png)
.png)
(PS2).png)
(PS2).png)
.png)
.png)
.png)
.png)
-Map00-CaseWhite.png)
-Map01-Piotrkow.png)
-Map02-RandomEncirclement.png)
-Map03-VistulaRiver.png)
-Map04-Warsaw.png)
-Map05-Denmark.png)
-Map06-Norway.png)
-Map07-LowCountries.png)
-Map08-France-Somme.png)
-Map09-France-Maginot.png)
-Map10-BattleOfBritain.png)
-Map11-SeaLion.png)
-Map12-Yugoslavia.png)
-Map13-Greece.png)
-Map14-BalticStates.png)
-Map15-Smolensk.png)
-Map16-Ukraine.png)
-Map17-Moscow-4Pz.png)
-Map18-Moscow-2Pz.png)
-Map19-Rostov.png)
-Map20-Sevastopol.png)
-Map21-Caucasus.png)
-Map22-Stalingrad.png)
-Map23-Kharkov.png)
-Map24-Kursk.png)
-Map25-Cyrenaica.png)
-Map26-Tobruk.png)
-Map27-Egypt-Syria.png)
-Map28-Iran-Iraq.png)
-Map29-ElAlamein.png)
-Map30-Tobruk.png)
-Map31-TurkeyEntersWar.png)
-Map32-FrenchAfrica.png)
-Map33-Sicily.png)
-Map34-Salerno.png)
-Map35-Anzio.png)
-Map36-Ural.png)
-Map37-Normandy.png)
-Map38-Falaise.png)
-Map39-Arnhem.png)
-Map40-Ardennes-44.png)
-Map41-Budapest.png)
-Map42-Germany.png)
-Map43-IslandCP.png)
-01-MilitaryExercise.png)
-02-PearlHarborSurpriseAttack.png)
-03-BattleOfTheCoralSea.png)
-04-BattleOfMidway.png)
-05-USFleetPursuit.png)
-06-GuadalcanalAttackForcePursuit.png)
-07-GuadalcanalRecapture.png)
-08-ConcealmentAnnihilation.png)
-09-USSubmarineSweep.png)
-10-WithdrawalInterdiction.png)
-11-SaipanGarrisonSupport.png)
-12-SouthPacificNavalBattle.png)
-13-NewGuineaAirBattle.png)
-14-BougainvilleAssault.png)
-15-ConvoyEscort.png)
-16-MidwayReattack.png)
-17-BattleOfLeyteGulf.png)
-18-FijiCounterOccupation.png)
-19-FijiBreakthrough.png)
-20-SamoaIslandPursuit.png)
-21-EnemyConvoyAttack.png)
-22-LandingInterdiction.png)
-23-SamoaGarrisonSupport.png)
-24-AdvanceOnHawaii.png)
-25-USNewWeaponsSweep.png)
-26-HawaiiOccupation.png)
-27-PacificFleetAnnihilation.png)
-28-WestCoastBombardment.png)
-29-PanamaBlockade.png)
-30-OperationGo.png)
-Debug-SmallIsland.png)
-Sewer1(In-GameMap).jpg)
-Sewer2(In-GameMap).jpg)
-LaboratoryB1F(In-GameMap).jpg)
-Laboratory1F(In-GameMap).jpg)
-Laboratory2F(In-GameMap).jpg)
-Laboratory3F(In-GameMap).jpg)
-Laboratory4F(In-GameMap).jpg)
-Laboratory5F(In-GameMap).jpg)
-WestArea(In-GameMap).jpg)
-EastArea(In-GameMap).jpg)
-ControlBlock1F(In-GameMap).jpg)
-ControlBlock2F(In-GameMap).jpg)
-ControlBlock3F(In-GameMap).jpg)
-ControlBlock4F(In-GameMap).jpg)
-ExcavationSite(In-GameMap).jpg)
-Cave1(In-GameMap).jpg)
-Cave2(In-GameMap).jpg)
-Cave3(In-GameMap).jpg)
-World.png)
-World(Mini-Map).png)
-FairyWorld.png)
-FairyWorld(Mini-Map).png)
-DemonWorld.png)
-DemonWorld(Mini-Map).png)
-MapKey-Legend.jpg)
-NalbinaFortress-AerialGardens(In-GameMap).jpg)
-NalbinaFortress-InnerWard(In-GameMap).jpg)
-NalbinaFortress-LowerApartments(In-GameMap).jpg)
-NalbinaFortress-UpperApartments(In-GameMap).jpg)
-NalbinaFortress-Highhall(In-GameMap).jpg)
-Rabanastre-Southgate(In-GameMap).jpg)
-Rabanastre-SouthernPlaza(In-GameMap).jpg)
-Rabanastre-Eastgate(In-GameMap).jpg)
-Rabanastre-Westgate(In-GameMap).jpg)
-Rabanastre-EastEnd(In-GameMap).jpg)
-Rabanastre-MuthruBazaar(In-GameMap).jpg)
-Rabanastre-NorthEnd(In-GameMap).jpg)
-DalmascaWestersand-GalteaDowns(In-GameMap).jpg)
-DalmascaWestersand-Midfault(In-GameMap).jpg)
-DalmascaWestersand-ShimmeringHorizons(In-GameMap).jpg)
-DalmascaWestersand-WindtraceDunes(In-GameMap).jpg)
-DalmascaWestersand-WesternDivide(In-GameMap).jpg)
-DalmascaWestersand-CorridorOfSand(In-GameMap).jpg)
-DalmascaWestersand-Wyrm'sNest(In-GameMap).jpg)
-DalmascaEstersands-Stepping(In-GameMap).jpg)
-DalmascaEstersands-Outpost(In-GameMap).jpg)
-DalmascaEstersands-YardangLabyrinth(In-GameMap).jpg)
-DalmascaEstersands-Sand-sweptNaze(In-GameMap).jpg)
-DalmascaEstersands-PassageEntrance(In-GameMap).jpg)
-DalmascaEstersands-BanksOfTheNebra(In-GameMap).jpg)
-DalmascaEstersands-MurmuringDefile(In-GameMap).jpg)
-DalmascaEstersands-SouthBankVillage(In-GameMap).jpg)
-DalmascaEstersands-NorthBankVillage(In-GameMap).jpg)
-DalmascaEstersands-Yoma(In-GameMap).jpg)
-DalmascaEstersands-BrokenSands(In-GameMap).jpg)
-Skyferry-Saloon(In-GameMap).jpg)
-Skyferry-ObservationParlour(In-GameMap).jpg)
-Skyferry-AirDeck(In-GameMap).jpg)
-Lowtown-NorthSprawl(In-GameMap).jpg)
-Lowtown-SouthSprawl(In-GameMap).jpg)
-GizaPlains(Dry)-ThroneRoad(In-GameMap).jpg)
-GizaPlains(Dry)-NomadVillage(In-GameMap).jpg)
-GizaPlains(Dry)-GizasNorthBank(In-GameMap).jpg)
-GizaPlains(Dry)-GizasSouthBank(In-GameMap).jpg)
-GizaPlains(Dry)-CrystalGlade(In-GameMap).jpg)
-GizaPlains(Dry)-Warrior'sWash(In-GameMap).jpg)
-GizaPlains(Dry)-ToamHills(In-GameMap).jpg)
-GizaPlains(Dry)-StarfallField(In-GameMap).jpg)
-GizaPlains(Rain)-ThroneRoad(In-GameMap).jpg)
-GizaPlains(Rain)-NomadVillage(In-GameMap).jpg)
-GizaPlains(Rain)-GizasNorthBank(In-GameMap).jpg)
-GizaPlains(Rain)-GizasSouthBank(In-GameMap).jpg)
-GizaPlains(Rain)-CrystalGlade(In-GameMap).jpg)
-GizaPlains(Rain)-Warrior'sWash(In-GameMap).jpg)
-GizaPlains(Rain)-ToamHills(In-GameMap).jpg)
-GizaPlains(Rain)-StarfallField(In-GameMap).jpg)
-GizaPlains(Rain)-TracksOfTheBeast(In-GameMap).jpg)
-GaramsytheWaterway-WaterwaySluiceControls(In-GameMap).jpg)
-GaramsytheWaterway-NorthernSluiceway(In-GameMap).jpg)
-GaramsytheWaterway-NorthSpurSluiceway(In-GameMap).jpg)
-GaramsytheWaterway-EastSpurStairs(In-GameMap).jpg)
-GaramsytheWaterway-EastWaterwayControl(In-GameMap).jpg)
-GaramsytheWaterway-No11Channel(NotDrained)(In-GameMap).jpg)
-GaramsytheWaterway-EastSluiceControl(In-GameMap).jpg)
-GaramsytheWaterway-SouthernSluiceway(In-GameMap).jpg)
-GaramsytheWaterway-WestSluiceControl(In-GameMap).jpg)
-GaramsytheWaterway-No10Channel(NotDrained)(In-GameMap).jpg)
-GaramsytheWaterway-No11Channel(Drained)(In-GameMap).jpg)
-GaramsytheWaterway-No10Channel(Drained)(In-GameMap).jpg)
-GaramsytheWaterway-No3CloacaSpur(In-GameMap).jpg)
-GaramsytheWaterway-No1Cloaca(In-GameMap).jpg)
-GaramsytheWaterway-No4CloacaSpur(In-GameMap).jpg)
-GaramsytheWaterway-CentralWaterwayControl(In-GameMap).jpg)
-GaramsytheWaterway-OverflowCloaca(In-GameMap).jpg)
-GaramsytheWaterway-CentralSpurStairs(In-GameMap).jpg)
-RoyalPalace-CellarStores(In-GameMap).jpg)
-RoyalPalace-Cellars(In-GameMap).jpg)
-RoyalPalace-LowerHalls(In-GameMap).jpg)
-RoyalPalace-GardenStairs(In-GameMap).jpg)
-NalbinaDungeons-Arena(In-GameMap).jpg)
-NalbinaDungeons-Stockade(In-GameMap).jpg)
-NalbinaDungeons-Confiscatory(In-GameMap).jpg)
-NalbinaDungeons-BlackWatch(In-GameMap).jpg)
-BarheimPassage-Lightworks(In-GameMap).jpg)
-BarheimPassage-OpSector29(In-GameMap).jpg)
-BarheimPassage-GreatEasternPassage(In-GameMap).jpg)
-BarheimPassage-OpSector36(In-GameMap).jpg)
-BarheimPassage-SpecialOpSector3(In-GameMap).jpg)
-BarheimPassage-OpSector37(In-GameMap).jpg)
-BarheimPassage-North-SouthJunction(In-GameMap).jpg)
-BarheimPassage-GreatCentralPassage(In-GameMap).jpg)
-BarheimPassage-ZeviahSubterrane(In-GameMap).jpg)
-BarheimPassage-TerminusNo4Adjunct(In-GameMap).jpg)
-BarheimPassage-TerminusNo4(In-GameMap).jpg)
-BarheimPassage-SpecialOpSector5(In-GameMap).jpg)
-BarheimPassage-East-WestBypass(In-GameMap).jpg)
-BarheimPassage-ZeviahSpan(In-GameMap).jpg)
-BarheimPassage-WestAnnex(In-GameMap).jpg)
-BarheimPassage-TerminusNo7Adjunct(In-GameMap).jpg)
-BarheimPassage-TerminusNo7(In-GameMap).jpg)
-Bhujerba-Aerodome(In-GameMap).jpg)
-Bhujerba-TravicaWay(In-GameMap).jpg)
-Bhujerba-Rithil'sProtectives-ArmorShop(In-GameMap).jpg)
-Bhujerba-Targe'sArms-WeaponShop(In-GameMap).jpg)
-Bhujerba-Mait'sMagicks-MagickShop(In-GameMap).jpg)
-Bhujerba-KhusSkygrounds(In-GameMap).jpg)
-Bhujerba-CloudborneRow(In-GameMap).jpg)
-Bhujerba-Cloudborne(In-GameMap).jpg)
-Bhujerba-StarasResidence(In-GameMap).jpg)
-Bhujerba-Miner'sEnd(In-GameMap).jpg)
-Bhujerba-Bashketi'sGambits(In-GameMap).jpg)
-Bhujerba-Clio'sTechnicks-TechnickShop(In-GameMap).jpg)
-Bhujerba-LhusuSquare(In-GameMap).jpg)
-Bhujerba-KaffTerrace(In-GameMap).jpg)
-LhusuMines-ShaftEntry(In-GameMap).jpg)
-LhusuMines-OltamSpan(In-GameMap).jpg)
-LhusuMines-Transitway1(In-GameMap).jpg)
-LhusuMines-ShuniaTwinspan(In-GameMap).jpg)
-LhusuMines-Site2(In-GameMap).jpg)
-LhusuMines-Site3(In-GameMap).jpg)
-LhusuMines-Transitway2(In-GameMap).jpg)
-LhusuMines-TascheSpan(In-GameMap).jpg)
-LhusuMines-Site9(In-GameMap).jpg)
-LhusuMines-Site11(In-GameMap).jpg)
-LhusuMines-LascheSpan(In-GameMap).jpg)
-LhusuMines-Site5(In-GameMap).jpg)
-LhusuMines-Site6South(In-GameMap).jpg)
-LhusuMines-Site6North(In-GameMap).jpg)
-LhusuMines-StagingArea(In-GameMap).jpg)
-LhusuMines-Site7(In-GameMap).jpg)
-DreadnoughtLeviathan-PortLaunch(In-GameMap).jpg)
-DreadnoughtLeviathan-PortSection(In-GameMap).jpg)
-DreadnoughtLeviathan-LargeFreightStores(In-GameMap).jpg)
-DreadnoughtLeviathan-AirshipBerthAccess(In-GameMap).jpg)
-DreadnoughtLeviathan-CentralBrigAccess(In-GameMap).jpg)
-DreadnoughtLeviathan-BrigNo1(In-GameMap).jpg)
-DreadnoughtLeviathan-StarboardSection(In-GameMap).jpg)
-DreadnoughtLeviathan-Sub-controlRoom(In-GameMap).jpg)
-Ogir-YensaSandsea-Platform1-EastTanks(In-GameMap).jpg)
-Ogir-YensaSandsea-Platform1-Refinery(In-GameMap).jpg)
-Ogir-YensaSandsea-EastJunction(In-GameMap).jpg)
-Ogir-YensaSandsea-PrimaryTankComplex(In-GameMap).jpg)
-Ogir-YensaSandsea-CentralJunction(In-GameMap).jpg)
-Ogir-YensaSandsea-Platform2-Refinery(In-GameMap).jpg)
-Ogir-YensaSandsea-Platform1-SouthTanks(In-GameMap).jpg)
-Ogir-YensaSandsea-SouthTankApproach(In-GameMap).jpg)
-Ogir-YensaSandsea-YensaBorderTunnel(In-GameMap).jpg)
-Nam-YensaSandsea-SandscaleBank(In-GameMap).jpg)
-Nam-YensaSandsea-Urutan-YensaSea(In-GameMap).jpg)
-Nam-YensaSandsea-WitheringShores(In-GameMap).jpg)
-Nam-YensaSandsea-AugurHill(In-GameMap).jpg)
-Nam-YensaSandsea-YellowSands(In-GameMap).jpg)
-Nam-YensaSandsea-DemesneOfTheSandqueen(In-GameMap).jpg)
-Nam-YensaSandsea-TrailOfFadingWarmth(In-GameMap).jpg)
-Nam-YensaSandsea-SimoonBluff(In-GameMap).jpg)
-TombOfRaithwall-ValleyOfTheDead(In-GameMap).jpg)
-TombOfRaithwall-HallOfTheDestroyer(In-GameMap).jpg)
-TombOfRaithwall-HallOfTheSentinel(In-GameMap).jpg)
-TombOfRaithwall-RoyalPassage(In-GameMap).jpg)
-TombOfRaithwall-NorthfallPassage(In-GameMap).jpg)
-TombOfRaithwall-SouthfallPassage(In-GameMap).jpg)
-TombOfRaithwall-CloisterOfFlame(In-GameMap).jpg)
-TombOfRaithwall-ChamberOfFirstLight(In-GameMap).jpg)
-OzmonePlain-FieldOfFallenWings(In-GameMap).jpg)
-OzmonePlain-DaganFlats(In-GameMap).jpg)
-OzmonePlain-Switchback(In-GameMap).jpg)
-OzmonePlain-HauloGreen(In-GameMap).jpg)
-OzmonePlain-Greensnake(In-GameMap).jpg)
-OzmonePlain-FieldOfLightWinds(In-GameMap).jpg)
-OzmonePlain-SunlitPath(In-GameMap).jpg)
-OzmonePlain-Shred(In-GameMap).jpg)
-ZertinianCaverns-InvitationToHeresy(In-GameMap).jpg)
-ZertinianCaverns-Sandfalls(In-GameMap).jpg)
-ZertinianCaverns-HourglassBasin(In-GameMap).jpg)
-ZertinianCaverns-HallsOfArdentDarkness(In-GameMap).jpg)
-ZertinianCaverns-Undershore(In-GameMap).jpg)
-ZertinianCaverns-AthrozaQuicksands(In-GameMap).jpg)
-ZertinianCaverns-BalamkaFault(In-GameMap).jpg)
-ZertinianCaverns-DrybeamCavern(In-GameMap).jpg)
-ZertinianCaverns-DarkenedWharf(In-GameMap).jpg)
-ZertinianCaverns-CanopyOfClay(In-GameMap).jpg)
-Jahara-BanksOfTheSogoht(In-GameMap).jpg)
-Jahara-LullOfTheLand(In-GameMap).jpg)
-Jahara-Elderknoll(In-GameMap).jpg)
-GolmoreJungle-PathsOfChainedLight(In-GameMap).jpg)
-GolmoreJungle-Needlebrake(In-GameMap).jpg)
-GolmoreJungle-WhisperleafWay(In-GameMap).jpg)
-GolmoreJungle-PartingGlade(In-GameMap).jpg)
-GolmoreJungle-DellOfTheDreamer(In-GameMap).jpg)
-GolmoreJungle-Branchway(In-GameMap).jpg)
-GolmoreJungle-Greenswathe(In-GameMap).jpg)
-GolmoreJungle-RustlingChapel(In-GameMap).jpg)
-EruytVillage-RoadOfVerdantPraise(In-GameMap).jpg)
-EruytVillage-Spiritwood(In-GameMap).jpg)
-EruytVillage-FaneOfThePath(In-GameMap).jpg)
-HenneMines-NorthEntrance(In-GameMap).jpg)
-HenneMines-PitheadJunctionA(In-GameMap).jpg)
-HenneMines-Phase1Shaft(In-GameMap).jpg)
-HenneMines-Phase1Dig(In-GameMap).jpg)
-HenneMines-CrossoverA(In-GameMap).jpg)
-HenneMines-PitheadJunctionB(In-GameMap).jpg)
-HenneMines-CrossoverB(In-GameMap).jpg)
-HenneMines-StagingShaft(In-GameMap).jpg)
-HenneMines-OreSeparation(In-GameMap).jpg)
-HenneMines-Phase2Dig(In-GameMap).jpg)
-HenneMines-CrossoverC(In-GameMap).jpg)
-HenneMines-PitheadJunctionC(In-GameMap).jpg)
-HenneMines-Phase2Shaft(In-GameMap).jpg)
-HenneMines-SpecialCharterShaft(In-GameMap).jpg)
-HenneMines-SpecialCharterDig(In-GameMap).jpg)
-MtBur-Omisace-Sand-strewnPass(In-GameMap).jpg)
-MtBur-Omisace-TempleApproach(In-GameMap).jpg)
-MtBur-Omisace-TempleGrounds(In-GameMap).jpg)
-MtBur-Omisace-HallOfTheLight(In-GameMap).jpg)
-ParaminaRift-FadingVale(In-GameMap).jpg)
-ParaminaRift-HeadOfTheSilverflow(In-GameMap).jpg)
-ParaminaRift-FreezingGorge(In-GameMap).jpg)
-ParaminaRift-FrozenBrook(In-GameMap).jpg)
-ParaminaRift-PathOfTheFirstfall(In-GameMap).jpg)
-ParaminaRift-SpineOfTheIcewyrm(In-GameMap).jpg)
-ParaminaRift-Silverflow'sEnd(In-GameMap).jpg)
-ParaminaRift-KarydineGlacier(In-GameMap).jpg)
-ParaminaRift-IceboundFlow(In-GameMap).jpg)
-StilshrineOfMiriam-WalkOfSky(In-GameMap).jpg)
-StilshrineOfMiriam-WalkOfMind(In-GameMap).jpg)
-StilshrineOfMiriam-WardOfMeasure(In-GameMap).jpg)
-StilshrineOfMiriam-WardOfVelitation(In-GameMap).jpg)
-StilshrineOfMiriam-WalkOfTornIllusion(In-GameMap).jpg)
-StilshrineOfMiriam-ColdDistance(In-GameMap).jpg)
-StilshrineOfMiriam-WalkOfPrescience(In-GameMap).jpg)
-StilshrineOfMiriam-WalkOfReason(In-GameMap).jpg)
-StilshrineOfMiriam-WardOfSteel(In-GameMap).jpg)
-StilshrineOfMiriam-WalkOfRevelation(In-GameMap).jpg)
-StilshrineOfMiriam-WardOfTheSword-King(In-GameMap).jpg)
-StilshrineOfMiriam-HallOfWorth(In-GameMap).jpg)
-StilshrineOfMiriam-VaultOfTheChampion(In-GameMap).jpg)
-StilshrineOfMiriam-ThroneOfVeiledGods(In-GameMap).jpg)
-NalbinaTown-WestBarbican(In-GameMap).jpg)
-NalbinaTown-JajimBazaar(In-GameMap).jpg)
-NalbinaTown-WestWard(In-GameMap).jpg)
-MosphoranHighwaste-SouthernSkirts(In-GameMap).jpg)
-MosphoranHighwaste-SummitPath(In-GameMap).jpg)
-MosphoranHighwaste-EmpyreanWay(In-GameMap).jpg)
-MosphoranHighwaste-RaysOfAshenLight(In-GameMap).jpg)
-MosphoranHighwaste-BabblingVale(In-GameMap).jpg)
-MosphoranHighwaste-TrailOfSky-flungStone(In-GameMap).jpg)
-MosphoranHighwaste-NorthernSkirts(In-GameMap).jpg)
-MosphoranHighwaste-HalnyCrossing(In-GameMap).jpg)
-MosphoranHighwaste-SkyreachRidge(In-GameMap).jpg)
-MosphoranHighwaste-EmpyreanSeat(In-GameMap).jpg)
-Salikawood-Omen-Spur(In-GameMap).jpg)
-Salikawood-PathOfHours(In-GameMap).jpg)
-Salikawood-TrunkwallRoad(In-GameMap).jpg)
-Salikawood-DivergingWay(In-GameMap).jpg)
-Salikawood-LivingChasm(In-GameMap).jpg)
-Salikawood-Sun-dappledPath(In-GameMap).jpg)
-Salikawood-GardenOfDecay(In-GameMap).jpg)
-Salikawood-QuietenedTrace(In-GameMap).jpg)
-Salikawood-GrandBower(In-GameMap).jpg)
-Salikawood-CorridorOfAges(In-GameMap).jpg)
-Salikawood-PiebaldPath(In-GameMap).jpg)
-NabreusDreadlands-GreenCrag(In-GameMap).jpg)
-NabreusDreadlands-MutedScarp(In-GameMap).jpg)
-NabreusDreadlands-ValeOfLingeringSorrow(In-GameMap).jpg)
-NabreusDreadlands-Hope'sReach(In-GameMap).jpg)
-NabreusDreadlands-EchoesOfThePast(In-GameMap).jpg)
-NabreusDreadlands-Slumbermead(In-GameMap).jpg)
-NabreusDreadlands-FogMutters(In-GameMap).jpg)
-NabreusDreadlands-OverlookingEternity(In-GameMap).jpg)
-NabreusDreadlands-SuccorMidstSorrow(In-GameMap).jpg)
-NabreusDreadlands-LifelessStrand(In-GameMap).jpg)
-NabreusDreadlands-FieldOfTheFallenLord(In-GameMap).jpg)
-NecroholOfNabudis-HallOfSlumberingMight(In-GameMap).jpg)
-NecroholOfNabudis-HallOfTheIvoryCovenant(In-GameMap).jpg)
-NecroholOfNabudis-CloisterOfReason(In-GameMap).jpg)
-NecroholOfNabudis-CloisterOfTheHighborn(In-GameMap).jpg)
-NecroholOfNabudis-CloisterOfDistantSong(In-GameMap).jpg)
-NecroholOfNabudis-CloisterOfSolace(In-GameMap).jpg)
-NecroholOfNabudis-HallOfEffulgentLight(In-GameMap).jpg)
-NecroholOfNabudis-Crucible(In-GameMap).jpg)
-PhonCoast-KaukulaPass(In-GameMap).jpg)
-PhonCoast-ResetaStrand(In-GameMap).jpg)
-PhonCoast-MauleiaStrand(In-GameMap).jpg)
-PhonCoast-Pora-PoraSands(In-GameMap).jpg)
-PhonCoast-CapeUahuk(In-GameMap).jpg)
-PhonCoast-CapeTialan(In-GameMap).jpg)
-PhonCoast-HakaweaShore(In-GameMap).jpg)
-PhonCoast-Hunter'sCamp(In-GameMap).jpg)
-PhonCoast-VadduStrand(In-GameMap).jpg)
-PhonCoast-CaimaHills(In-GameMap).jpg)
-PhonCoast-LimatraHills(In-GameMap).jpg)
-PhonCoast-Rava'sPass(In-GameMap).jpg)
-TchitaUplands-RealmOfTheElderDream(In-GameMap).jpg)
-TchitaUplands-Skytrail(In-GameMap).jpg)
-TchitaUplands-ChosenPath(In-GameMap).jpg)
-TchitaUplands-OliphzakRise(In-GameMap).jpg)
-TchitaUplands-NamelessSpring(In-GameMap).jpg)
-TchitaUplands-GardenOfLife'sCircle(In-GameMap).jpg)
-TchitaUplands-Highlands(In-GameMap).jpg)
-TchitaUplands-FieldsOfEternity(In-GameMap).jpg)
-TchitaUplands-SunderedEarth(In-GameMap).jpg)
-TchitaUplands-LostWay(In-GameMap).jpg)
-TchitaUplands-UazcuffHills(In-GameMap).jpg)
-TchitaUplands-ShadedPath(In-GameMap).jpg)
-SochenCavePalace-DoubtAbandoned(In-GameMap).jpg)
-SochenCavePalace-HallOfLambentDarkness(In-GameMap).jpg)
-SochenCavePalace-Acolyte'sBurden(In-GameMap).jpg)
-SochenCavePalace-MirrorOfTheSoul(In-GameMap).jpg)
-SochenCavePalace-FallsOfTime(In-GameMap).jpg)
-SochenCavePalace-Destiny'sMarch(In-GameMap).jpg)
-SochenCavePalace-Pilgrim'sPath&Ascetic'sPath(In-GameMap).jpg)
-SochenCavePalace-HallOfShadowlight(In-GameMap).jpg)
-SochenCavePalace-TemptationEluded(In-GameMap).jpg)
-SochenCavePalace-HallOfTheWrothGod(In-GameMap).jpg)
-SochenCavePalace-ChamberOfTheChosen(In-GameMap).jpg)
-SochenCavePalace-SkybentChamber(In-GameMap).jpg)
-OldArchades-AlleyOfLowWhispers(In-GameMap).jpg)
-OldArchades-AlleyOfMutedSighs(In-GameMap).jpg)
-Archades-Trant(In-GameMap).jpg)
-Archades-Rienna(In-GameMap).jpg)
-Archades-Molberry(In-GameMap).jpg)
-Archades-Nibasse(In-GameMap).jpg)
-Archades-Tsenoble(In-GameMap).jpg)
-Archades-GrandArcade(In-GameMap).jpg)
-Archades-HighgardenTerrace(In-GameMap).jpg)
-DraklorLaboratory-66thFloor(In-GameMap).jpg)
-DraklorLaboratory-67thFloor(In-GameMap).jpg)
-DraklorLaboratory-68thFloor(In-GameMap).jpg)
-DraklorLaboratory-70thFloor(In-GameMap).jpg)
-DraklorLaboratory-EnergyTransitarium(In-GameMap).jpg)
-BalfonheimPort-SaccioLane(In-GameMap).jpg)
-BalfonheimPort-QuaysideCourt(In-GameMap).jpg)
-BalfonheimPort-CanalLane(In-GameMap).jpg)
-BalfonheimPort-GallerinaMarketplace(In-GameMap).jpg)
-BalfonheimPort-ChivanyBreakwater(In-GameMap).jpg)
-BalfonheimPort-SeaBreezeLane(In-GameMap).jpg)
-CerobiSteppe-WindmillLocations(In-GameMap).jpg)
-CerobiSteppe-SouthLiavellHills(In-GameMap).jpg)
-CerobiSteppe-NorthLiavellHills(In-GameMap).jpg)
-CerobiSteppe-TerracedBank(In-GameMap).jpg)
-CerobiSteppe-FeddikRiver(In-GameMap).jpg)
-CerobiSteppe-Journey'sRest(In-GameMap).jpg)
-CerobiSteppe-Northsward(In-GameMap).jpg)
-CerobiSteppe-Crossfield(In-GameMap).jpg)
-CerobiSteppe-OldElaniseRoad(In-GameMap).jpg)
-Feywood-WalkOfFlittingRifts(In-GameMap).jpg)
-Feywood-WalkOfStolenTruths(In-GameMap).jpg)
-Feywood-WalkOfDancingShadow(In-GameMap).jpg)
-Feywood-Antiquity'sEnd(In-GameMap).jpg)
-Feywood-RedolentGlade(In-GameMap).jpg)
-Feywood-WhiteMagick'sEmbrace(In-GameMap).jpg)
-Feywood-IceFieldOfClearsight(In-GameMap).jpg)
-Feywood-EdgeOfReason(In-GameMap).jpg)
-Giruvegan-GateOfEarth(In-GameMap).jpg)
-Giruvegan-GateOfWater(In-GameMap).jpg)
-Giruvegan-TrimahlaWater-Steps(In-GameMap).jpg)
-Giruvegan-AadhaWater-Steps(In-GameMap).jpg)
-Giruvegan-HaalmikahWater-Steps(In-GameMap).jpg)
-Giruvegan-GateOfFire(In-GameMap).jpg)
-Giruvegan-GateOfWind(In-GameMap).jpg)
-GreatCrystal-Overview-1(In-GameMap).jpg)
-GreatCrystal-Overview-2(In-GameMap).jpg)
-GreatCrystal-1(In-GameMap).jpg)
-GreatCrystal-2(In-GameMap).jpg)
-GreatCrystal-3(In-GameMap).jpg)
-GreatCrystal-4(In-GameMap).jpg)
-GreatCrystal-5(In-GameMap).jpg)
-GreatCrystal-6(In-GameMap).jpg)
-GreatCrystal-7(In-GameMap).jpg)
-GreatCrystal-8(In-GameMap).jpg)
-RidoranaCataract-FootfallsOfThePast(In-GameMap).jpg)
-RidoranaCataract-EchoesFromTime'sGarden(In-GameMap).jpg)
-RidoranaCataract-Colosseum(In-GameMap).jpg)
-RidoranaCataract-CityOfOtherDays(In-GameMap).jpg)
-RidoranaCataract-PathOfHiddenBlessing(In-GameMap).jpg)
-Pharos-FirstAscent-TheyWhoThirstNot(In-GameMap).jpg)
-Pharos-FirstAscent-Wellspring(In-GameMap).jpg)
-Pharos-FirstAscent-WellspringLabyrinth(In-GameMap).jpg)
-Pharos-FirstAscent-BlackrockVault(In-GameMap).jpg)
-Pharos-FirstAscent-WellspringRavel-1stFlight(In-GameMap).jpg)
-Pharos-FirstAscent-WellspringRavel-2ndFlight(In-GameMap).jpg)
-Pharos-FirstAscent-WellspringRavel-3rdFlight(In-GameMap).jpg)
-Pharos-FirstAscent-WellspringRavel-4thFlight(In-GameMap).jpg)
-Pharos-FirstAscent-Horizon'sBreak(In-GameMap).jpg)
-Pharos-FirstAscent-Horizon'sCusp(In-GameMap).jpg)
-Pharos-SecondAscent-Reach(In-GameMap).jpg)
-Pharos-SecondAscent-StationOfBanishment(In-GameMap).jpg)
-Pharos-SecondAscent-StationOfSuffering(In-GameMap).jpg)
-Pharos-SecondAscent-StationOfAscension(In-GameMap).jpg)
-Pharos-SecondAscent-ReachOfTheDamned(In-GameMap).jpg)
-Pharos-SecondAscent-BoundsOfTruth(In-GameMap).jpg)
-Pharos-SecondAscent-CleftOfProfaningWind(FenrirFight)(In-GameMap).jpg)
-Pharos-SecondAscent-ReachOfTheOccult(In-GameMap).jpg)
-Pharos-ThirdAscent-SpireRavel-1stFlight-2ndFlight(In-GameMap).jpg)
-Pharos-ThirdAscent-SpireRavel-1stFlight(In-GameMap).jpg)
-Pharos-ThirdAscent-SpireRavel-2ndFlight(In-GameMap).jpg)
-Pharos-ThirdAscent-EmpyreanRavel(In-GameMap).jpg)
-Pharos-Subterra-Penumbra-Interior(In-GameMap).jpg)
-Pharos-Subterra-Penumbra-North(In-GameMap).jpg)
-Pharos-Subterra-Penumbra-South(In-GameMap).jpg)
-Pharos-Subterra-Umbra-Interior(In-GameMap).jpg)
-Pharos-Subterra-Umbra-North(In-GameMap).jpg)
-Pharos-Subterra-Umbra-South(In-GameMap).jpg)
-Pharos-Subterra-Abyssal-Interior(In-GameMap).jpg)
-Pharos-Subterra-Abyssal-North(In-GameMap).jpg)
-Pharos-Subterra-Abyssal-South(In-GameMap).jpg)
-Pharos-Subterra-Hell'sChallenge(In-GameMap).jpg)
-SkyFortressBahamut(In-GameMap).jpg)
.png)
.png)
.png)
.png)
.png)
.png)
.png)
.png)
.png)
.png)
.png)
.png)
.png)
.png)
.png)
.png)
.png)
.png)
.png)
.png)
.png)
.png)
.png)
.png)
.png)
.png)
.png)
.png)
.jpg)
-SeasideHill.jpg)
-GrandMetropolis.jpg)
-BINGOHighway.jpg)
-EggTreat.jpg)
-PinballMatch.jpg)
-HotElevator.jpg)
-RoadRock.jpg)
-MadExpress.jpg)
-TerrorHall.jpg)
-CityTop.jpg)
-CasinoRing.jpg)
-TurtleShell.jpg)
-SeasideCourse.jpg)
-CityCourse.jpg)
-CasinoCourse.jpg)
-RailCanyon.jpg)
-FrogForest.jpg)
-EggFleet.jpg)
-Act1.jpg)
-Act2.jpg)
-Act3.jpg)
-Cairo.png)
-London.png)
-Narvik.png)
-Ottawa.png)
-Paris.png)
-Praha.png)
-Warsaw.png)
-Beograde.png)
-Berlin.png)
-Budapest.png)
-Dussel.png)
-Iraklion.png)
-Kharkov.png)
-Kiev.png)
-Konigsberg.png)
-Leningr.png)
-London.png)
-Moscow.png)
-Paris.png)
-Praha.png)
-Stalingrad.png)
-Tunis.png)
-Warsaw.png)
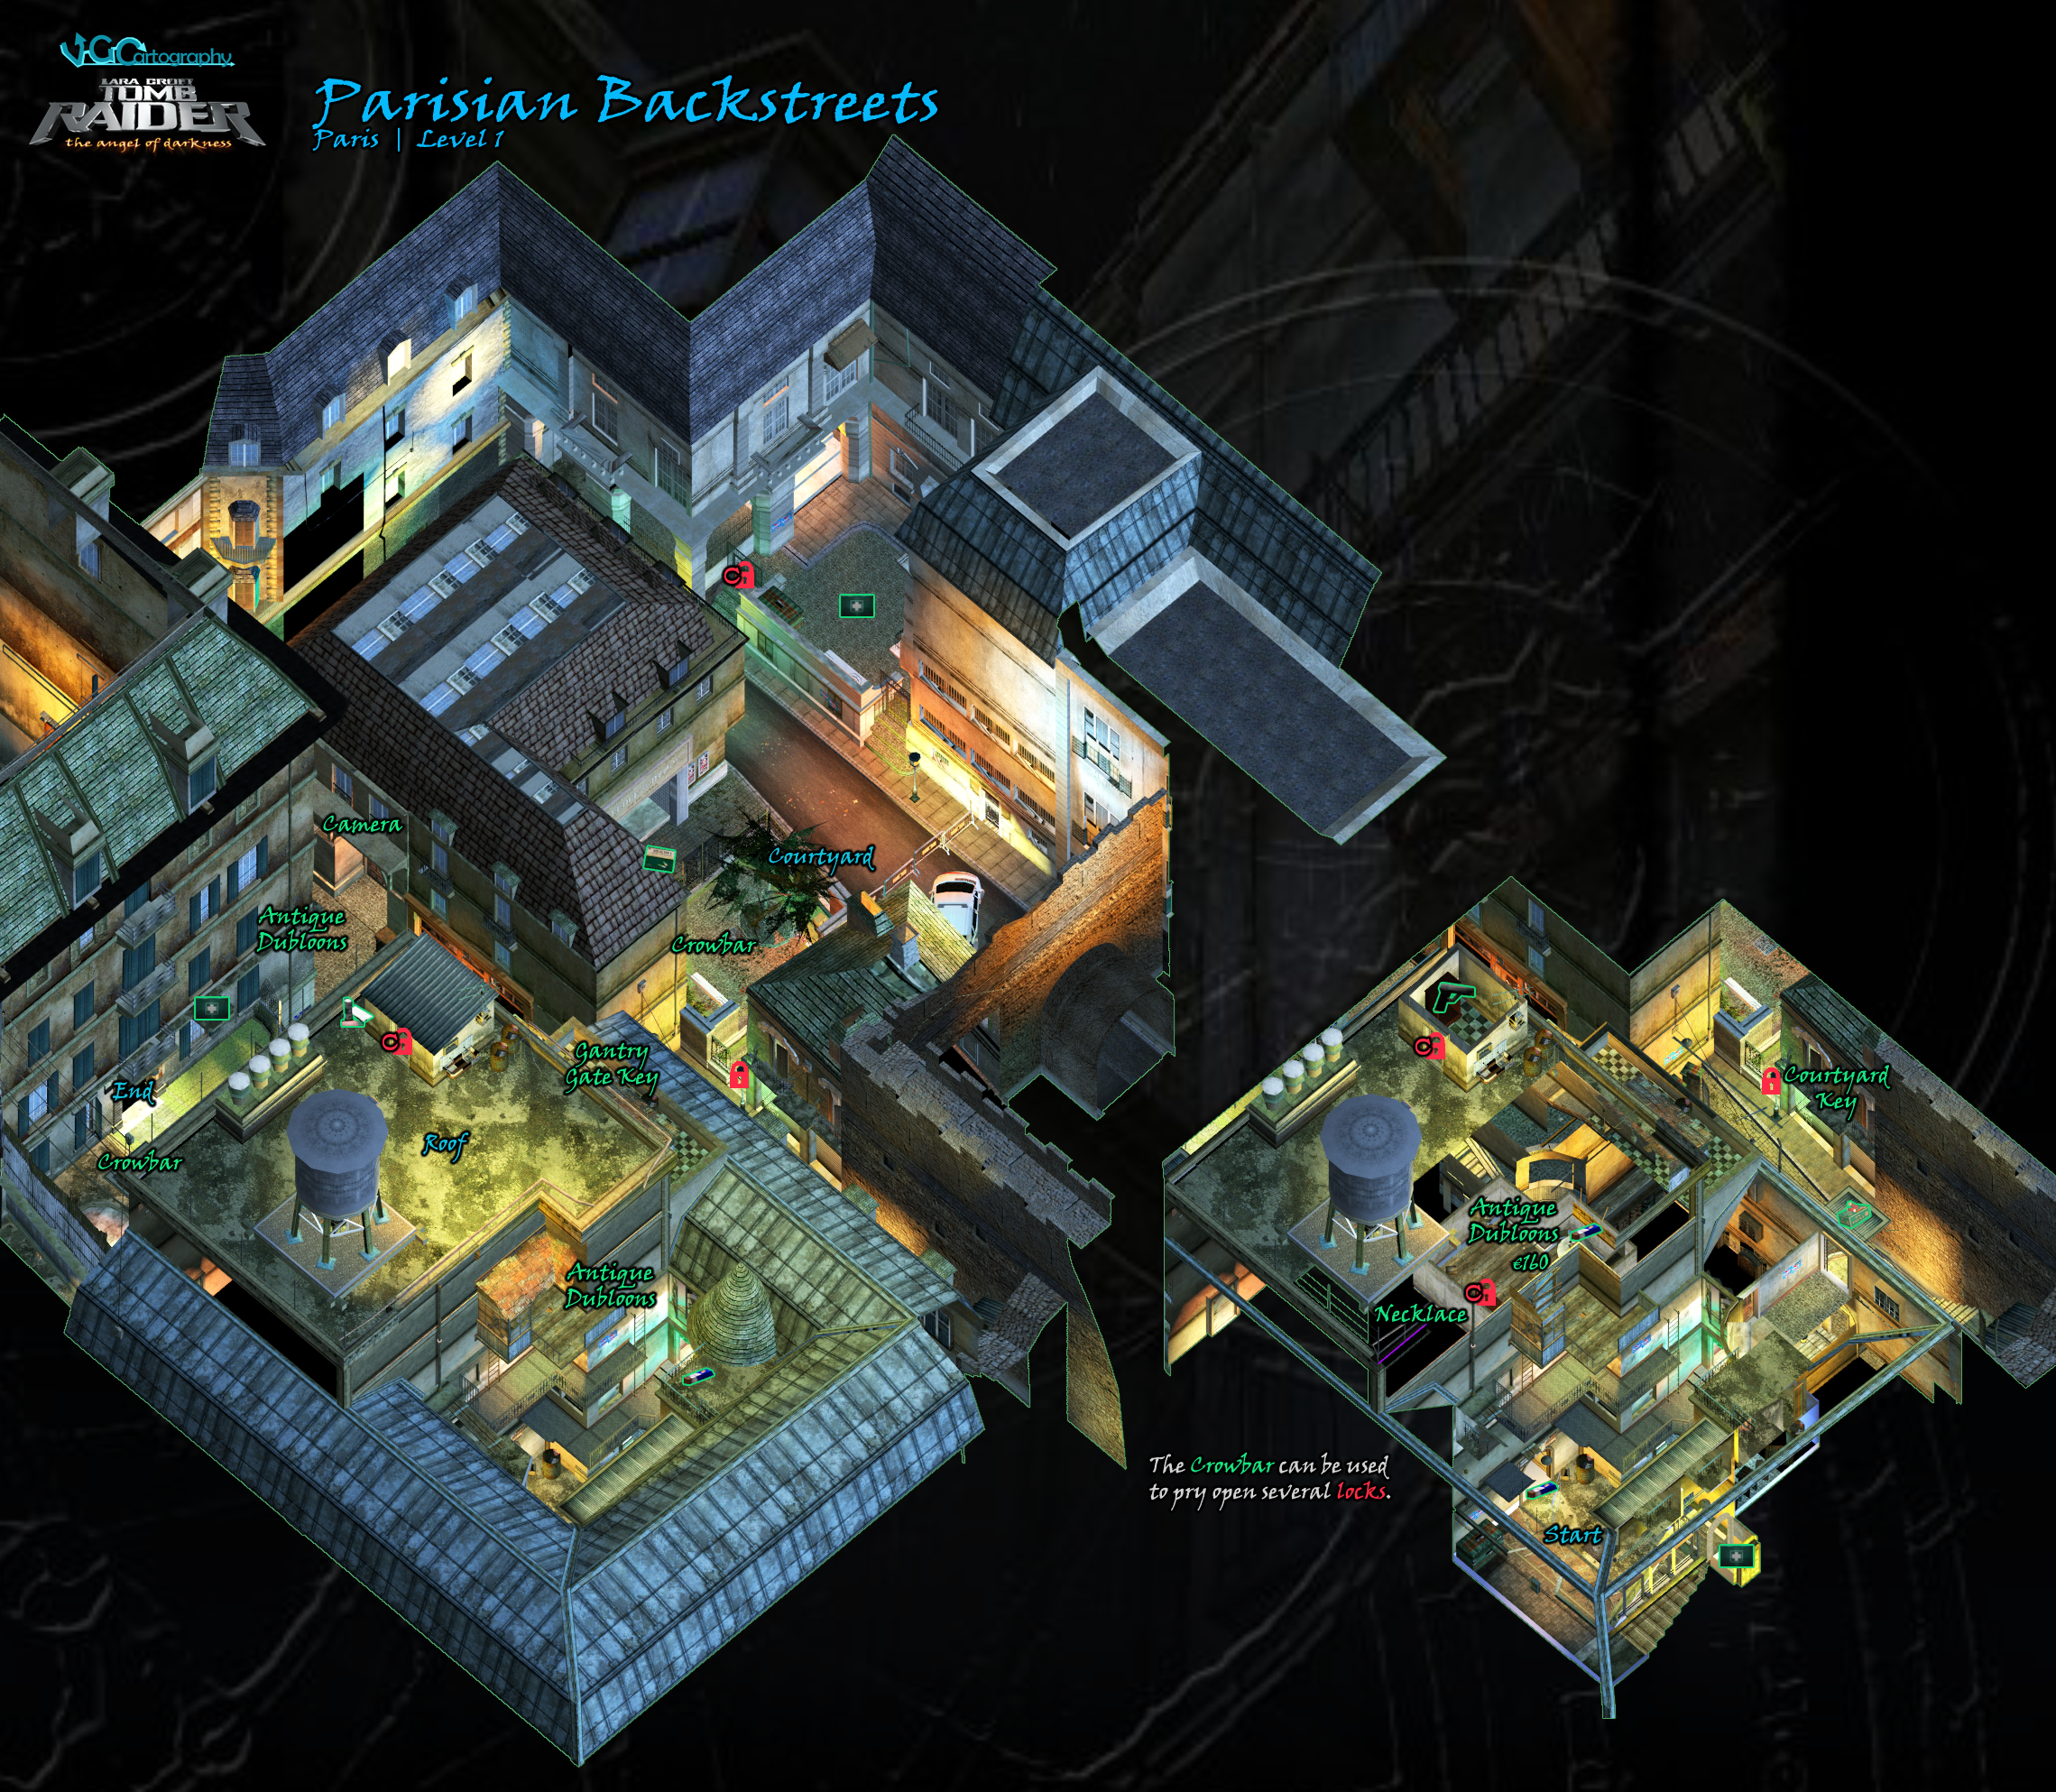
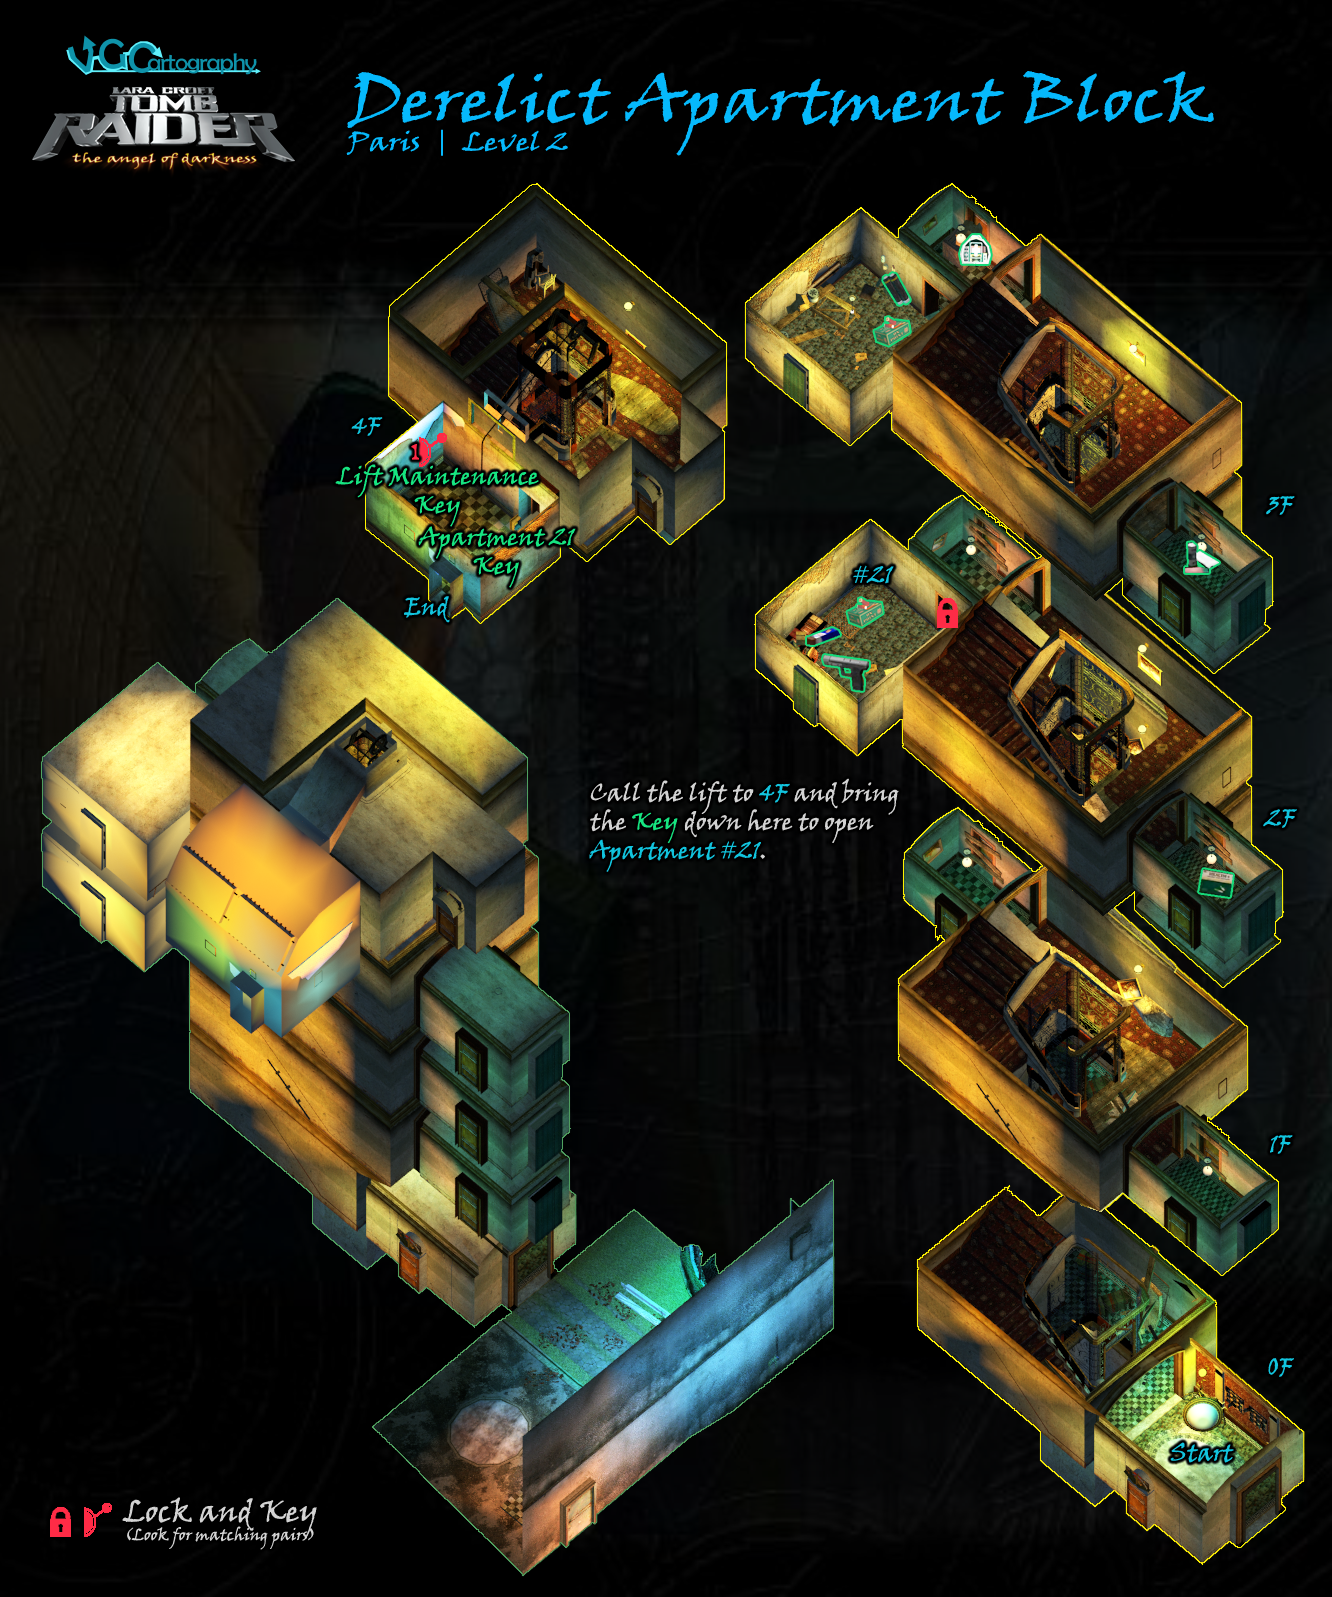
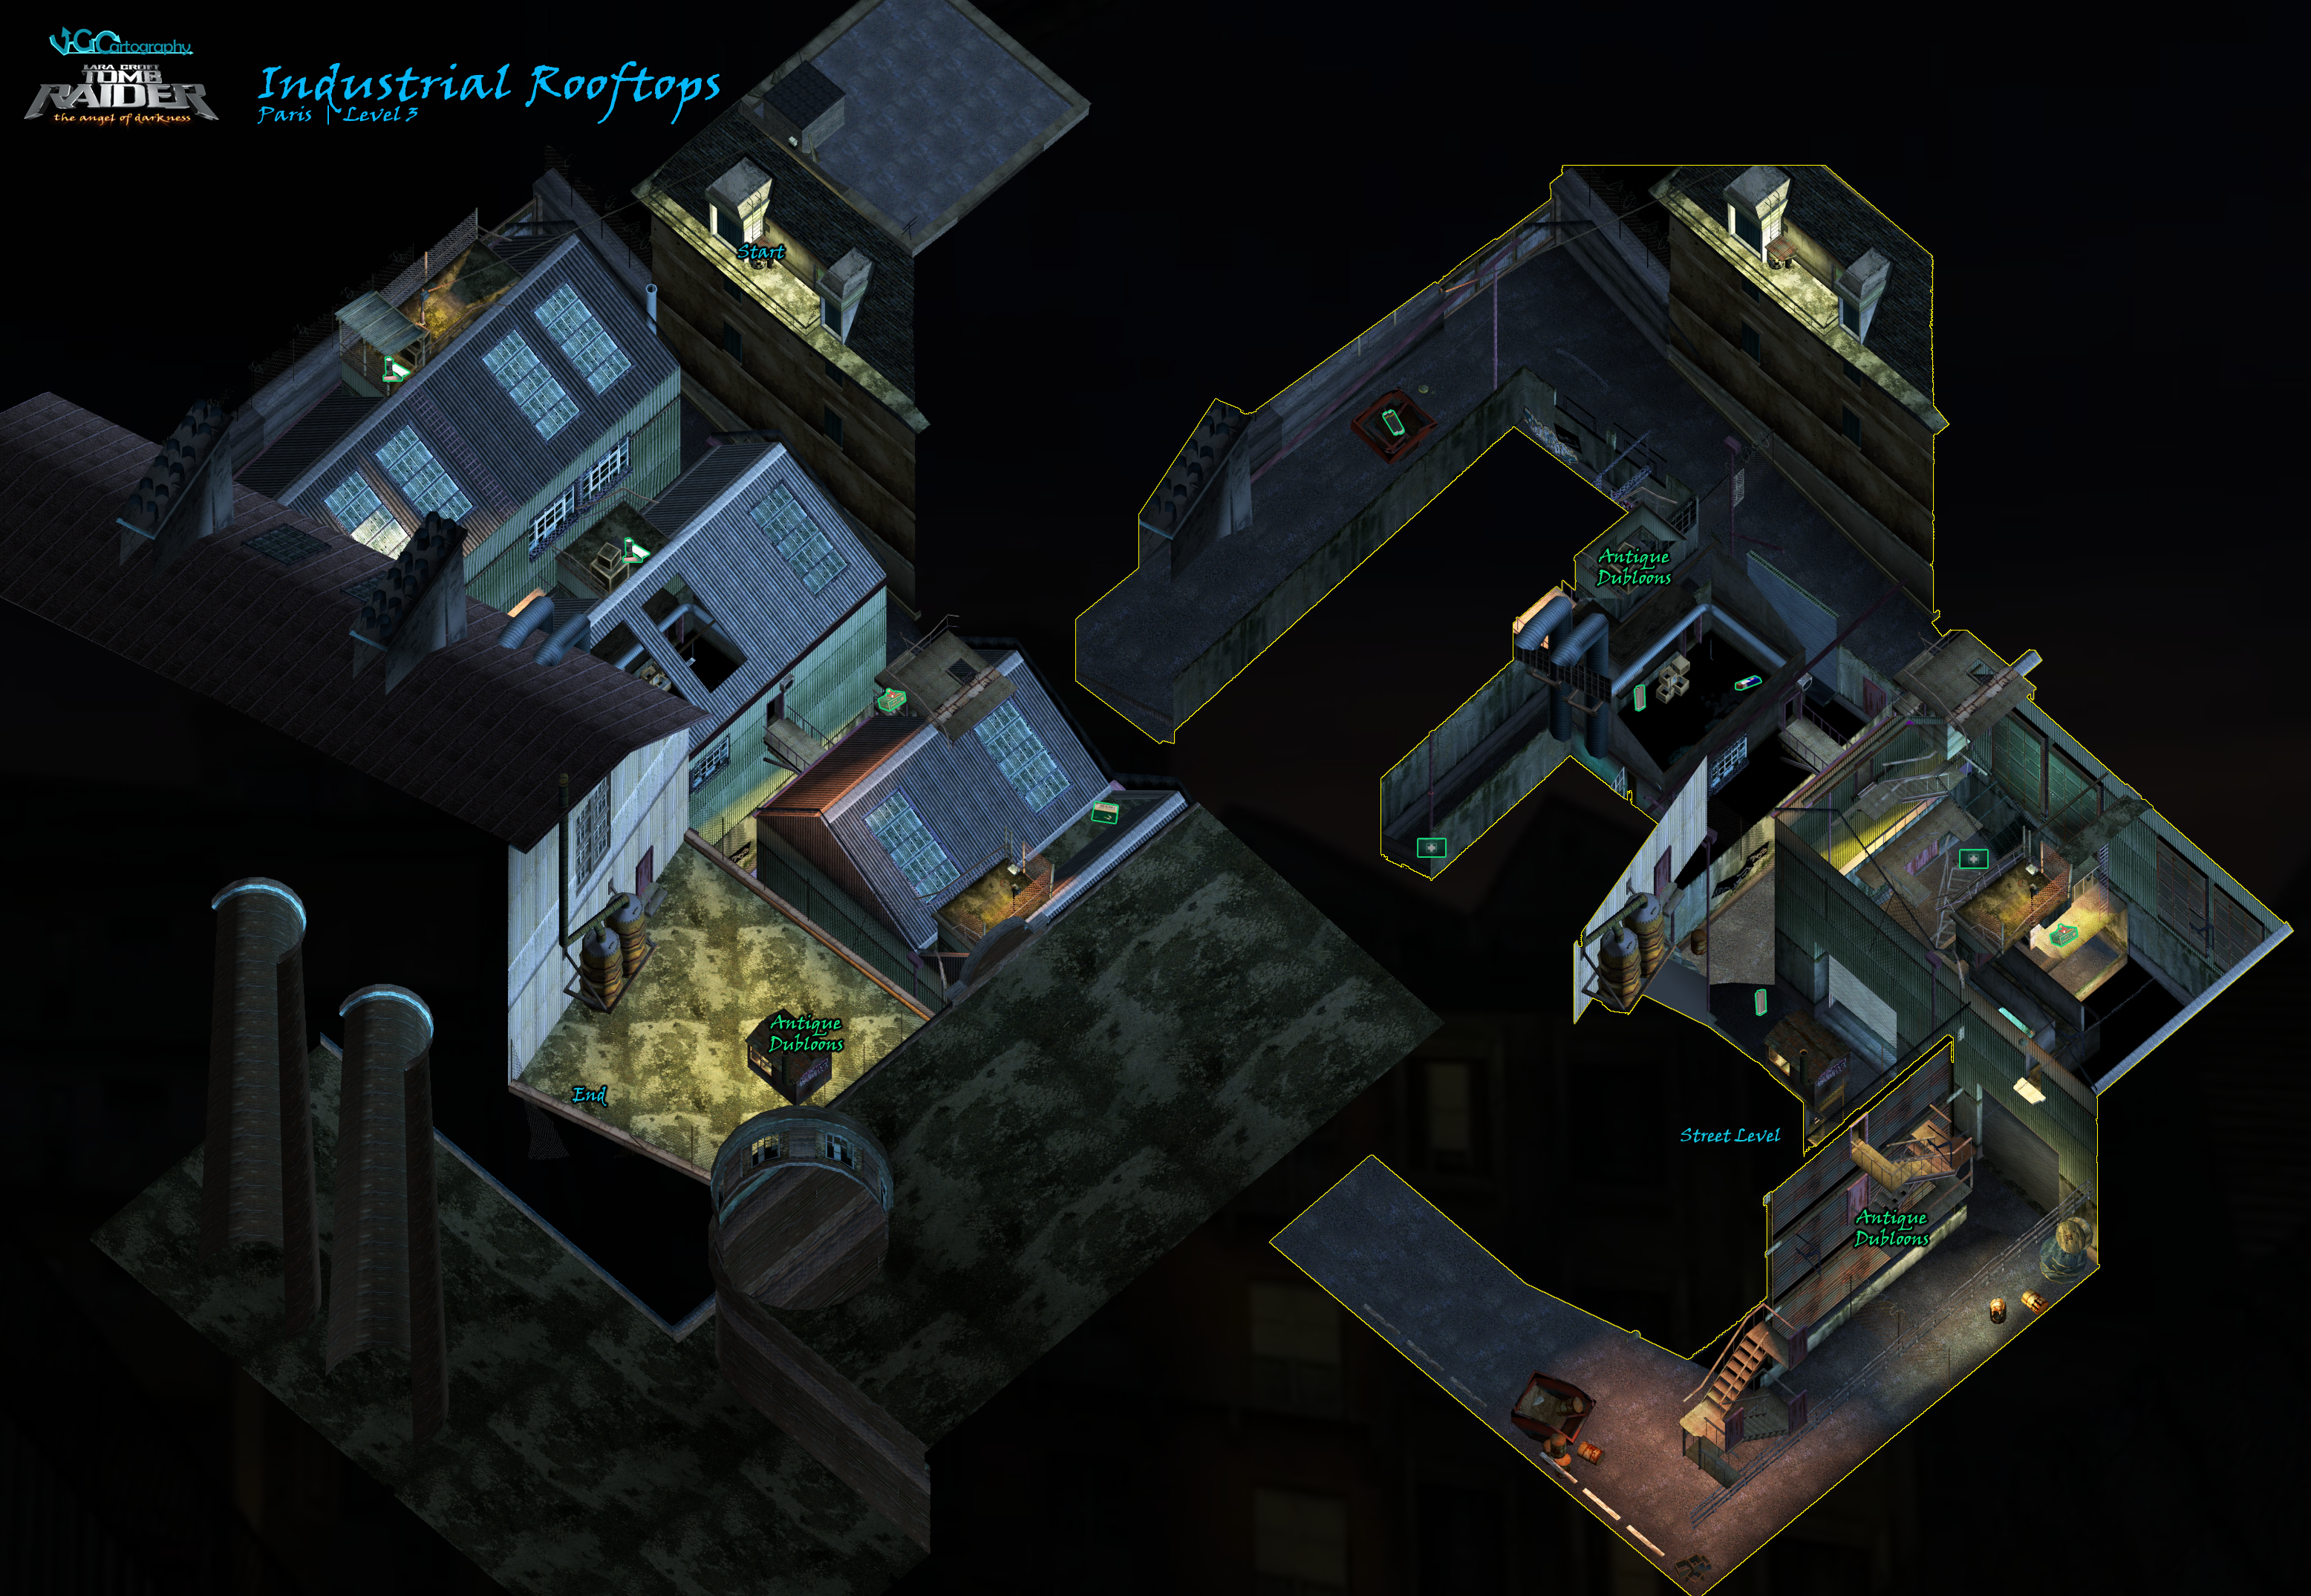
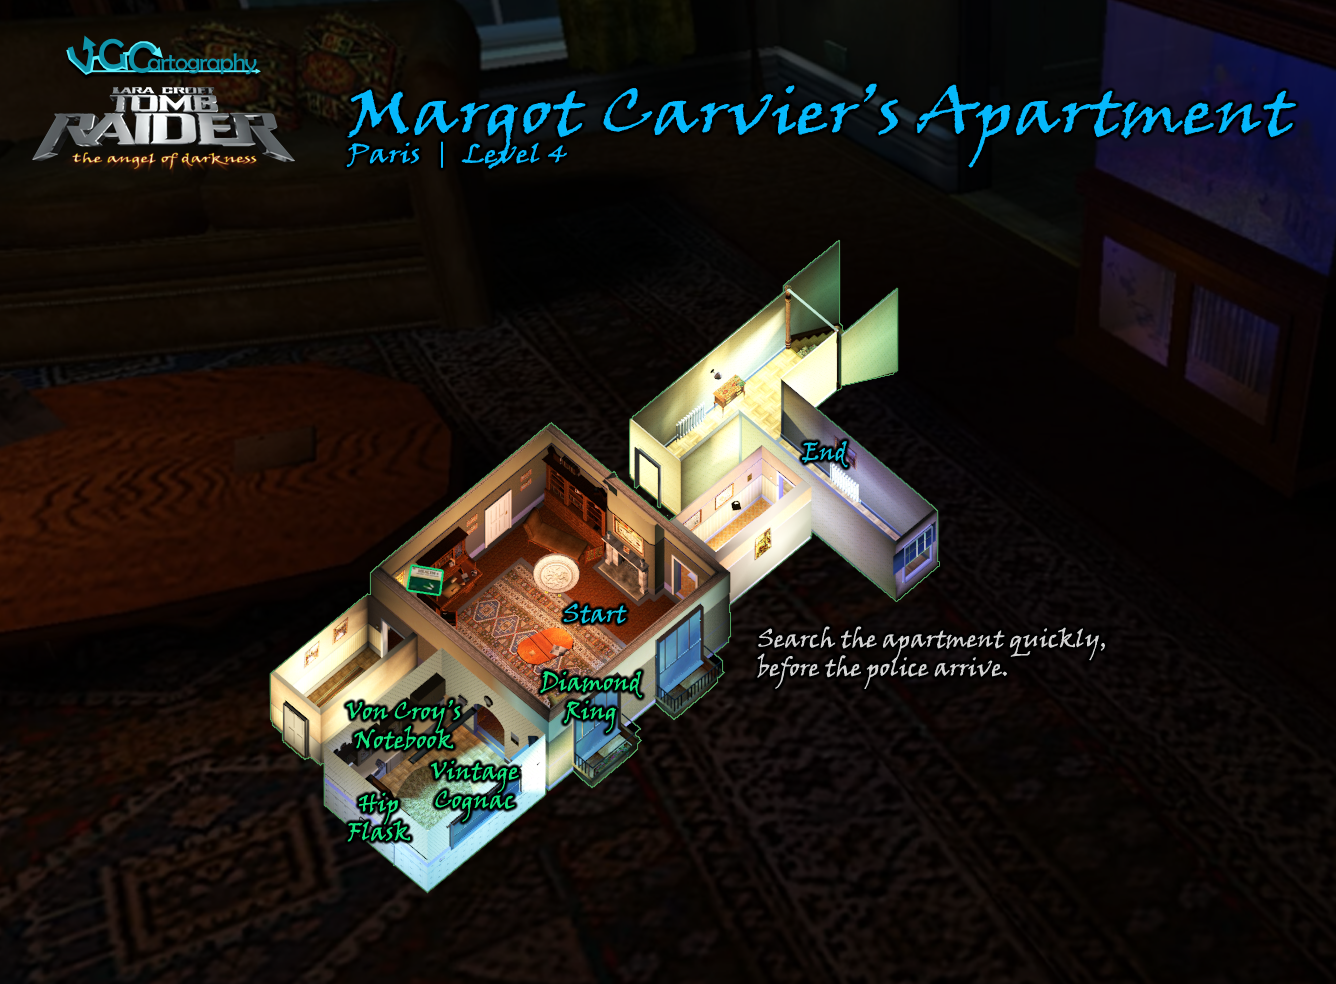
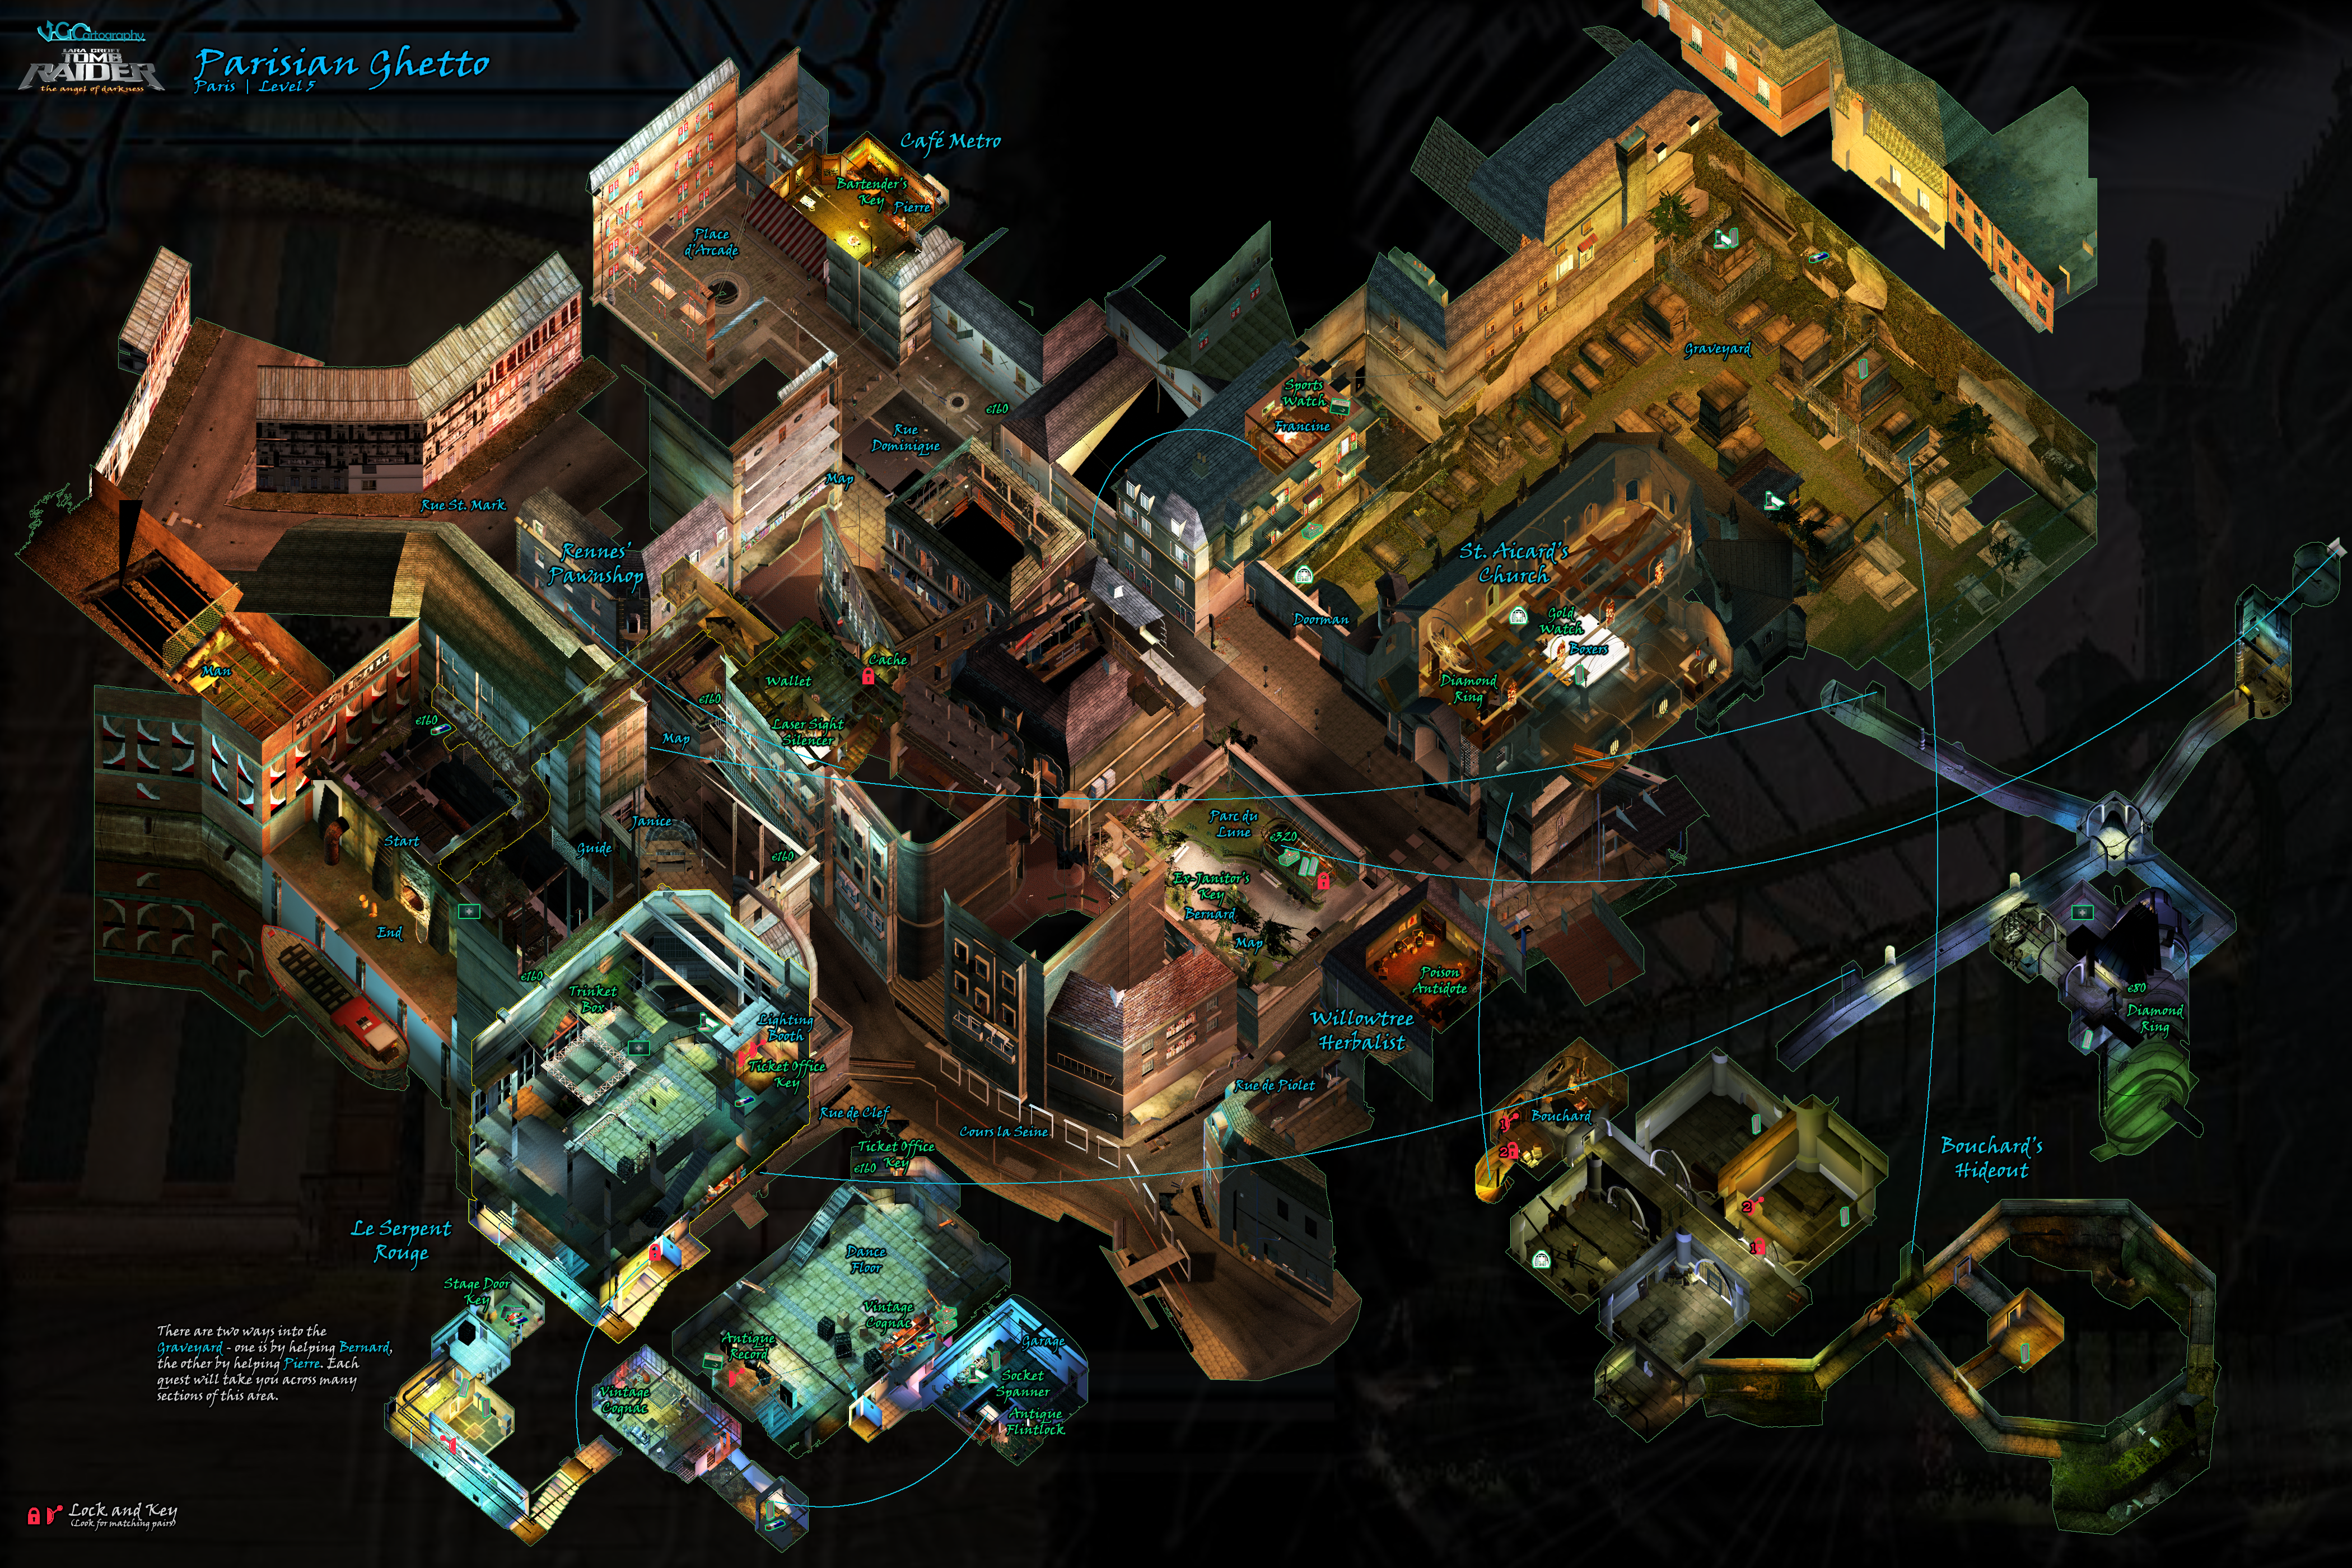
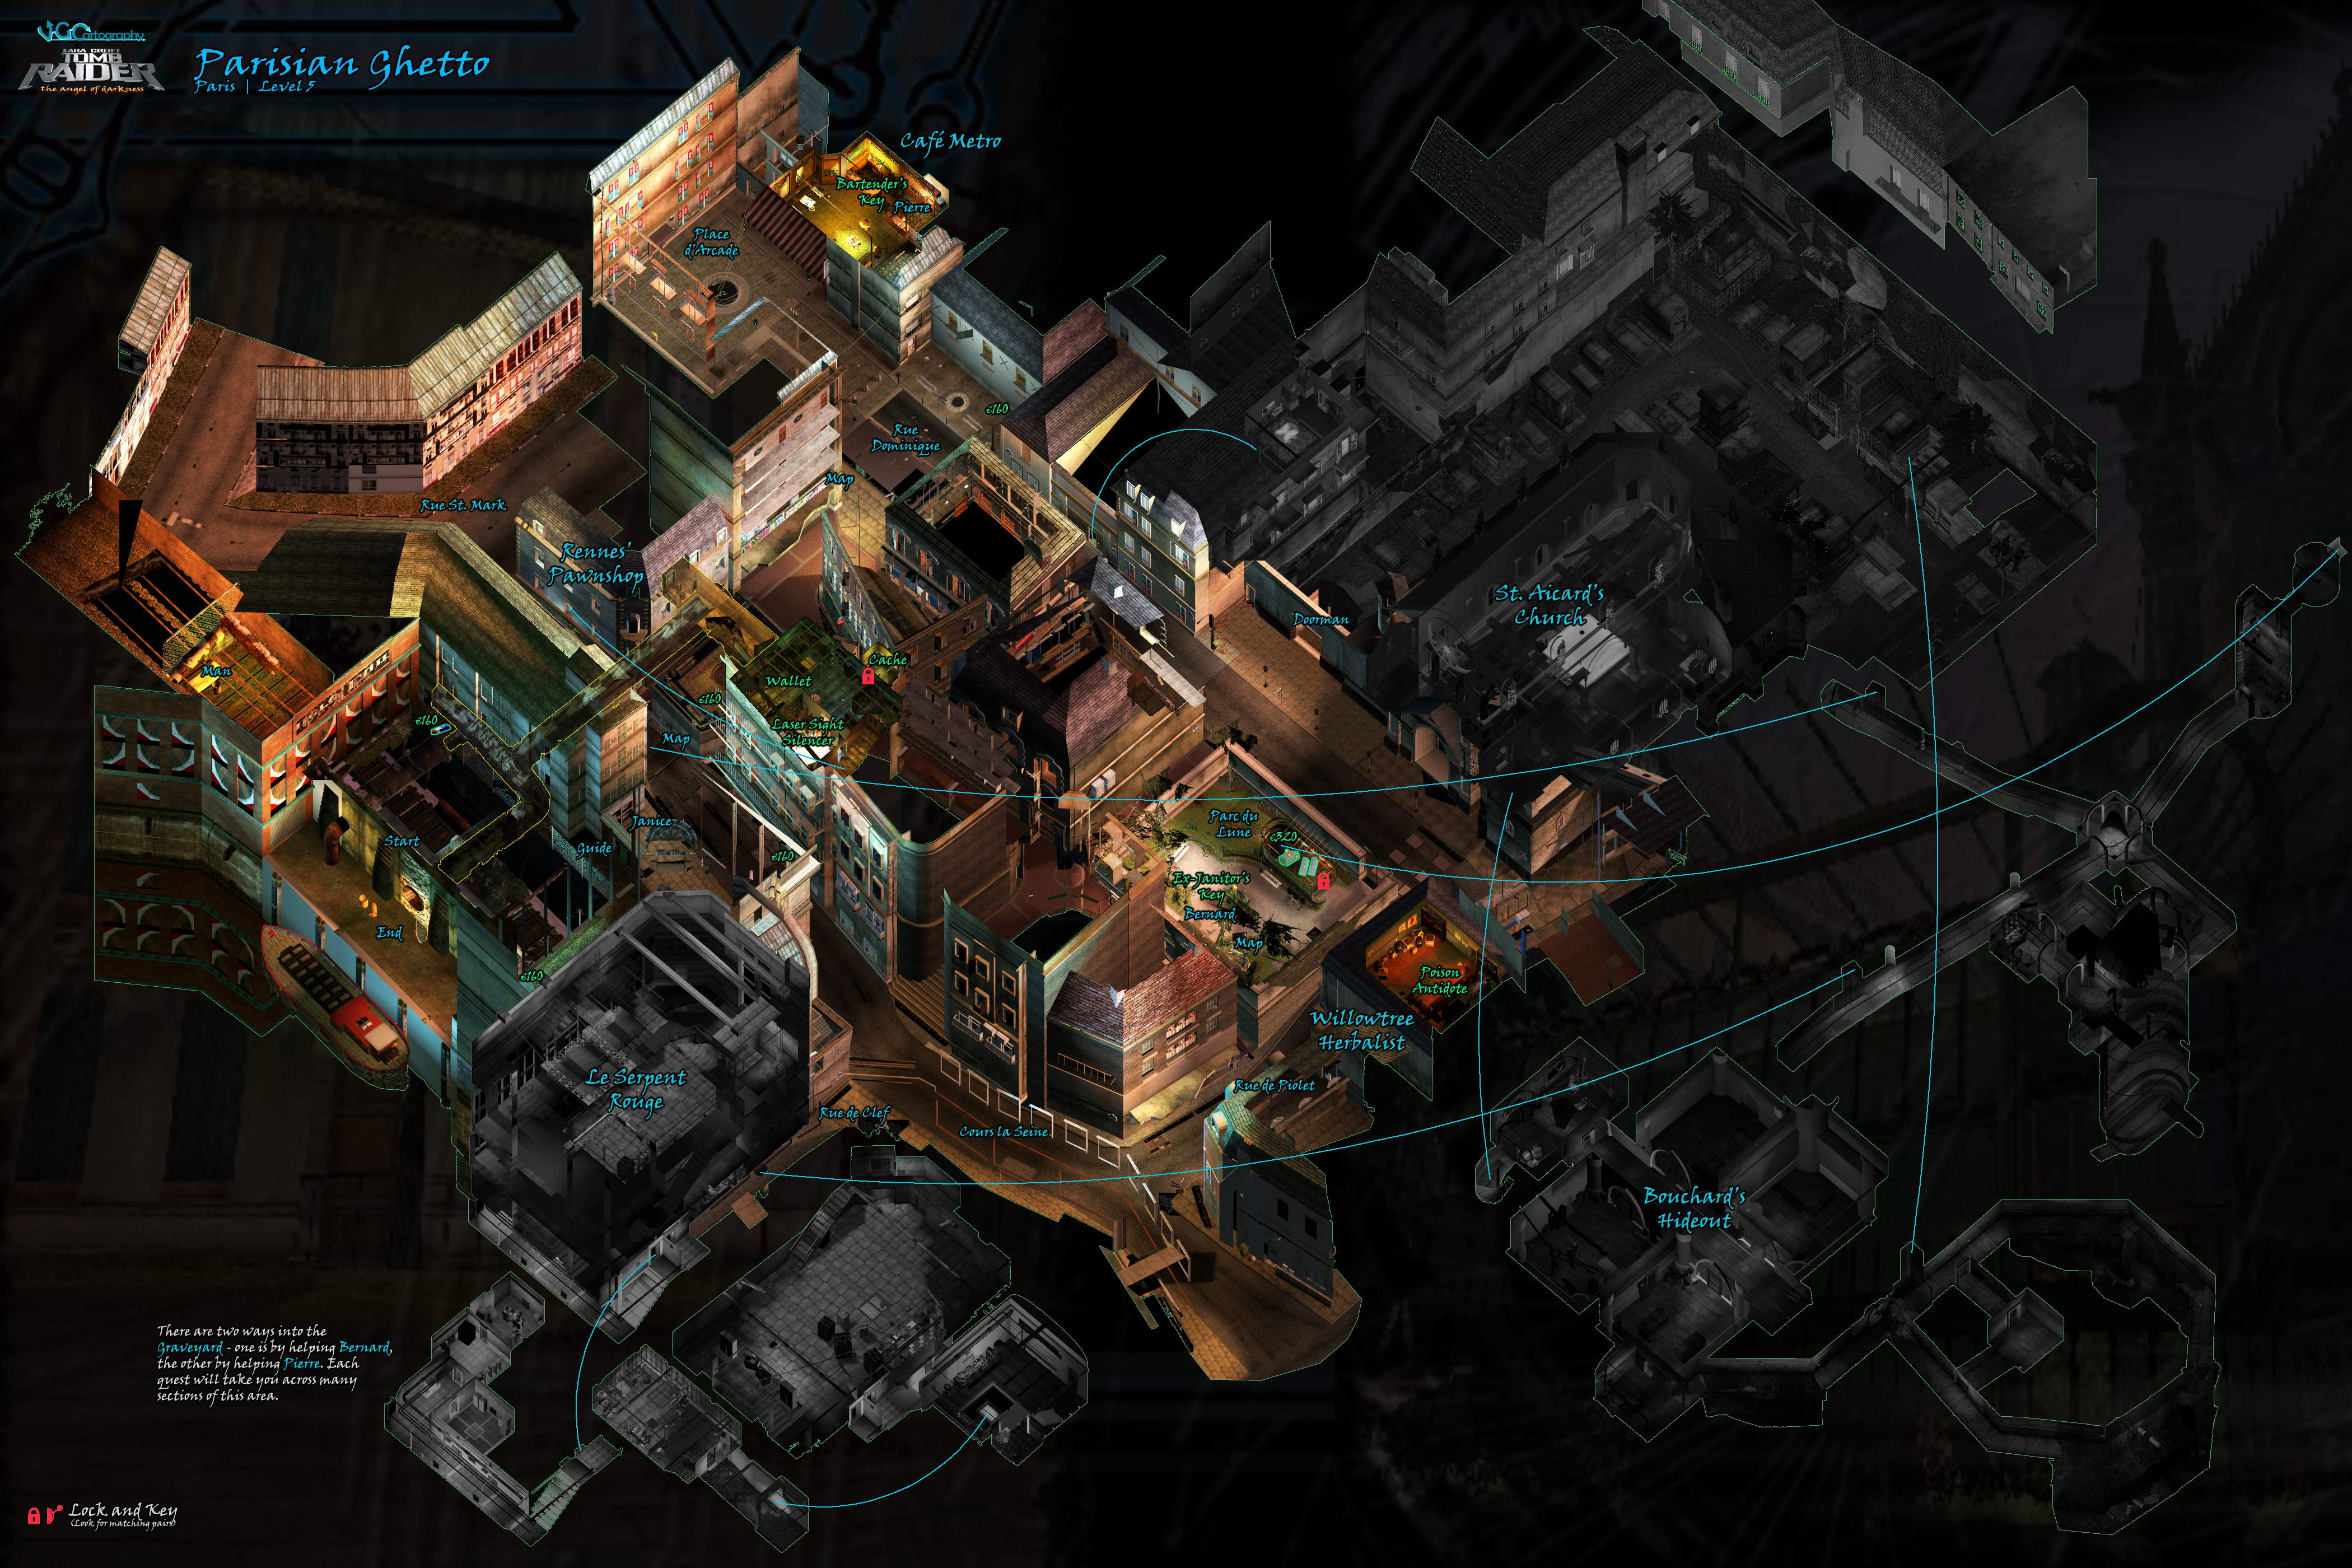
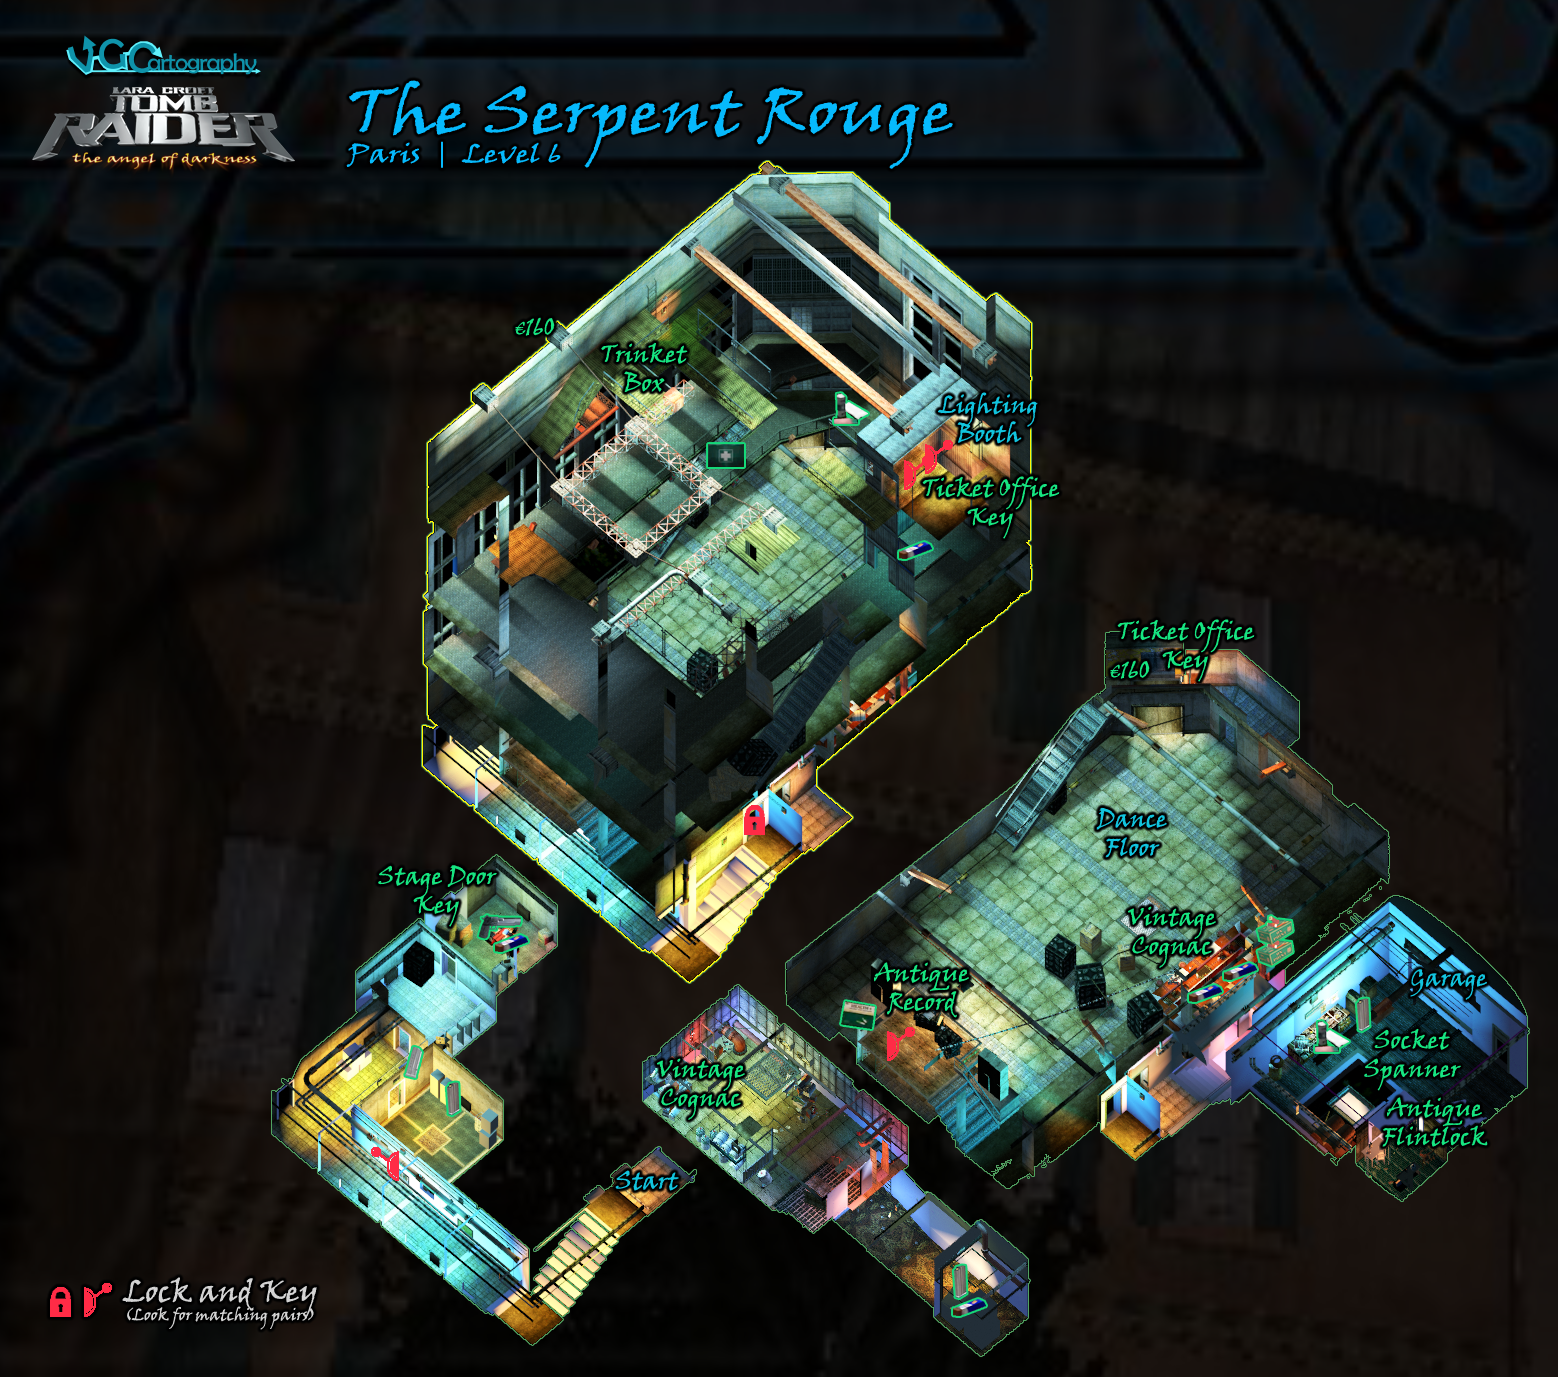
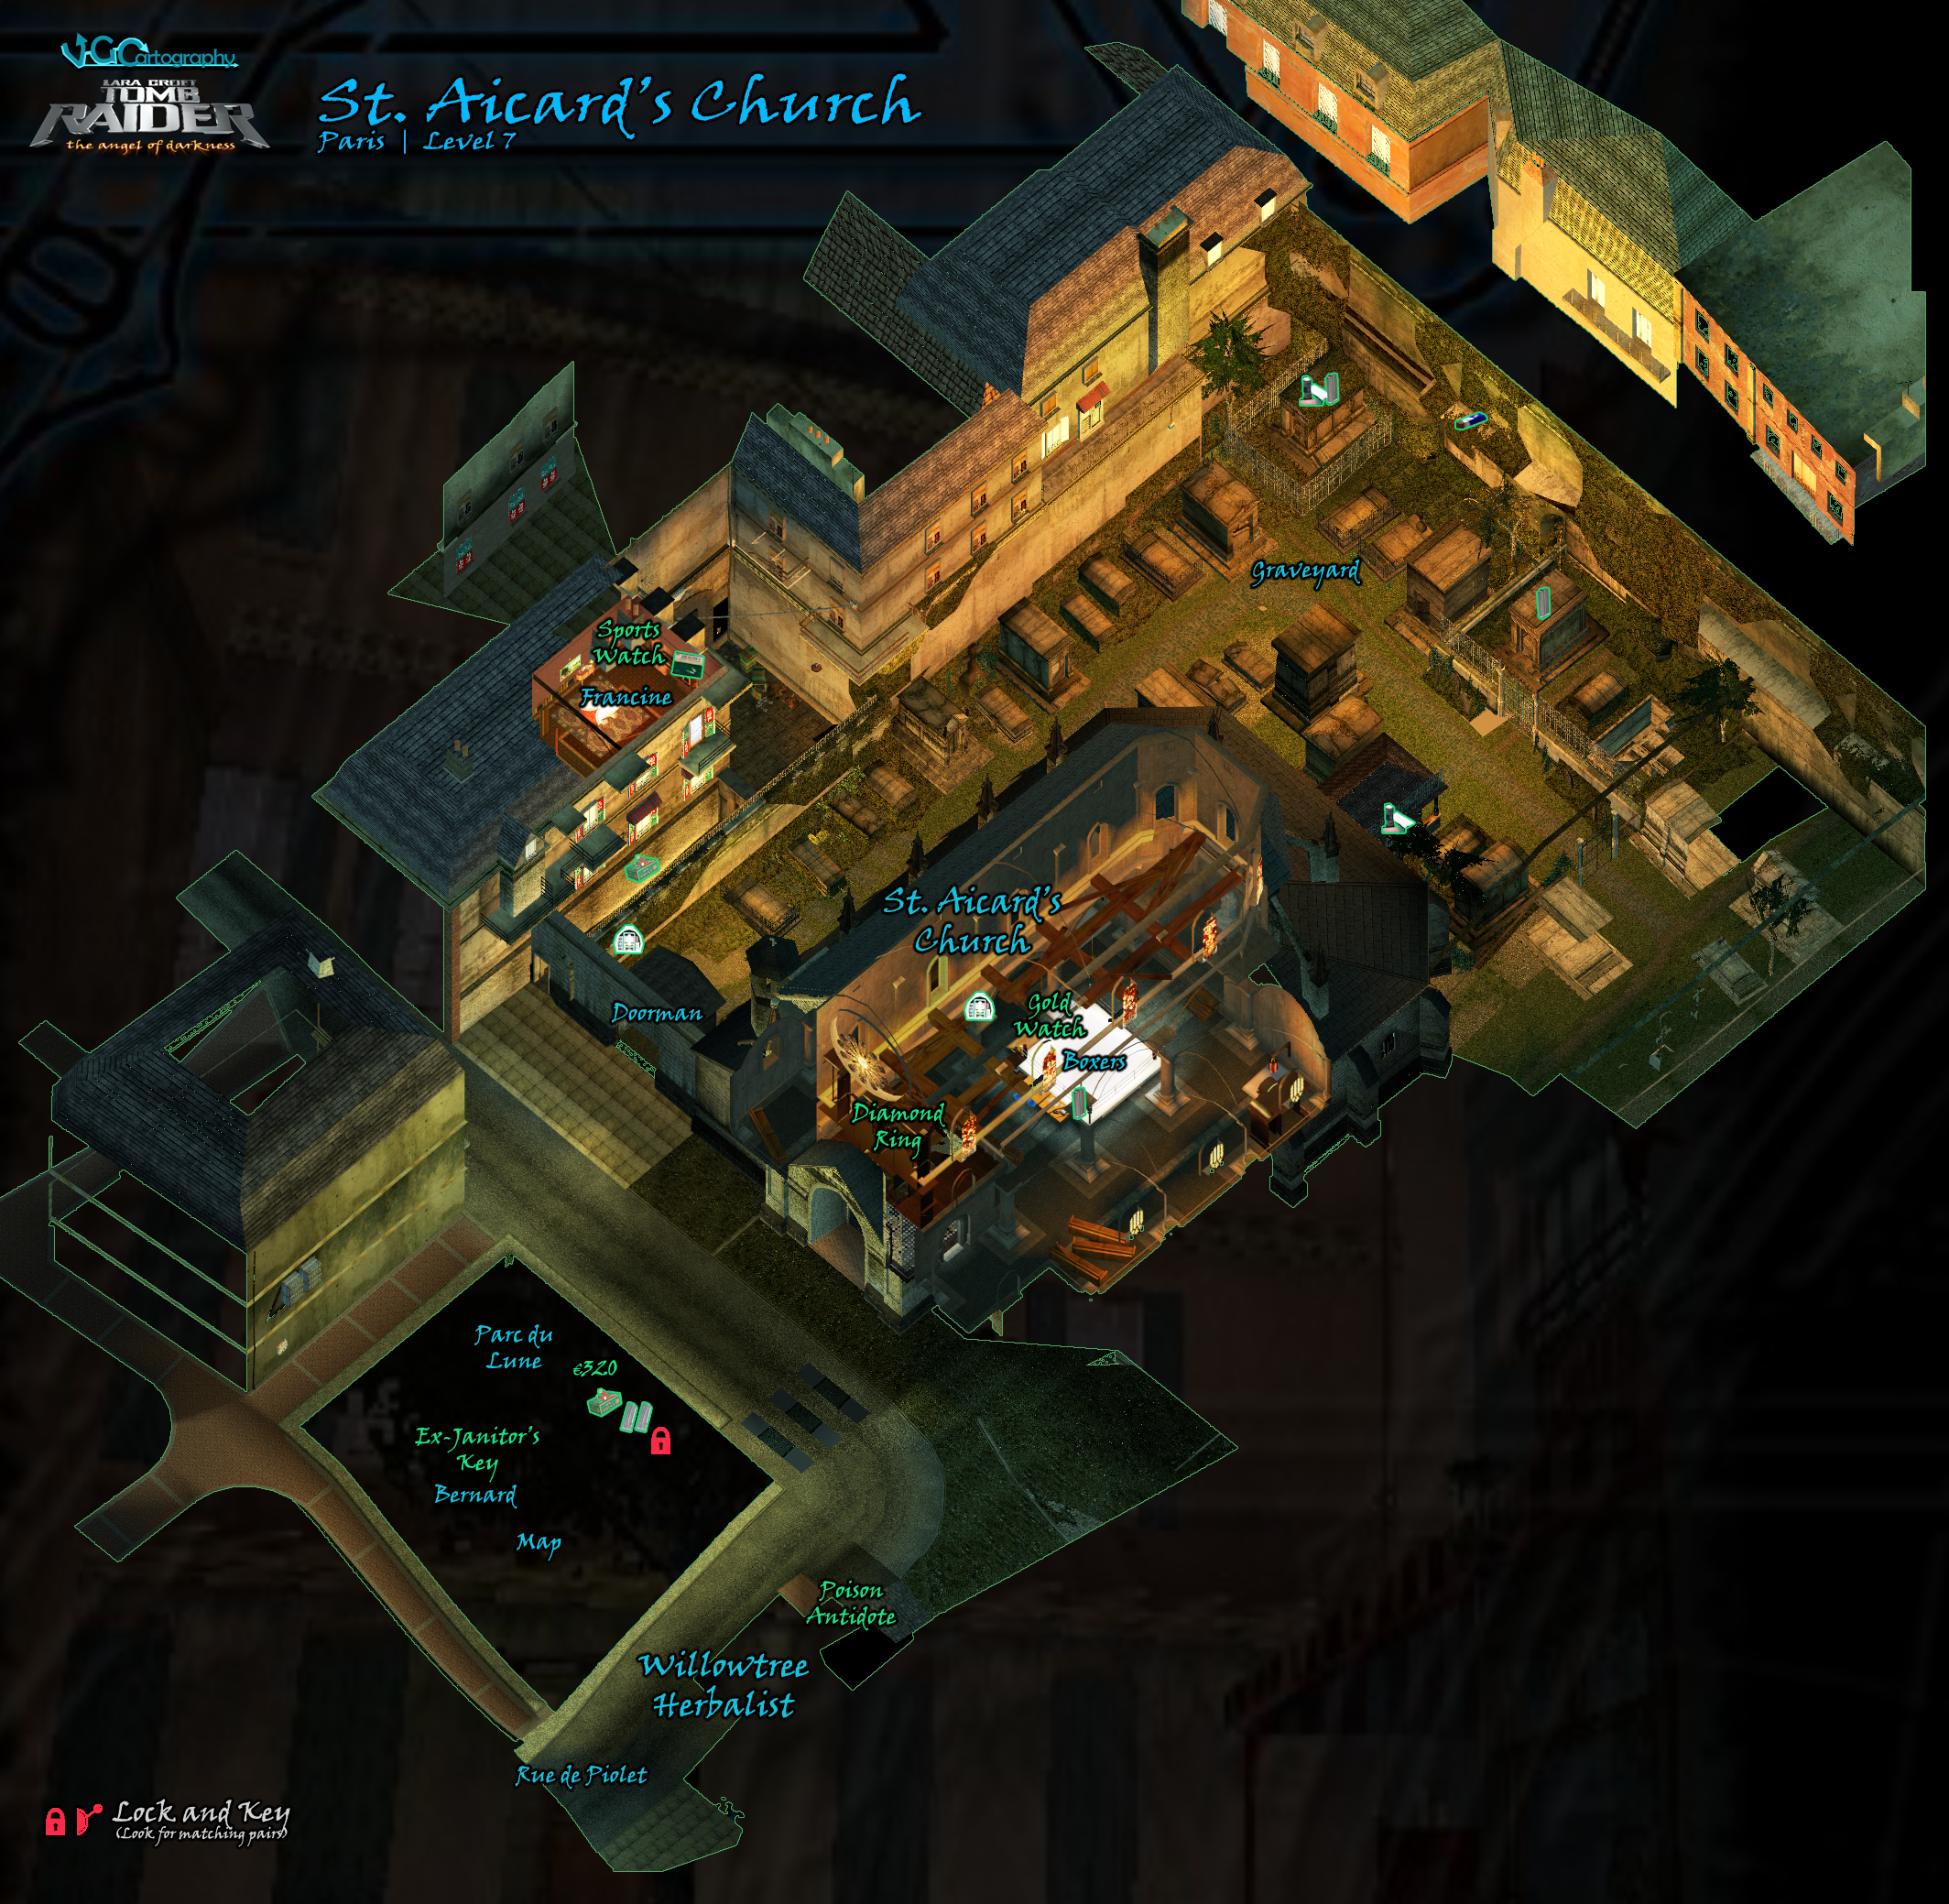
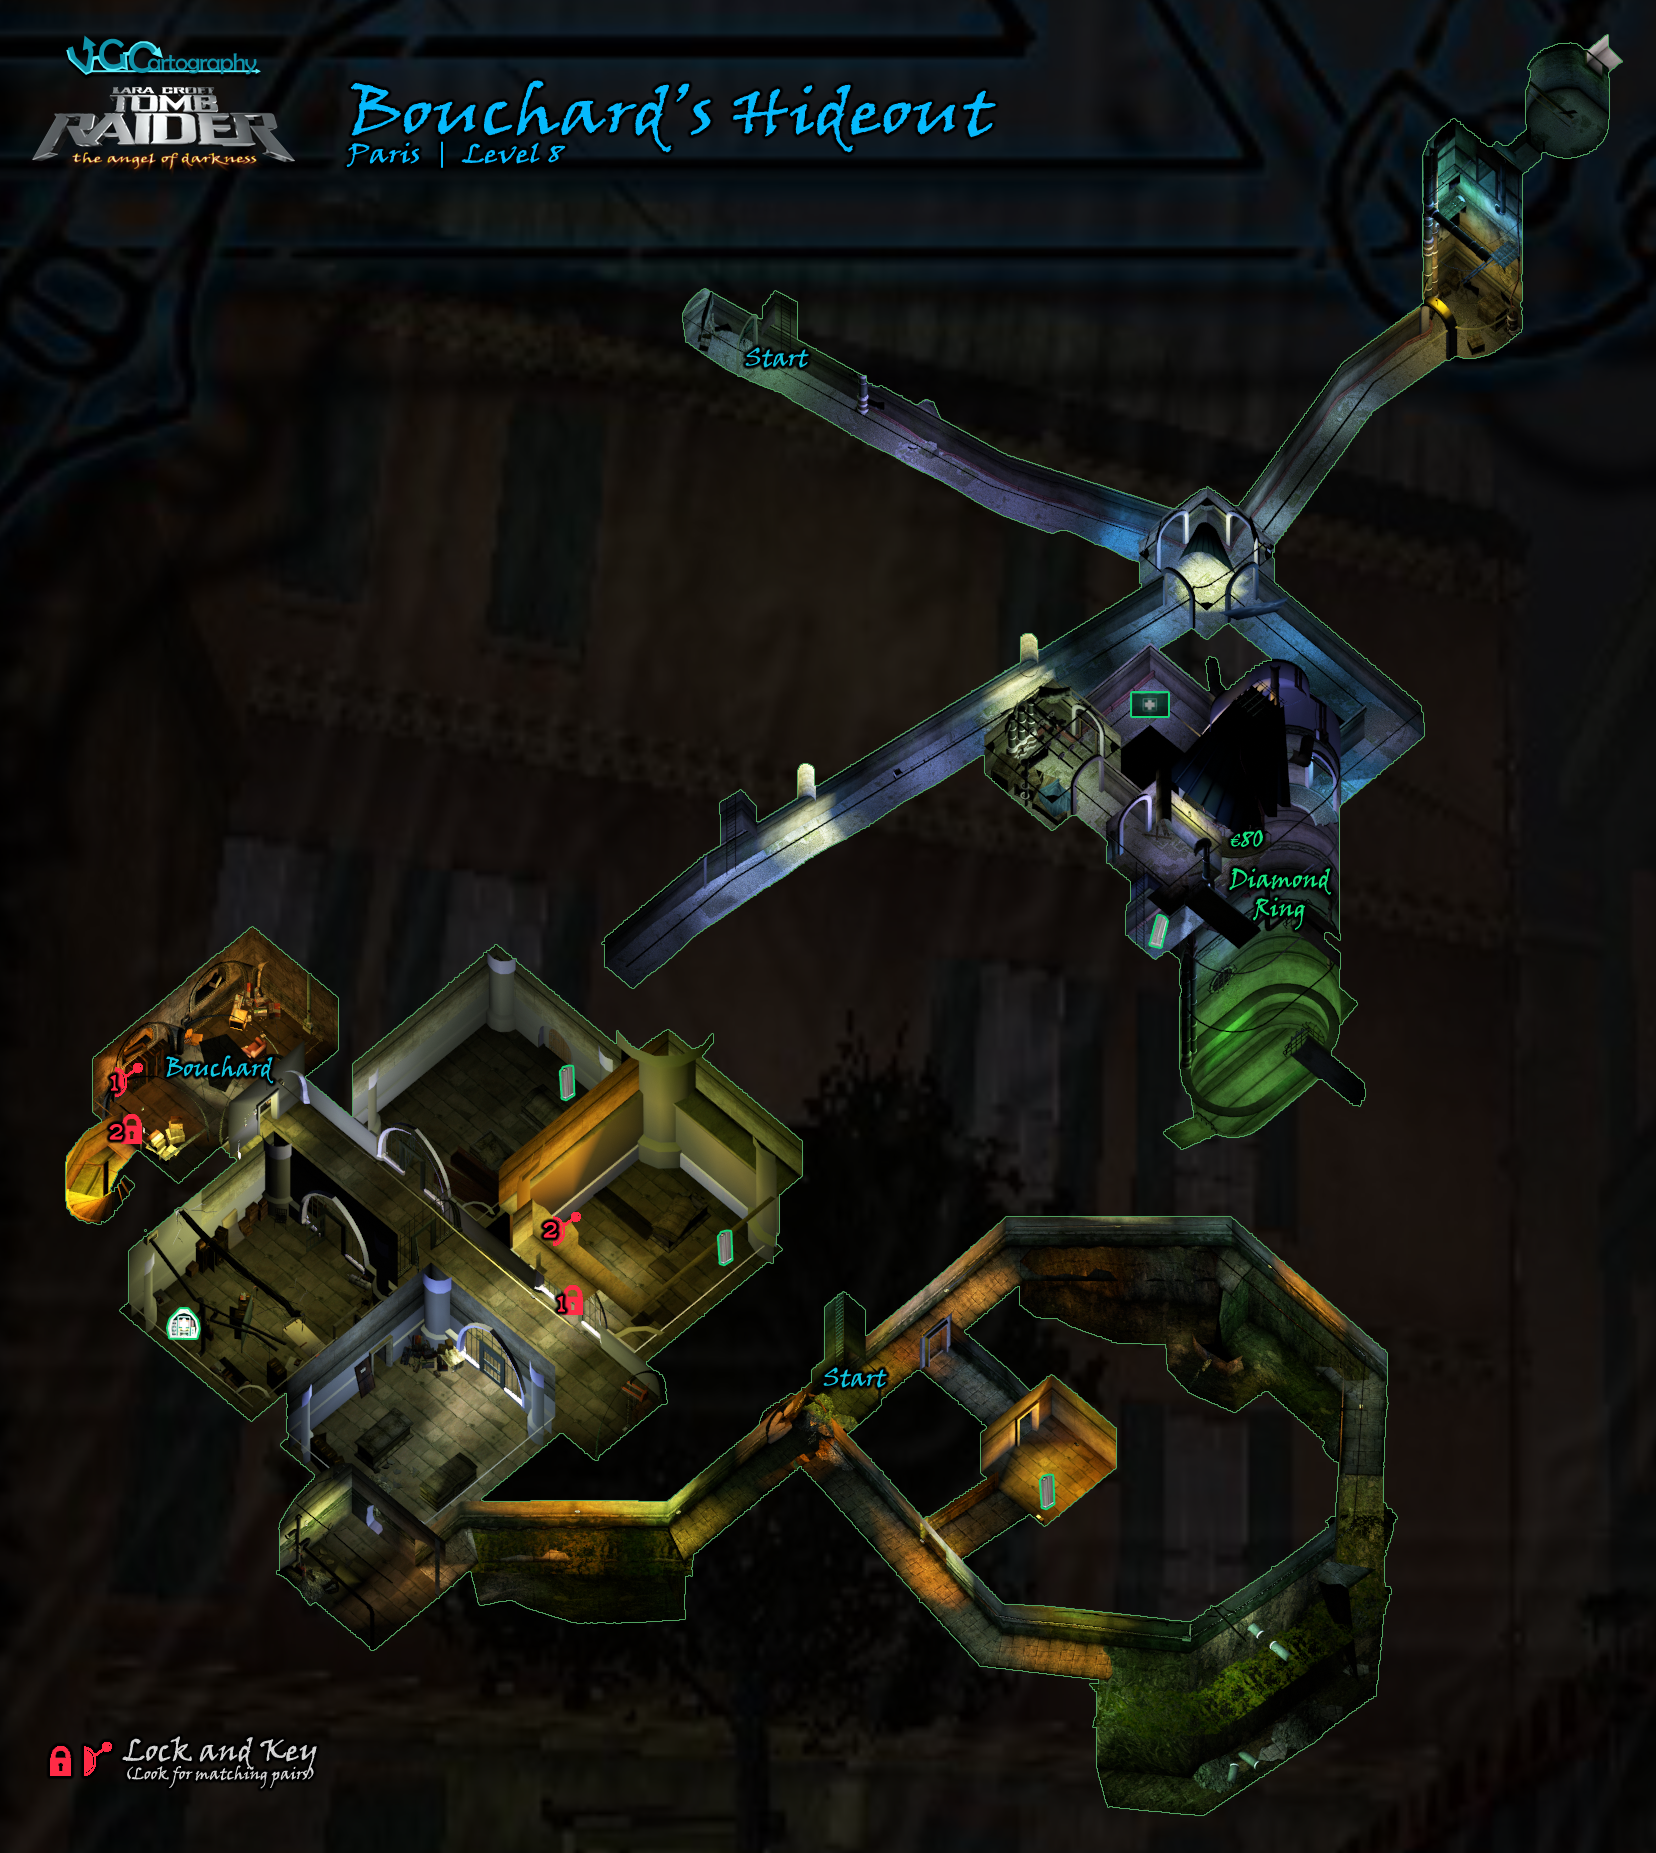
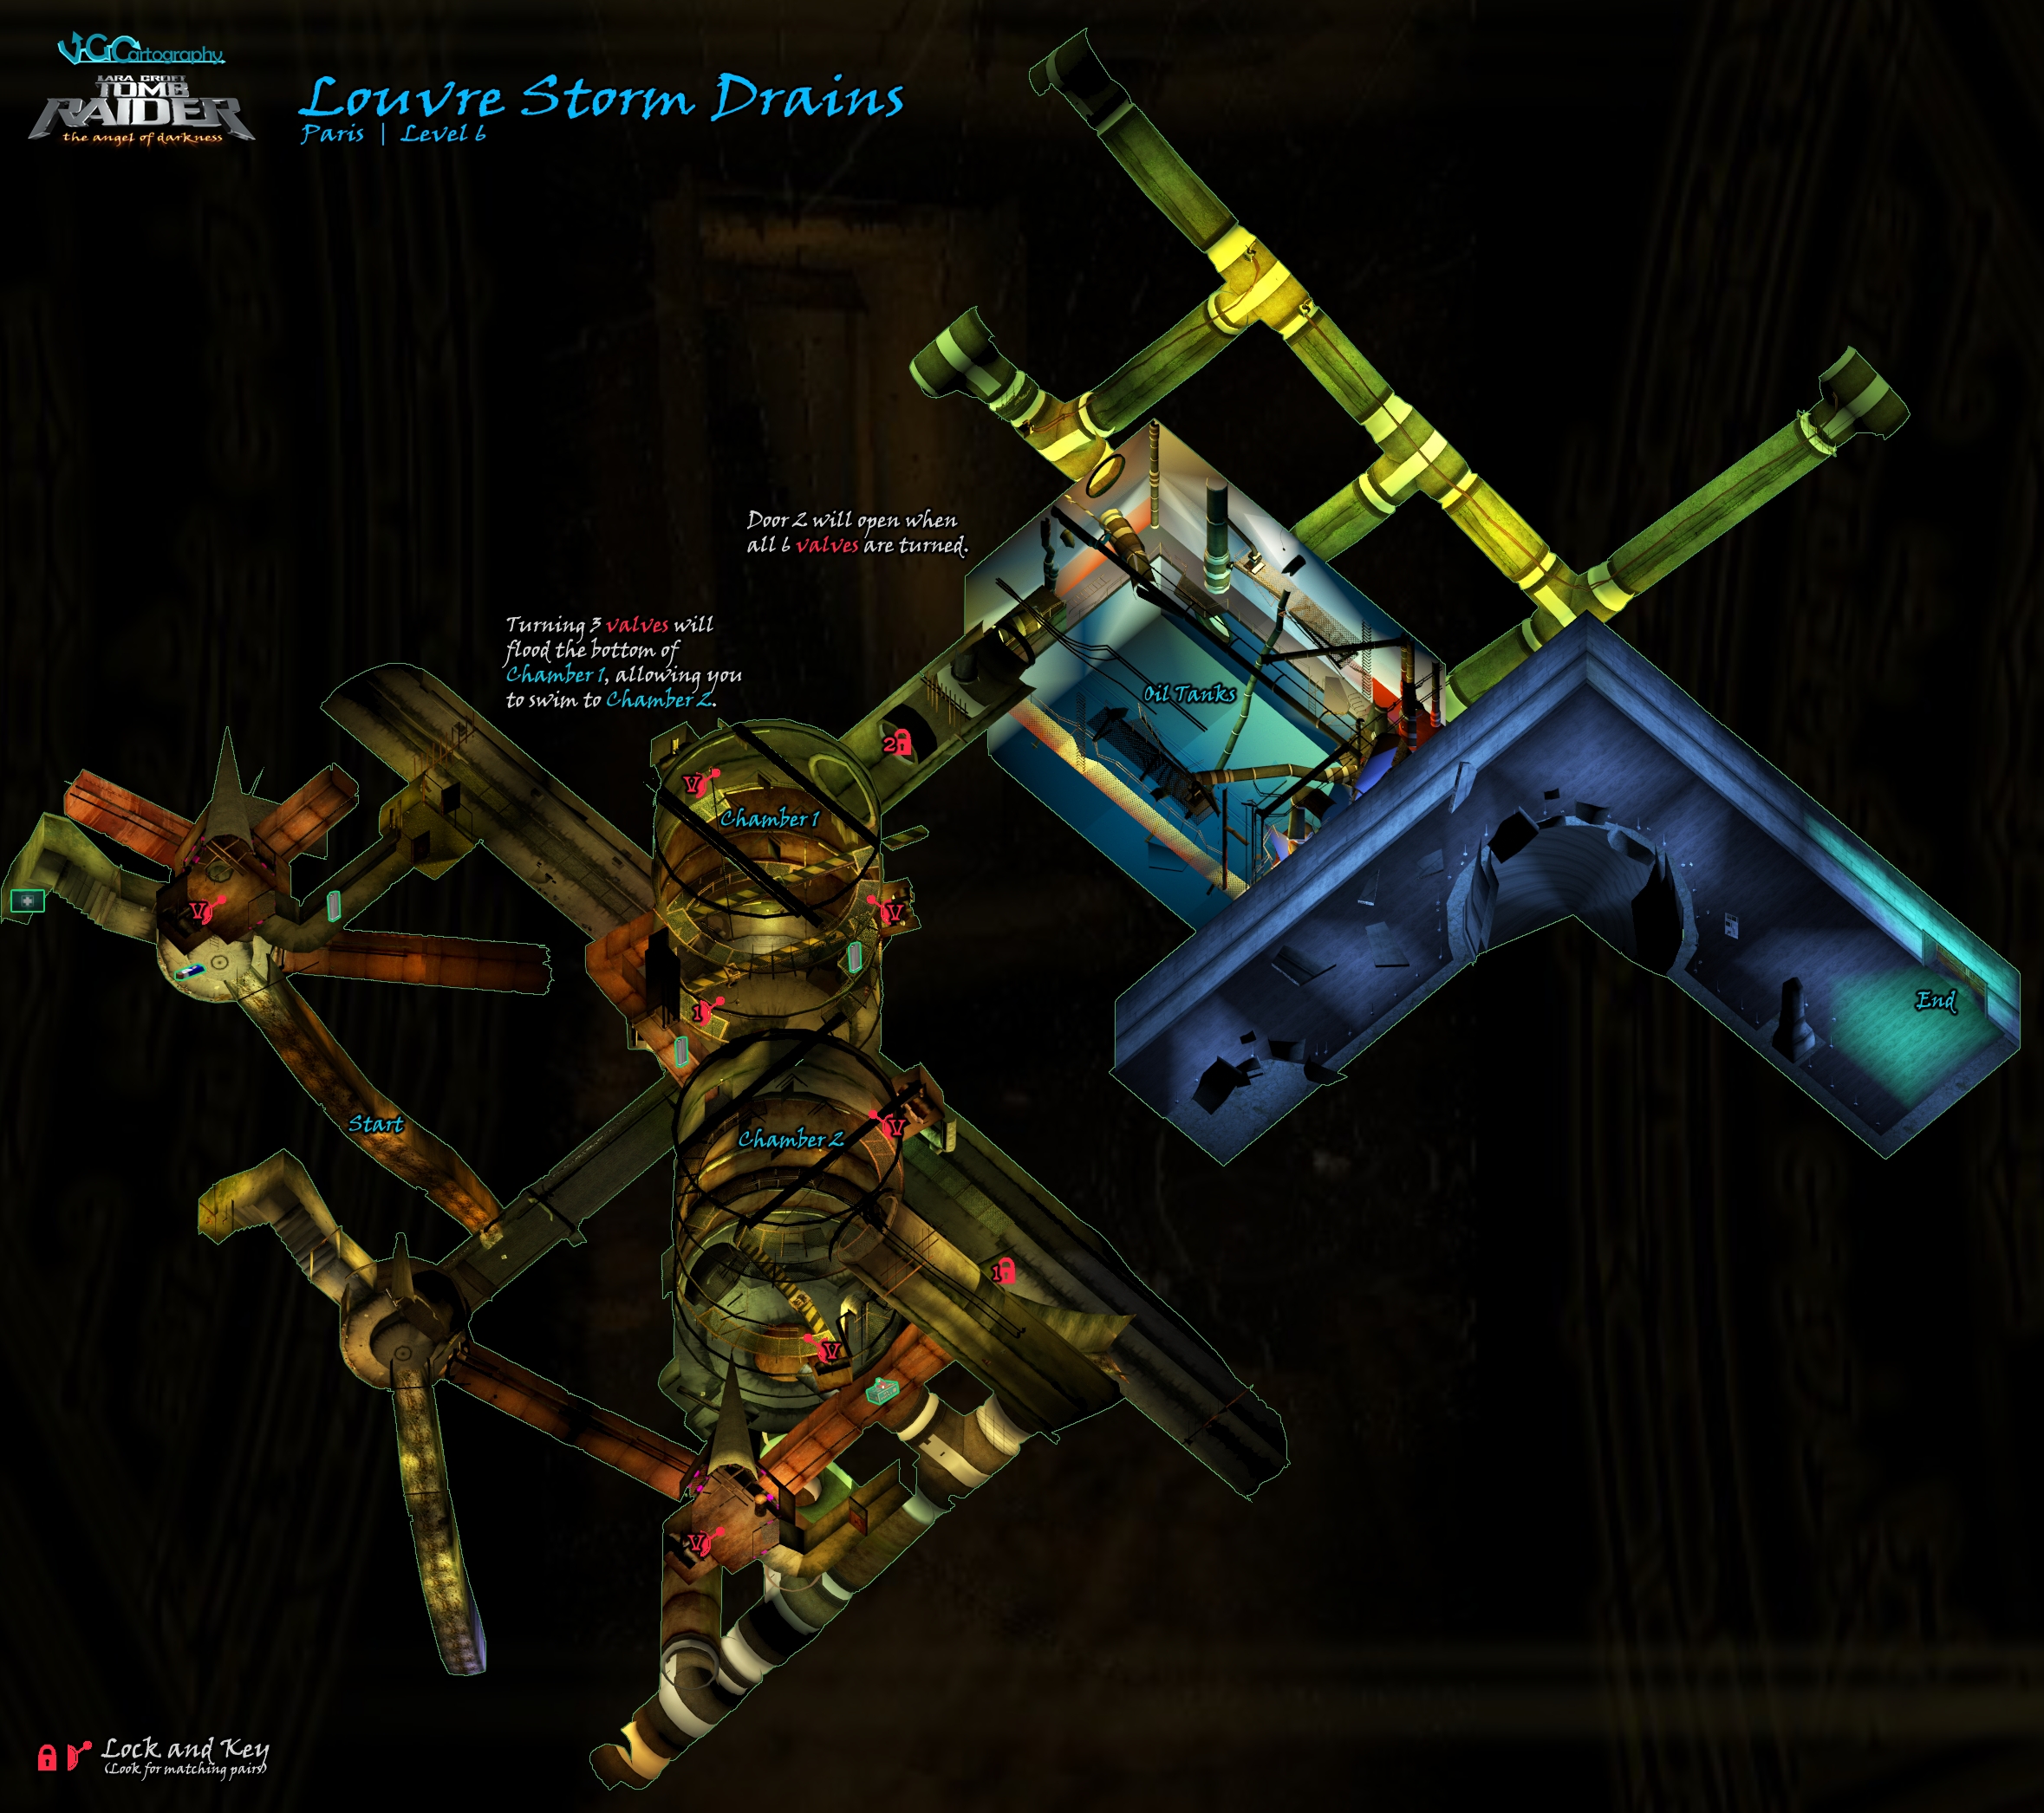
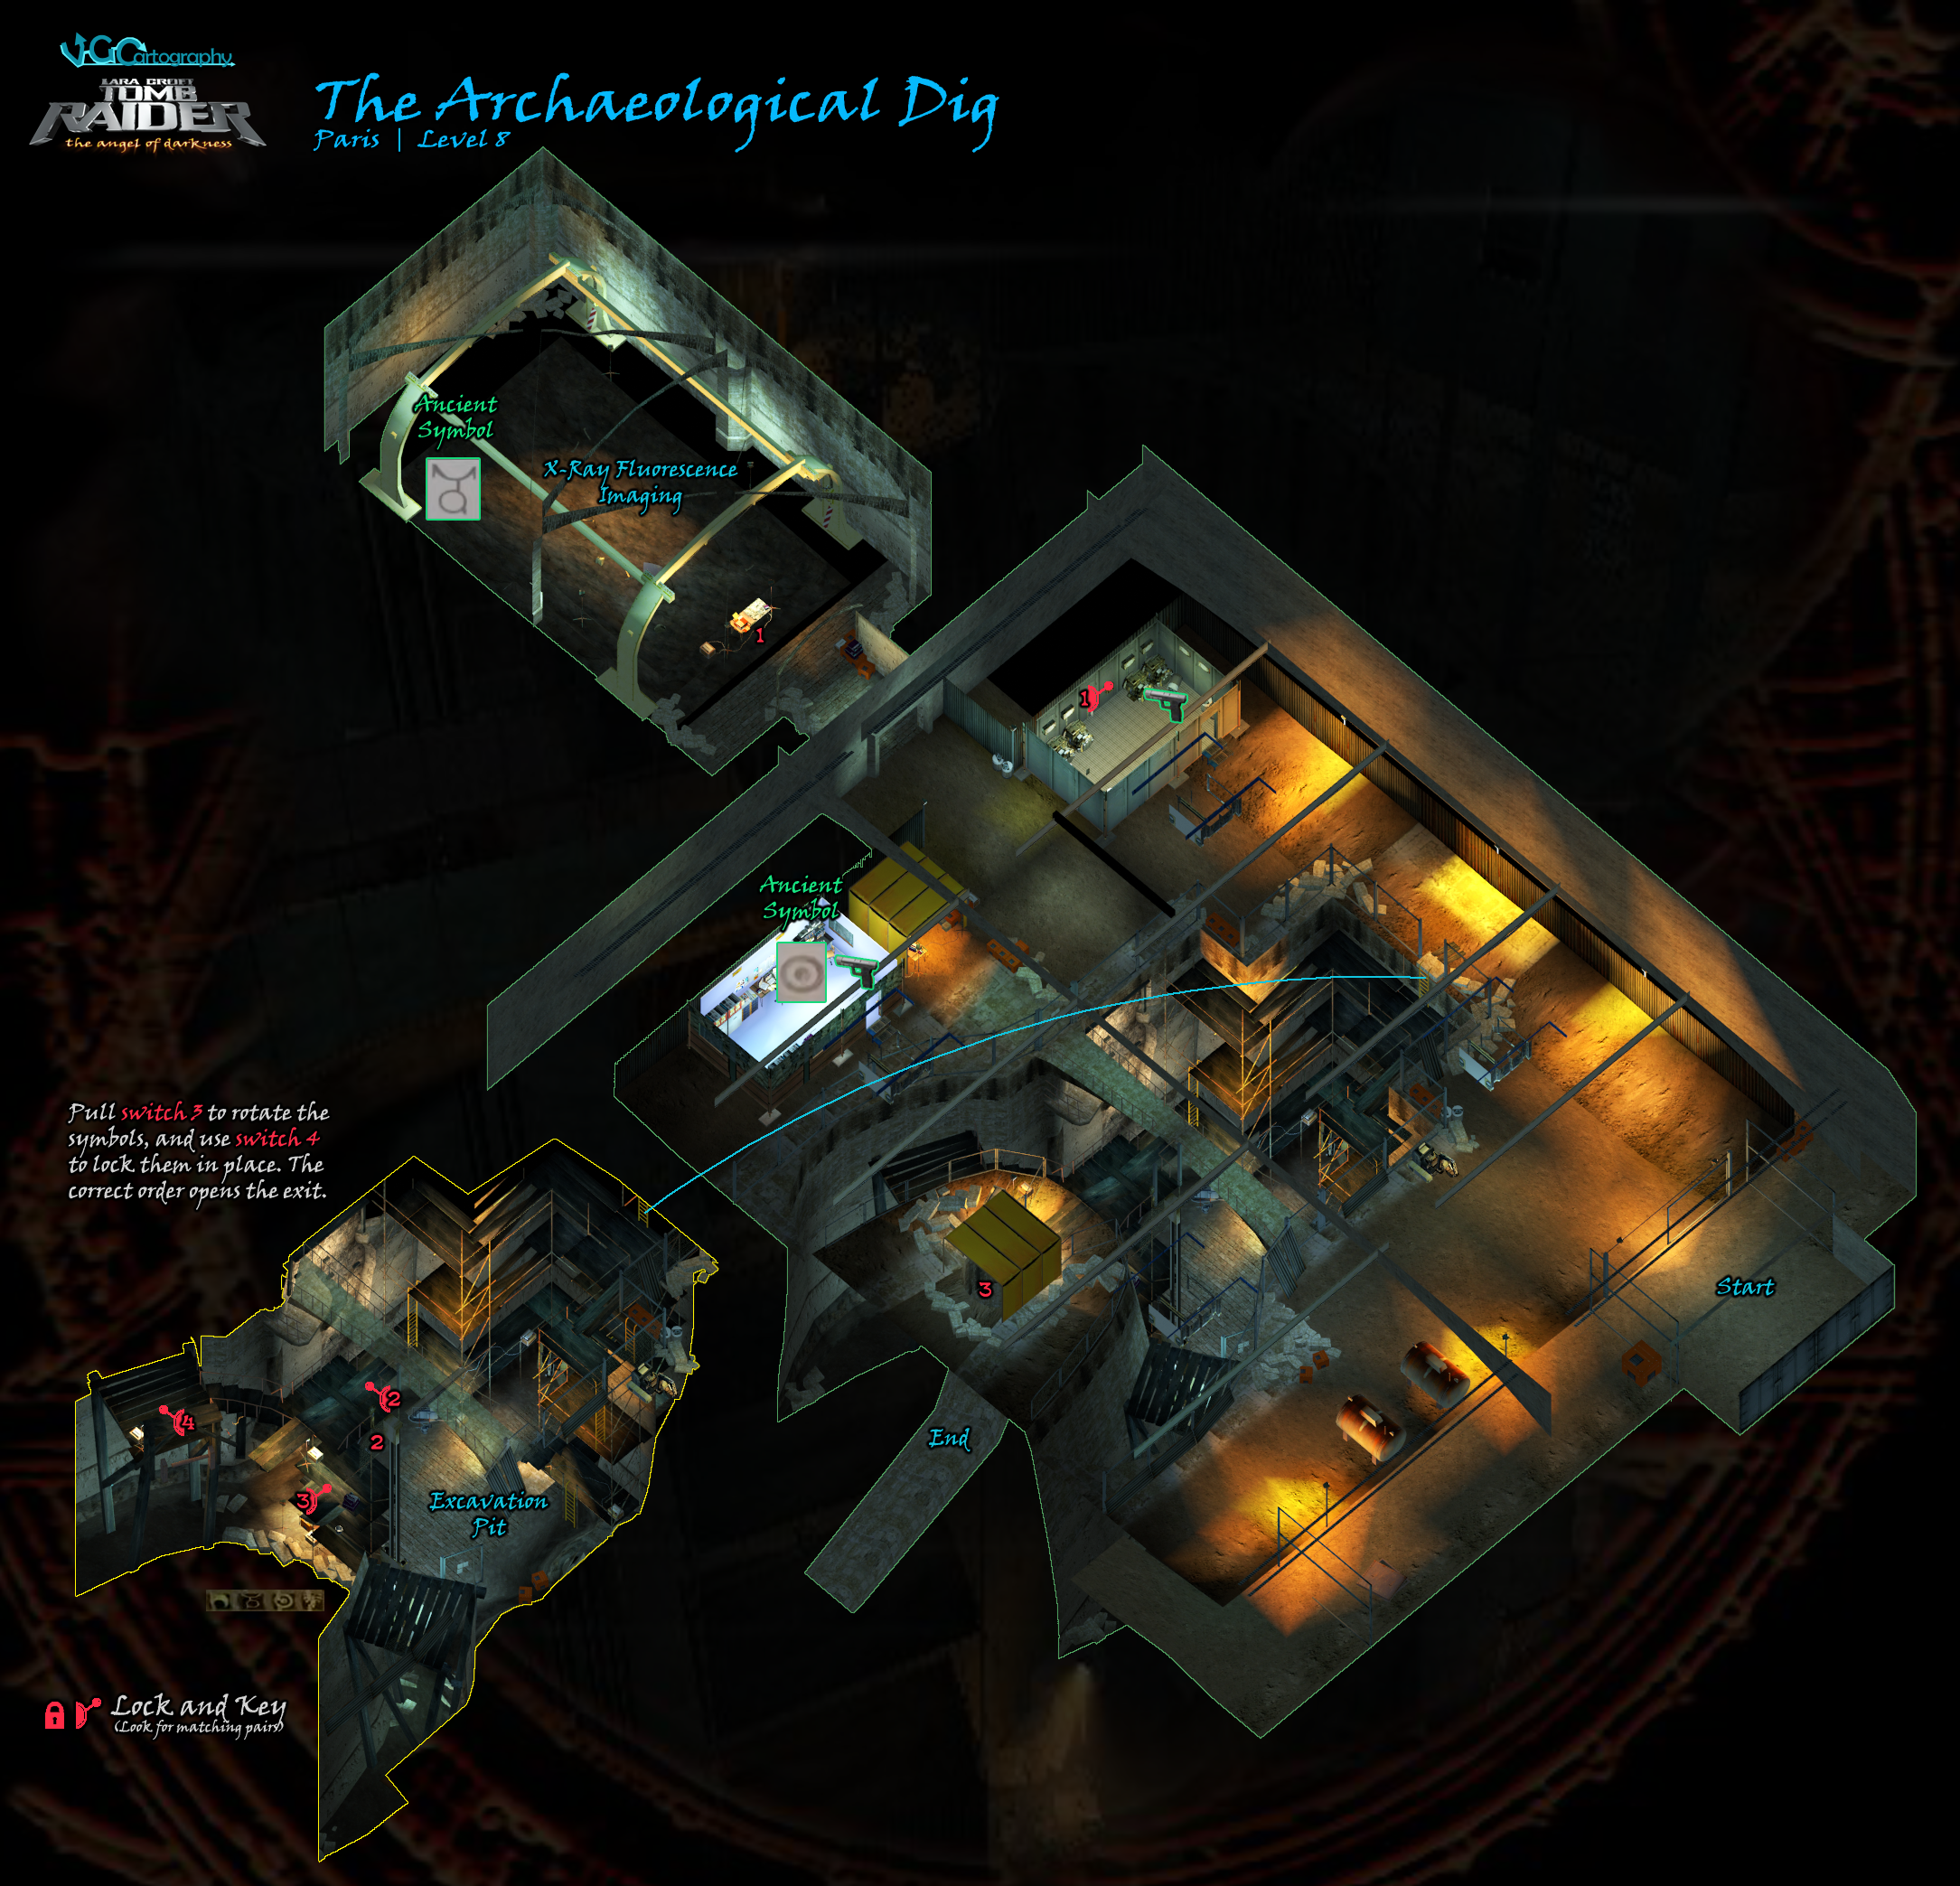
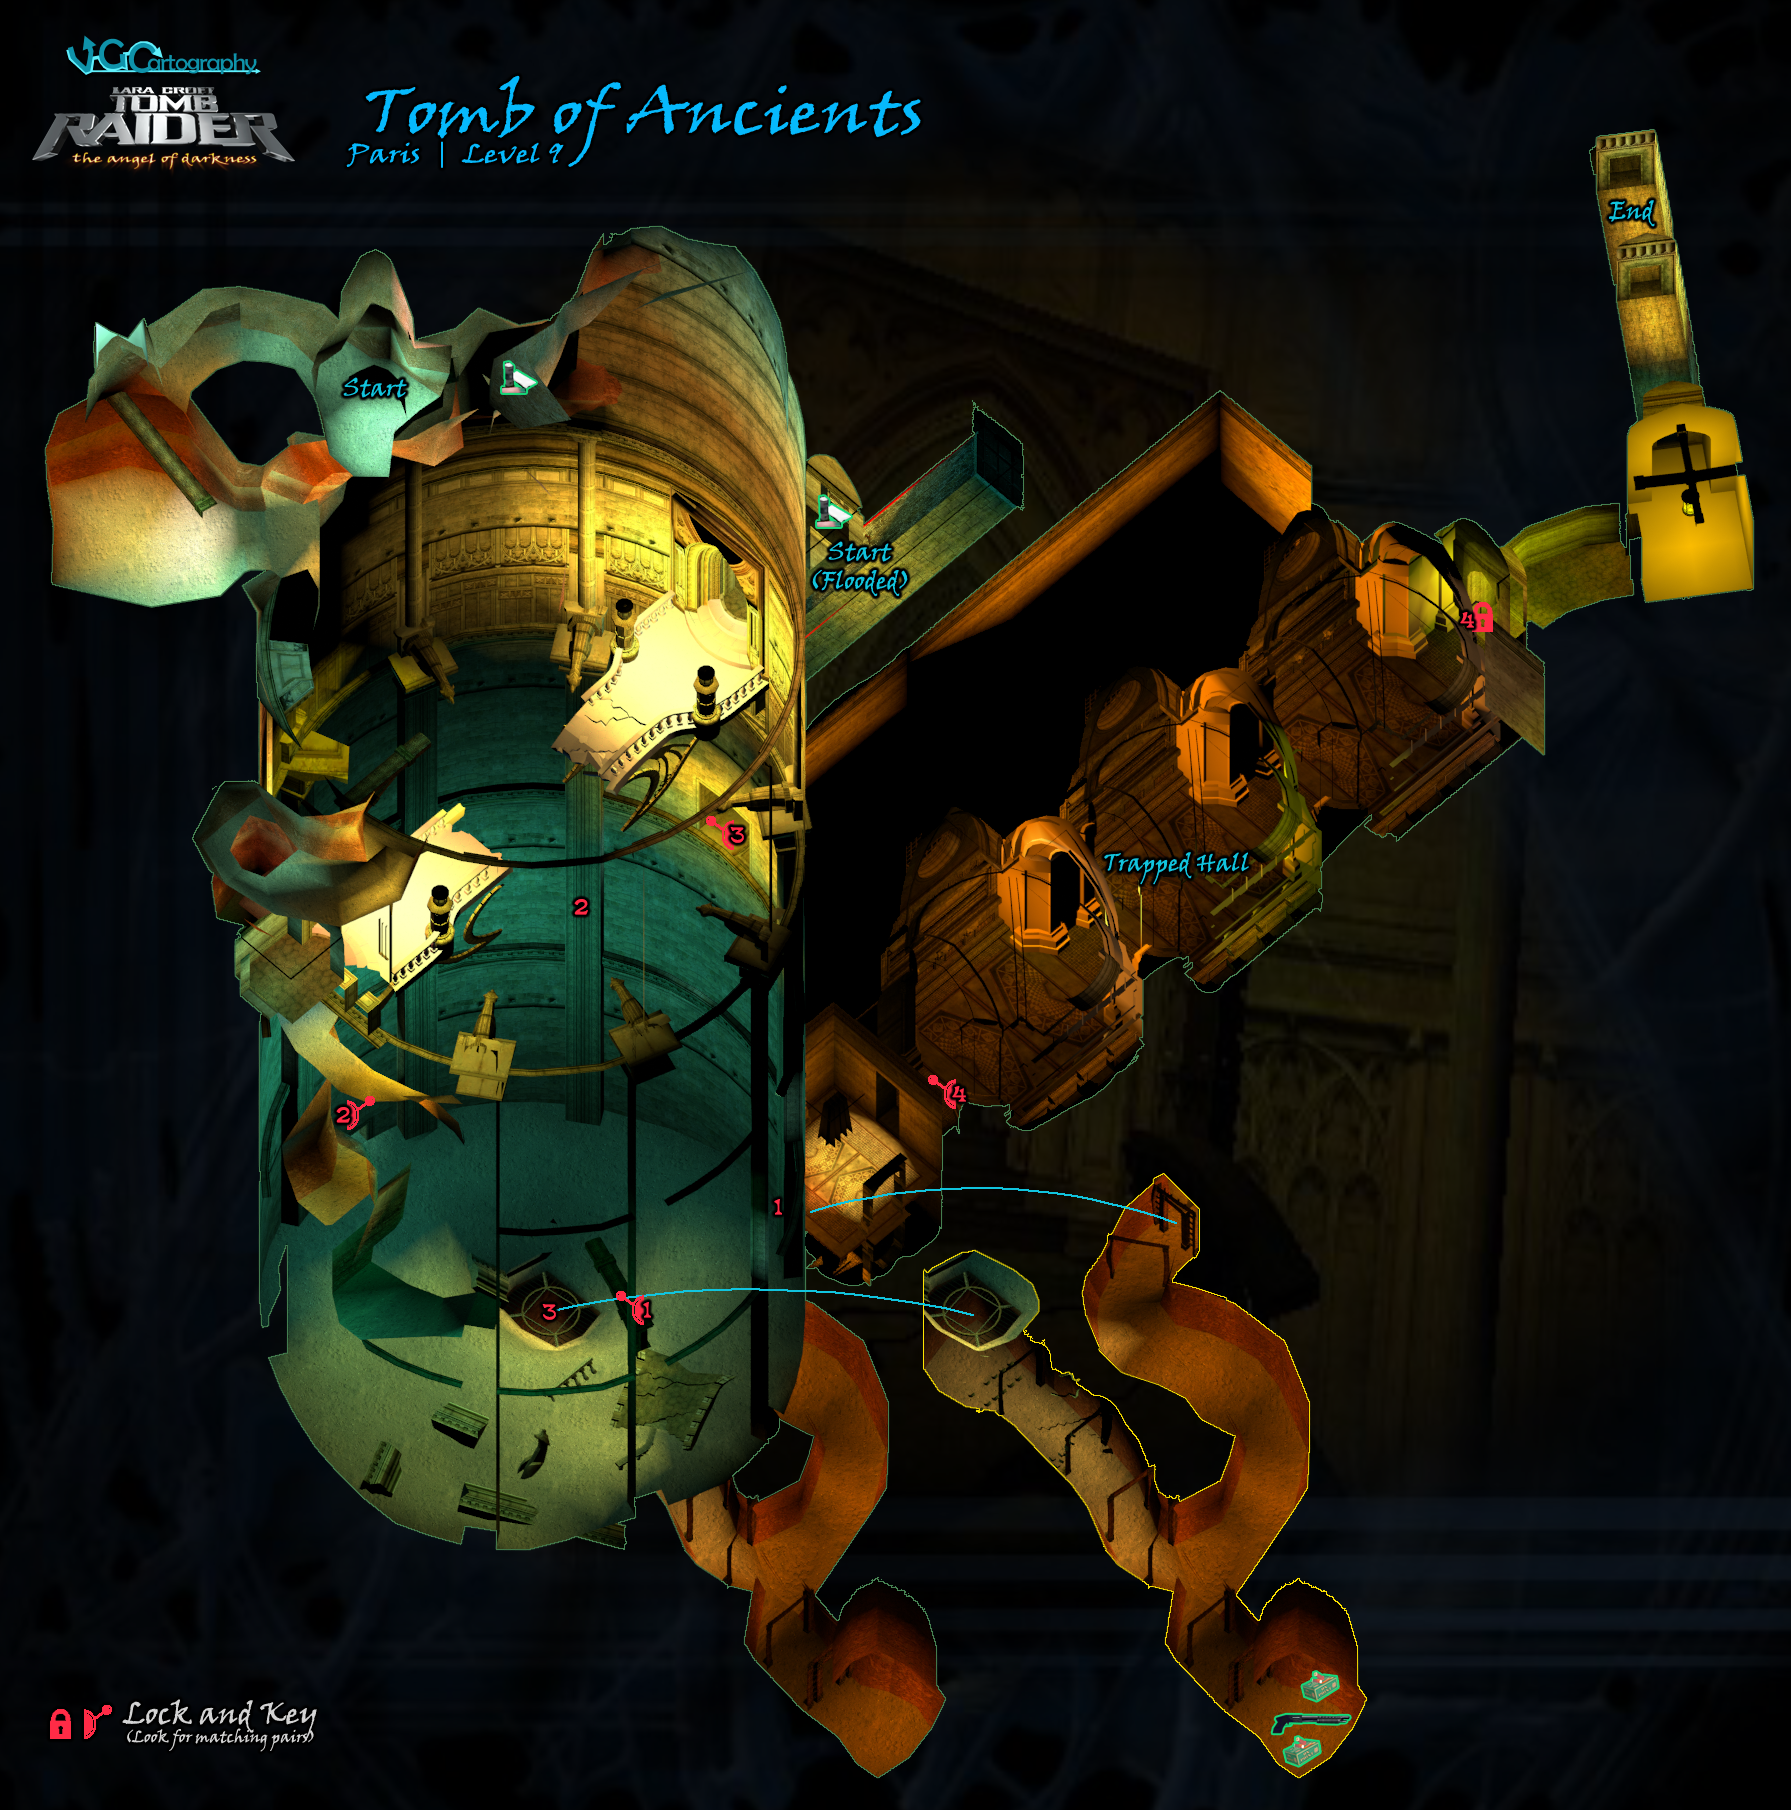
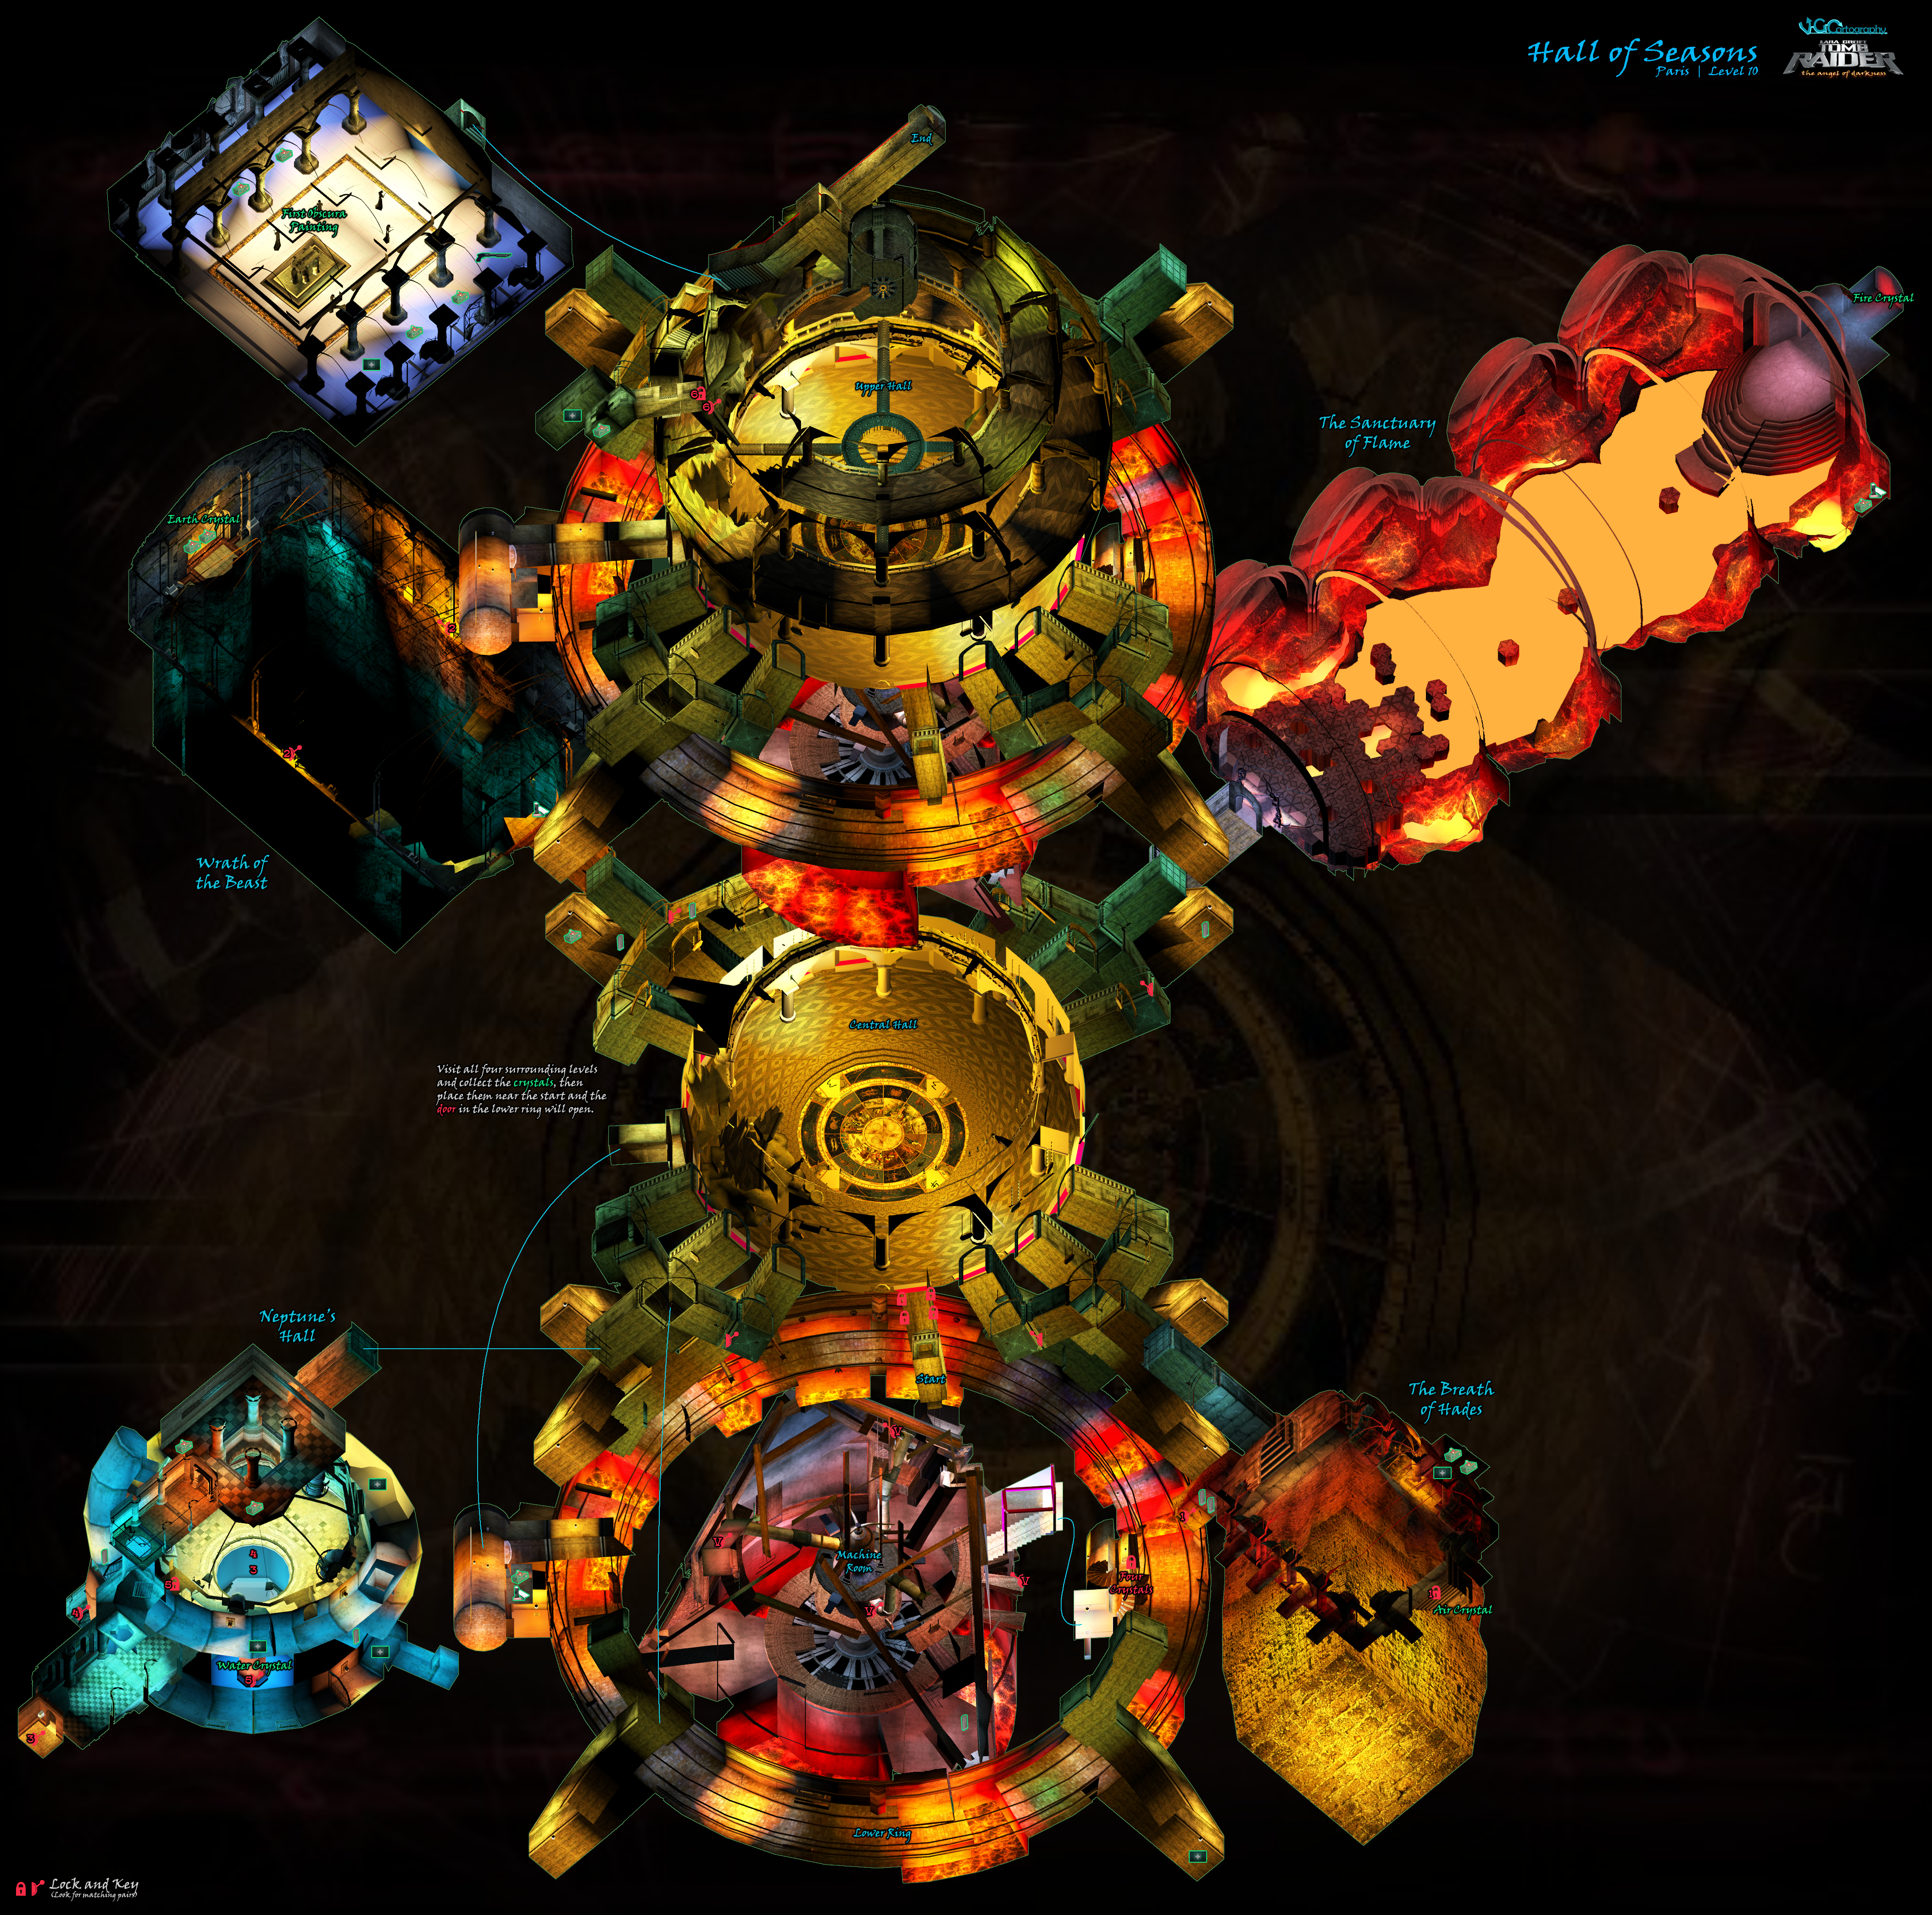
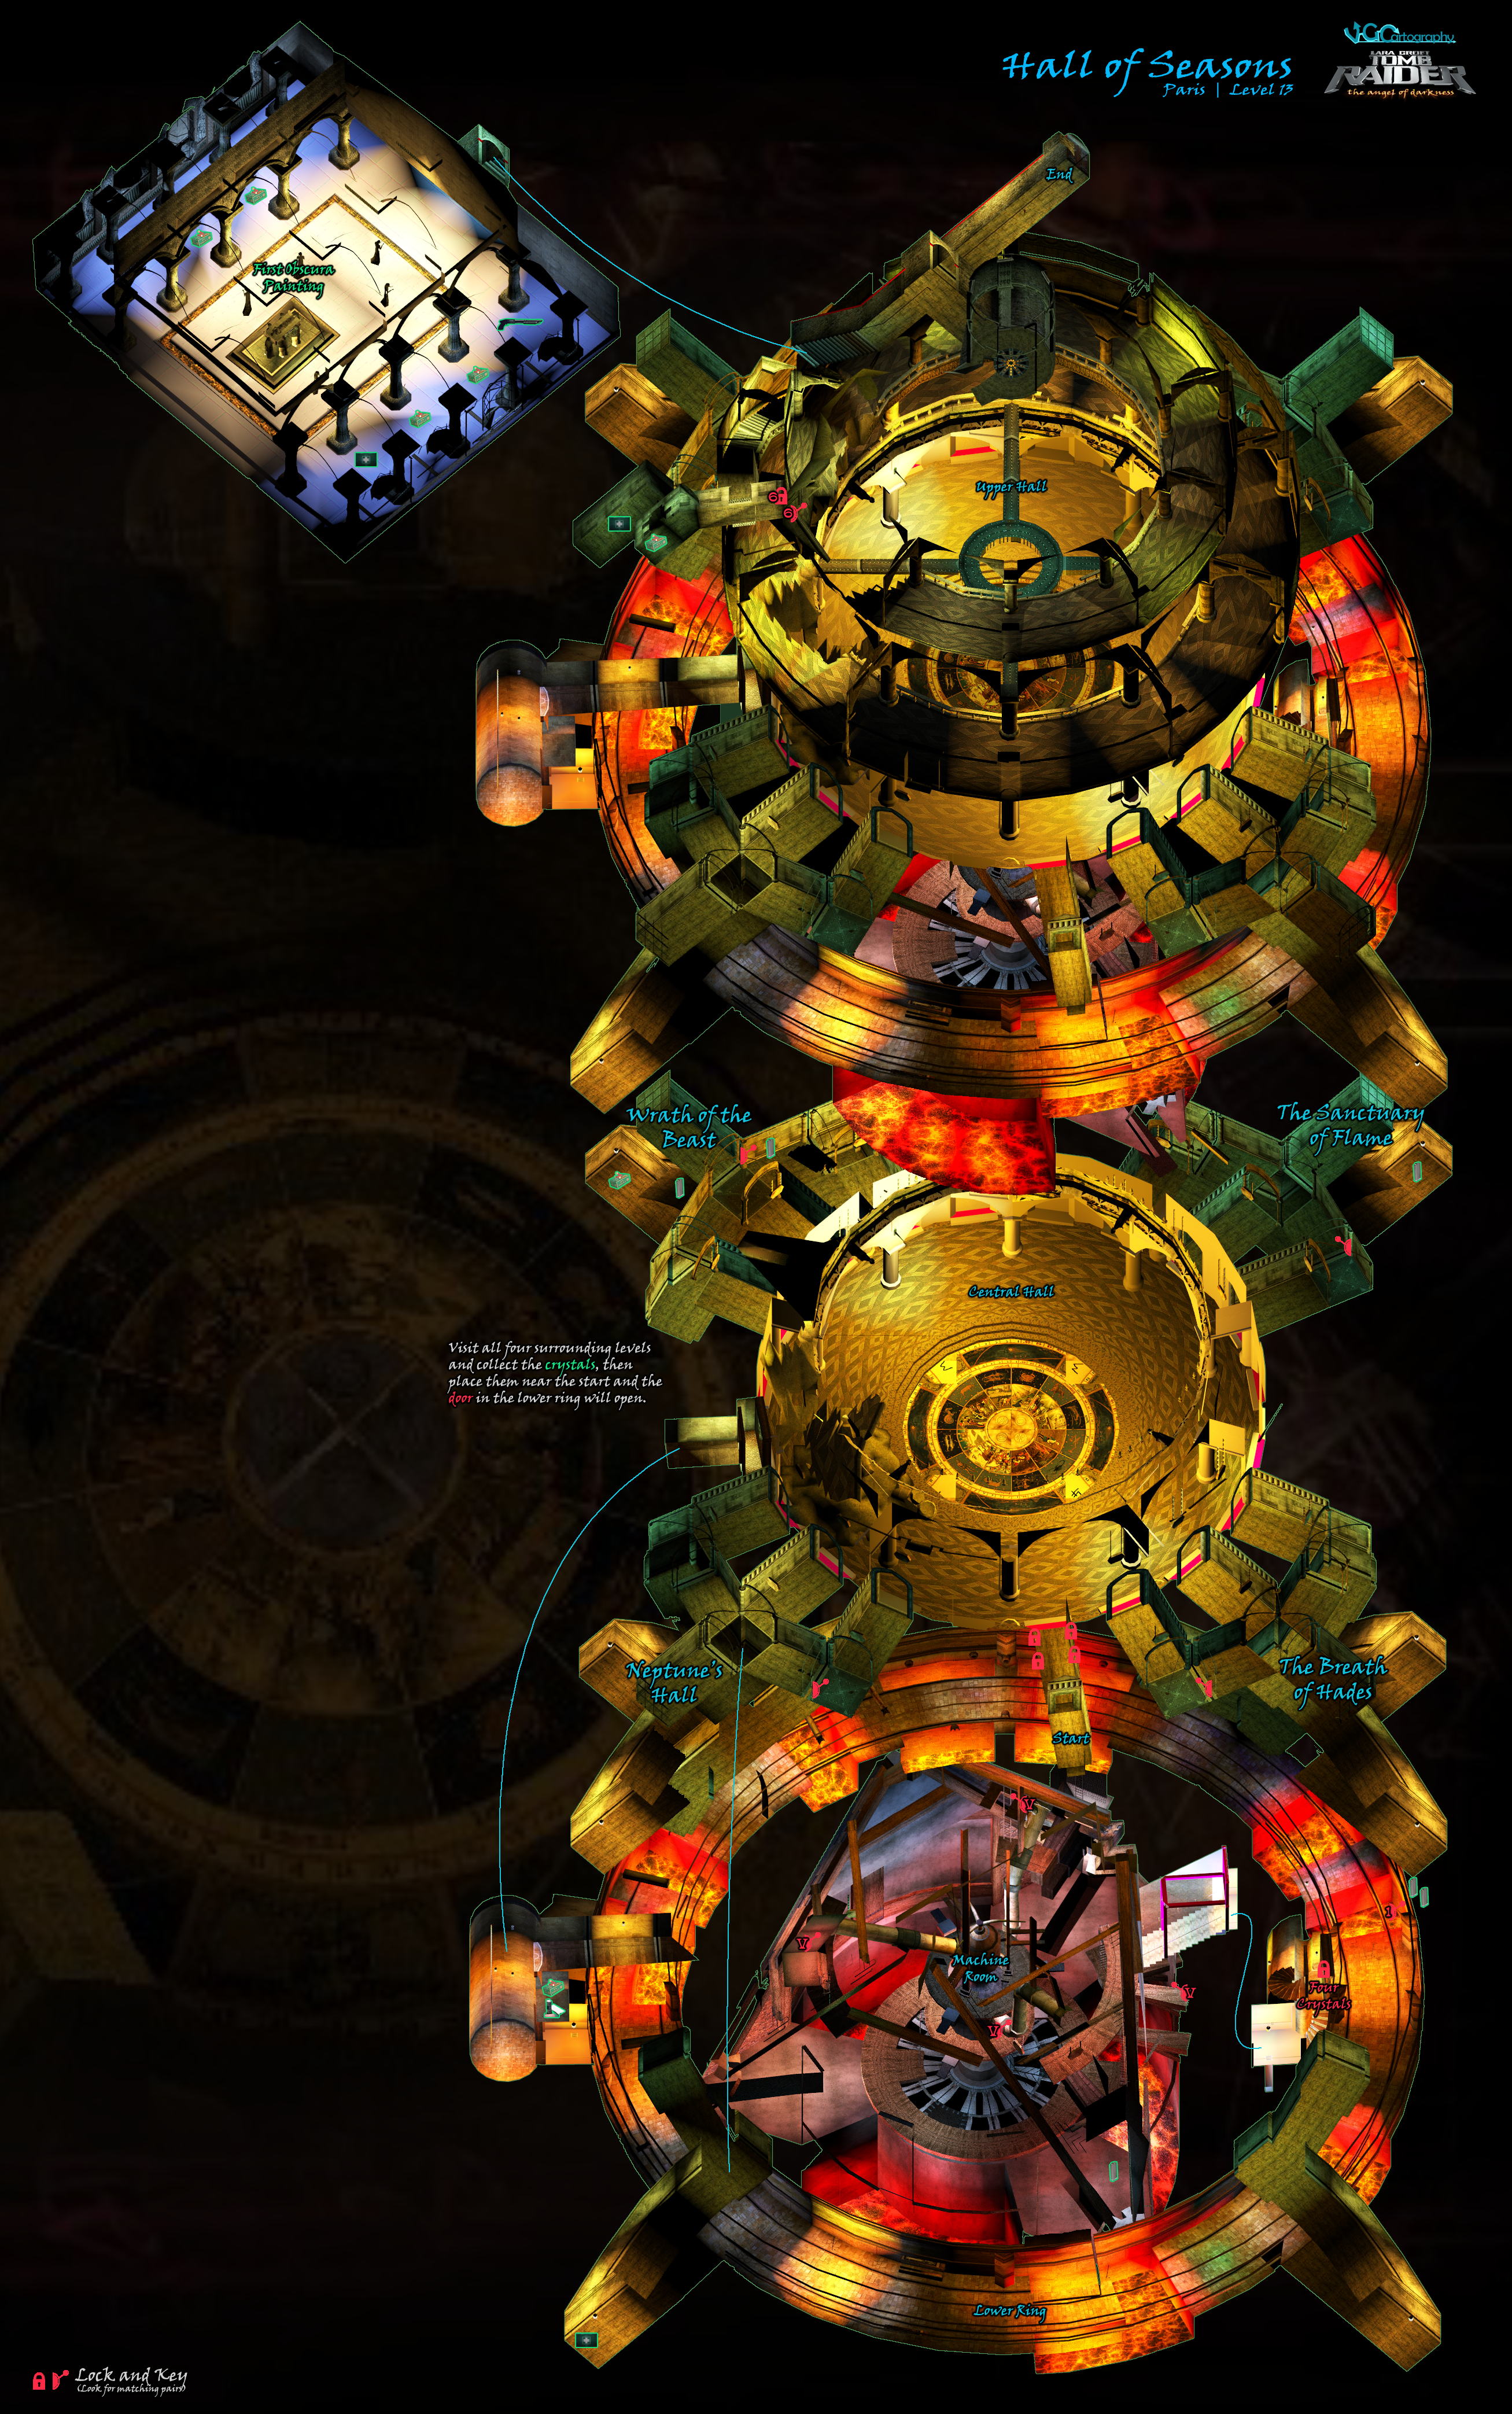
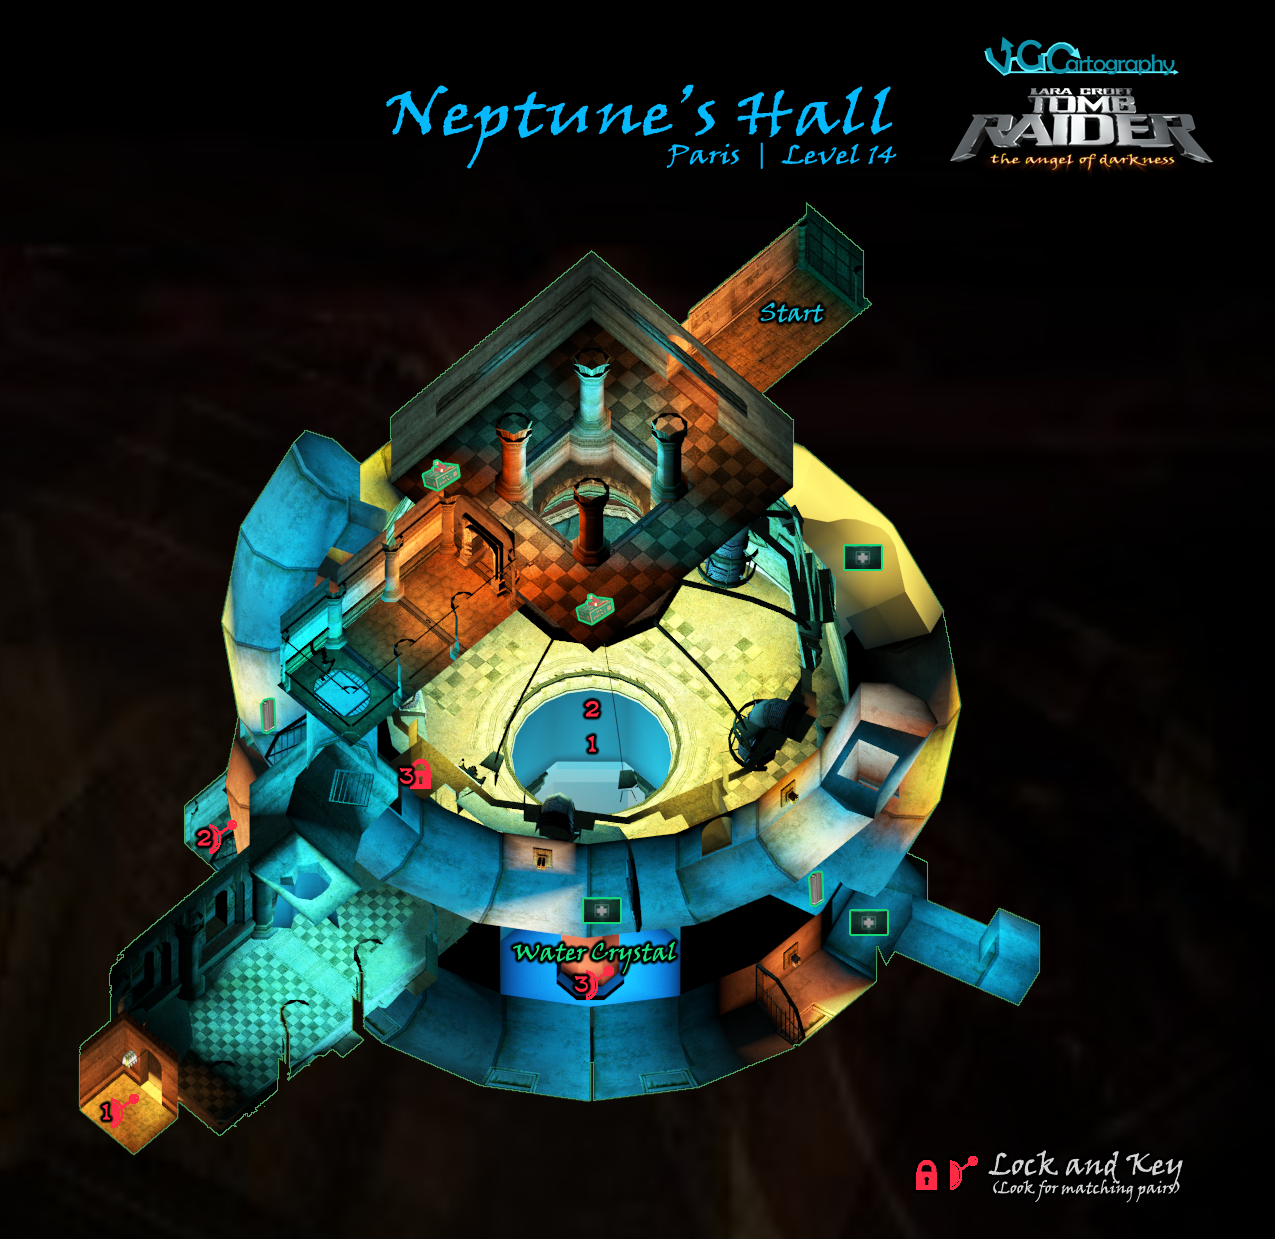
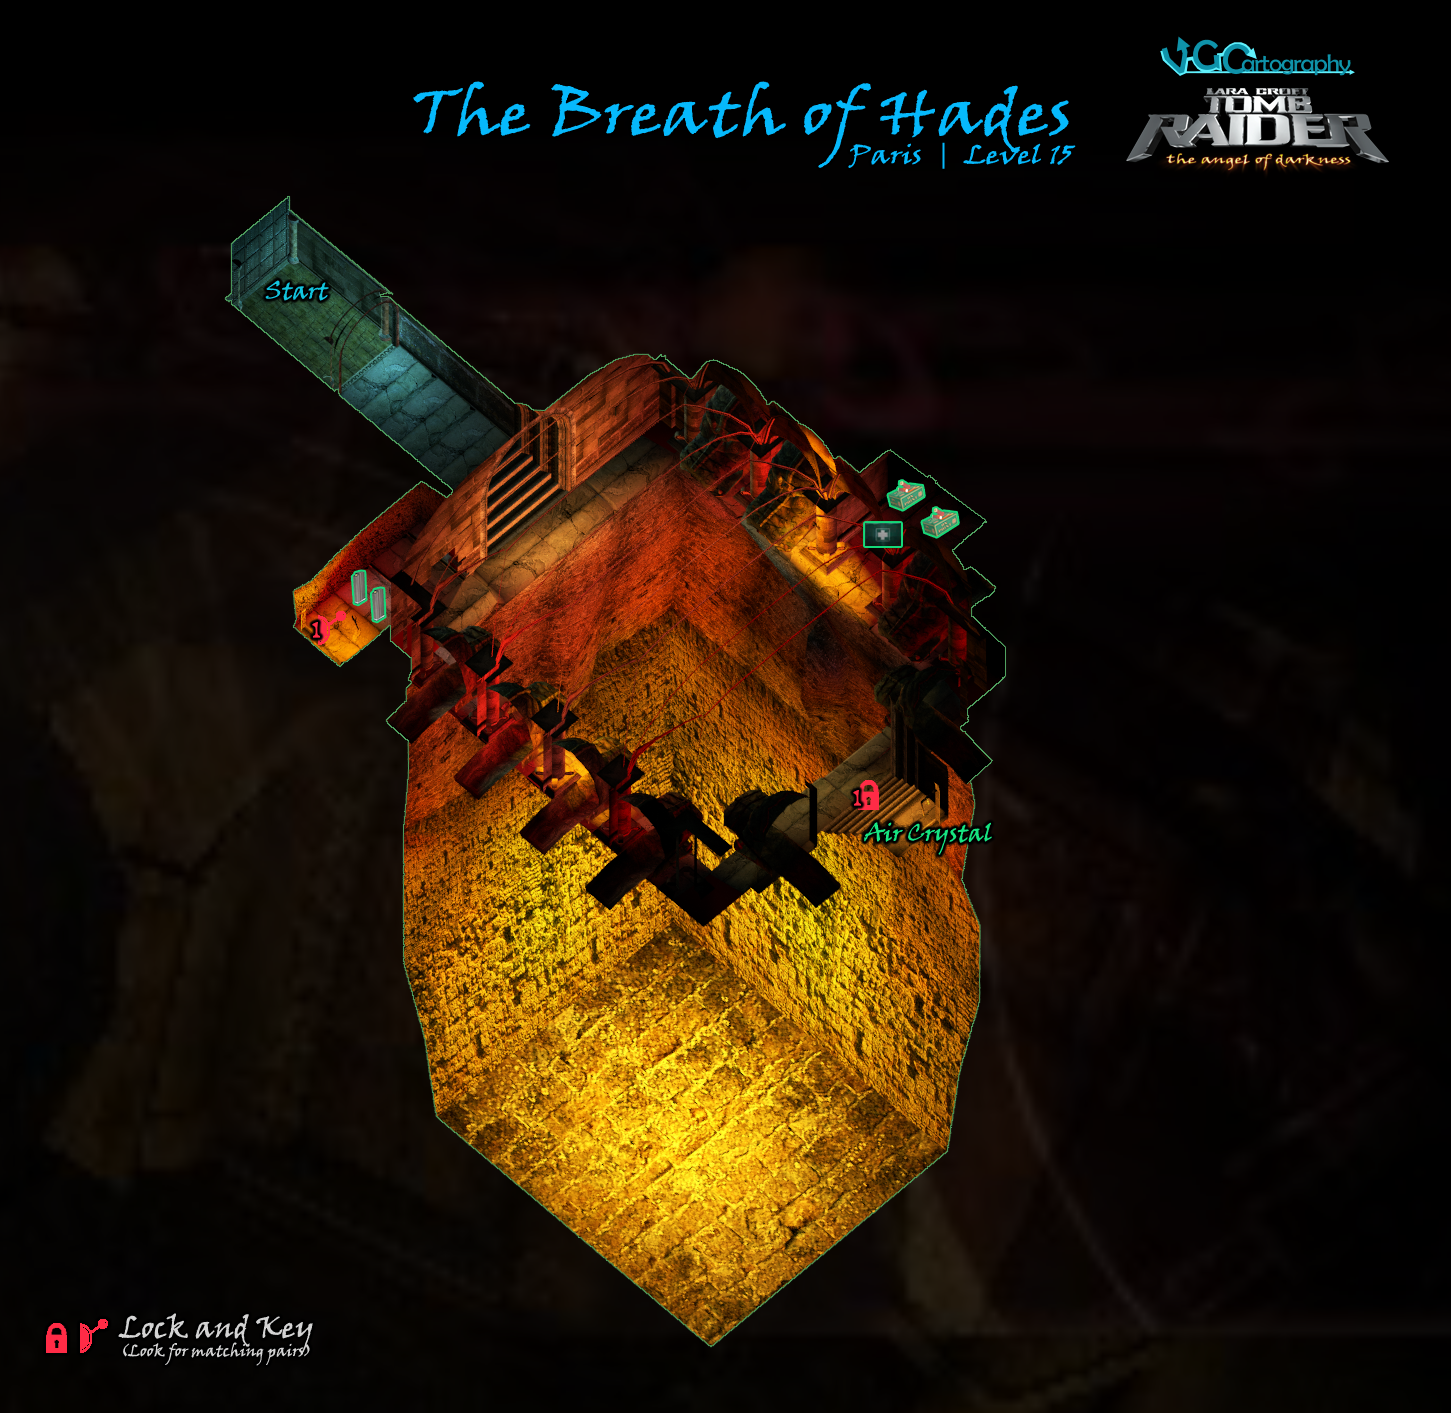
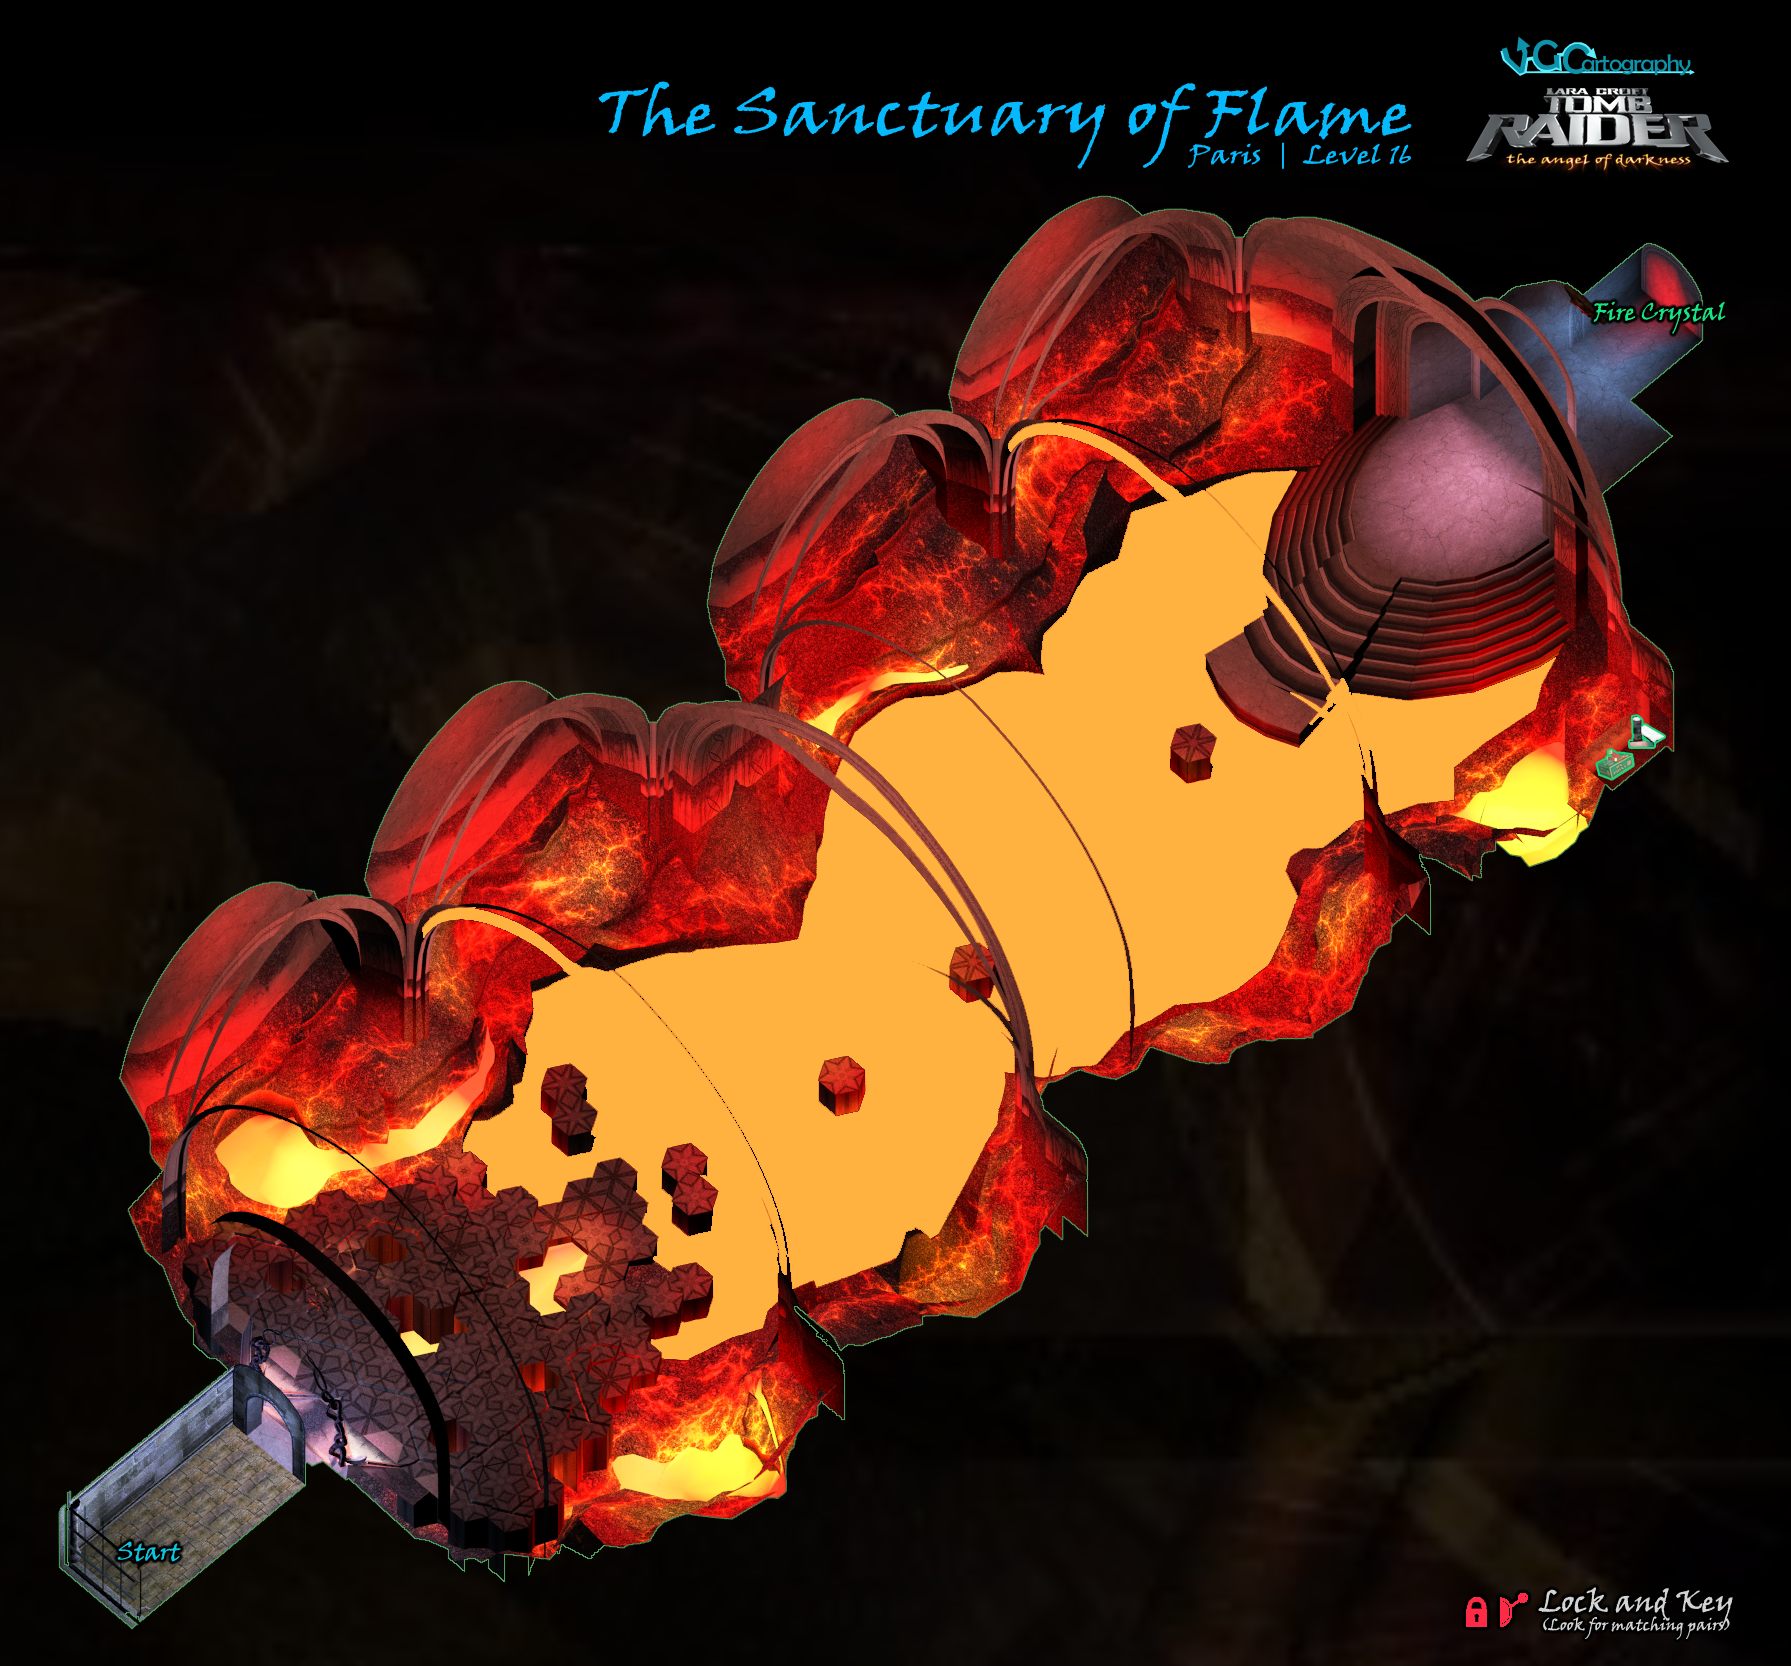
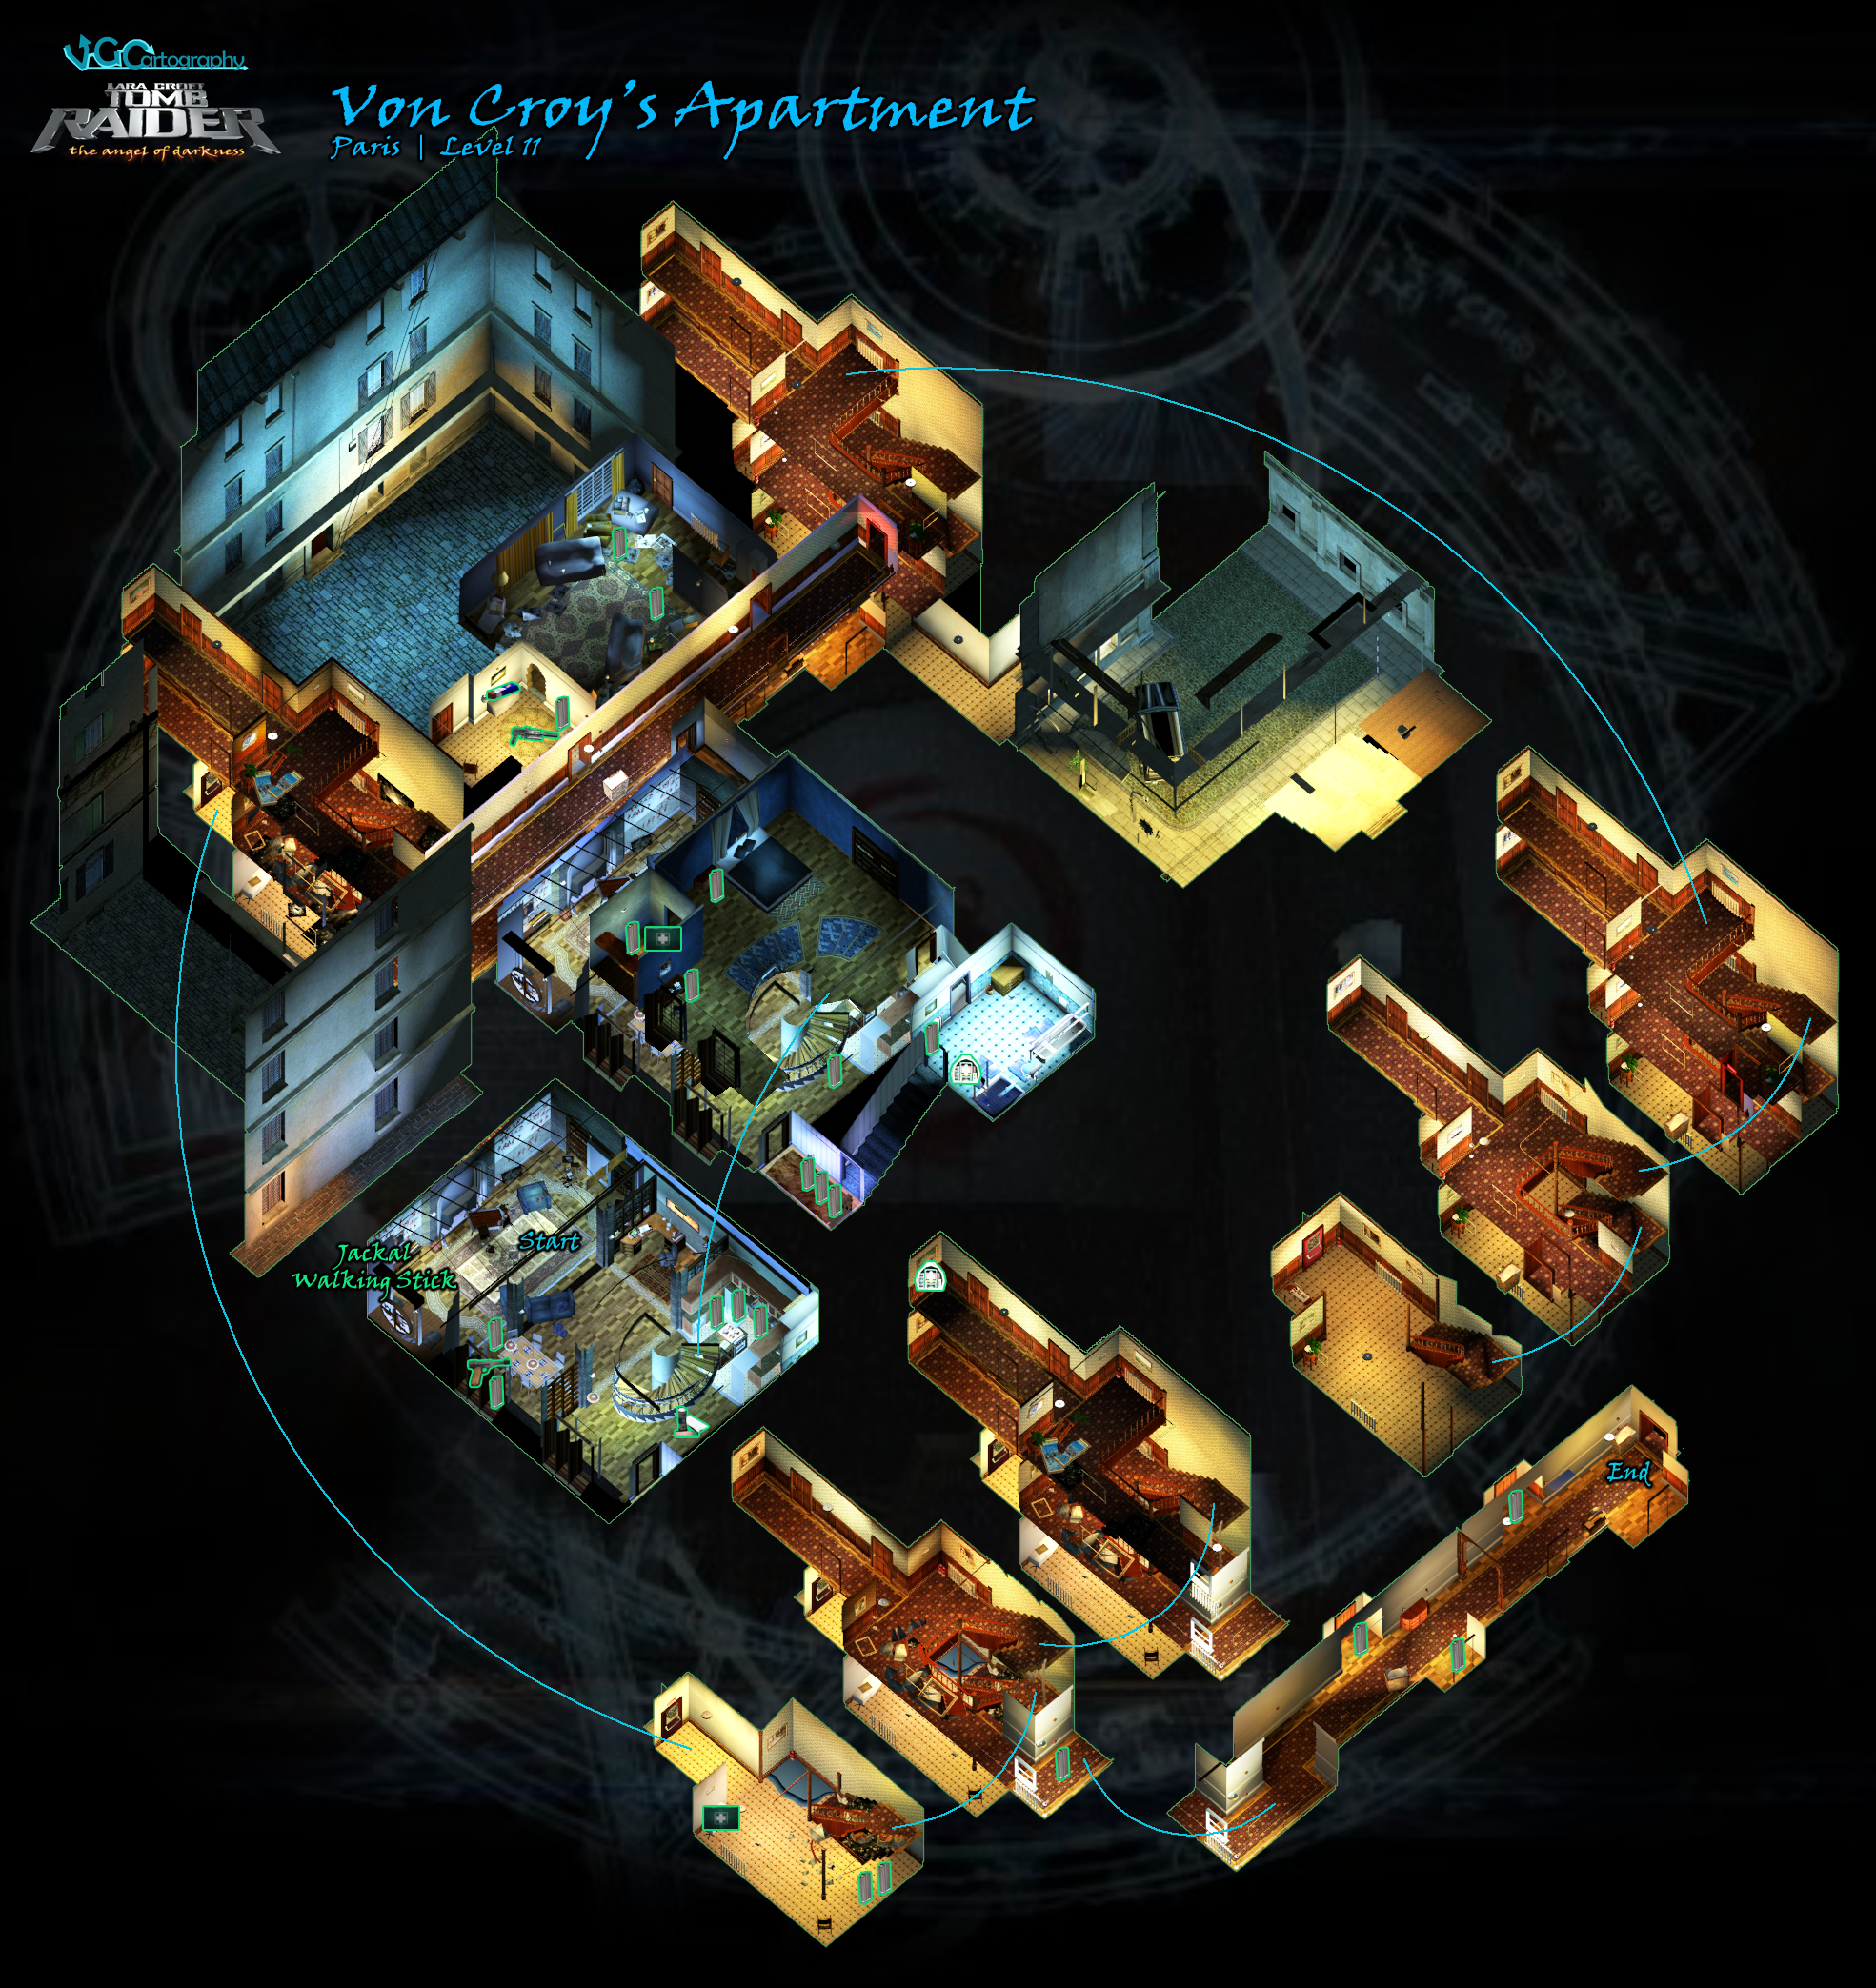
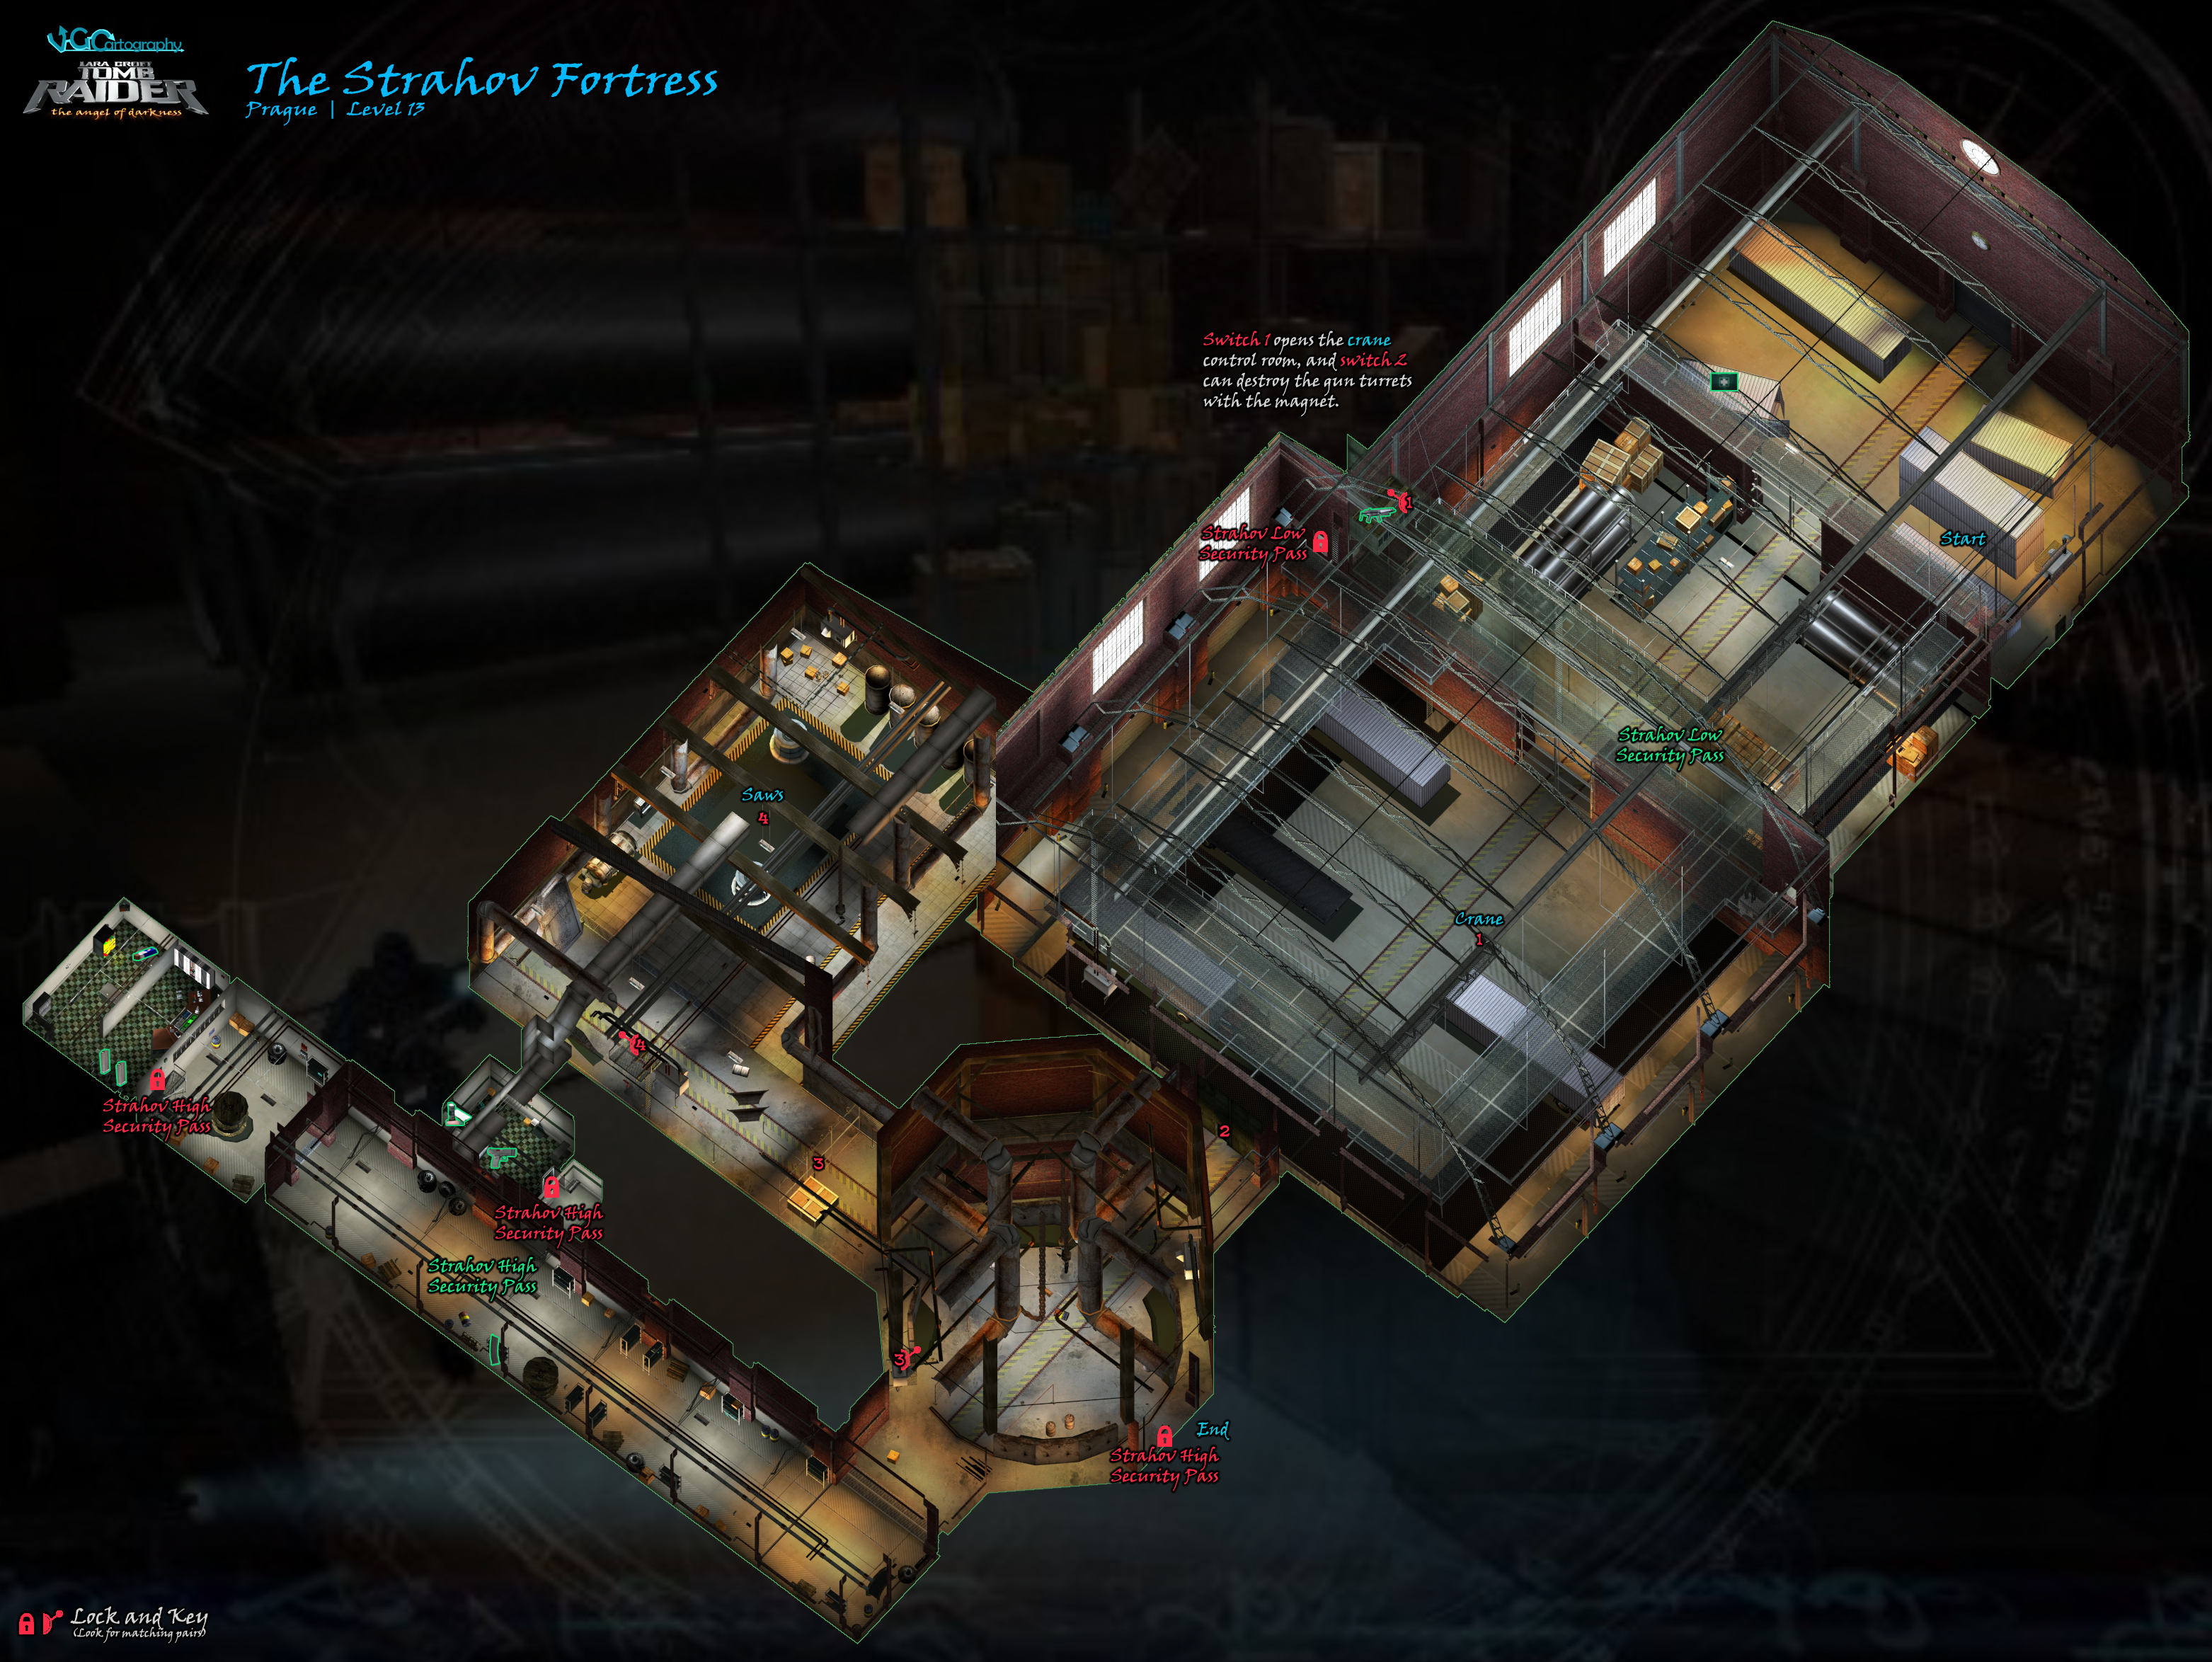
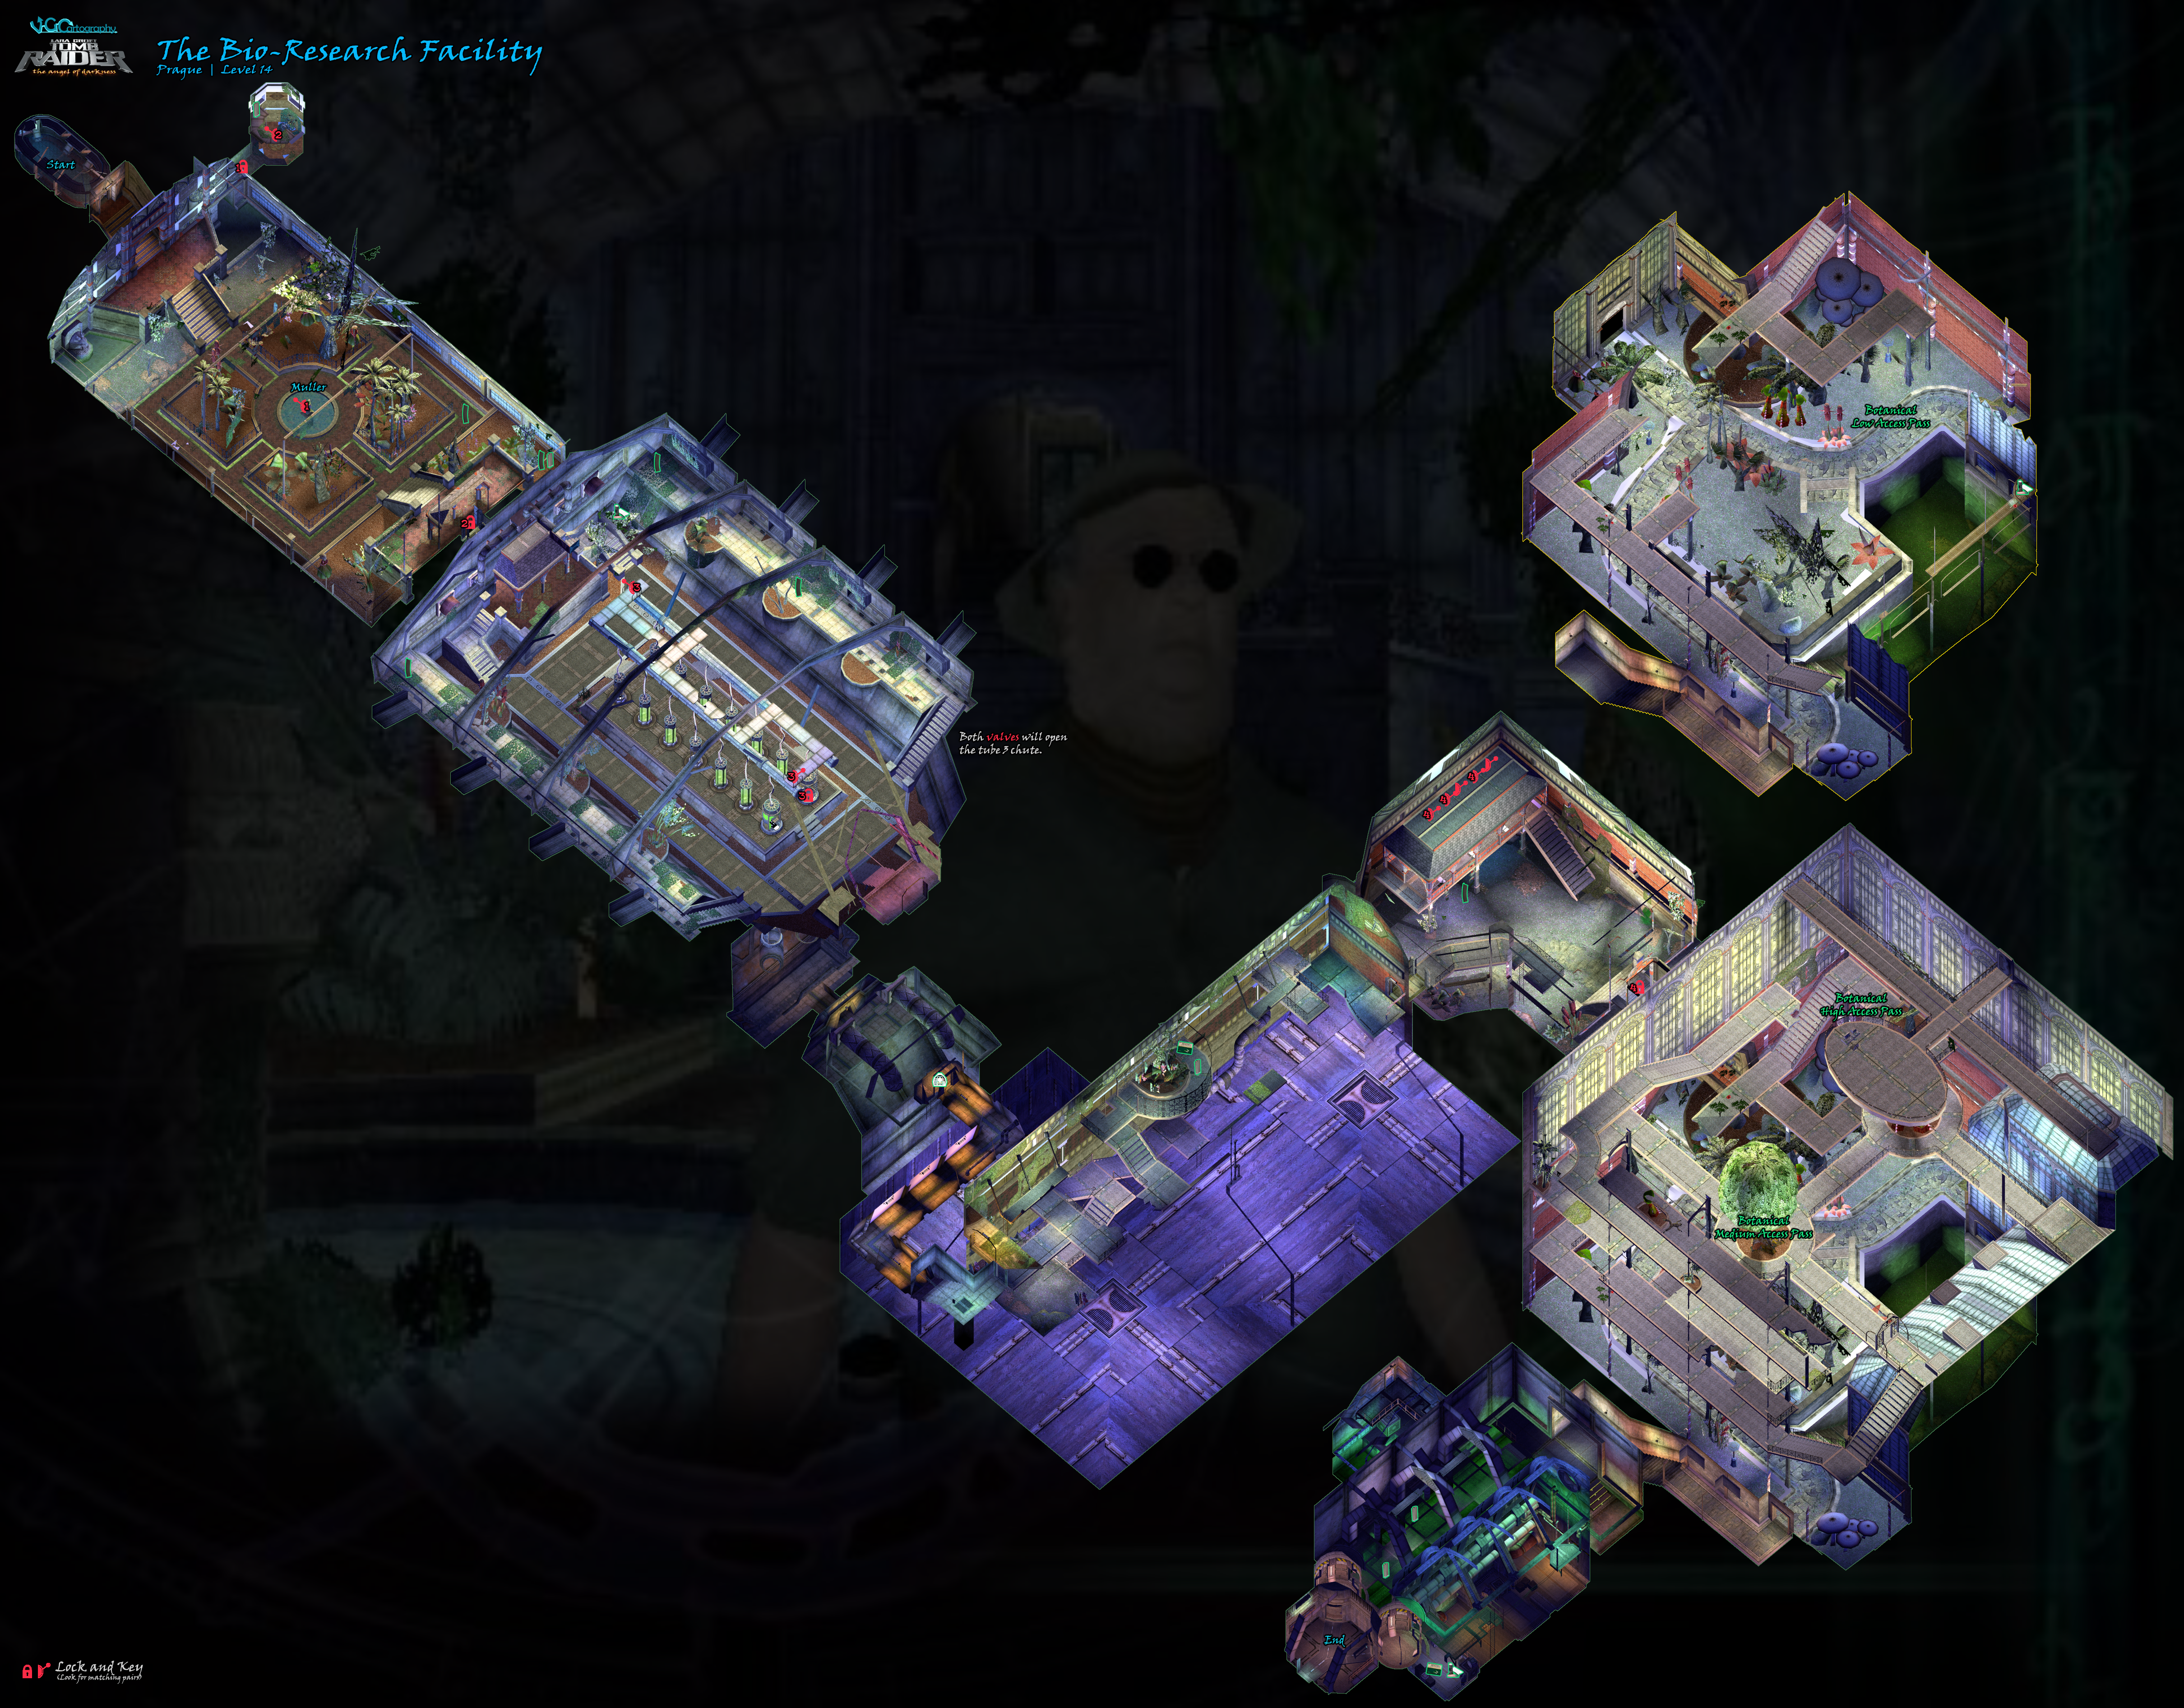
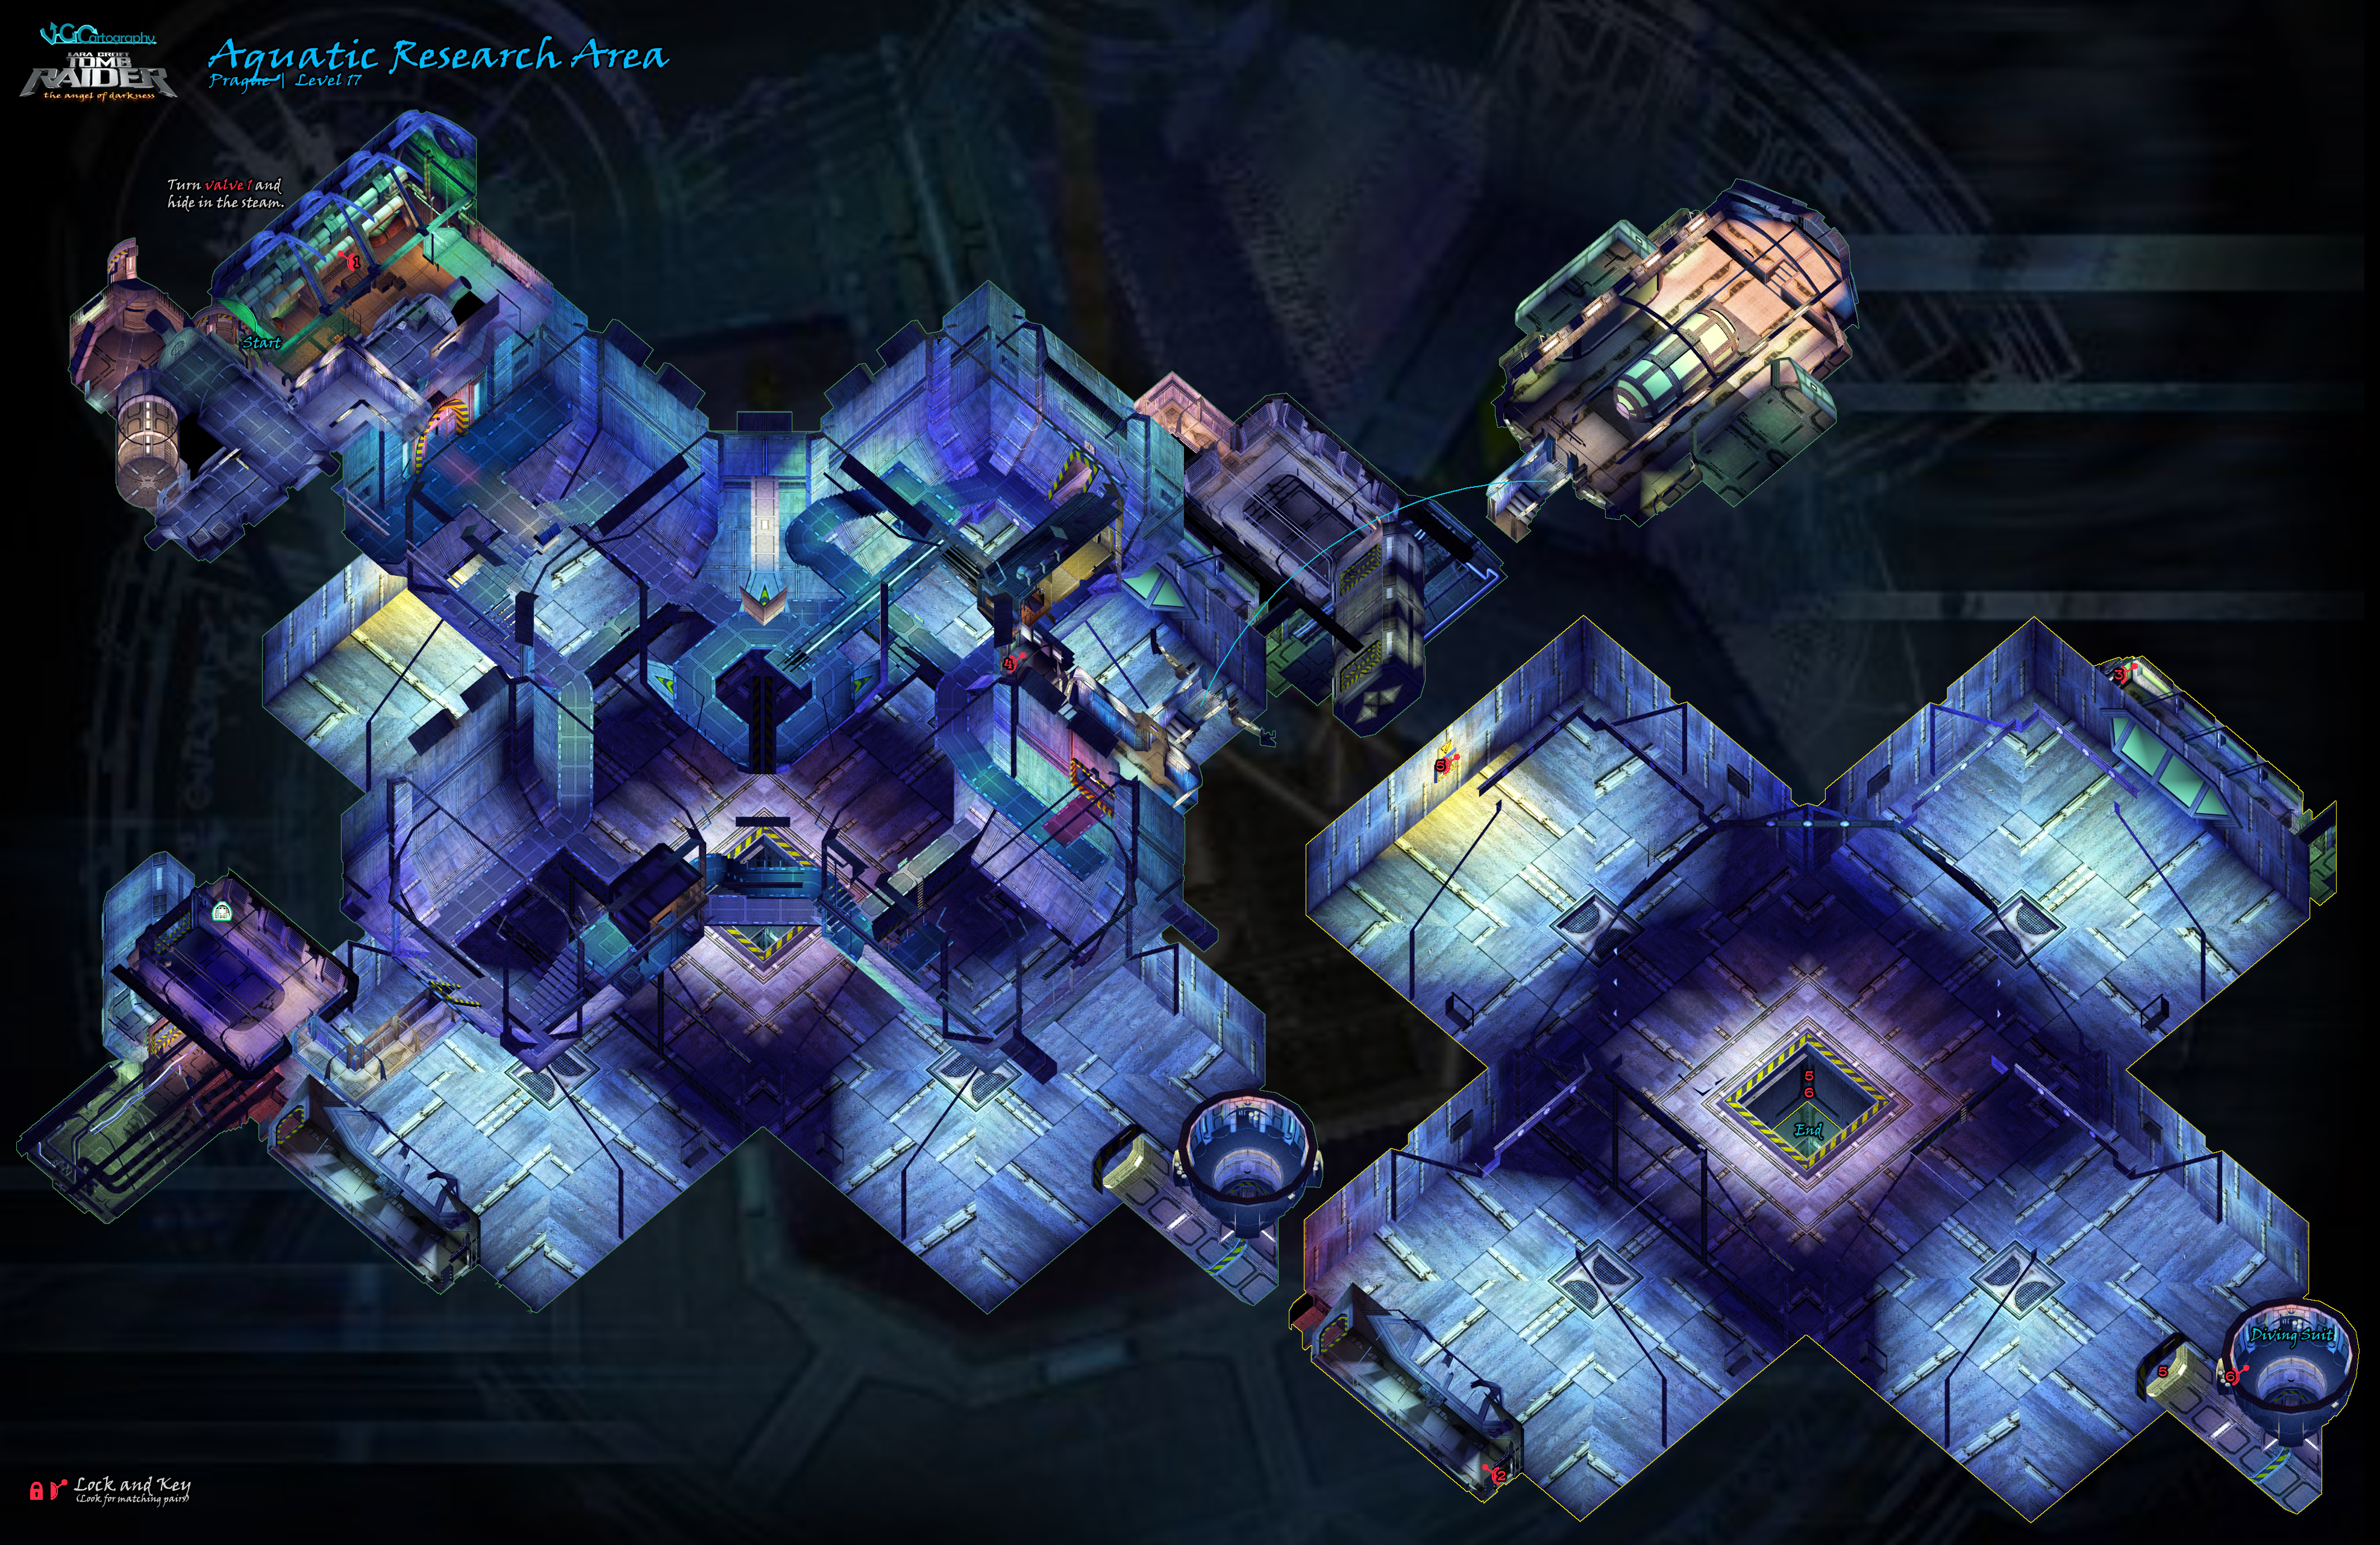
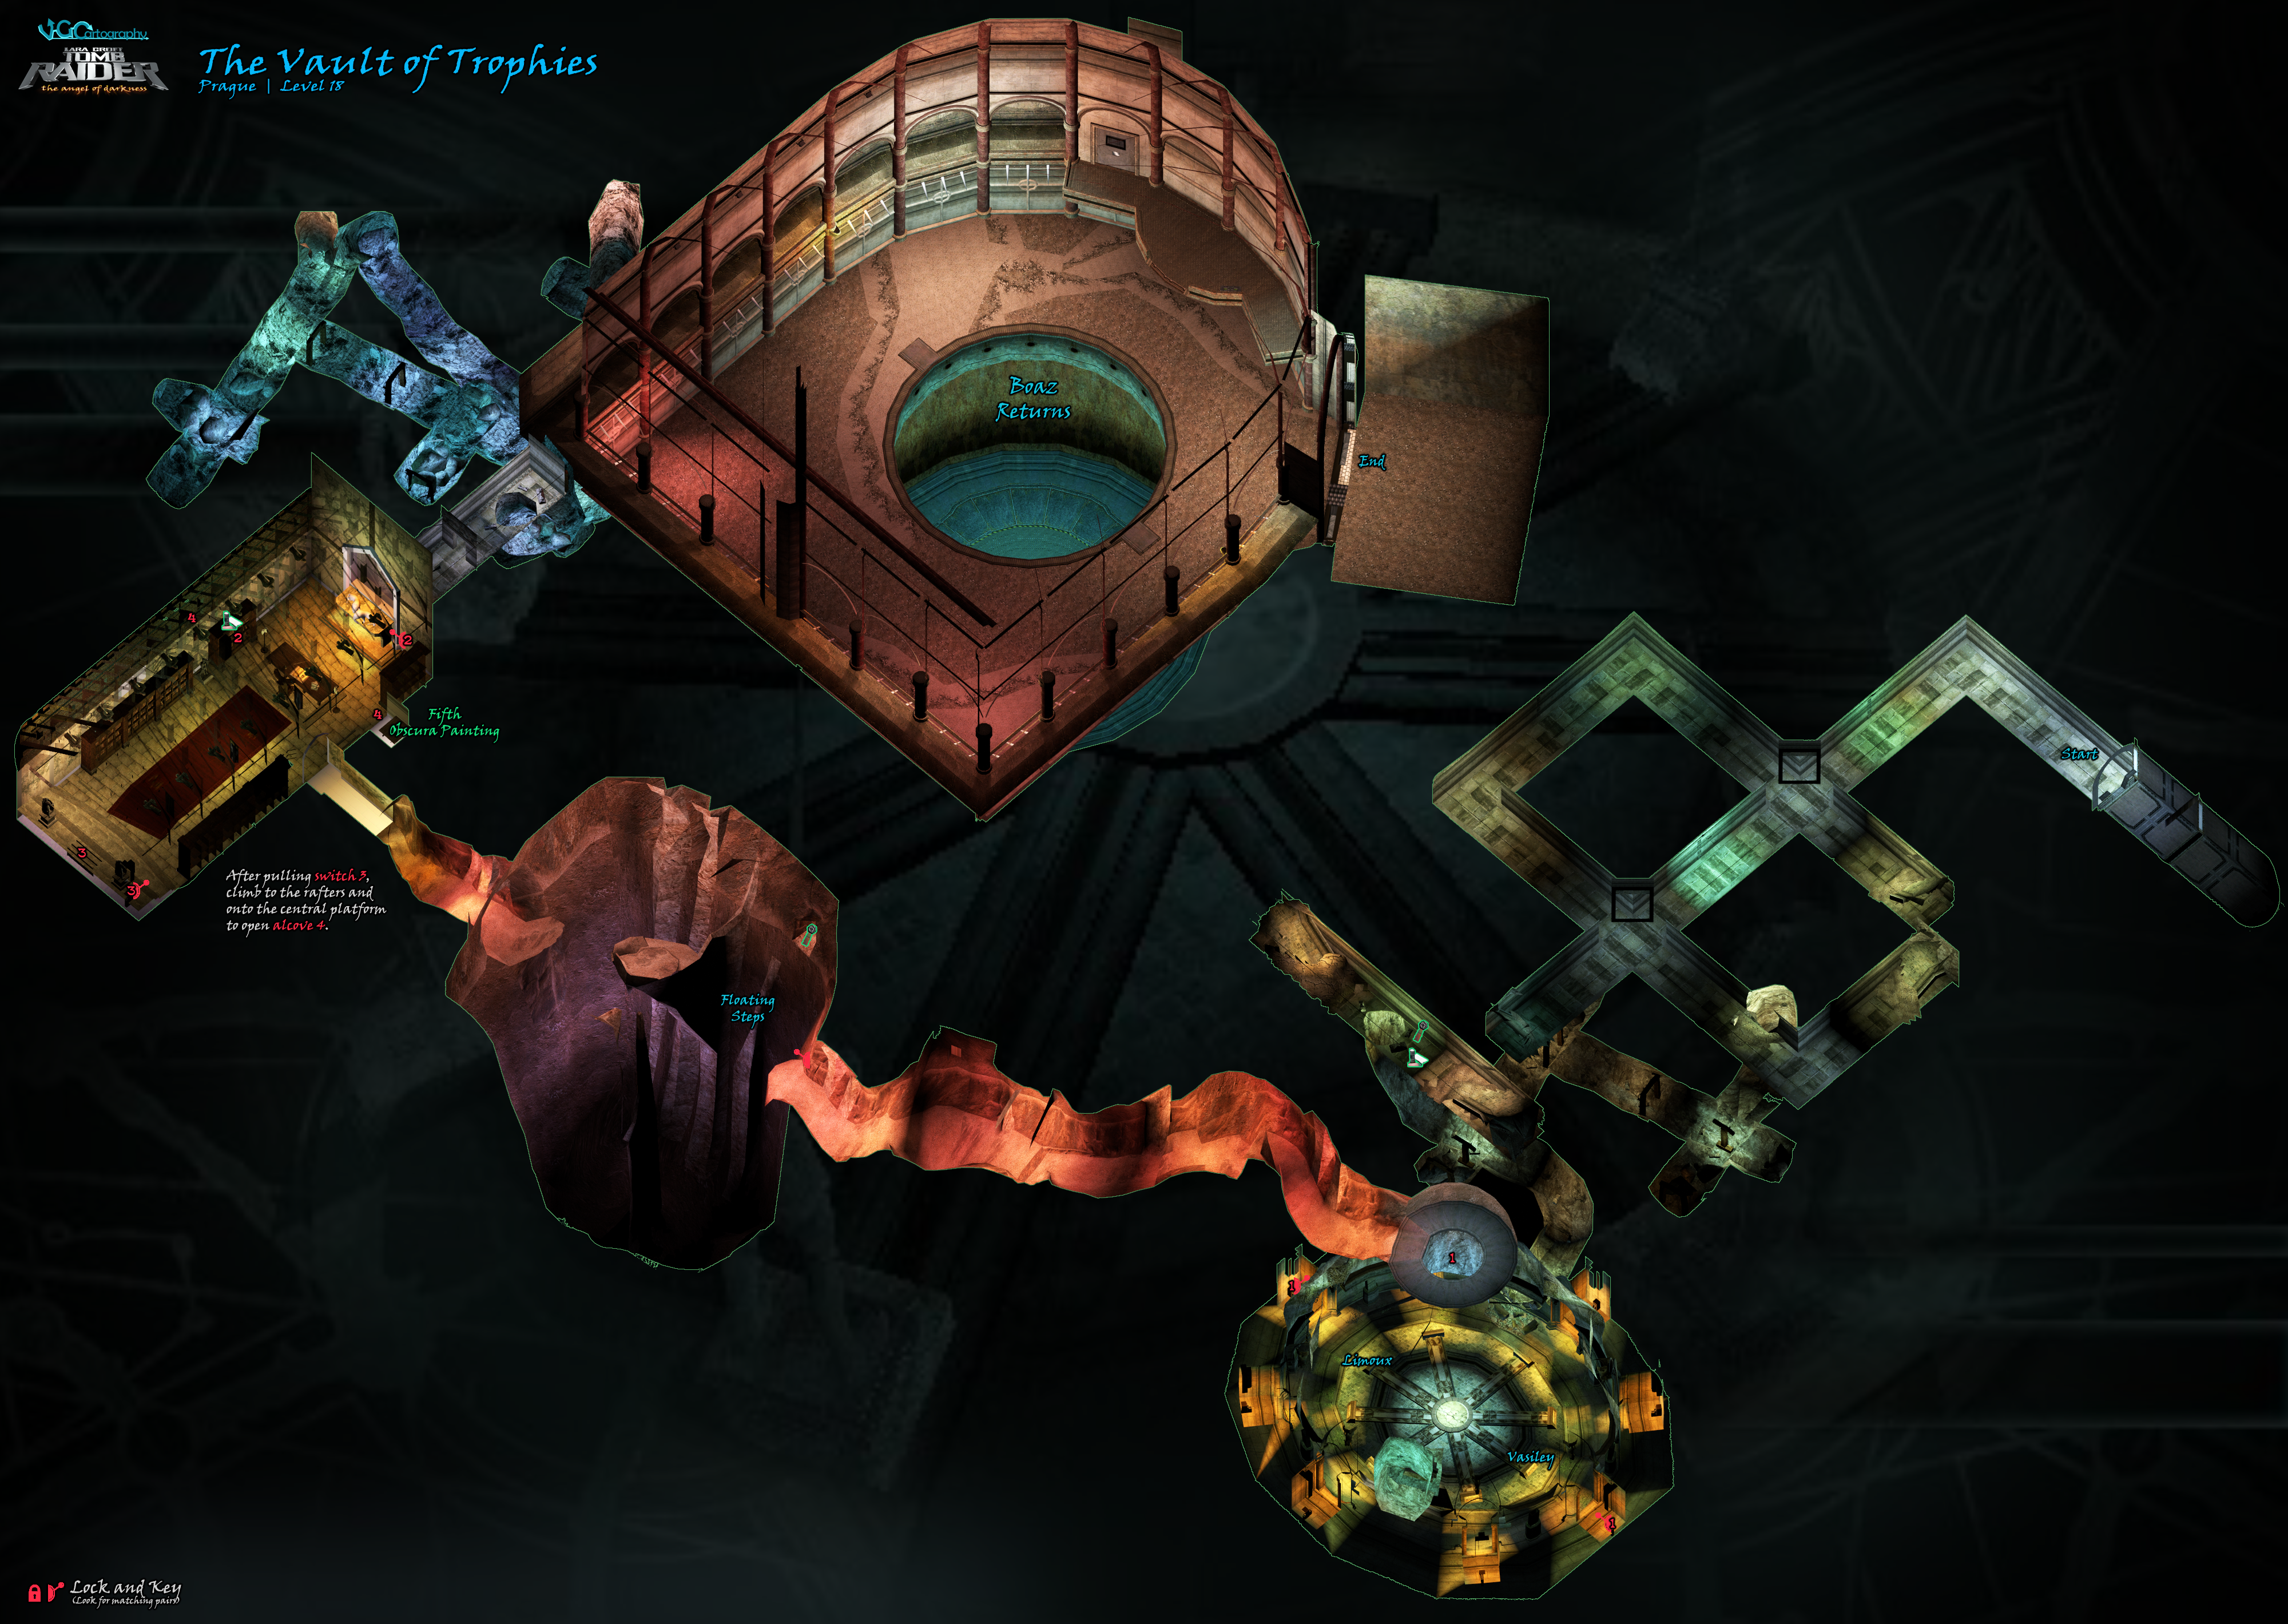
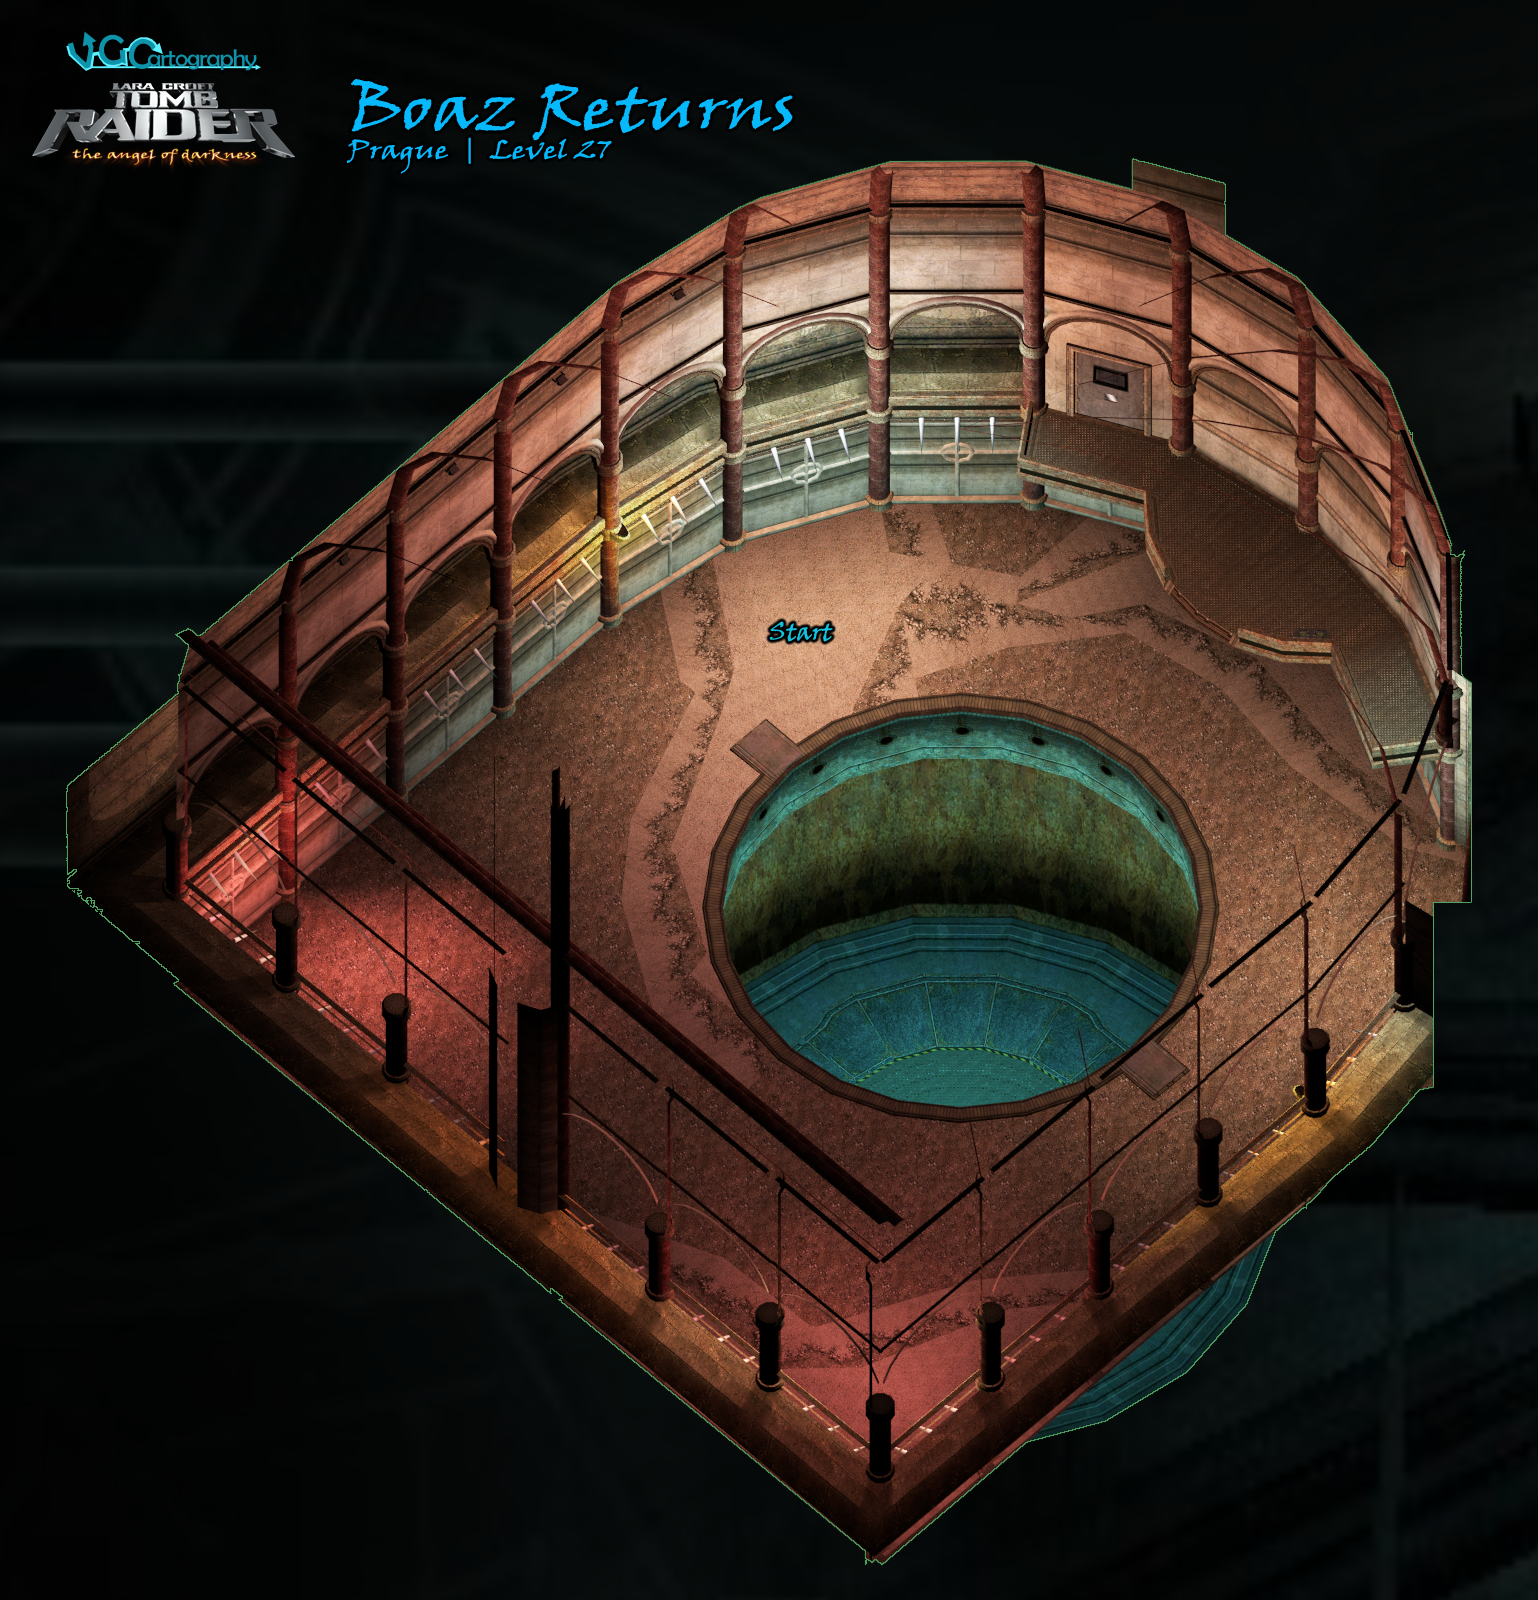
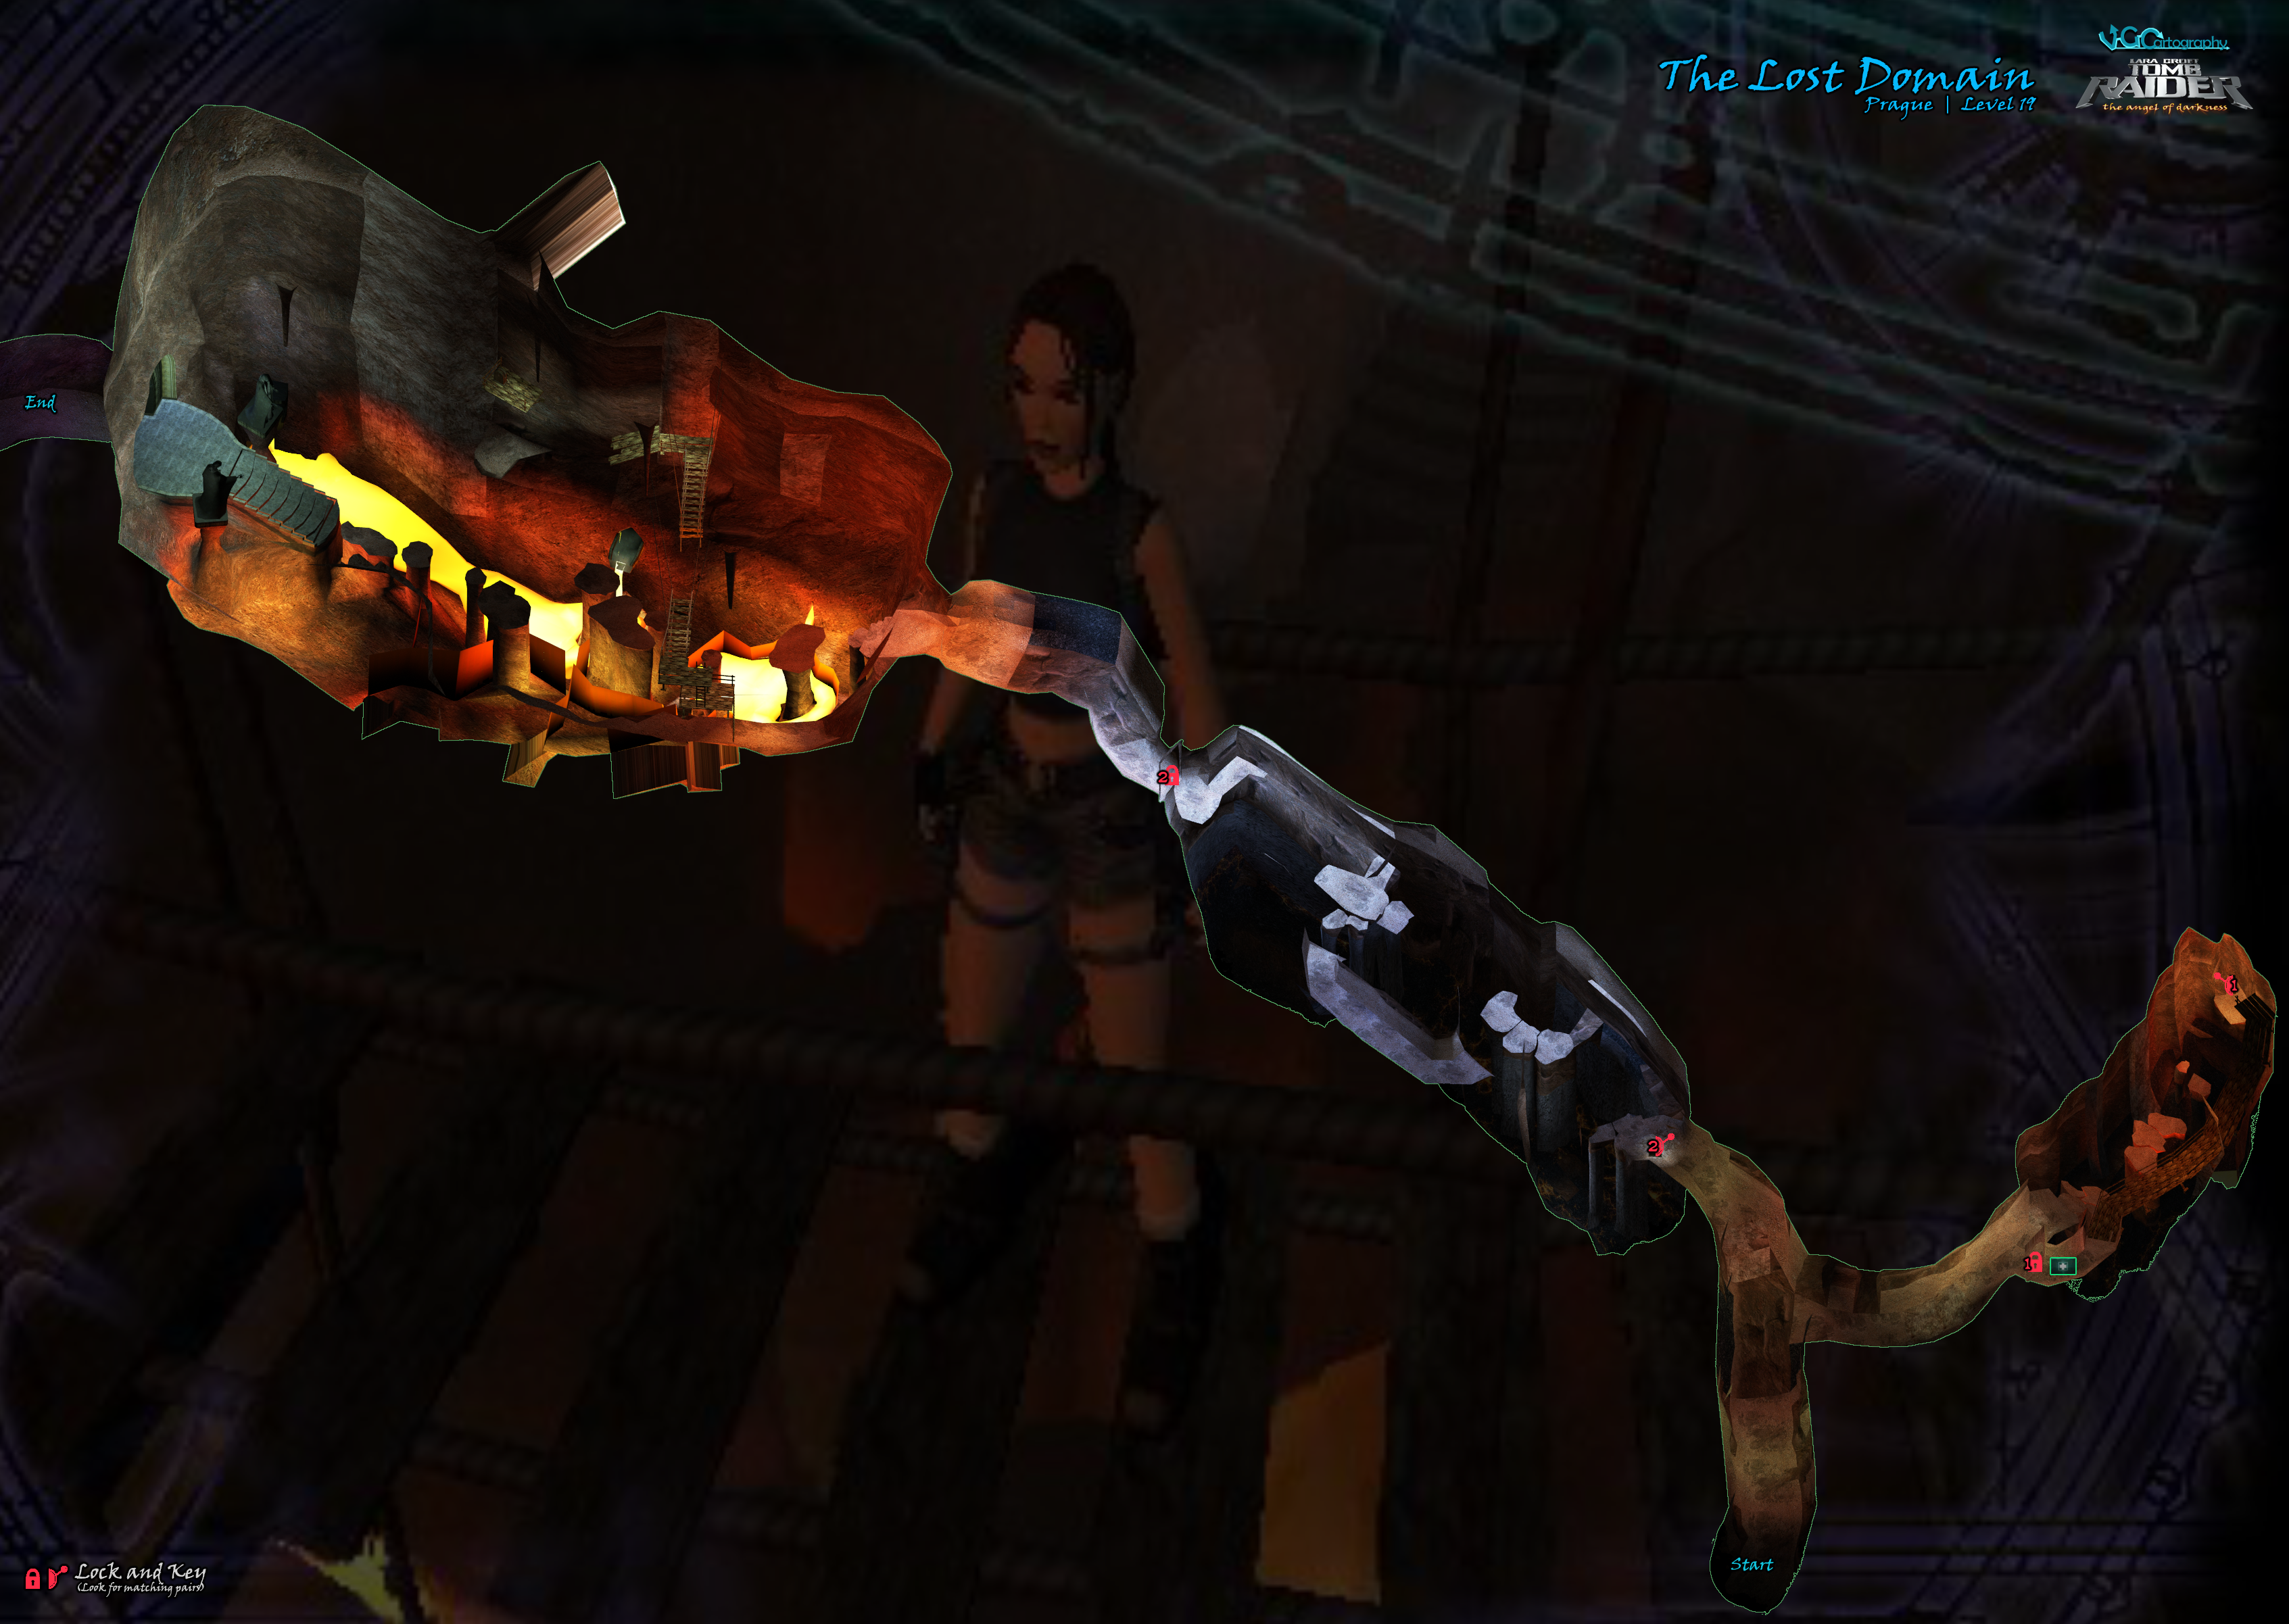
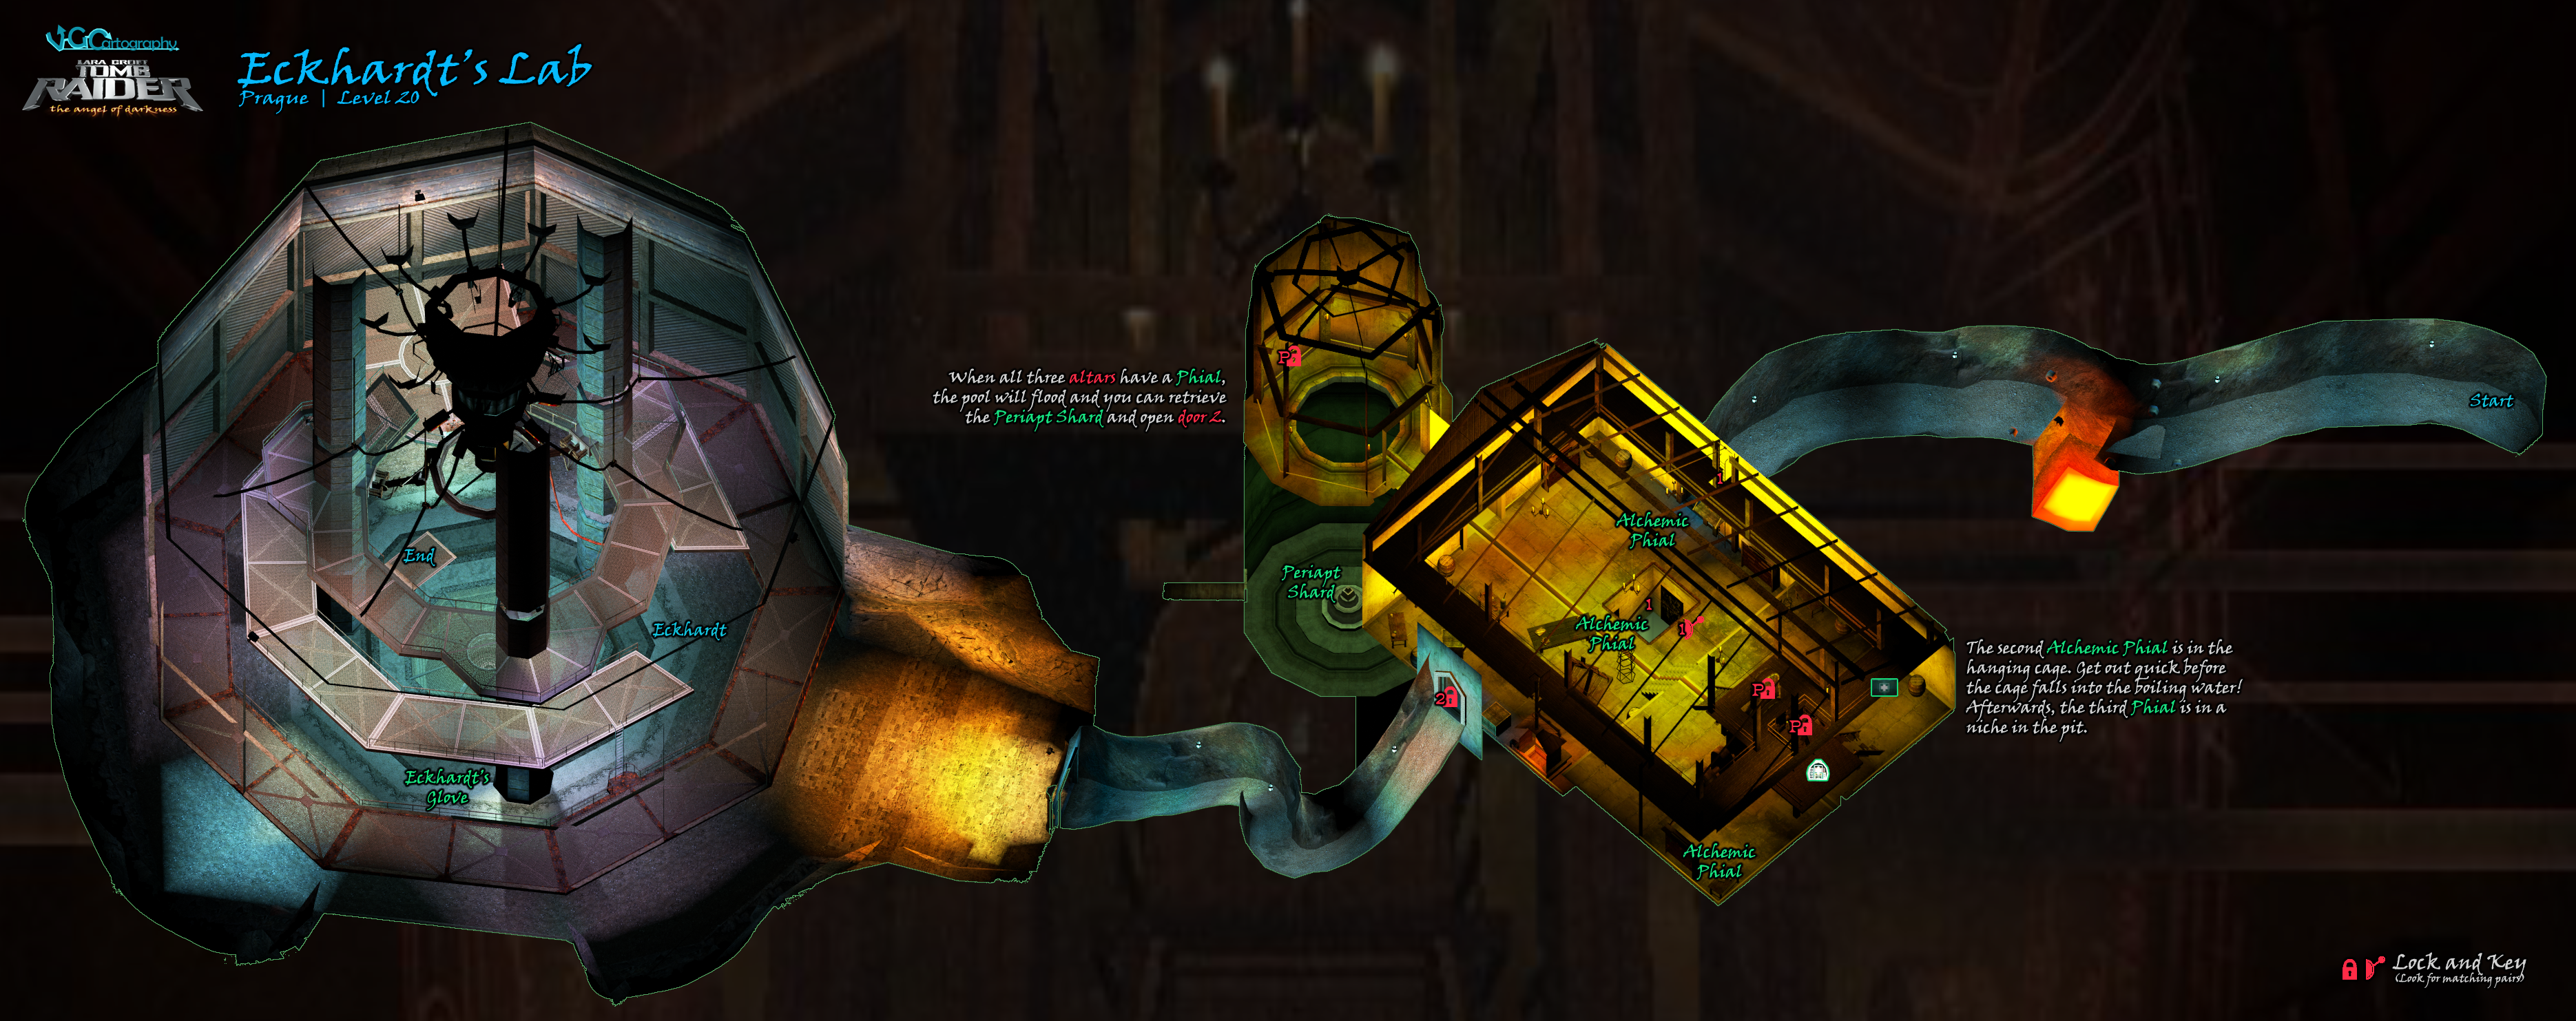
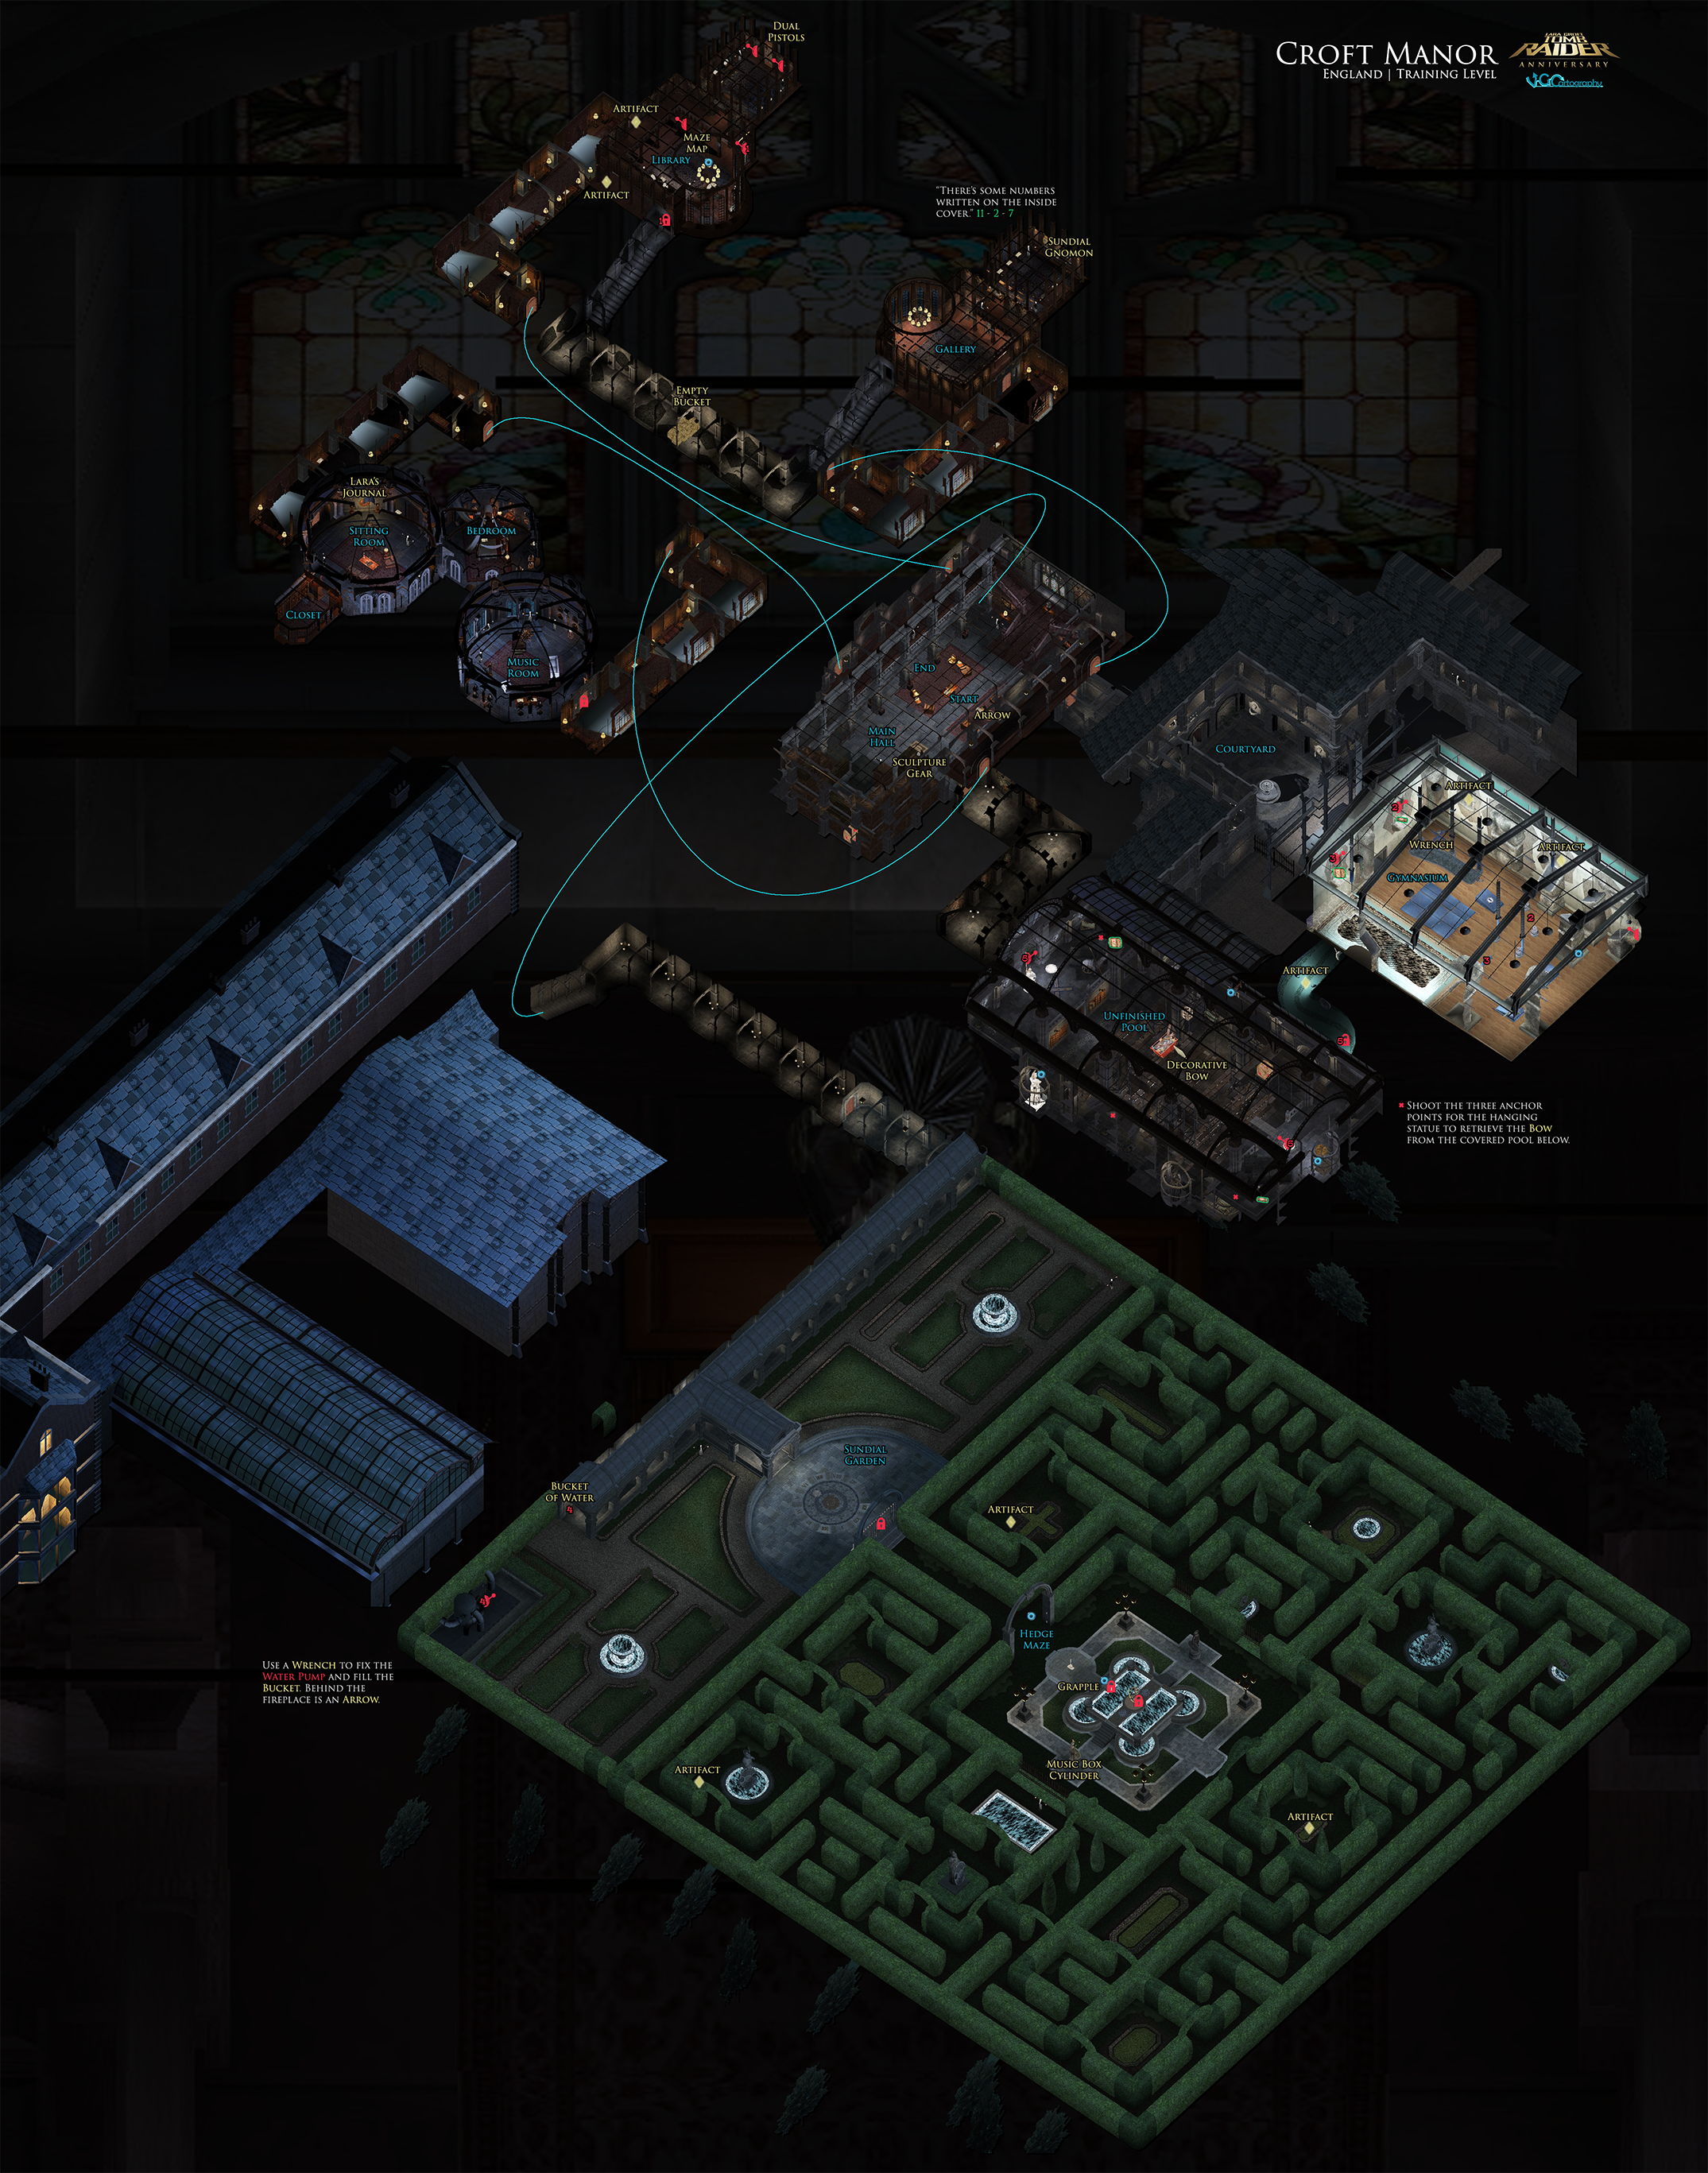
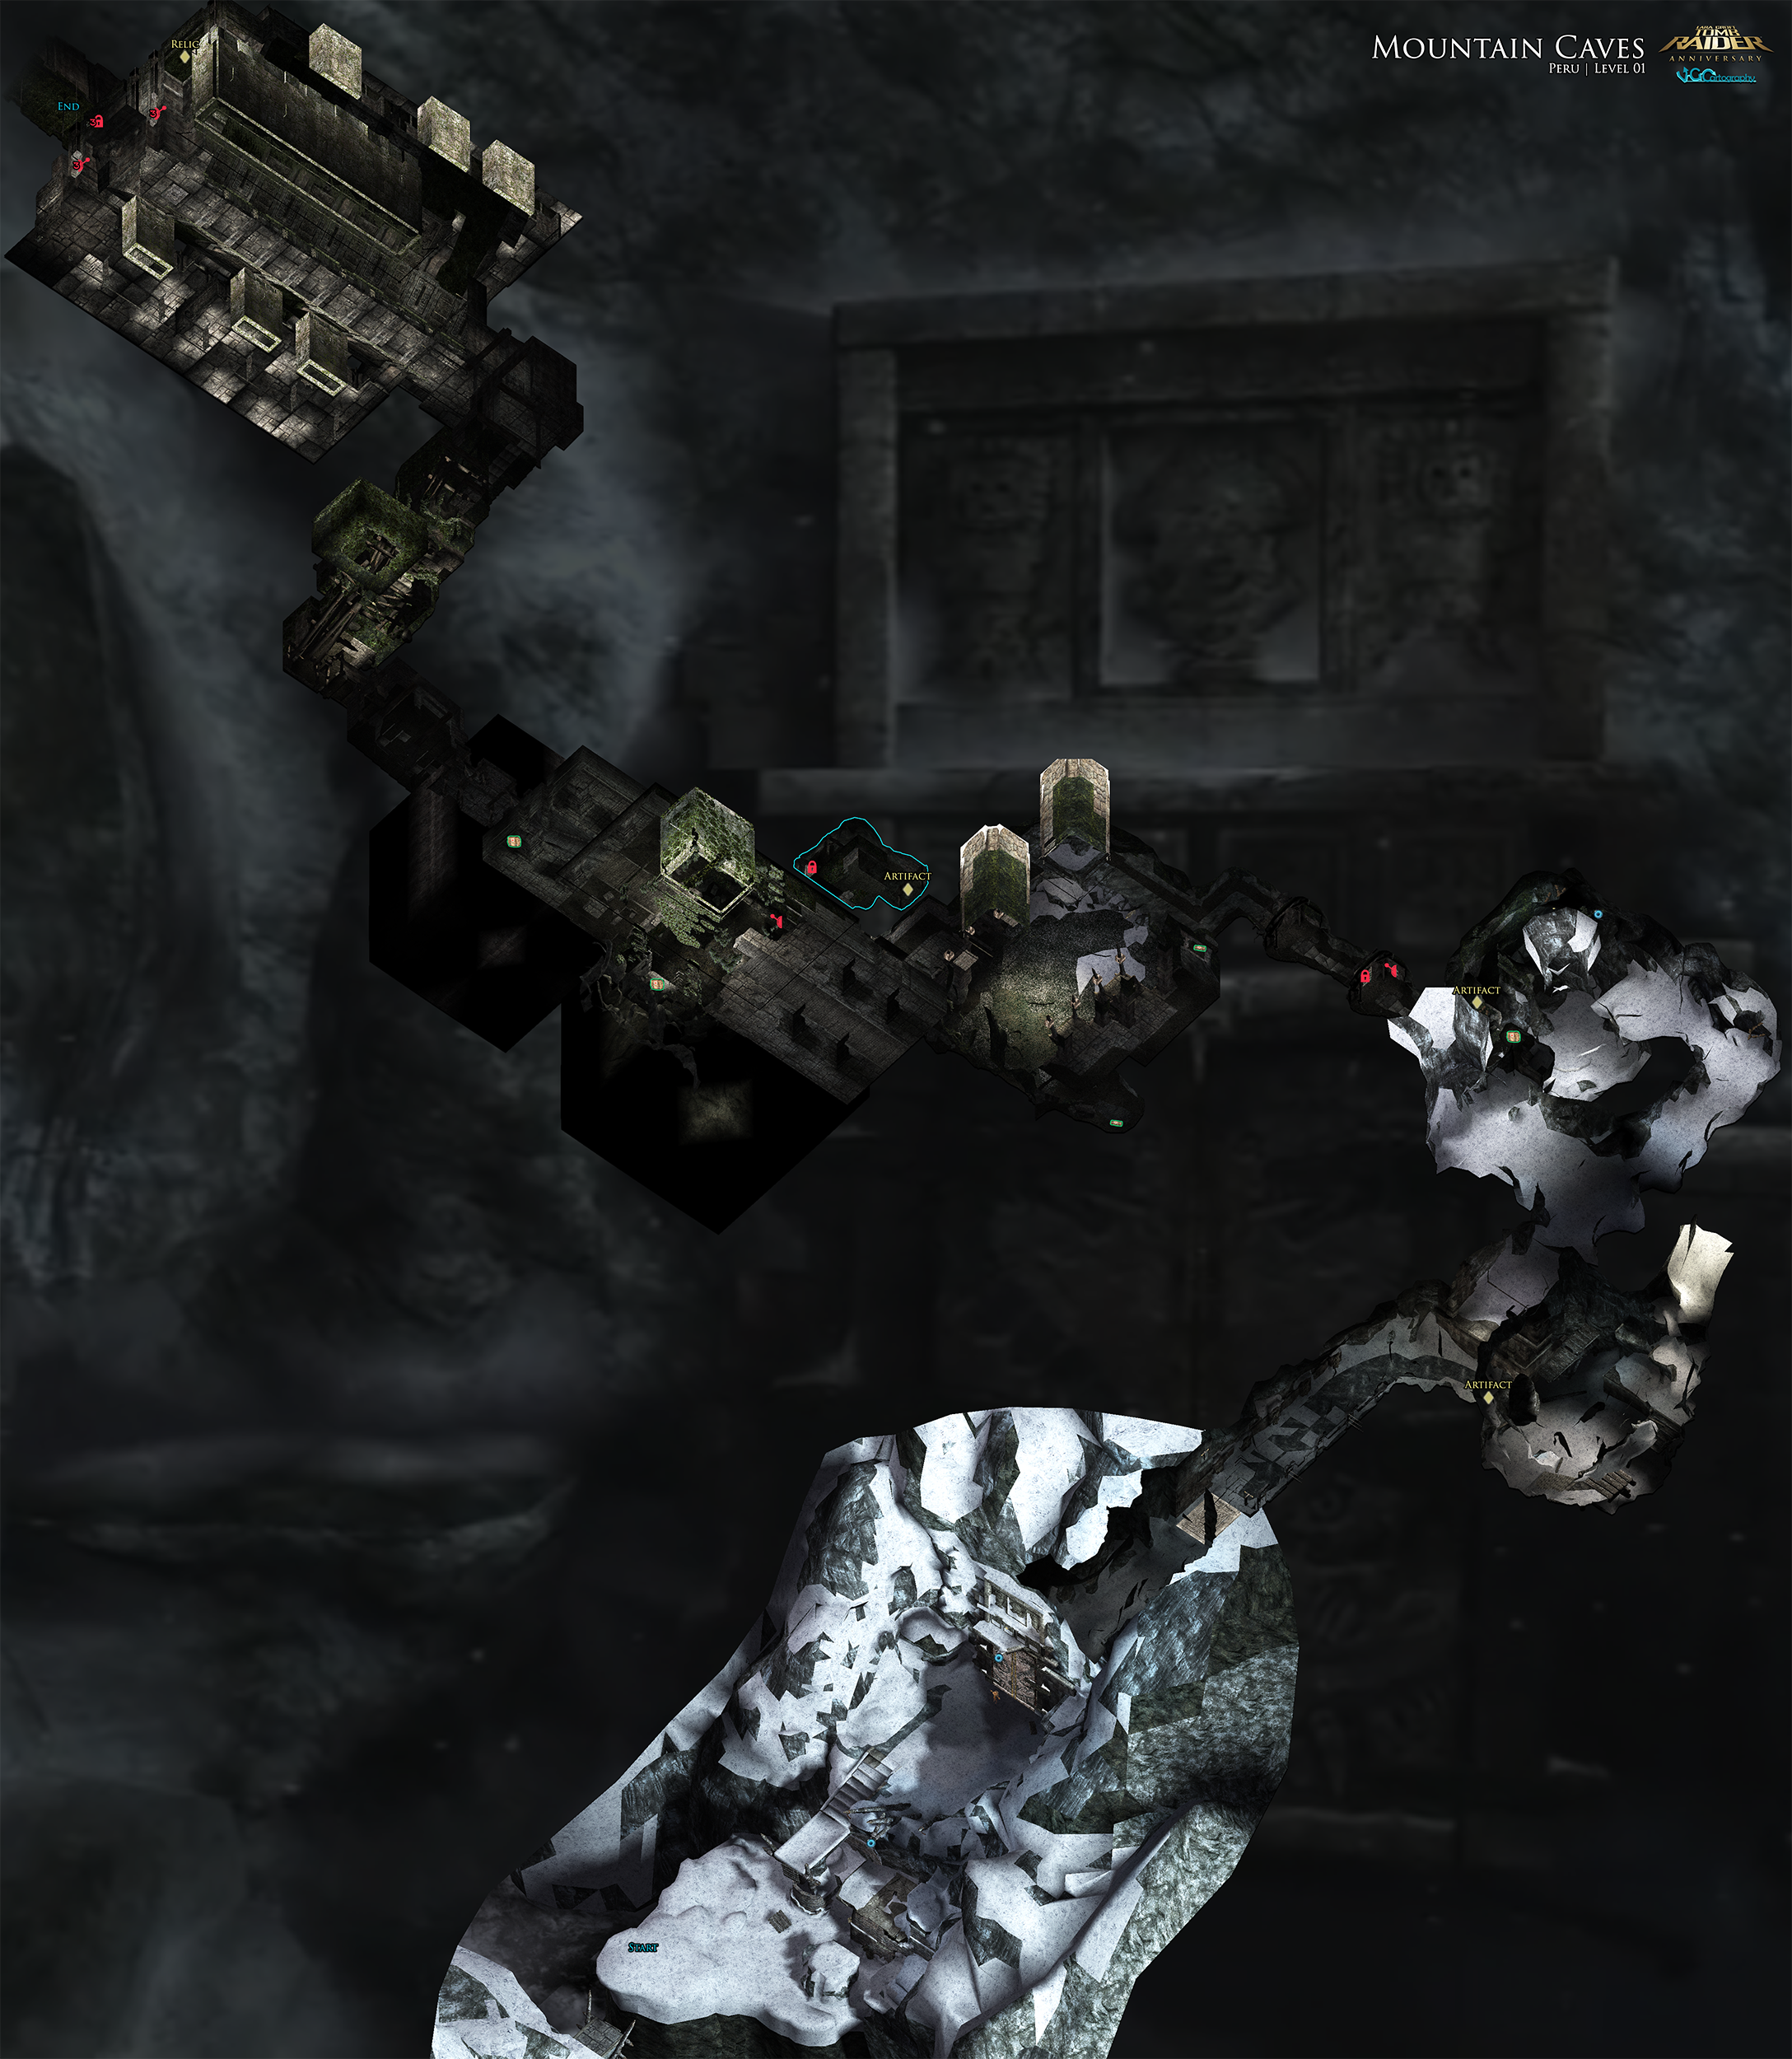
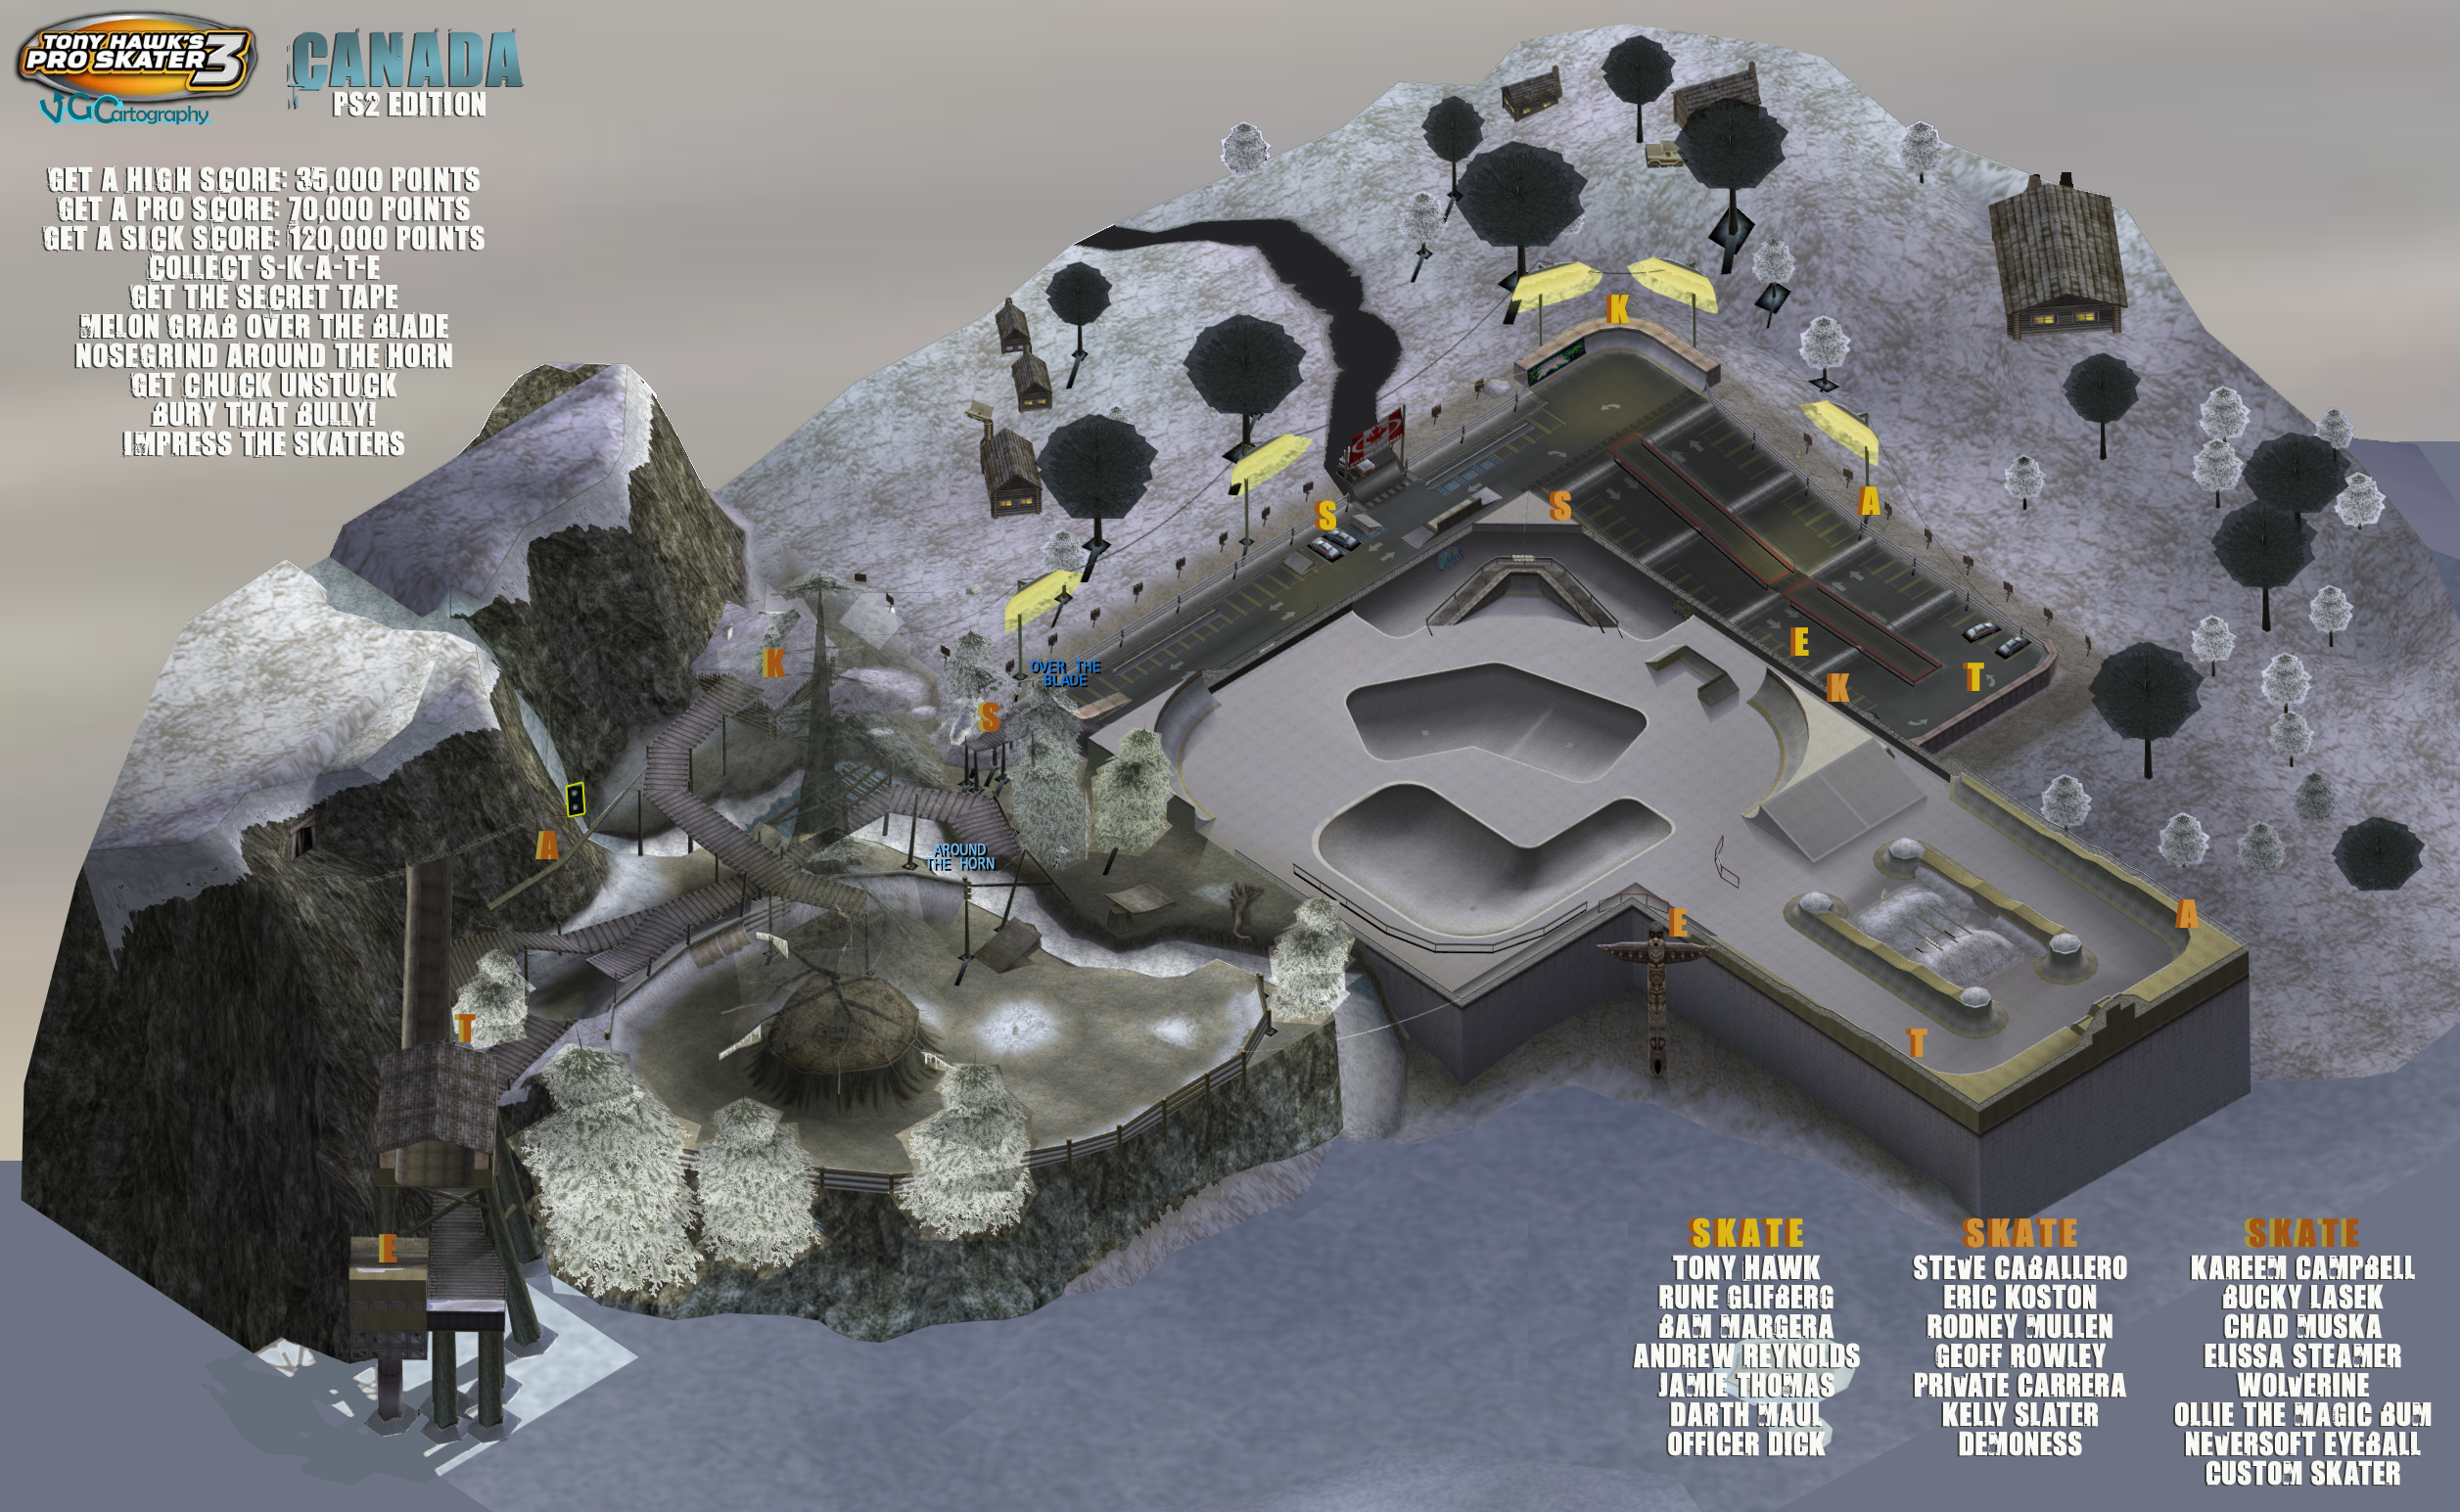
.png)